A common reason for data loss on any Windows version (including Windows 10/11), is accidentally formatting a hard drive while there was important data on it. But, there’s no need to fret because if you act swiftly, you can still recover this data and essentially unformat the hard drive. Use the guide below to familiarize yourself with the process and safely undo a hard drive format, recovering data from an accidentally purged HD.
For Mac users, we’ve covered the process of unformatting a hard drive on macOS in our detailed guide.
Is it Possible to Unformat a Hard Drive?
In this article, we use the term ‘unformat’ to refer to data recovery after formatting a hard drive. Therefore, yes, it is completely possible to unformat an HDD. But, the success and chances of recovering files from a formatted hard drive will depend on two primary factors:
- 🧹 How the drive was formatted: If you formatted the hard drive using Windows Explorer and the Quick Format option was checked, data recovery from the hard disk drive is possible and fairly easy too. On the other hand, a non-quick format, or a Full Format is impossible to undo, and your data is likely lost forever. Thus, it’s important to know whether you performed a Quick Format or Full Format of your drive so that you don’t waste precious time and money unnecessarily.
- ⌛ Time elapsed since formatting: If you formatted the hard drive and installed a new OS or copied a lot of files since formatting, the amount of data recovered will be minuscule. This is because new data overwrites previous data on the drive, making data recovery impossible. Thus, it’s always recommended you act as quickly as possible after discovering the data loss.
It is crucial to understand the nuances of unformatting a hard drive, especially considering the diversity of scenarios you might face. For instance, if you need to unformat an external hard drive, there’s no need to worry about overwriting your data as long as you’ve stopped using it. In such cases, you can install data recovery software confidently on your primary system drive. However, if you have formatted a partition of your system drive — and it is not the partition your operating system uses — then it is safe to install the recovery software on a different, unaffected partition of the same drive. Conversely, if you find yourself with a formatted system partition and your PC won’t boot, then the best action is to use a secondary computer that already has data recovery software and connect your affected drive to it as external storage.
Moreover, it’s important to note that while we will be focusing on Windows 10/11, as stated in the heading, the compatibility of data recovery tools is not confined to just these versions. Many of these tools are designed to work with older versions of Windows, and there are even specialized versions or older iterations of the software that cater to these systems.
How to Unformat a Hard Drive Using Data Recovery Software
Third party data recovery apps are your best and only bet when looking to unformat a hard drive. These programs essentially function as unformat software and allow users to recover their files easily and at a fraction of the cost of the best professional data recovery services.
However, not all data recovery software is created equal, and it’s important to choose the best data recovery apps from the horde of options available today.
To make your job easier, we’ll demonstrate how you can unformat an HDD using three premier data recovery programs:
Option A: Using Disk Drill
There are plenty of reasons why we chose to list Disk Drill as the first program in this tutorial. Not only is Disk Drill an easy-to-use program that supports all major operating systems, file systems, and storage drives, it also offers market leading data recovery rates at costs that won’t burn a hole in your pocket. In fact, if you’re looking to unformat an HDD on Windows 10/11, you can recover up to 500 MB of data for free as part of Disk Drill for PC’s free trial.

It would be amiss not to mention that Disk Drill supports scanning of multi-formatted drives. This means that a FAT32 drive was formatted to NTFS and subsequently to exFAT, Disk Drill can scan and recover data from it. It sounds counterintuitive, but more files are overwritten if a drive is formatted to the same file system. Different file systems write their data to different areas of the disk.
Here is how you can recover data from an accidentally formatted hard drive using Disk Drill:
- Download Disk Drill and run the installer on your computer. If you’ve formatted a non-system partition or an external hard drive, install Disk Drill on your primary system drive. For a formatted system partition, use a secondary computer to install Disk Drill.
- Connect the hard drive you want to unformat to the computer. If it’s an internal drive from a non-bootable system, use a hard drive enclosure to connect it as external storage to another computer. For external hard drives or non-system partitions, you can perform recovery using the same computer.
- Open Disk Drill, select the accidentally formatted HDD and click on Search for lost data.
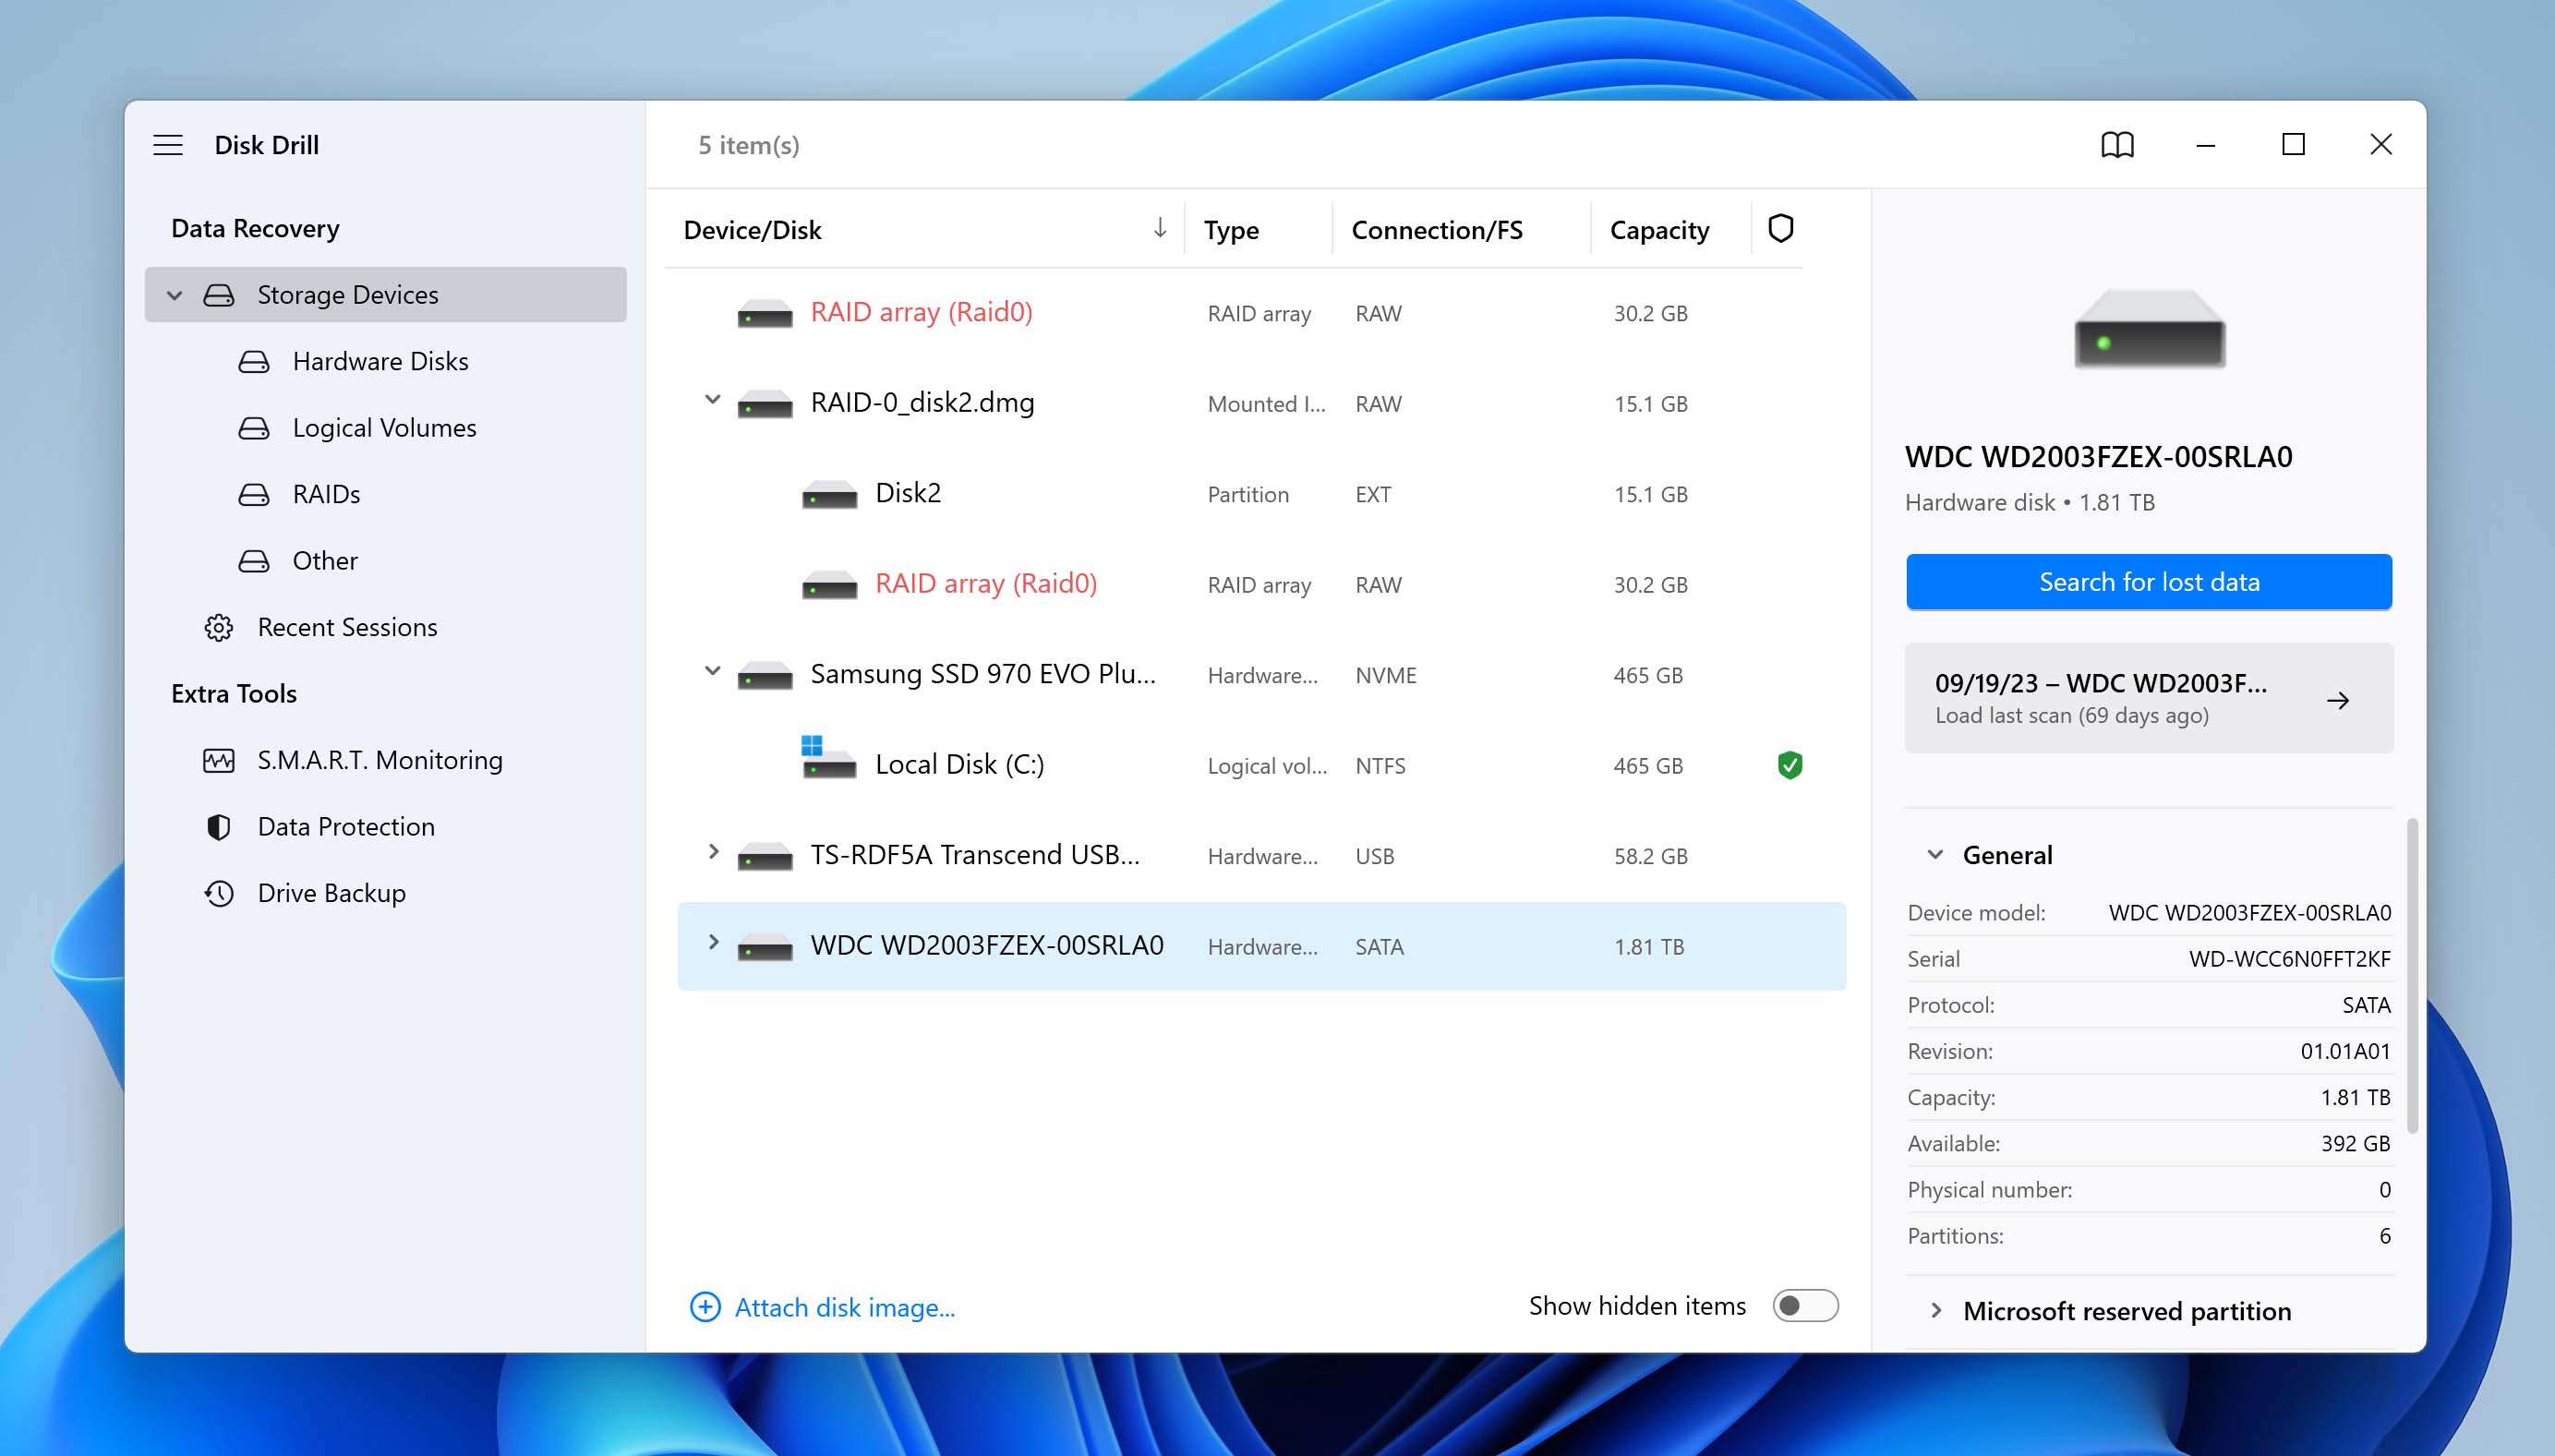
- You can view recoverable files in real time as Disk Drill scans your drive, or wait for the scan to be over.
- Click on Review found items on the next screen. You can also opt to directly click on the file types you want to recover (such as Pictures, Video, etc.).
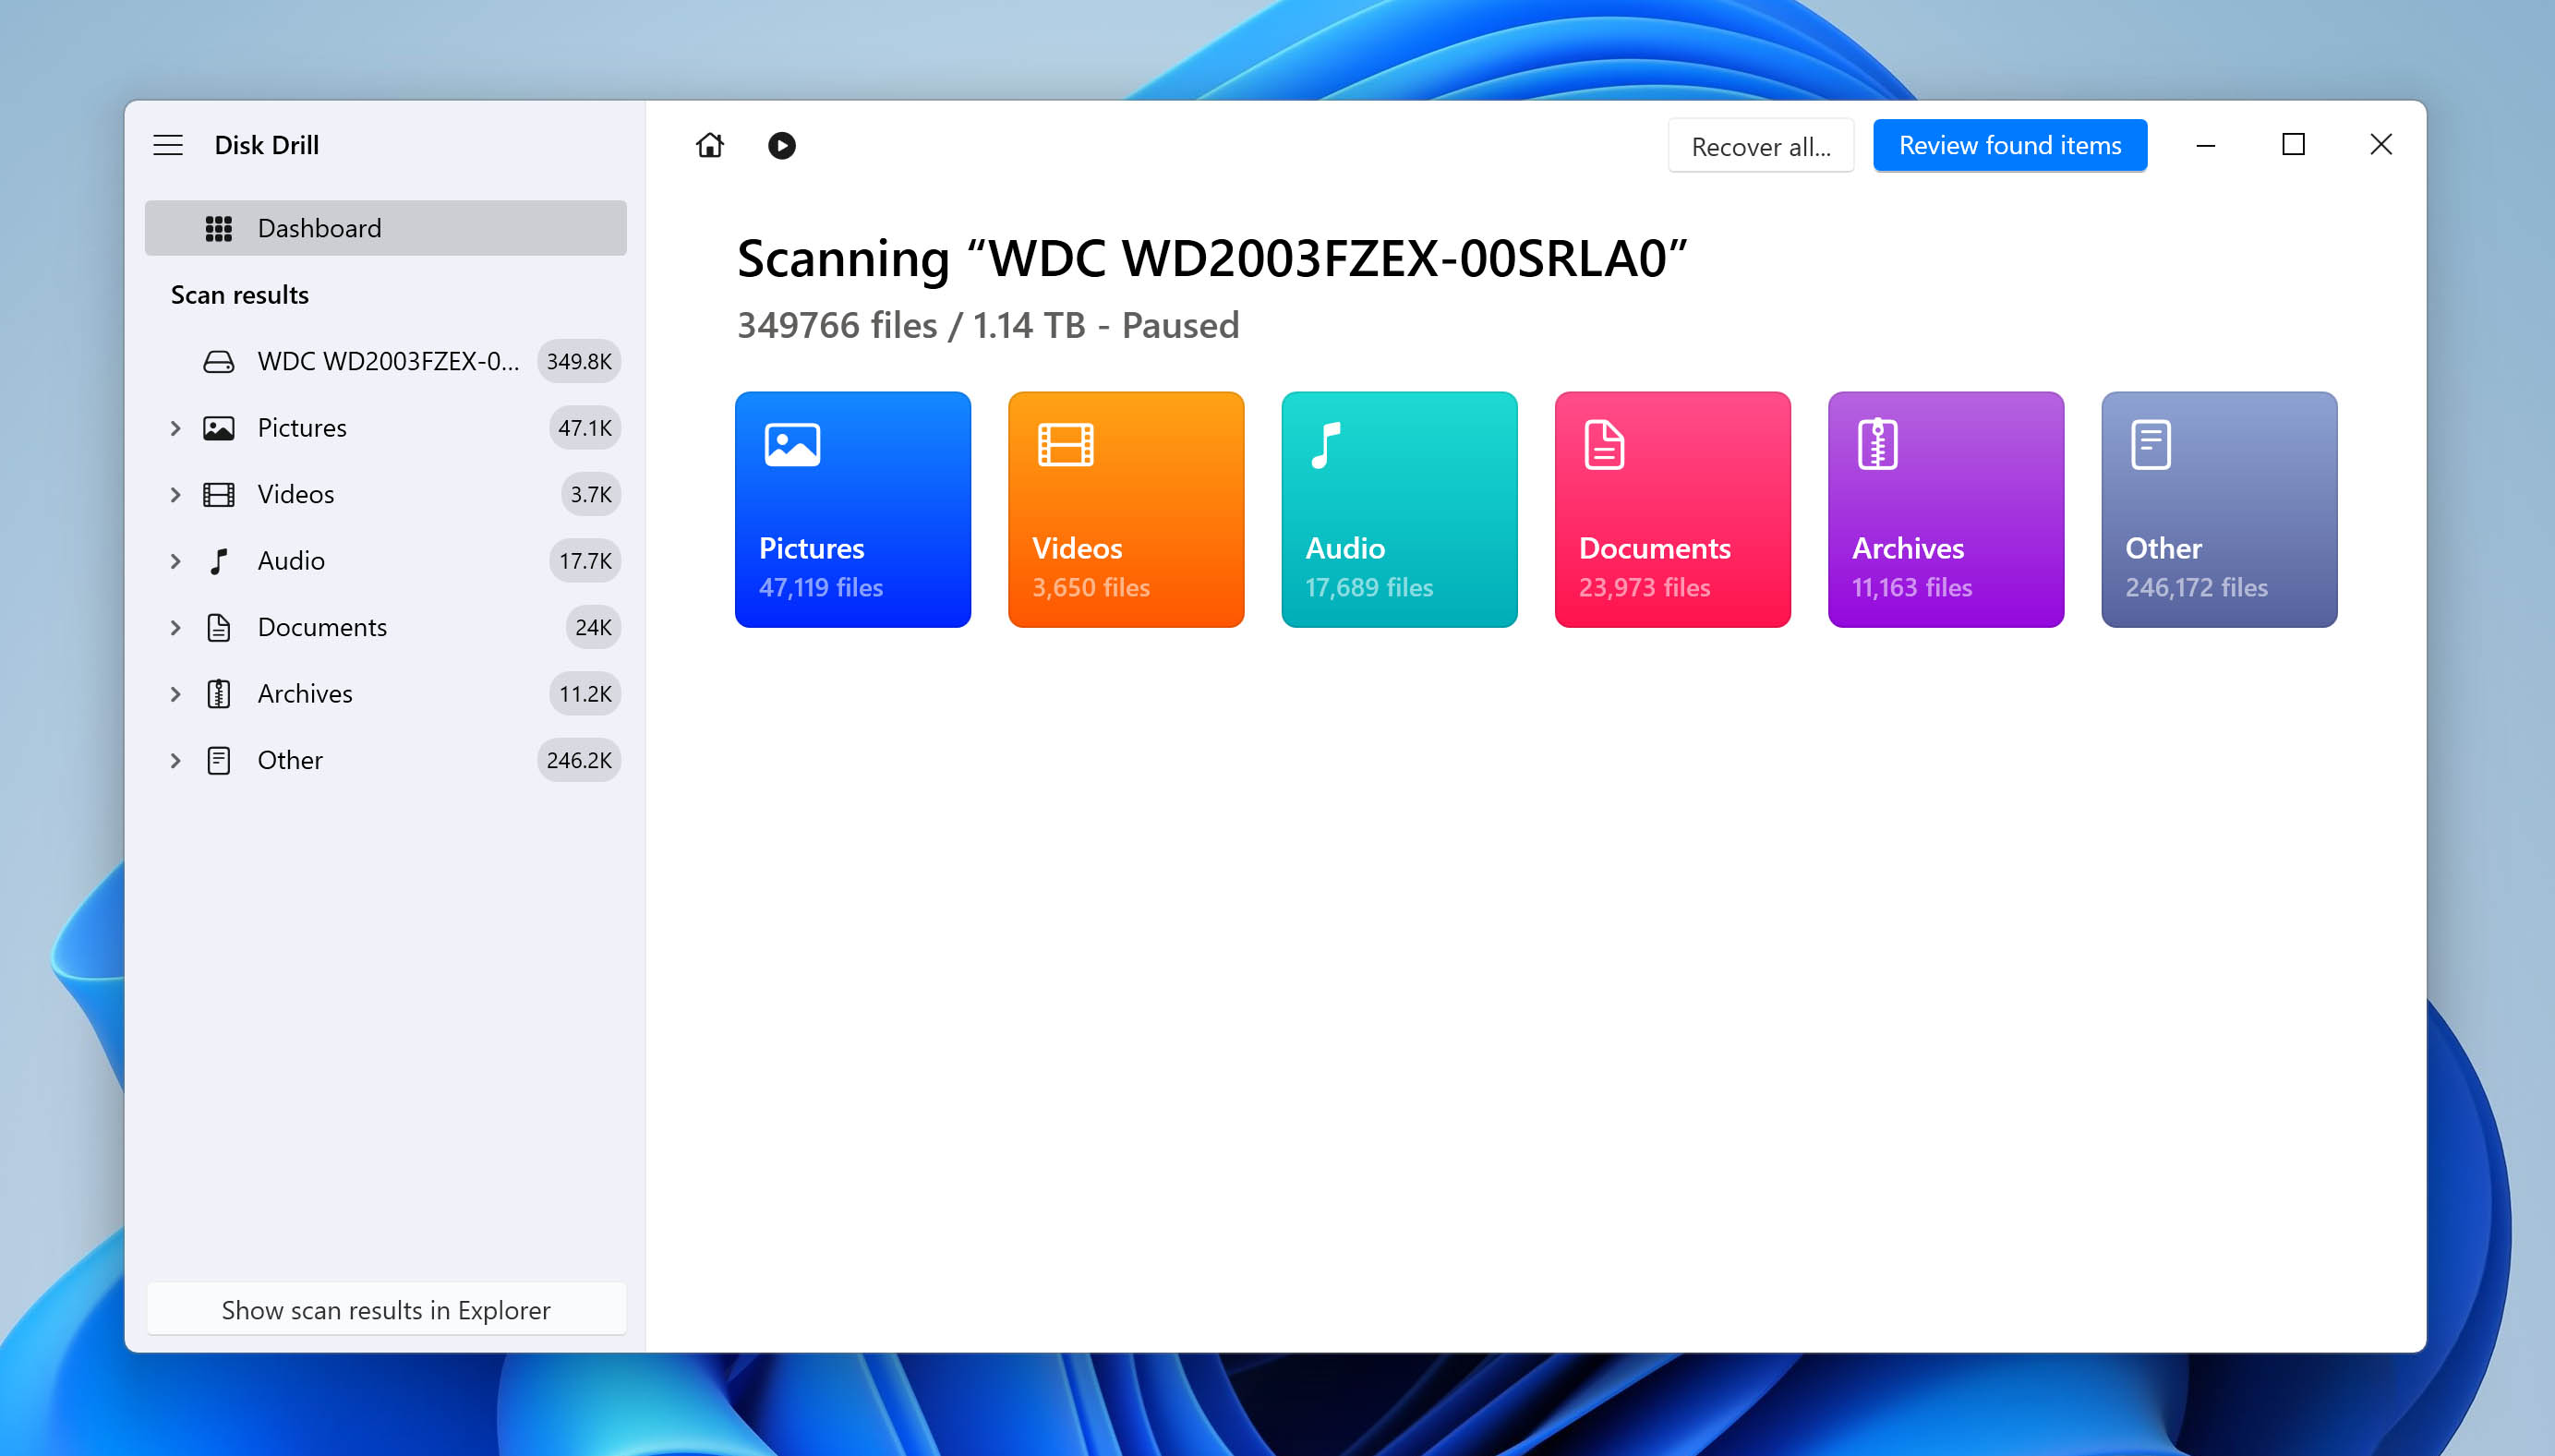
- Disk Drill will display a list of the recoverable files along with the recovery chances next to each of them. Double-click on a file to preview it. Select the files you want to recover, using the checkbox next to each one. Click on Recover.
- Choose a recovery destination for the deleted files and click Next. Select a directory that is not located on the formatted drive, lest you overwrite the deleted files.
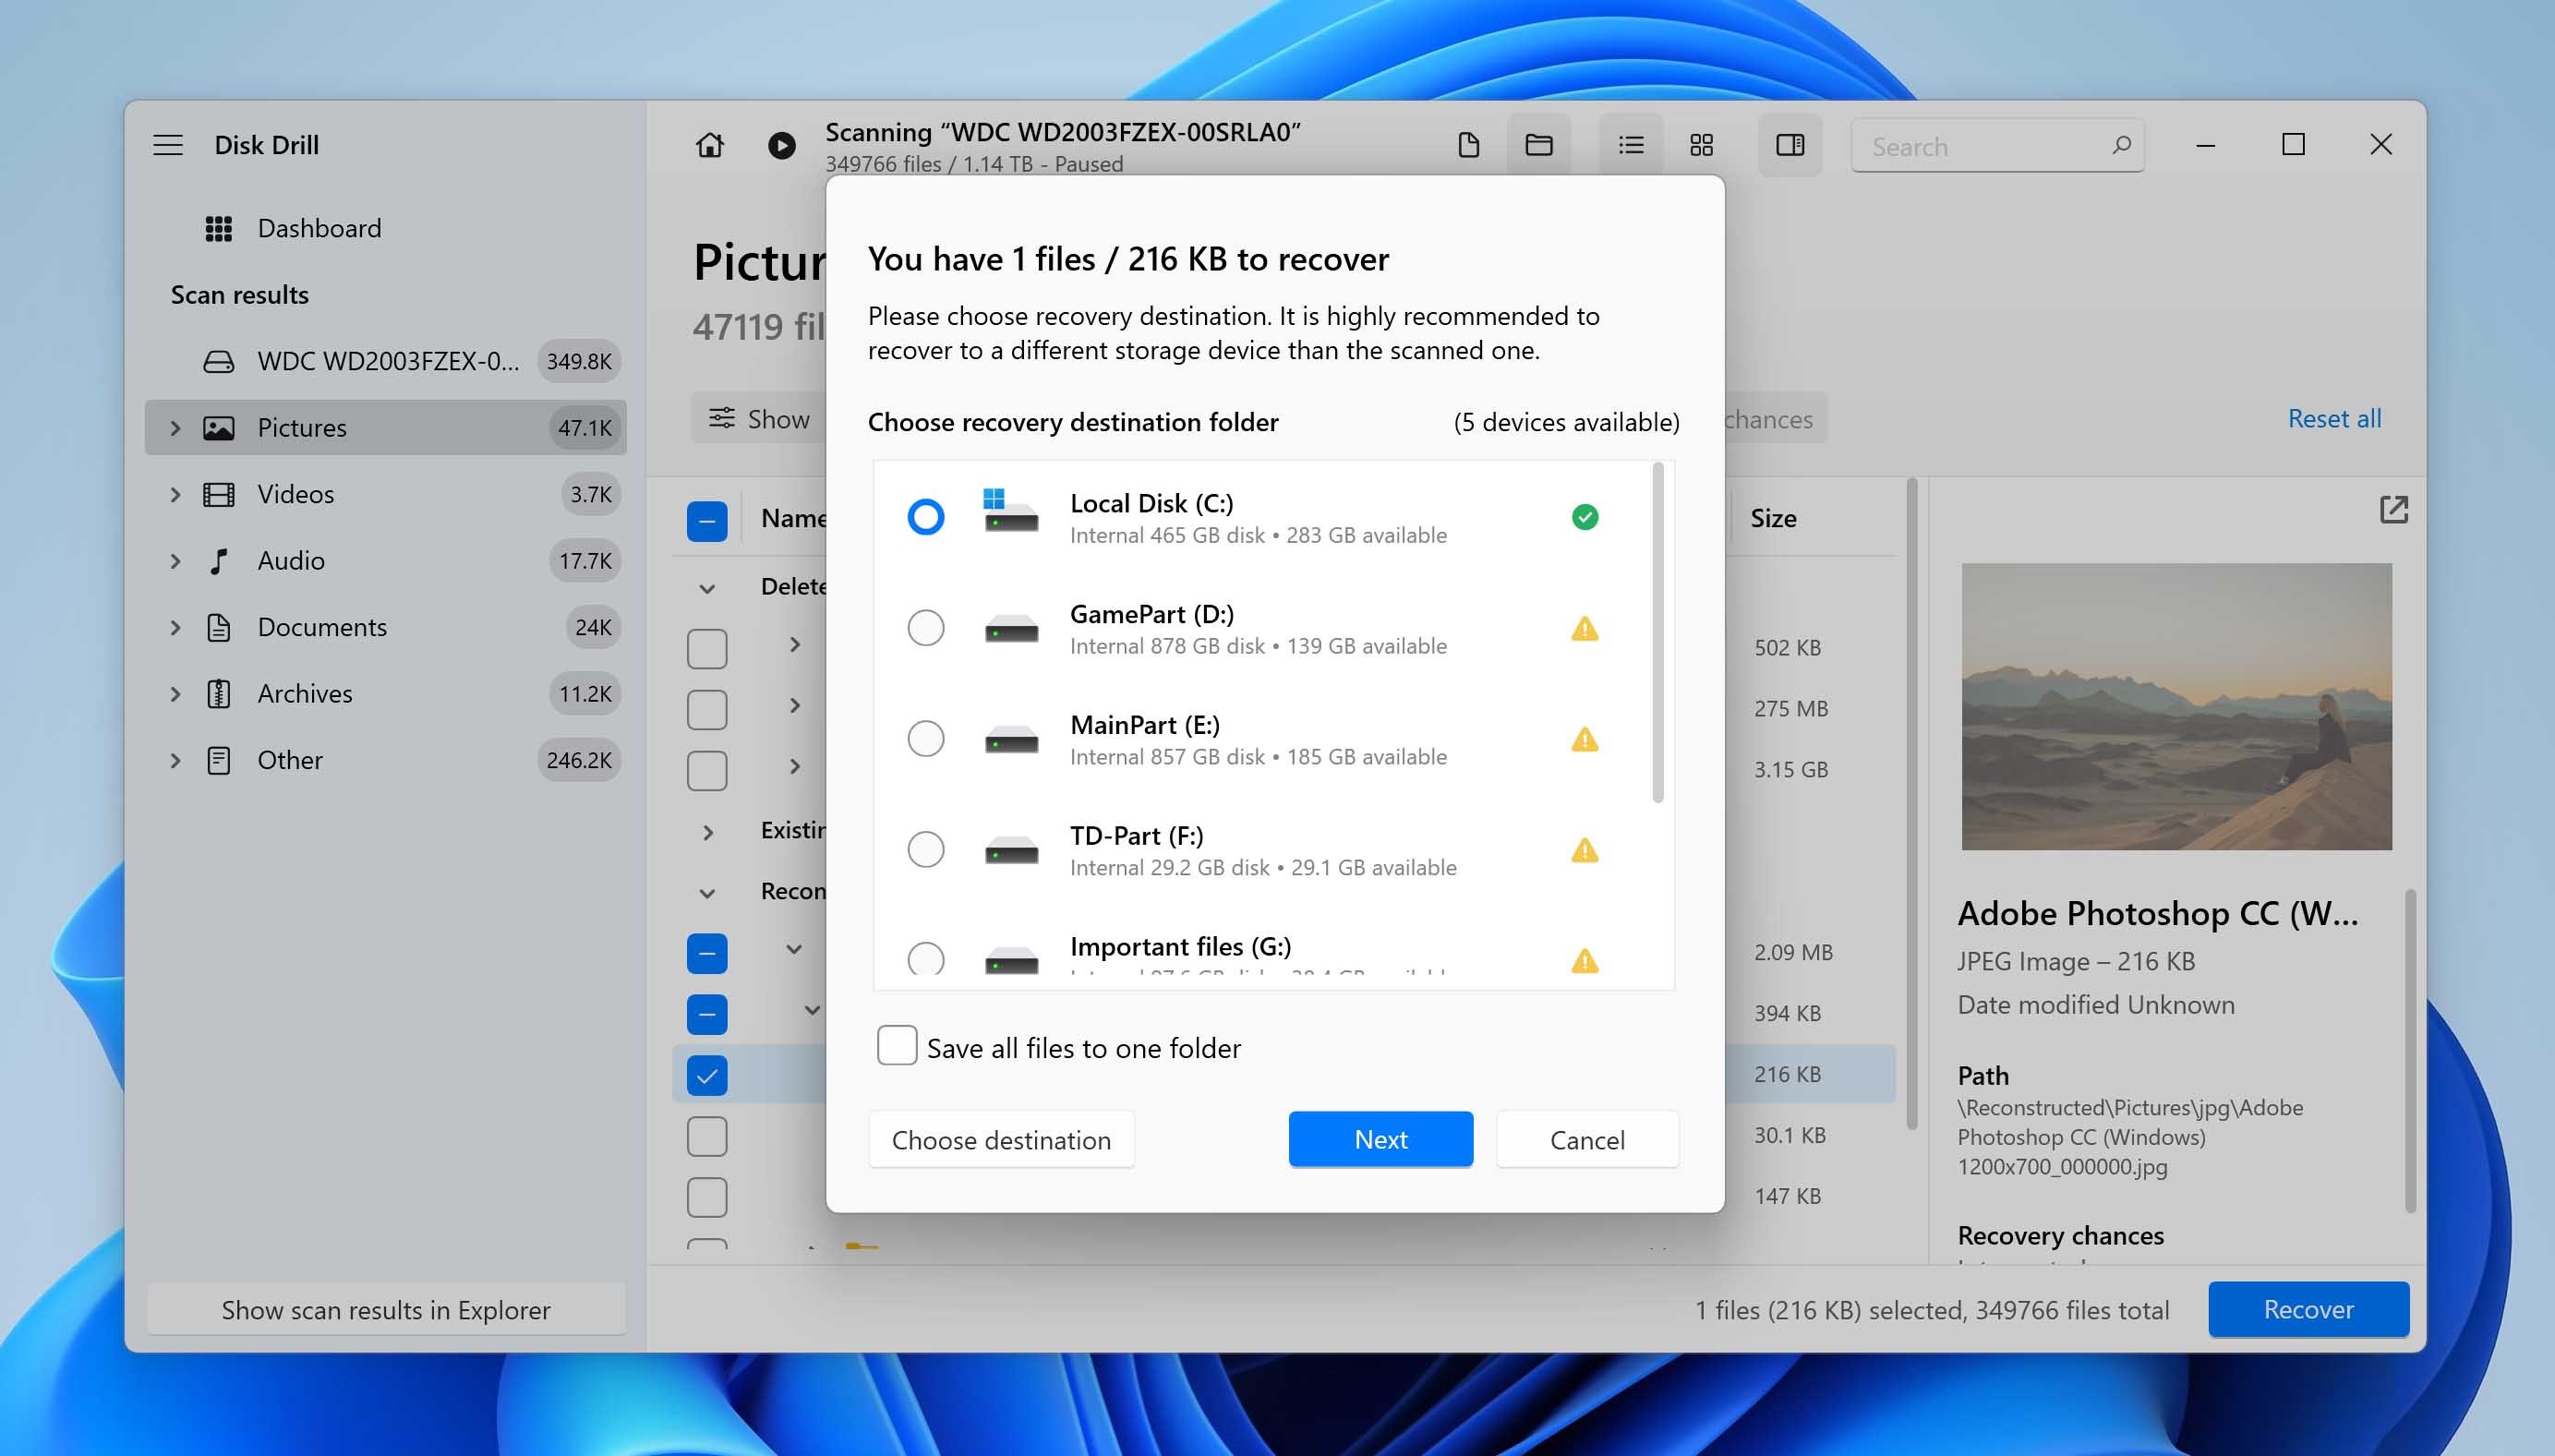
- Disk Drill will recover the selected files. To view the files in Windows Explorer, simply click on the Show recovered data in Explorer button.
For a complete look at Disk Drill and its various features, take a look at our Disk Drill review that has real-life examples of Disk Drill’s functionality. We also conducted a comprehensive analysis of Disk Drill’s safety aspects in a separate review, ensuring a detailed understanding of its security features.
The software also comes with other nice-to-have features such as drive backup, data protection, and a sophisticated file sorting system.
Option B: Using R-Studio Data Recovery
Another data recovery software worth a shot is R-Studio Data Recovery. It comes with all the bells and whistles one would expect from a decent data recovery program. Its features include–support for a wide range of file systems, and file recovery chances estimation, amongst others.

Similar to Disk Drill, R-Studio too allows you to create and scan byte-to-byte copies of your disk, i.e disk images. Another unique feature of the program is the ability to restore the recovered data on a computer on your network instead of saving it locally.
These features and more are explored in more detail in our R-Studio review.
The trial version of R-Studio supports the recovery of files that are smaller than 256 KB. To recover larger files, you’ll need to purchase a license.
Instructions on how to unformat an HDD using R-Studio are listed below:
- Download R-Studio and install the program. Keep the installation tips mentioned in Step 1 of the section above in mind.
- Launch R-Studio, select the drive you want to unformat, and click on the Scan button at the top.

- In the next window, you can leave all the scan options as they are and simply click Scan. But, if you want to save some time, you can click on the Change option next to File System, and choose the relevant file system of your drive (NTFS, FAT, exFAT, etc.).
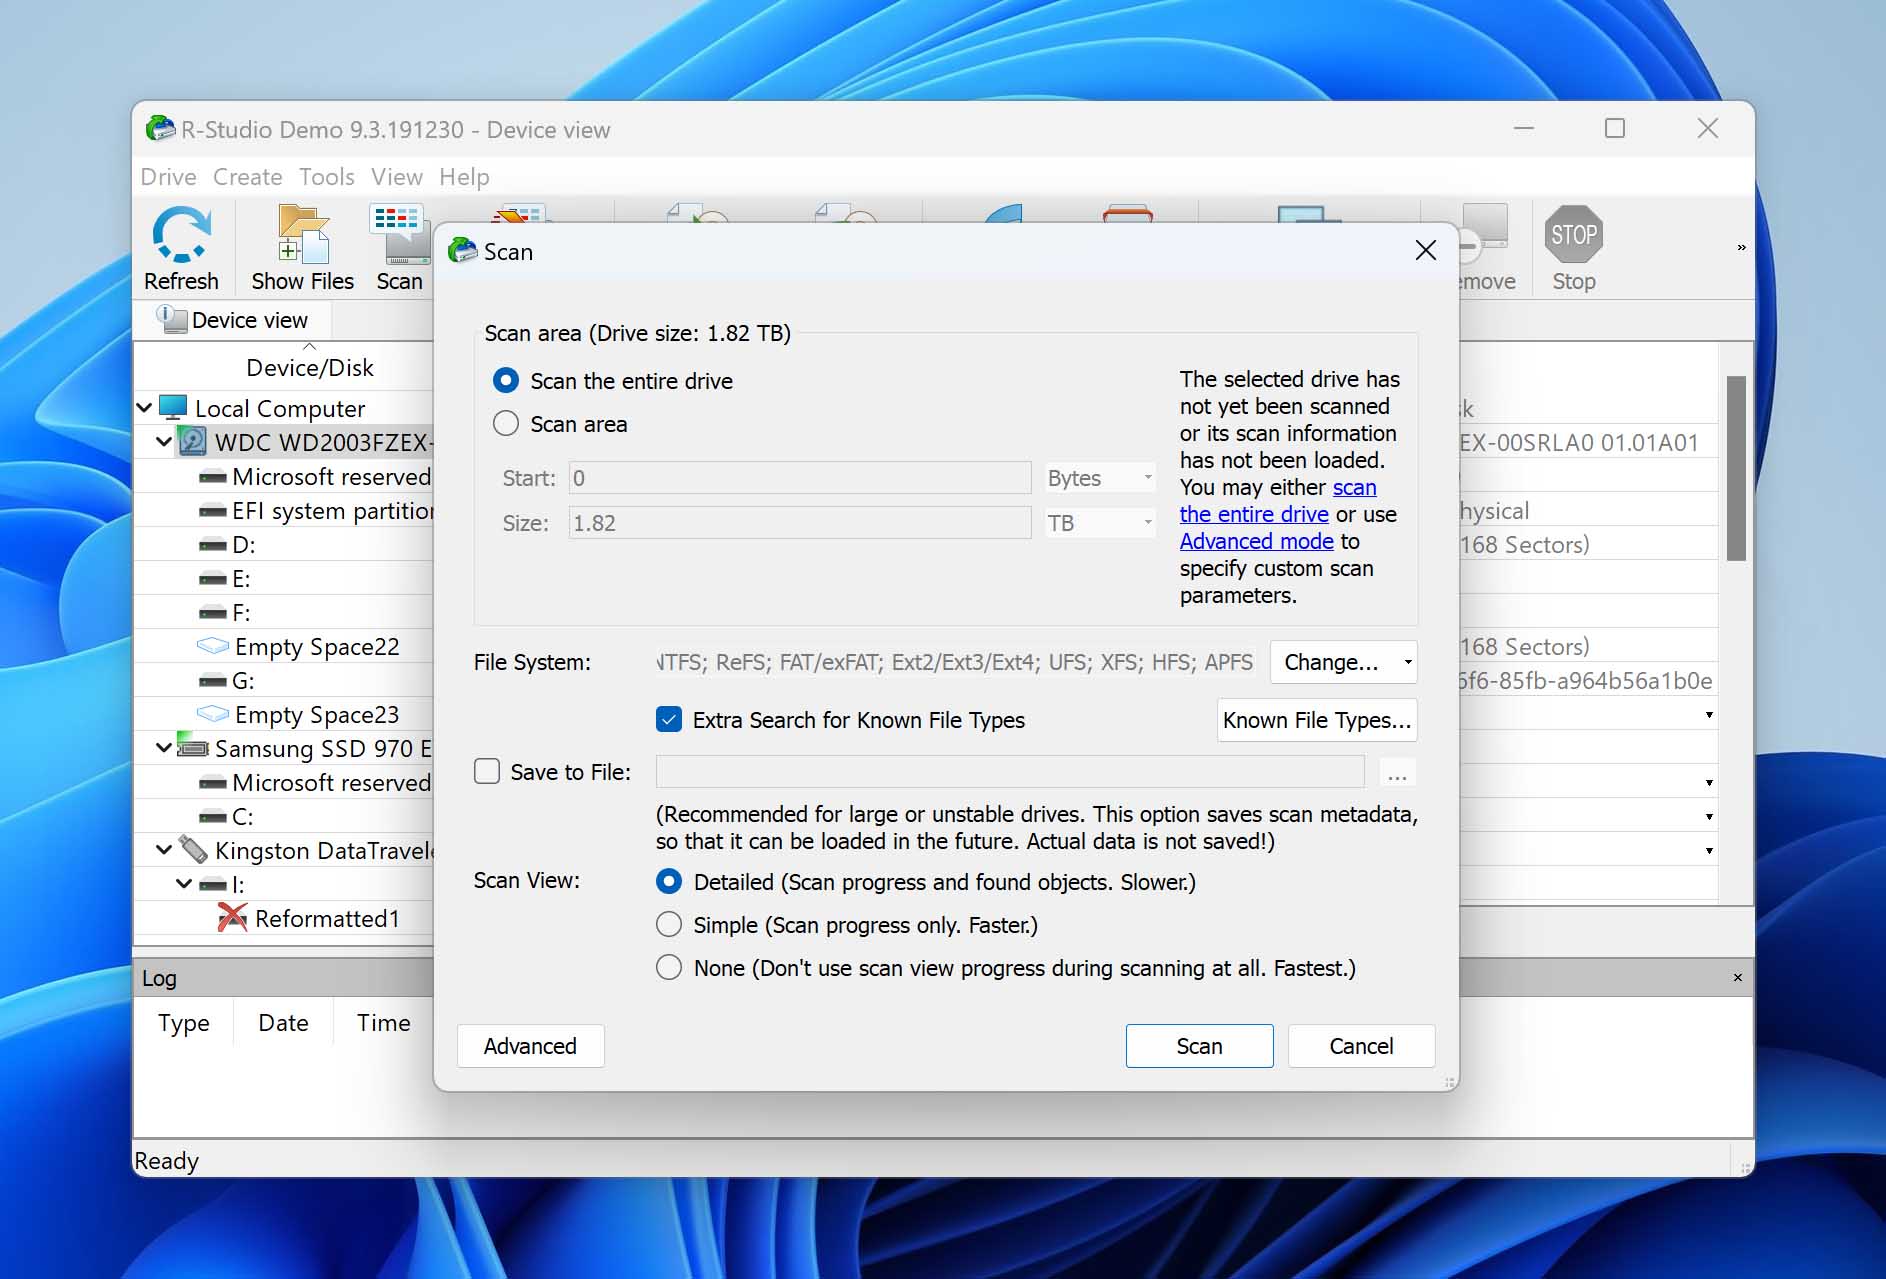
- Wait for R-Studio to finish scanning your drive.
- After the scan is over, click on the newly created Rec drive right below the scanned drive. This has been highlighted in the image below. You can choose to view both recognized or RAW files as visible in the image. Subsequently, click on the Show Files option towards the top of the window.

- Now, select the files you want to recover using the list. You can use the Preview button to preview images, etc. Select the files you want to retrieve using the checkboxes and click on Recover Marked.
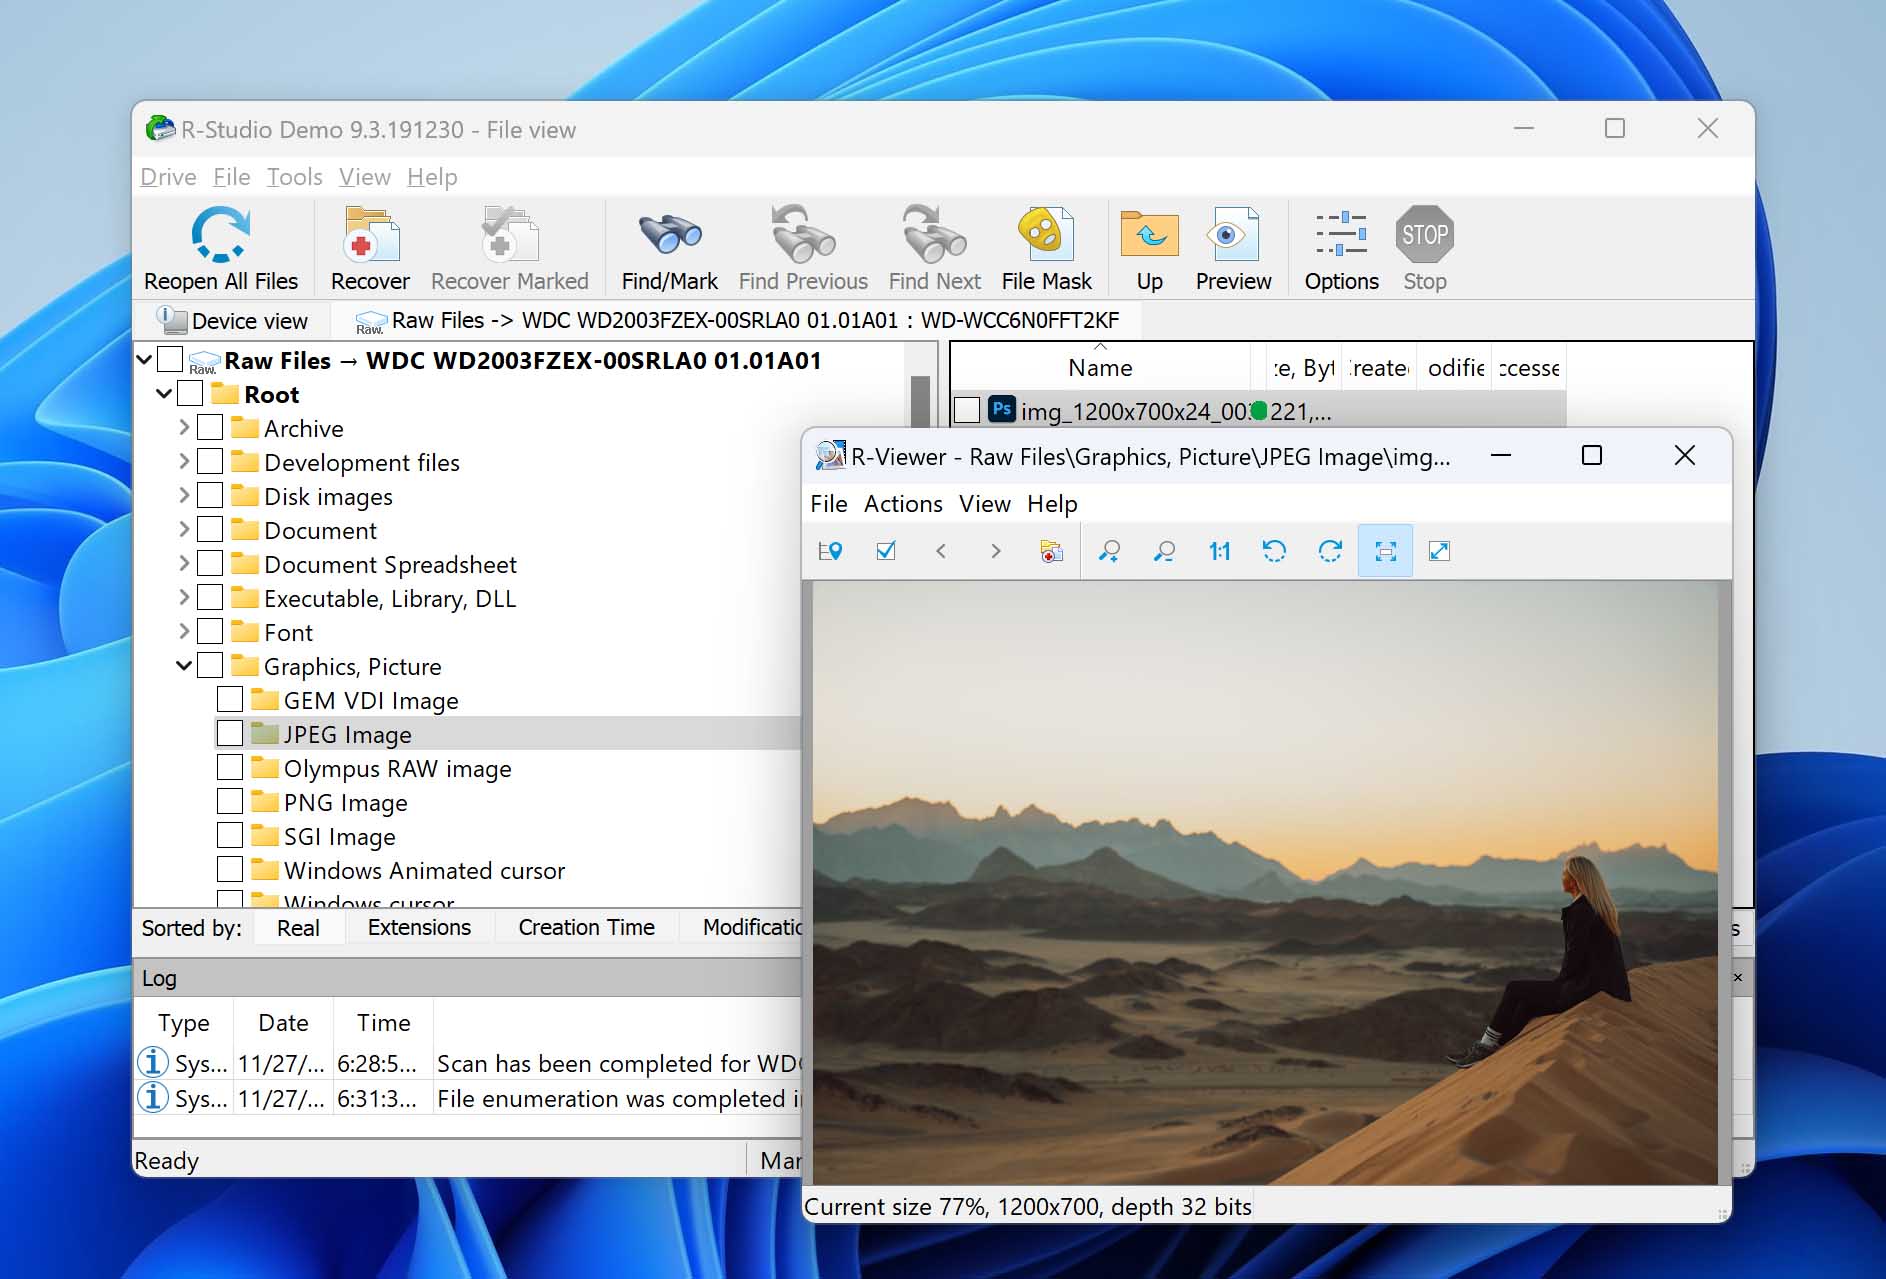
- In the next window, you’ll be prompted to choose a recovery destination for the files. Leave the other options as they are and click OK.

Option C: Using Recuva
Our review of Recuva delves deep into other features of the program.
Steps to unformat a hard drive using Recuva:
- Download Recuva and extract it.
- Open Recuva and click Next on the welcome screen.
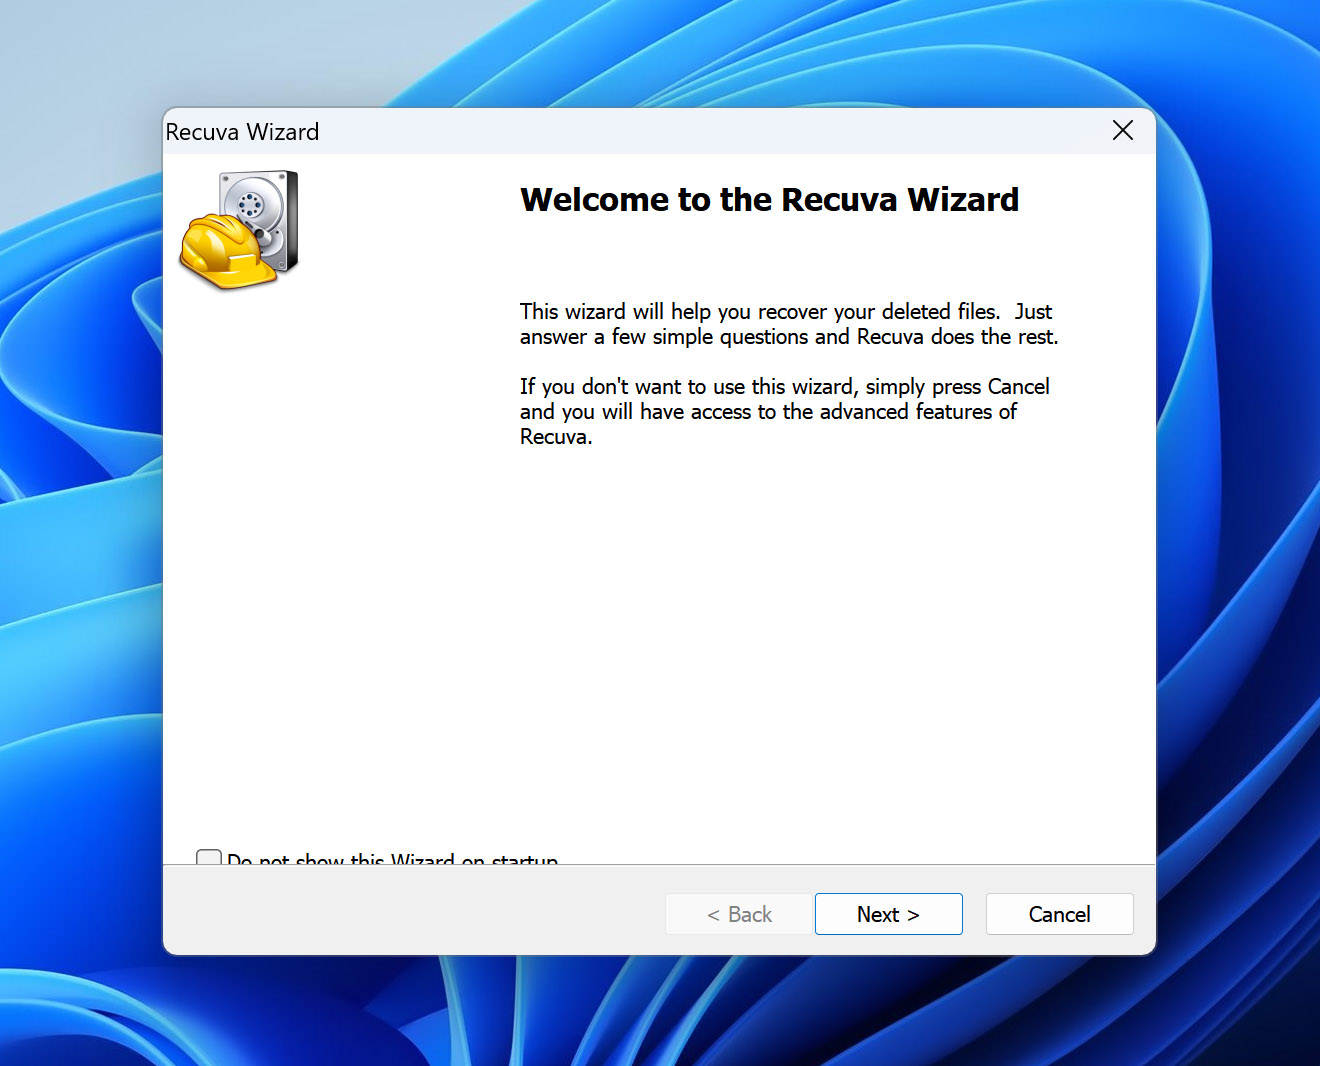
- Select the file types you want to recover. If you want to recover multiple file types, leave All files selected. Click on Next.

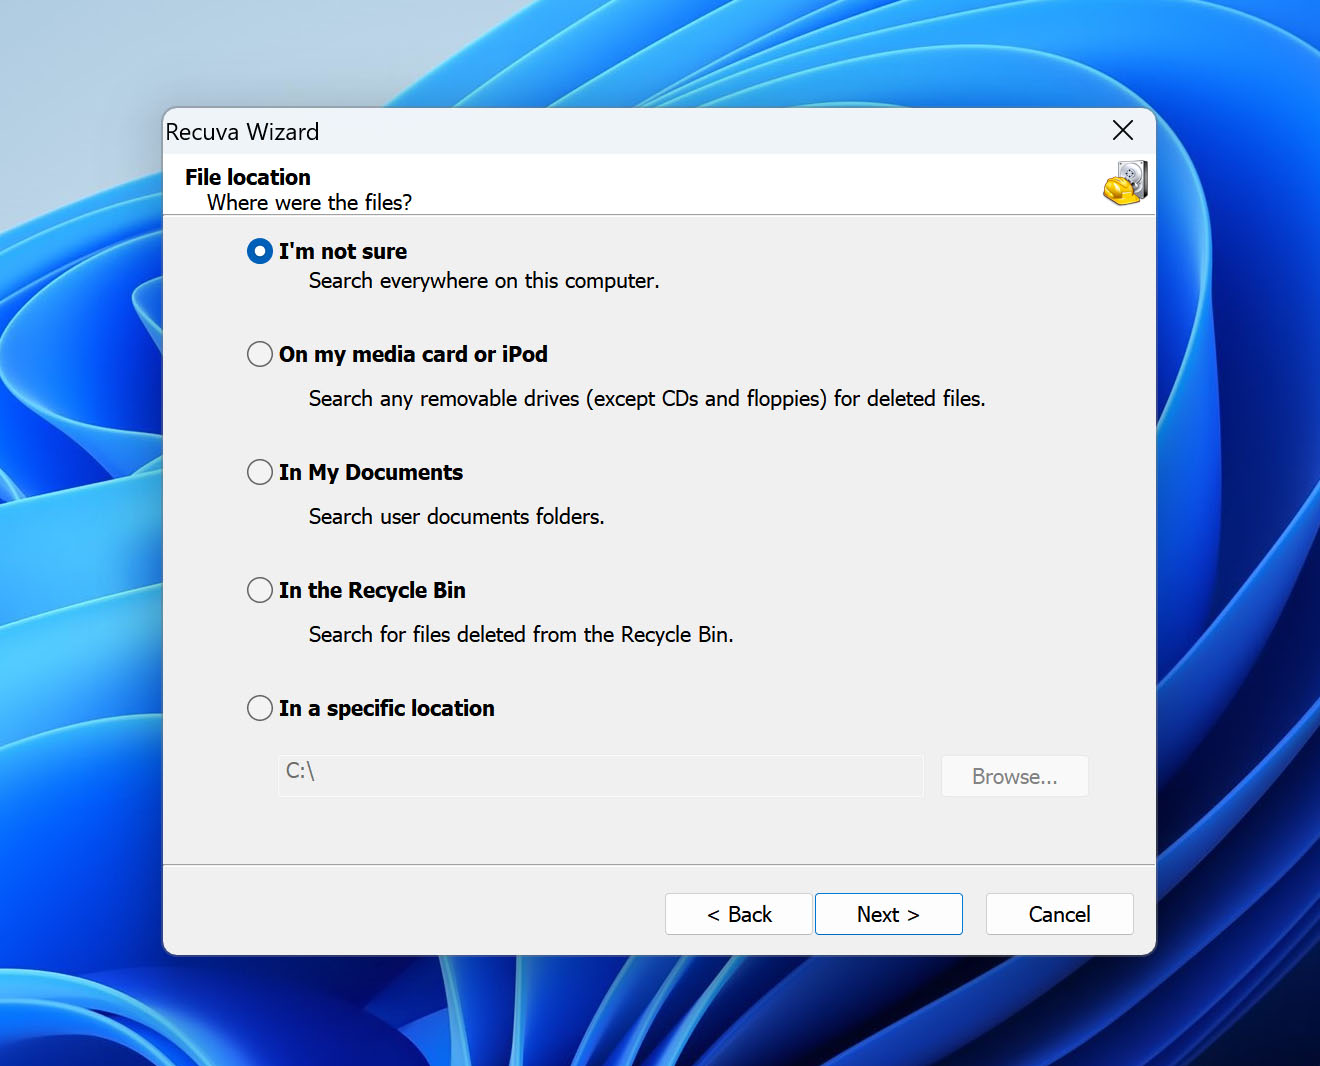
- Choose the location where you want to scan for lost data. If you want to unformat the entire HDD, leave the I’m not sure option selected and click Next.
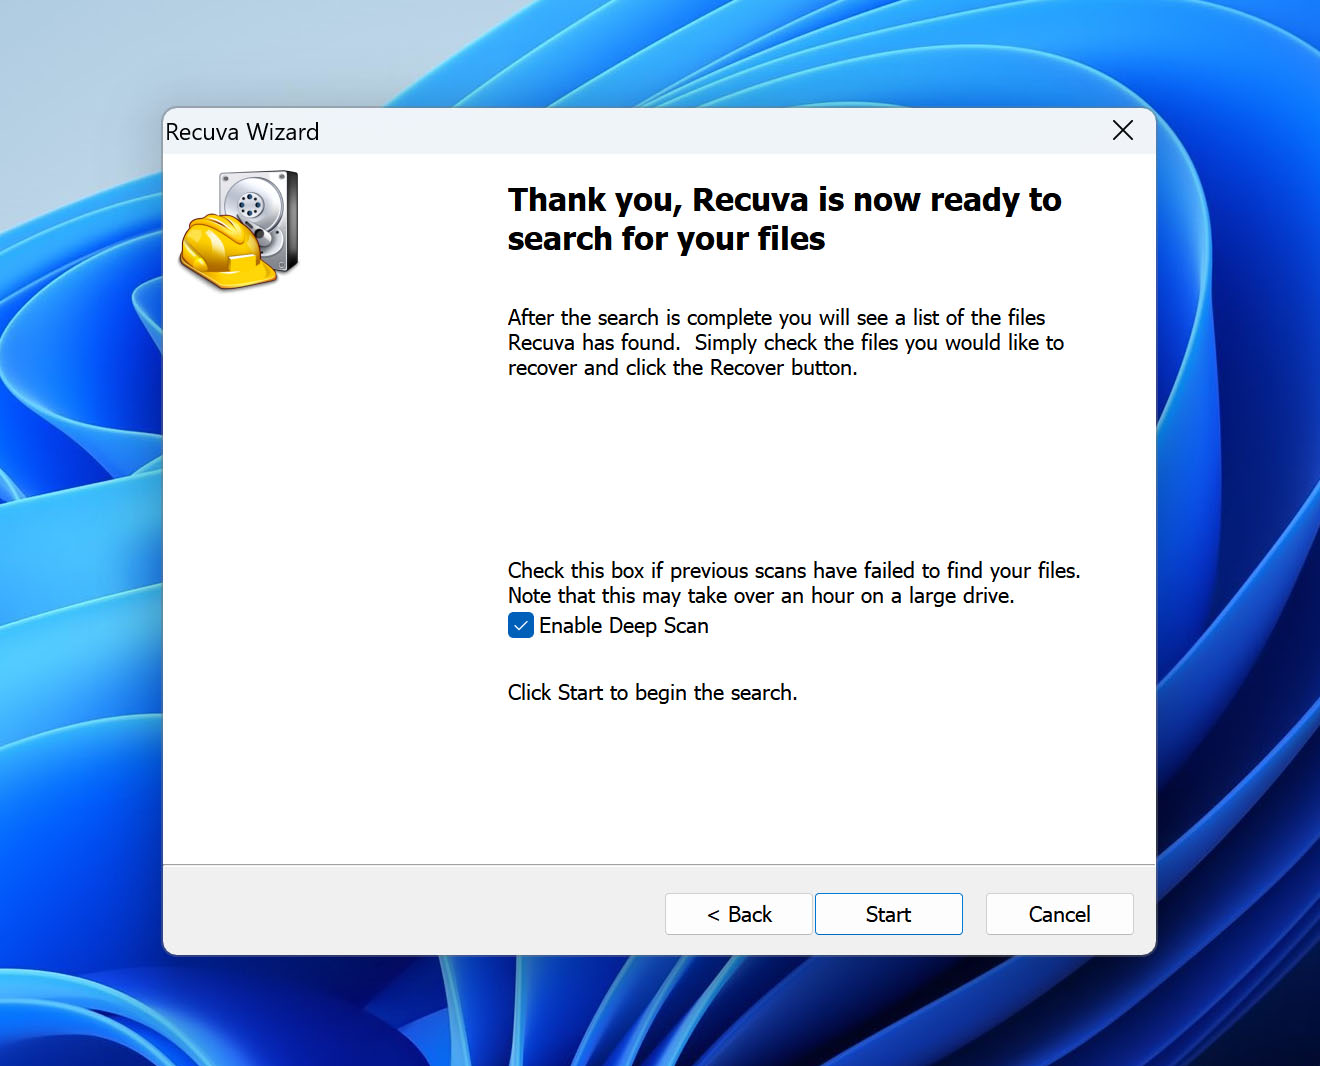
- On the next screen, check the Enable Deep Scan option and click on Start.
- Wait for Recuva to scan the formatted drive.
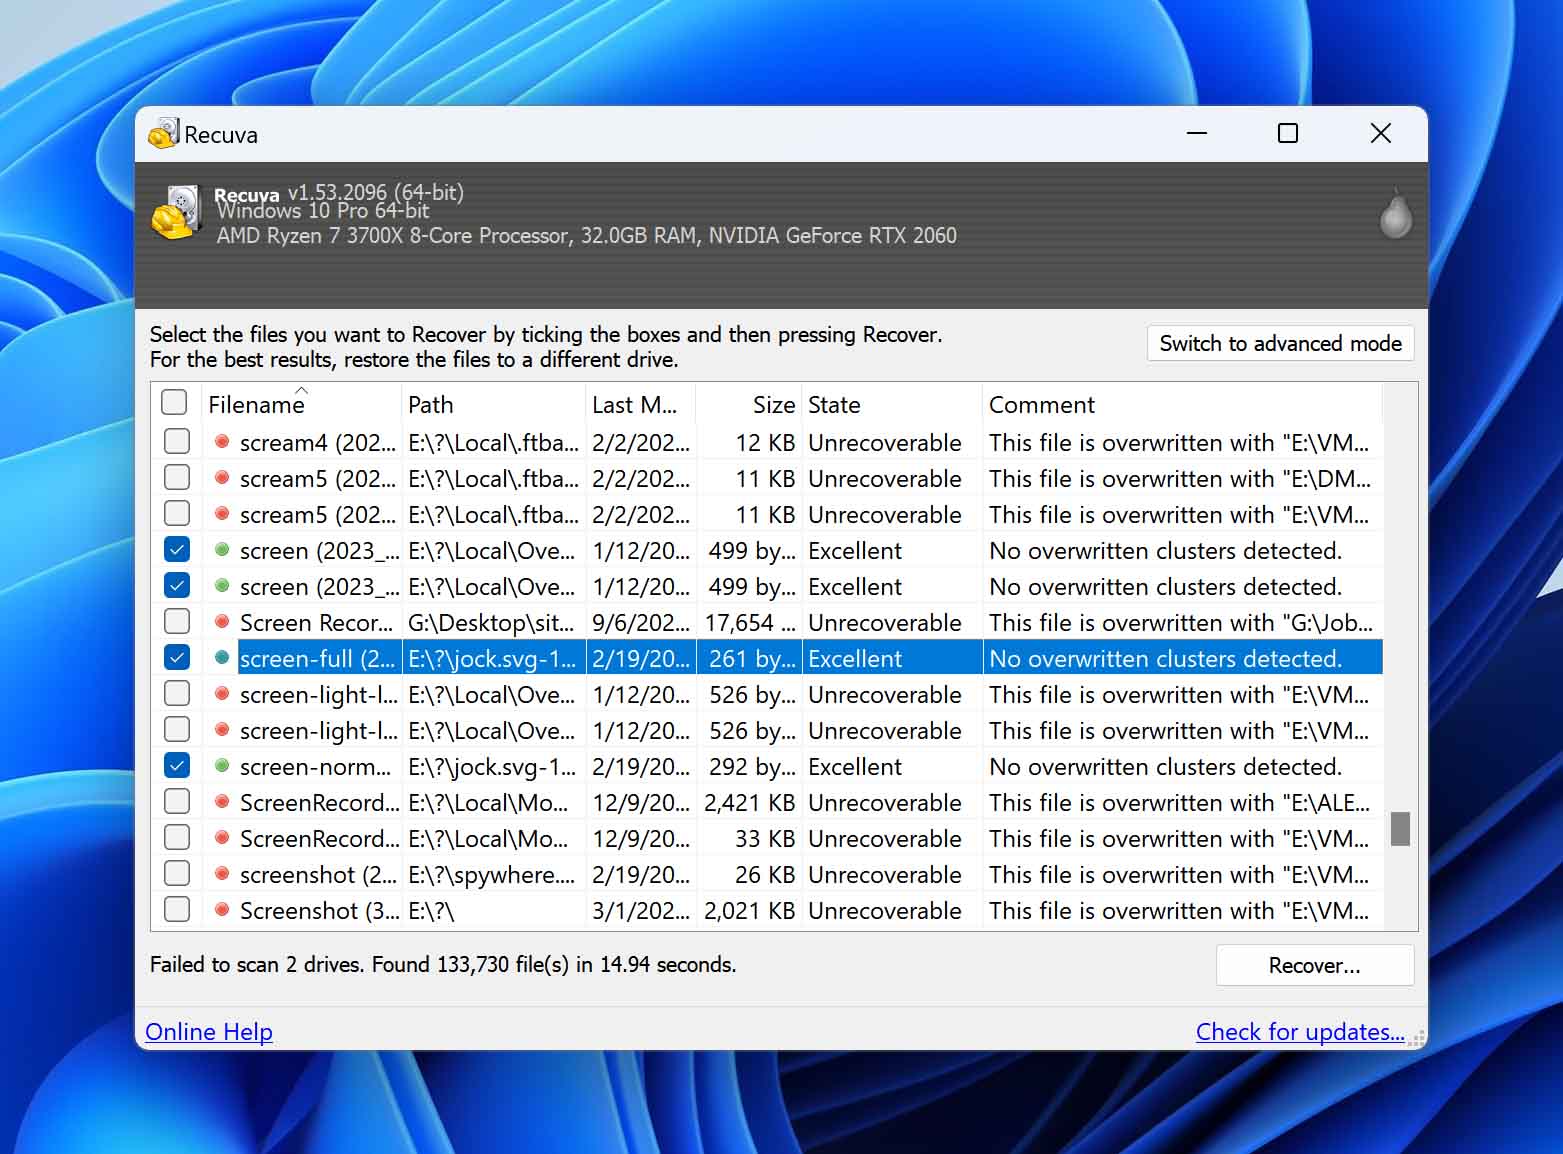
- Select the files you want to recover, then click the Recover button.
- Choose a recovery destination and click OK. Recuva will restore the files to the selected location.
What Does Drive Formatting Actually Do?
Most of us have a nascent understanding of disk formatting and what it actually does to your hard disk drive. Yes, it does erase all the data on your hard drive, but that’s not all. The paragraphs below will explore the concept of disk formatting and its various types.
In addition to deleting all the files on your hard drive, formatting also renews the file system and checks for bad sectors on your drive (Full Format only). Broadly, formatting can be classified into two types:
- ⬇️ Low Level Formatting: After a hard drive has been manufactured, companies perform low-level formatting on it to prepare the drive for its very first use. In this process, tracks, cylinders, and sectors are physically marked out on your drive using professional tools and methods. Due to the expertise required, low level formatting is usually performed by the manufacturer, even though there are some specialized programs that allow the average user to perform a low level format.
- ⬆️ High Level Formatting: This is the kind of formatting most users are familiar with. High level formatting can be performed by the typical PC user. A high-level format is used to delete the data from a disk, create partitions, and prepare the drive for a new OS installation.
Did you know: MS-DOS versions 5.0-6.22 actually had support for an external DOS command called unformat that let users undo formatting and restructure the formatted hard drive.
FAQ
What is the best unformat software that you recommend?
In our guide, we have covered three solutions: Disk Drill, R-Studio, and Recuva, and we believe these software programs are the best in their respective categories. Disk Drill offers a solid overall solution with excellent scanning results and a user-friendly interface. If Disk Drill doesn’t seem like a good fit for you, we’ve also covered R-Studio, which will appeal more to tech-savvy users looking for advanced features. Meanwhile, Recuva is one of the best completely free software options available. Additionally, we have an article where you can learn more about alternatives to Disk Drill.
What is the best free unformat software?
Most good data recovery programs like Disk Drill come with a free trial, and users have to pay if they want to retrieve data larger than the specified size (500 MB in Disk Drill’s case). But, there are few completely free unformat programs, listed below:
- Recuva for personal use (Windows)
- PhotoRec (Windows, Linux, and macOS)
- Puran File Recovery for personal use (Windows)
- TestDisk (Windows, Linux, and macOS)
How do I undo formatting my hard drive?
To undo formatting your hard drive, follow these steps:
- Download, install, and open the data recovery software of your choice.
- Select the drive you wish to unformat and initiate a scan.
- Wait for the scan to complete, then review the items found.
- Select the files you wish to restore.
- Choose a safe location for recovery and complete the process.
Can formatted data be recovered?
Yes, data recovery is possible if the hard drive was formatted using Quick Format and the previous data hasn’t been overwritten by new files.
Can I unformat my hard drive for free?
Yes, you can unformat your HDD for free by using any of the programs in our list of free unformat software mentioned in the first answer.
Is it possible to unformat the USB drive?
Yes, it’s possible to unformat a USB drive using effective data recovery programs like Disk Drill. Remember to stop using the device immediately and perform data recovery ASAP.
Can I unformat SSD?
It can be tricky to unformat an SSD due to a feature called TRIM, that internally erases files soon after they are deleted. But, users can turn off the TRIM feature as soon as they discover the data loss, before it has a chance to trigger. You can then scan the SSD using a good data recovery program and retrieve your files.
Conclusion
From the sections above, it’s clear that data recovery software makes it exponentially easier to unformat an HDD. But, it’s important to have realistic expectations, especially if you used the drive after it was formatted or performed a full format.
This article was written by Manuviraj Godara, a Staff Writer at Handy Recovery Advisor. It was also verified for technical accuracy by Andrey Vasilyev, our editorial advisor.
Curious about our content creation process? Take a look at our Editor Guidelines.
