Have you run into an issue with your Toshiba hard drive that has caused some of your data to become lost or deleted? You’re not the first, and you won’t be the last. But your chances of recovering that data depend on a few factors, particularly what caused the data loss and which steps you take to recover the data.
As there are many ways you can approach Toshiba hard drive recovery, knowing what decisions to make can save you a whole lot of stress, and may even be the difference between recovering all of your data vs none of it. In this article, you’ll find several proven methods for recovering data from a Toshiba hard drive.
Wanna skip the theory part? Jump to the recovery guide right away.
Can You Recover Data From a Toshiba Hard Drive?
Yes, you can recover data from a Toshiba hard drive that has suffered from data loss. The route you take to recover that data depends on where the issue originated. While both internal hard drives and external hard drives can suffer from most of the same problems, each is more susceptible to a specific set of issues that can arise over time. We’ve left out basic data loss scenarios like regular file deletion and formatting, instead focusing on more complicated situations.
Toshiba Internal Drives
Even if you’re using a Toshiba drive to host your operating system, recovering data from an internal hard drive is definitely possible in a lot of circumstances.
Here are some common issues that cause data loss on internal hard drives, along with an estimation of your recovery chances:
Problem |
Description |
Recoverability |
Mechanical failure |
Hard drives are mechanical, which means they’re susceptible to physical malfunctions like head crashes, spindle motor failure, and stiction. |
The type of mechanical failure heavily determines the recoverability of data. No matter the cause, consulting a professional data recovery service is the best course of action. Attempting DIY data recovery methods on a physically unstable disk may cause the data to become permanently unrecoverable. |
Bad sectors |
Sectors are used to store data on the platters of your hard drive. Over time, bad sectors will appear with normal use. However, when a sudden influx of bad sectors starts appearing, it’s a sign that the hard drive is rapidly starting to fail. |
Data cannot be recovered from physical bad sectors, as they’re parts of the hard drive that are no longer operational. However, you can recover data from logical bad sectors using data recovery software and then repair them using Victoria911. |
Logical errors |
Logical errors include file system corruption, interrupted formatting, a corrupted partition table, and unrecognized drives. |
Data recovery is very likely in cases like this, provided the drive hasn’t been used extensively. We’d recommend recovering the data using DIY data recovery software before attempting to fix the drive. |
System freezes or crashes |
If your computer freezes or crashes during critical processes like updating the operating system, resizing a partition, or transferring files, some data, or even the file system itself, can become corrupted and either lost or unusable. |
The recovery of data from a Toshiba drive with a corrupted file system with DIY data recovery software is certainly possible. Recovering corrupted data is also possible, though it will need to be repaired upon recovery. |
In order to troubleshoot a system drive that’s no longer bootable, you have two options. The first option involves removing the drive and connecting it to another computer as an external drive. The second option is creating a bootable USB on another computer and then using it to boot into a temporary environment where you can perform recovery.
Toshiba External Drives
External hard drives, like those of the Toshiba Canvio range, are essentially internal hard drives in an enclosure that allows you to use them as an external device. Therefore, in addition to many of the problems that internal drives face, external hard drives also have some unique issues that commonly appear.
These are a few issues that plague external hard drives in particular:
Problem |
Description |
Recoverability |
Physical damage |
As a portable storage device, external hard drives are much more likely to encounter physical damage. This can range from bent connector pins to a failed motor as a result of being dropped. |
It’s impossible to know the recoverability of your data, and it’s too risky to attempt data recovery yourself. Physically damaged drives should be handled by a professional data recovery service instead. |
Insufficient power |
External hard drives need enough power to remain active. If you’re using an unpowered USB hub, it may not be providing enough power to start the drive (which is when it needs the most power) and continue to keep it spinning. |
Provided the data is still present, all you need to do is connect to a port with sufficient power. If the data was lost because the drive turned off while in use, there’s a good chance that data recovery software can get the data back. |
Slow performance or frequent disconnections |
Slow drive performance or frequent disconnections often point towards either a faulty cable or faulty connector, more often than not the latter. |
Replacing the faulty cable will restore access to the data. However, if the frequent disconnections resulted in data becoming corrupted during transfer, we recommend using data recovery software to get it back. |
Not showing up in File Explorer |
An external Toshiba hard drive that shows in Disk Management but not File Explorer indicates that something went wrong when Windows tried to mount the drive. |
Sometimes it’s as easy as assigning a drive letter to restore access to the data. However, it can be a byproduct of a more severe issue. Therefore, recovering the data first is a good idea. |
If handled improperly, particularly when being ejected from a computer, external hard drives are very susceptible to logical corruption in the form of file system corruption. This commonly leads to users who need to either recover data from an uninitialized disk or recover files from a RAW external hard drive.
While this isn’t an exhaustive list of all the possible causes behind Toshiba hard drive data loss, it should cover most of the big ones. With that in mind, let’s look at what you need to do to prepare for Toshiba hard drive recovery.
Before We Begin
Your chances of performing a successful recovery decrease with time. To give yourself the best chance at recovering your data, you should take into account a few important points before you do anything.
- ✋ Stop using the drive – Continued use of the drive increases the chance of your data being overwritten. As data is written to the drive (even temporary files created by the OS), there’s a chance that new data will be written to the same physical space where your deleted data resides. If that happens, data recovery becomes near-impossible.
- 🙅♂️ Do not format – Logically damaged drives may suggest you perform a format when you connect them. Formatting a drive will delete your data and further hinder your attempts at recovery, so you should always attempt recovery first.
- 📀 Copy the data – If you know your drive is malfunctioning, you need to back it up before recovering the data. Hard drives that are starting to fail will show symptoms like long wait times to open files, disappearing data, and generally erratic performance. In an unstable state, the added stress of data recovery may cause the drive to fail entirely, rendering the data unrecoverable. We’ll show you how to create a copy of the data below, which also applies to drives that are otherwise inaccessible.
You can recover data from a disk as long as long as it appears in Disk Management and shows the correct capacity. You can find Disk Management by opening the Start menu and searching “Disk Management”. If the disk either (a) doesn’t appear in Disk Management, or (b) shows the incorrect size, it’s a sign of mechanical failure and it should be fixed before you attempt data recovery.
How to Recover Data From a Toshiba Hard Drive
To recover data from your Toshiba hard drive, we’re going to use data recovery tools. Data recovery tools can scan your drive for recoverable data and retrieve it for you. You can even use them to recover data from hard drives that no longer boot. The three recovery tools we’ll focus on are Disk Drill, Windows File Recovery, and Recuva.
In any data loss situation, data recovery should be performed before any fixes are implemented. Attempting to fix the issue straight away could result in some of the data becoming permanently lost.
Option A: Disk Drill for Windows
Disk Drill is first on the list for a few reasons, but primarily for its ease of use and versatility. Not only can it recover files that have been deleted, but it’s also capable of recognizing and scanning corrupted, formatted, or RAW Toshiba hard drives that either don’t appear or constantly prompt you to format.
We’ve split this into a two-step process, with the first explaining when and how you should back up your drive, and the second demonstrating how to perform data recovery. If you’re certain that a backup is not required in your case, you can skip straight to step 2.
Step 1: Creating a byte-to-byte copy
Any time you face data loss, creating a byte-to-byte copy of the drive in question is a good practice to minimize further risks. In times when the drive is corrupted, damaged, or malfunctioning; it’s essential. Scanning the drive itself will put additional stress on the hardware, perhaps to the point of failure. To get around this, you can create an identical copy of the drive and scan that instead.

You can create a backup right within Disk Drill, just bear in mind that you’ll need a Disk Drill PRO license to recover 500 MB or more from it.
Follow these steps to create a byte-to-byte copy with Disk Drill:
- Download and install Disk Drill.
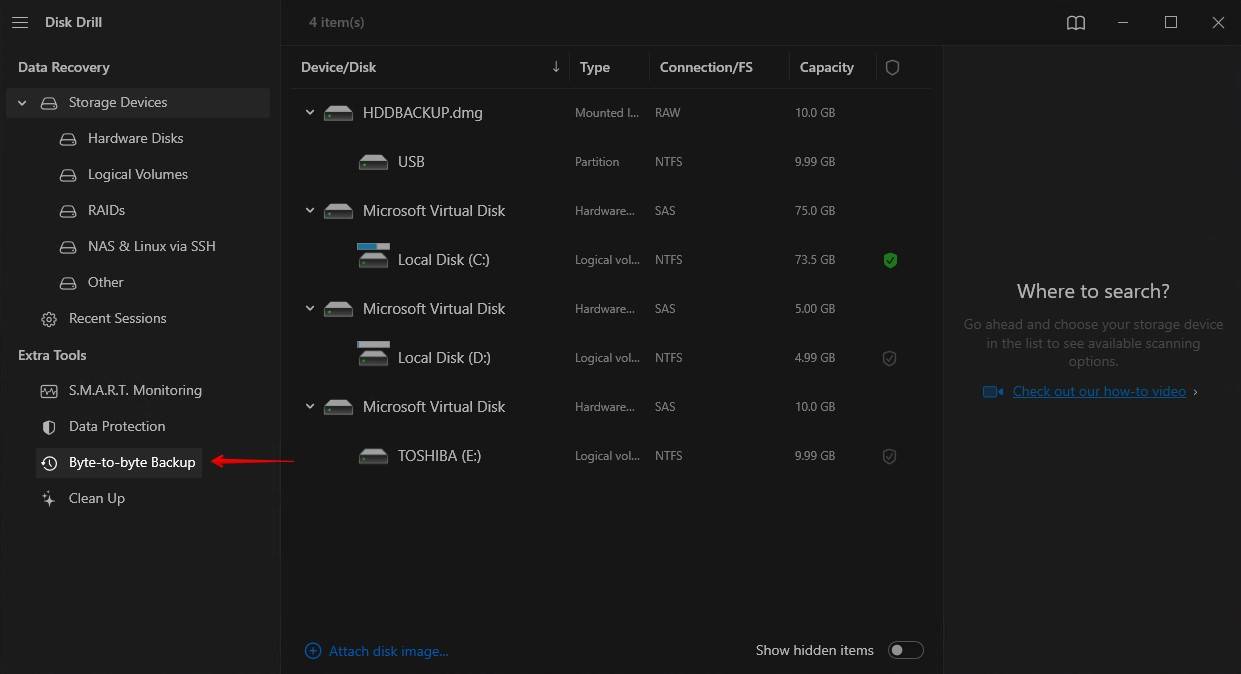
- Click Byte-to-byte Backup.
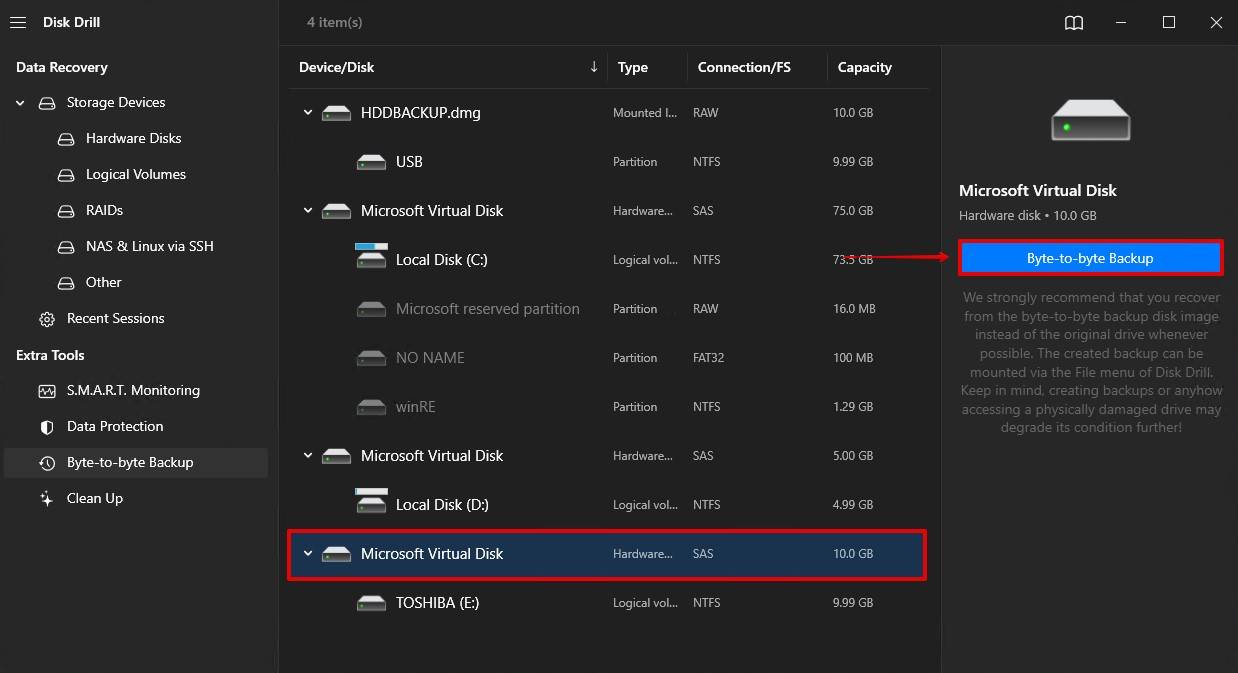
- Select your Toshiba drive and click Byte-to-byte Backup.
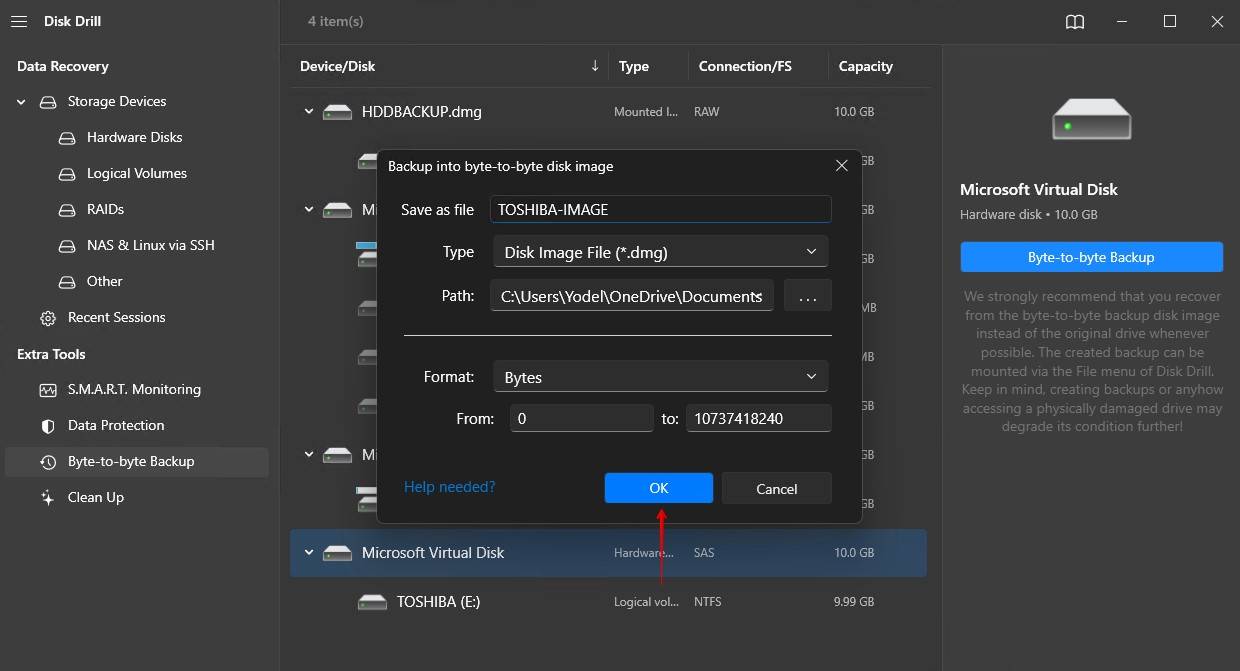
- Give it a name, select an output location, and click OK.
- Return to the Storage Devices screen and attach your disk image by clicking Attach disk image.
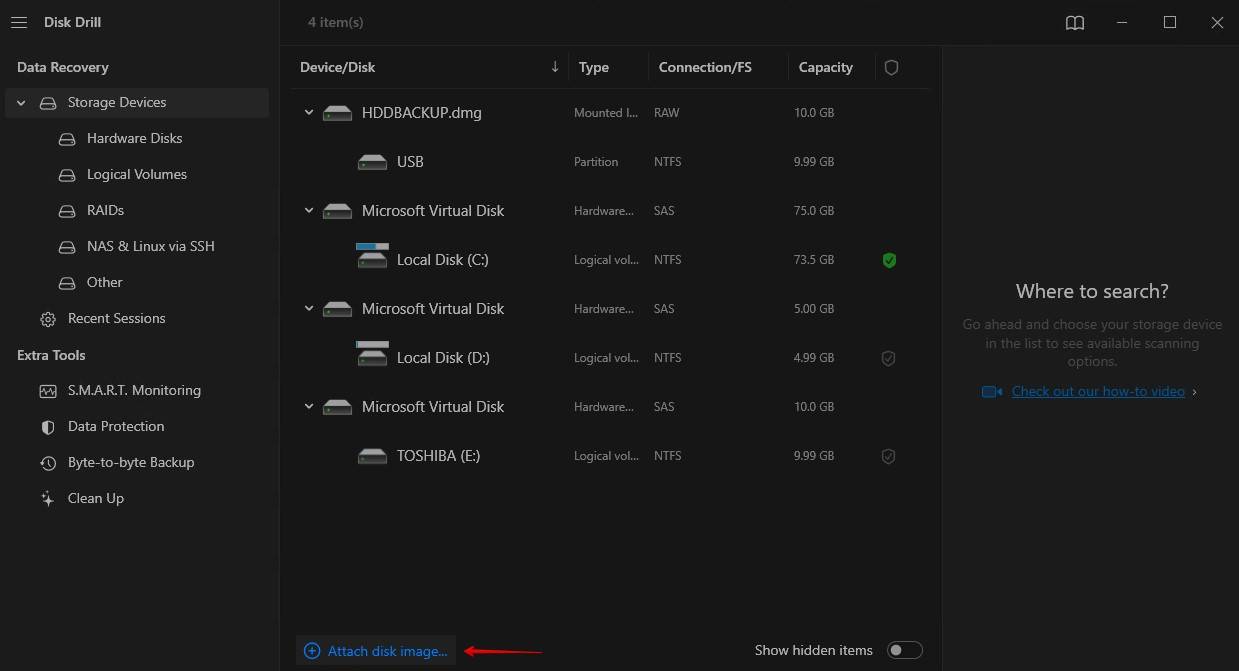
It is possible to create a disk image using other software such as Clonezilla or Macrium Reflect and then scan it using software that supports image scanning. In this instance, we preferred to use Disk Drill as it can handle both image creation and data recovery.
Step 2: Recovering the data
The actual data recovery process is very straightforward. It’s important to note that there is never a time when data recovery can be guaranteed, as it’s dependent on what data remains on the drive at the time of scanning.
You can learn more about Disk Drill and what it’s capable of in our Disk Drill review.
Follow these instructions to recover data from a Toshiba drive (or disk image) using Disk Drill:
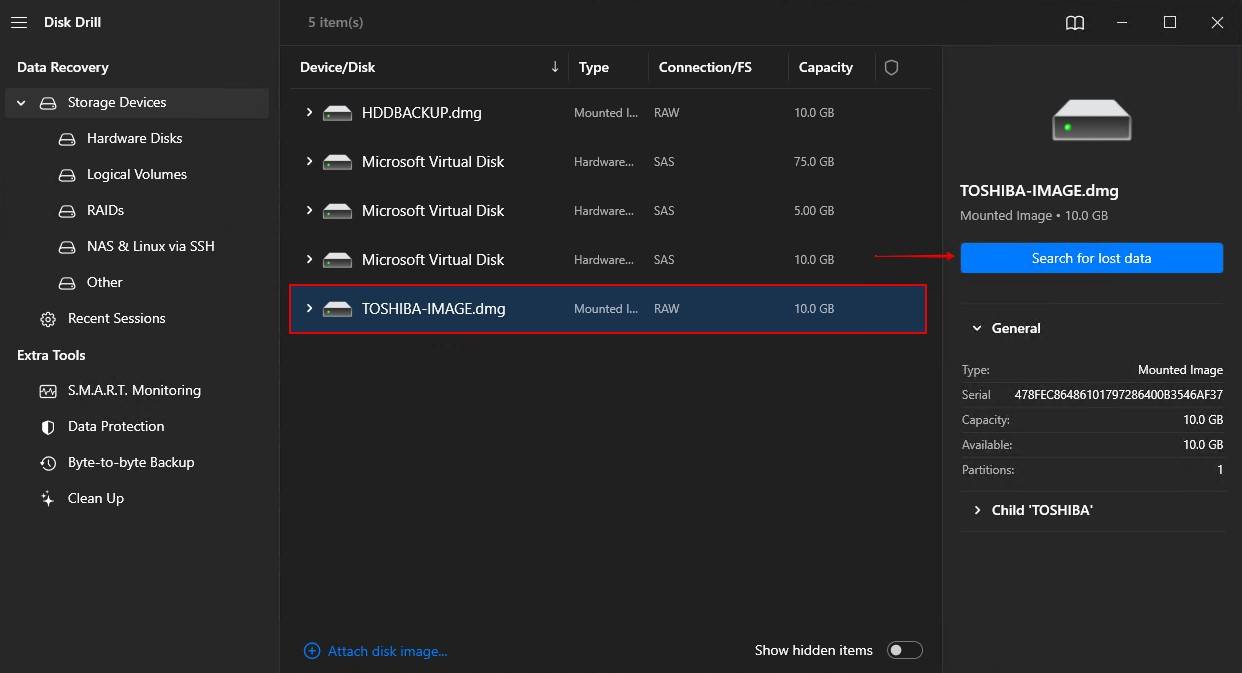
- Select the drive or image you’d like to scan, then click Search for lost data.
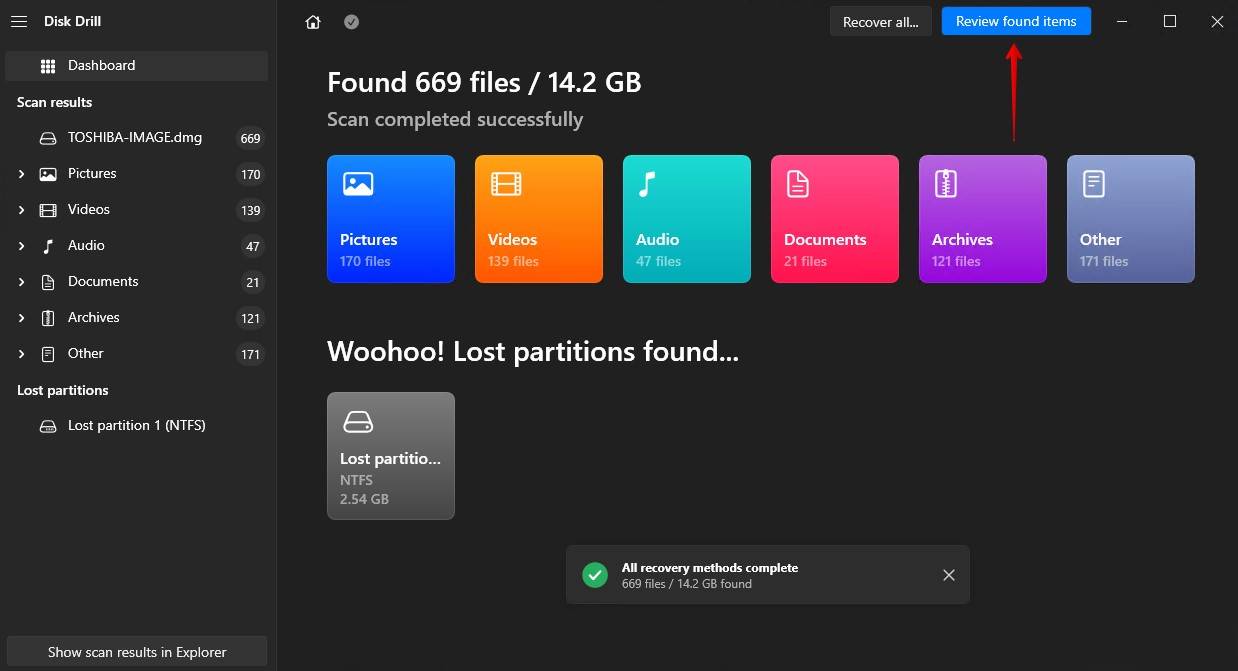
- Click Review found items to see what Disk Drill found on your Toshiba hard drive.
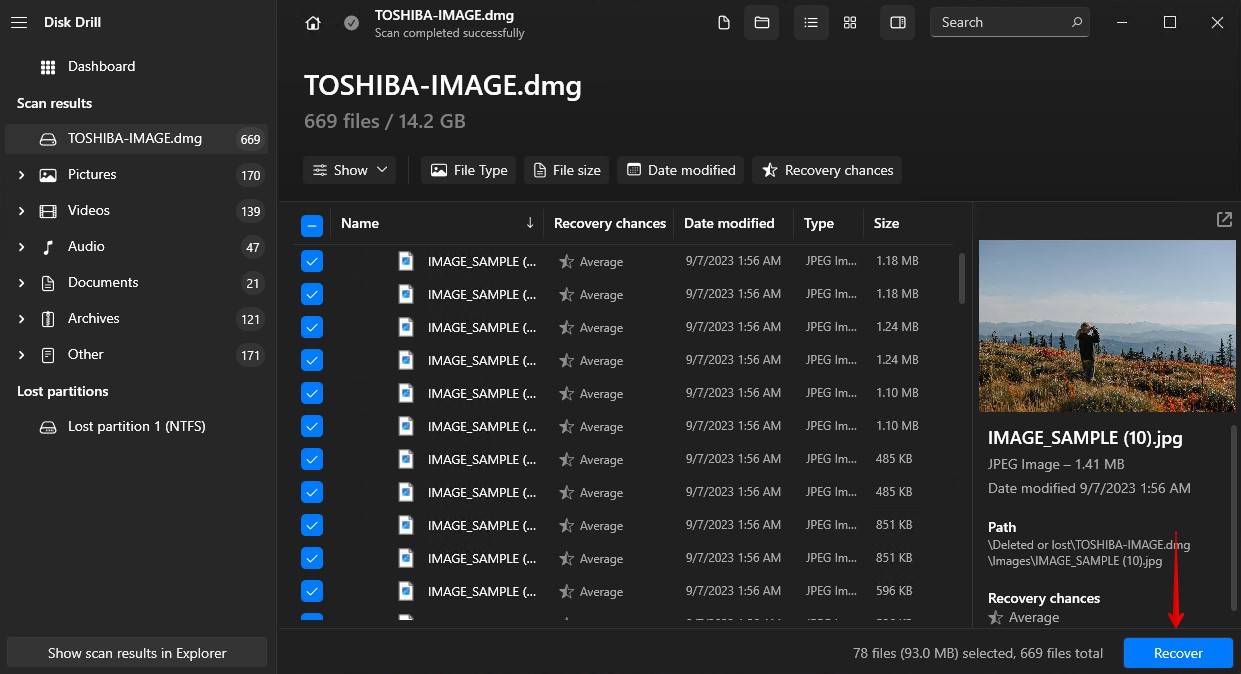
- Select the files you want to recover. Use the preview function to confirm the files are worth recovering, then click Recover.
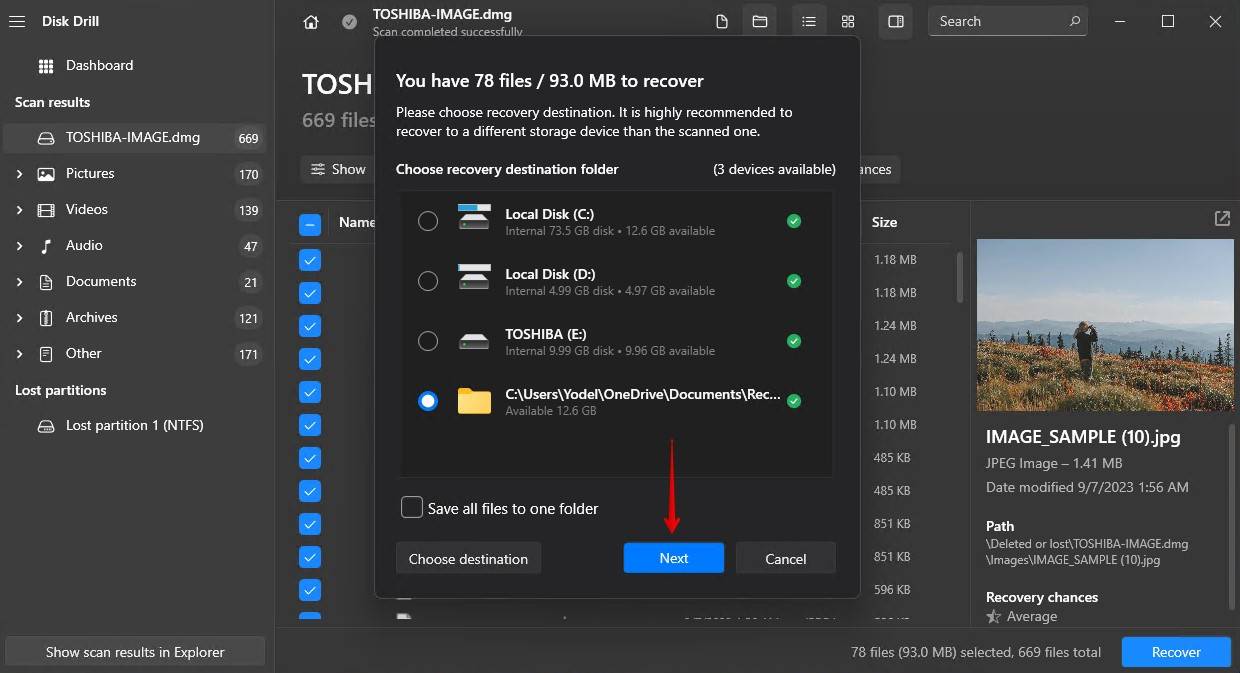
- Choose where you want to store the recovered files. This should be on another physical storage device to avoid corrupting the data you’re recovering. Click Next to finish data recovery.
Option B: Windows File Recovery Tool
The Windows File Recovery tool is the official recovery solution from Microsoft. It’s completely free, only requiring a working version of Windows and a Microsoft account to download and use. Based on the results of our tests, as well as others we’ve found online, Windows File Recovery is best suited for recovering recently deleted files from system (or internal) volumes using NTFS. This includes those emptied from the Recycle Bin or deleted using Shift + Delete. It’s not well-suited for more complex tasks outside of this.

If you find navigating a terminal interface too daunting, a graphical wrapper is available called WinFRGUI. Learn more about it in our WinFRGUI overview.
Here’s how you recover files from a Toshiba hard drive using Windows File Recovery.
- Get the Windows File Recovery tool from the Microsoft Store. Once installed, open it.

- Type winfr E: C:\RecoveredFiles /regular. Replace E: with the drive letter you want to scan. Replace C:\RecoveredFiles with the output location for the recovered files. Press Enter.

- Press Y to continue
If your files weren’t recovered this time around, try replacing the /regular parameter with /extensive in step two. This will do a deeper scan of your drive, but may take a little bit longer.
Option C: Recuva
Recuva is another data recovery tool. You can use it to recover an unlimited amount of data for free. It’s useful in the same situations as Windows File Recovery, with a slight edge when tasked with recovering data either from a formatted disk or by file signature only.

Regardless of this bonus, free tools very rarely compare to professional ones. This is highlighted in our comparison of Recuva vs Disk Drill. Furthermore, Recuva’s safety has been called into question on more than one occasion due to its parent company’s past controversies regarding data safety.
Follow these instructions to recover data using Recuva:
- Download, install, and open Recuva.

- Click Next on the first screen. Recuva uses a guided, wizard-like approach to data recovery.

- Choose what types of files you want to recover and click Next.

- Choose where the files were located before they were lost. Click Next.

- Click Start. Alternatively, tick the Enable Deep Scan option if you would like Recuva to do a deeper scan of your drive (which will take longer).

- Mark what files you want to recover, then click Recover.

- Choose where you want to restore the files.

How to Fix a Toshiba Hard Drive that Doesn’t Work Properly
Following data recovery, you can begin troubleshooting your Toshiba hard drive and implementing fixes to start using it again. The below, DIY-oriented solutions offer a methodical approach to fixing common logical problems that can prevent a Toshiba hard drive from appearing and working as intended.
Method 1: Try Another Port/Computer
The first (and easiest) step is testing the drive in another port. This will help localize the issue to the drive or port, eliminating wasteful troubleshooting. This really only applies if you want to fix an external hard drive that’s not showing up or showing up intermittently. If you’ve already managed to recover your data – you can skip this step.
Here’s a basic approach to this method:
- Try another USB port. If you test another USB port (preferably one connected to the motherboard directly) and it works, it means the problem is with the USB port you were using. This can happen if the USB port is disabled or unable to deliver the necessary power to the storage device.
- Try another computer. If the drive works on another computer, it means that something is preventing your computer from reading the drive and that the drive is otherwise healthy.
If you’ve tried both and the drive still hasn’t worked in either case, then you can safely say that the problem can be localized to the drive and that further troubleshooting is necessary.
Method 2: Add/Change Drive Letter
In order to access a storage device from your Windows computer, it must first have a drive letter. Without a drive letter, the drive will not appear in File Explorer, nor will it be accessible through other traditional means. While data recovery software can still read drives that don’t have a drive letter, it’s oftentimes unnecessary as the problem is very easily fixed by re-assigning or changing the drive letter.
Follow these instructions to add or change a drive letter.
- Right-click Start and click Disk Management.

- Right-click the volume of your Toshiba hard drive and click Change Drive Letter and Paths.

- Click Add. If you already have a drive letter, click Change instead.

- Select a drive letter from the dropdown menu and click OK.

Method 3: Error Checking
Windows comes with an error-checking feature that makes use of the CheckDisk (CHKDSK) functionality without using a command-line interface. Essentially, it will scan your drive for any identifiable issues and attempt to rectify them.
Follow these steps to check your Toshiba drive for errors.
- In File Explorer, right-click on your drive and select Properties.

- Click the Tools tab, then click Check.

- Click Scan drive.

- Click Close. Alternatively, click Show Details to view a detailed overview of what the scan found in the Event Viewer.

Method 4: Repair Bad Sectors with Victoria911
Victoria911, also known as Victoria for Windows, is a free hard drive diagnostic utility. With it, you can perform a surface test of the drive to locate bad sectors. While it’s impossible to repair physical bad sectors, Victoria911 has the ability to fix logical bad sectors that it finds.
Follow these steps to repair bad sectors with Victoria911:
- Download and open Victoria911.
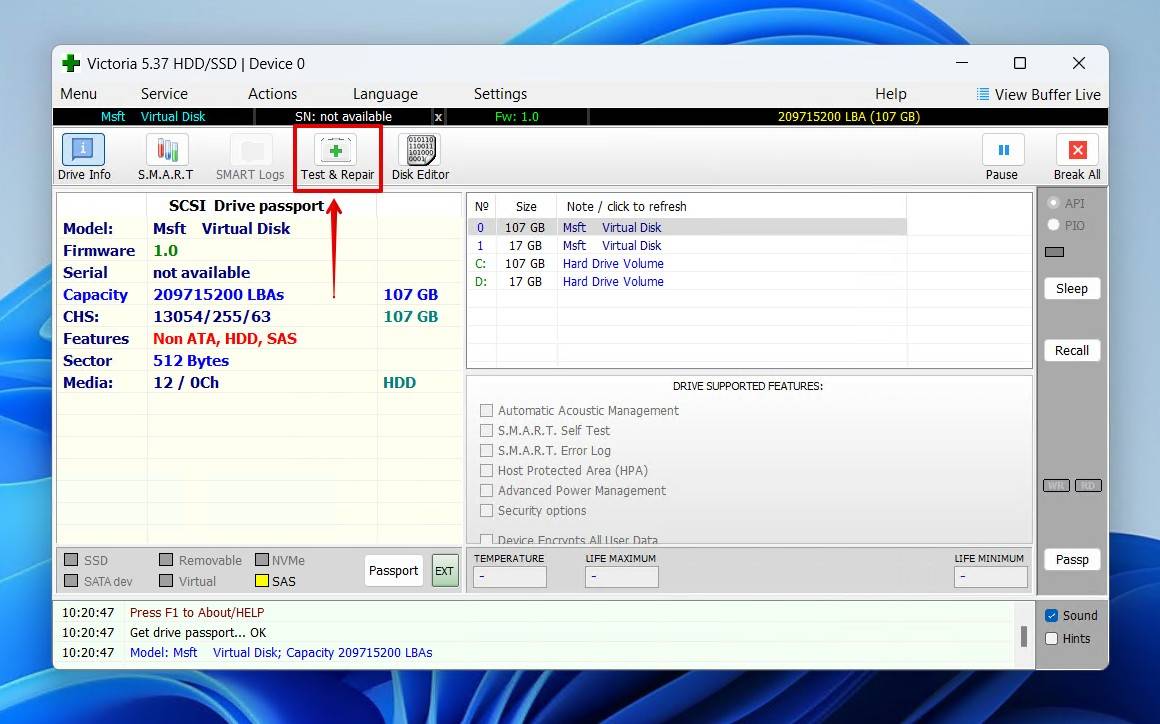
- Click Test & Repair.
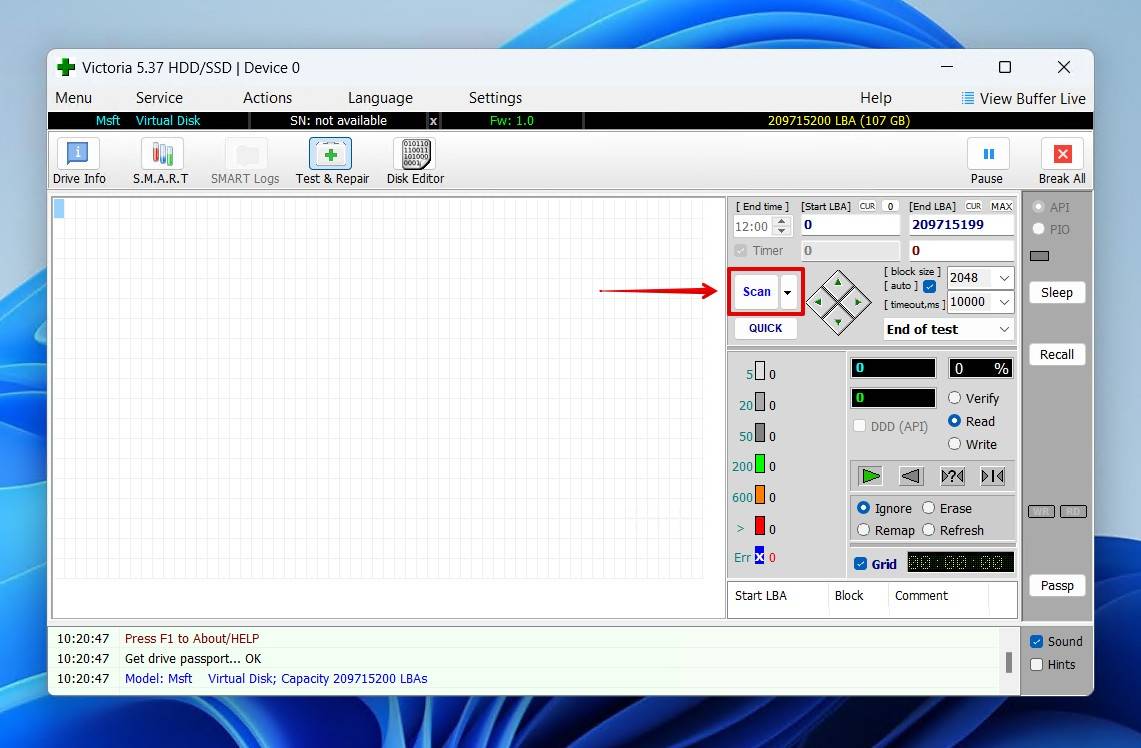
- Click Scan. By default, Victoria911 will mark but ignore any bad sectors it finds.
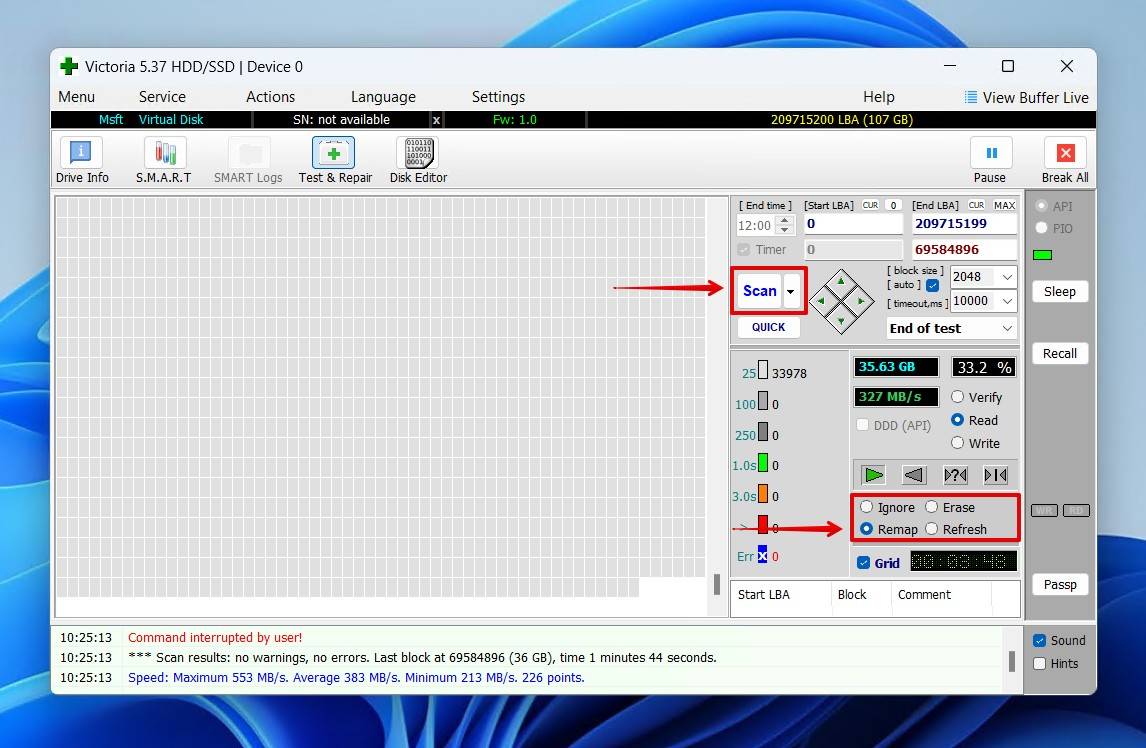
- Change the option to Remap, then perform another scan. Victoria911 will scan again, but this time it will attempt to remap the logical bad sectors to a spare one.
Can You Recover Data From a Dead/Physically Damaged Toshiba Hard Drive?
A dead hard drive is one that doesn’t appear anywhere on your computer. To File Explorer, Device Manager, and BIOS, your Toshiba hard drive is non-existent. Typically, this happens to hard drives that sustain some sort of physical damage. Unlike logical damage, physical damage is much more dangerous and less likely to be resolved using the troubleshooting methods we’ve already mentioned.
If your drive is, for all intents and purposes, dead, then you should contact a data recovery service provider instead. A data recovery professional has the tools and expertise to perform high-level data recovery, giving you the best chance of success in comparison to any software. The caveat is that this is the most expensive option, considering you’re employing a professional (though it is possible to find ones that are cheaper). Despite that, if the data on the drive is of the utmost importance, relying on a professional is always going to yield the greatest results.
How to Protect Your Toshiba Hard Drive From Data Loss
After you have recovered your files, you want to do everything in your power to make sure this doesn’t happen again. There is never a 100% guarantee that you will be able to recover your files, so keeping them safe allows you to rest easy. Here are a few tips for keeping the data on your Toshiba hard drive safe.
- 👍 Make backups – The best way to protect your data is to create a safe copy of it. Windows comes with backup features like File History and Backup & Restore for this exact purpose. Alternatively, you can use third-party software like Clonezilla or similar backup and recovery software.
- ⏏ Eject safely – When removing any storage device from your computer, eject it safely before doing so to ensure any write processes in operation are safely stopped. Otherwise, you risk corrupting your data because it hasn’t been completely saved.
- 👀 S.M.A.R.T. monitoring – Your drive’s S.M.A.R.T. data is an up-to-date reflection of your drive’s health. You can manually check this by running the wmic diskdrive get status command in Command Prompt, or by using Disk Drill’s disk monitoring feature which will actively monitor in the background.
By taking into account the above points (most notably the suggestion to back up your data), you can guarantee that your data is safe in the event that your Toshiba hard drive fails. When your files seemingly disappear next time, you can simply restore a copy of your data in a matter of minutes rather than spend hours trying to recover it.
FAQ
What is the best Toshiba hard disk repair tool?
It really depends on the type of damage you’re trying to repair. We already have a list of the best hard drive repair software, which will also apply to Toshiba hard drives. As usual, you should start with data recovery first, either with Disk Drill or another data recovery tool. Following that, you can try repairing the Toshiba hard disk with CHKDSK, HDD Regenerator, TestDisk, and Victoria911.
Does Toshiba have native hard drive recovery software?
Toshiba doesn’t have its own hard drive recovery software that you can download. Some Toshiba computers do come with the Toshiba HDD Recovery Utility, which is located on the recovery partition, but this simply helps restore the computer to working order. It’s not considered a data recovery tool.
Instead, Toshiba recommends having the drive inspected by data recovery professionals.
How do I restore my Toshiba hard drive?
If you’re having issues with your Toshiba hard drive, you can try error checking the drive using Windows. This will make use of the CheckDisk (CHKDSK) functionality by scanning and repairing any issues that are found.
- In File Explorer, right-click your drive and select Properties.
- Click Tools.
- Click Check.
- Click Scan and repair drive.
How to reset a Toshiba external hard drive?
Unlike your headphones or Bluetooth speakers, you don’t hold a button to reset a Toshiba external hard drive. Instead, what you need to do is format it. Formatting is the process of renewing the file system that the hard drive uses. During this process, all of the data on the drive is deleted.
- In File Explorer, right-click your drive and select Format.
- Choose your desired file system and what name you want the drive to have. Also, ensure Quick Format is enabled.
- Click Start.
Can I recover data if my Toshiba external hard drive is corrupted and unreadable?
Yes, it’s possible to recover data from external hard drives and restore them to a readable state. What’s most important when determining if recovery is an option is the readability of the drive. As long as your drive appears in Disk Management and shows the correct capacity, recovery is an option. If you connect your external hard drive and find that it’s not appearing in Disk Management (or anywhere else), your next best step is to contact a data recovery professional to take care of it for you.
Conclusion
Just like most drives, recovery is possible from Toshiba hard drives. It’s important to remember that continued use of a device that has suffered from data-loss could ruin your chances of recovering your data. If you’re ever in a situation where you’ve lost some or all of your files, keep the drive off and create a byte-to-byte backup to perform recovery from.
This article was written by Jordan Jamieson-Mane, a Staff Writer at Handy Recovery Advisor. It was also verified for technical accuracy by Andrey Vasilyev, our editorial advisor.
Curious about our content creation process? Take a look at our Editor Guidelines.
