Most of us use external storage drives to keep a backup of important data. And when it comes to external backup drives, Seagate Backup Plus is one of the most popular offerings on the market. But what if you lose data from your Seagate Backup Plus Portable or Slim drive? We’ve worked on cases like this many times and helped countless people recover their data. Keep reading—we’ll walk you through everything you need to know about Seagate Backup Plus recovery. But first, let’s take a closer look at Seagate Backup Plus drives.
Seagate Backup Plus Drives In a Nutshell
The Seagate Backup Plus Slim drives come in storage sizes of 1 TB and 2 TB while the larger Seagate Backup Plus Portable drives have storage options of 2 TB, 4 TB, and 5 TB. Both drives are compatible with Windows (7 onwards) and macOS (10.11 onwards), and they come formatted in the exFAT format by default.
To make the most out of the Seagate Backup Plus Portable/Slim drives, you need to download and install free software called Seagate Toolkit, on your PC. The program lets you access features such as:
- Mirror Activity. This feature lets you create a Mirror folder on your computer, that syncs all its files with the Seagate Backup Plus Portable/Slim drive. This means that any files you add, modify, or delete in the Mirror folder on your PC will reflect in the folder in the Seagate Backup Plus drive and vice versa.
- Backup Activity. Available for Windows only, Backup Activity lets you schedule backups at regular intervals.
Can You Recover Data From Seagate Backup Plus Drives?
Yes, in most cases of data loss, you can recover data from Seagate Backup Plus external hard disks using data recovery software. These programs are designed to locate and restore deleted, or inaccessible files by scanning the drive’s storage sectors for residual data, even if the drive is corrupted.
Nevertheless, the data recovery chances are strongly related to the cause of data loss. Thus, let’s look at some common data loss scenarios and whether Seagate Backup Plus data recovery is possible in each of the cases:
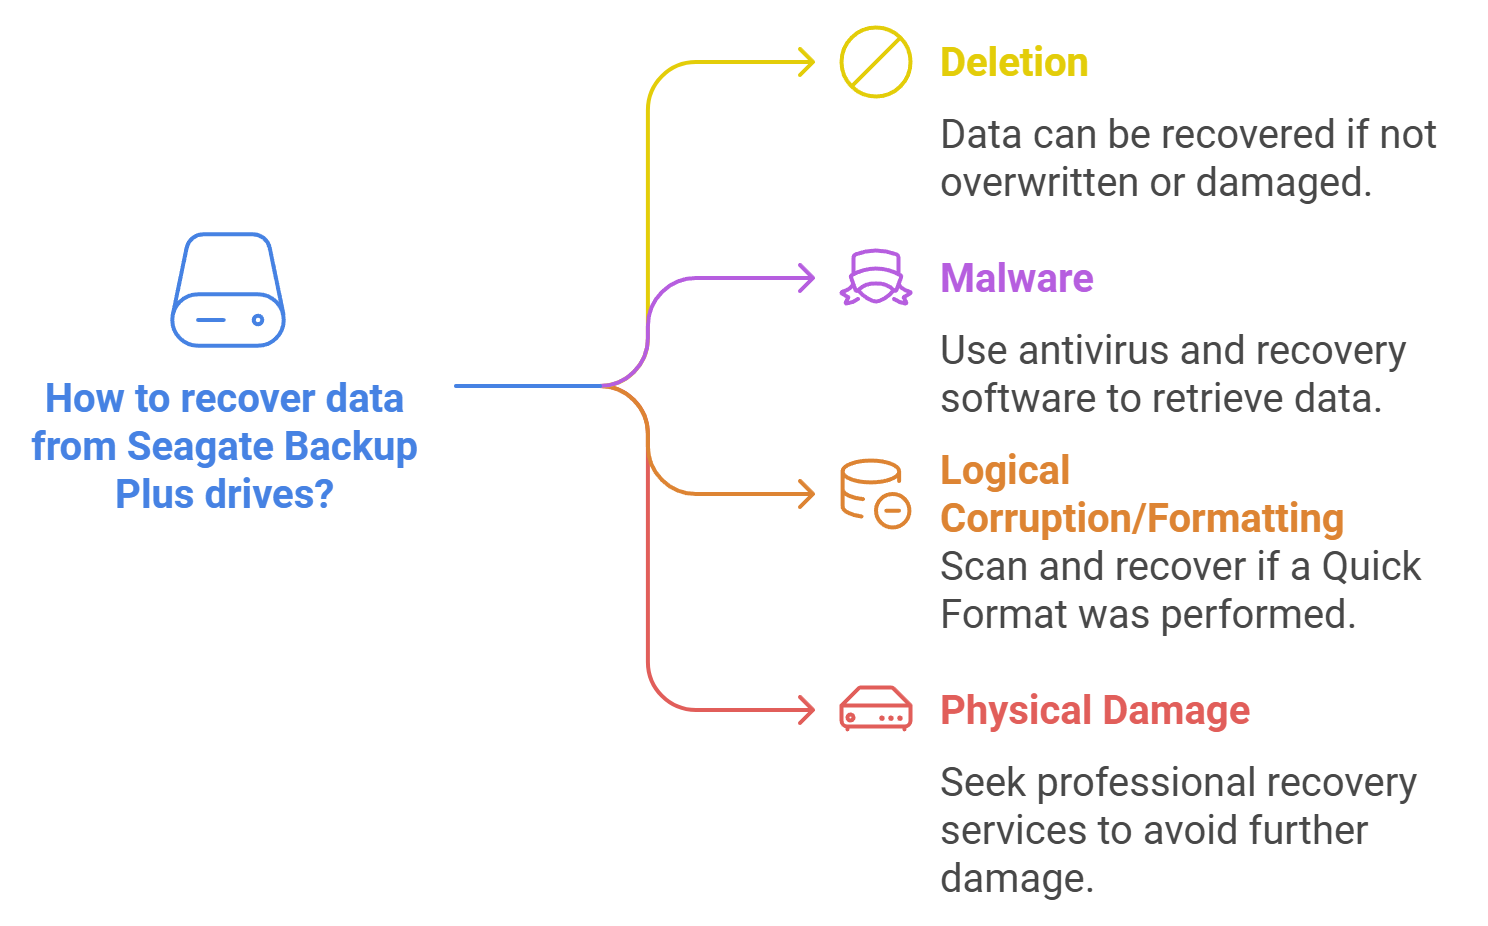
- 😓 Deletion. Deletion, whether accidental or intentional and later regretted, is usually the simplest data loss scenario when it comes to recovery. You will likely be able to recover your data as long as it hasn’t been overwritten or damaged.
- 🦠 Malware. Computer viruses and other malware are a leading cause of data loss from Seagate Backup Plus Portable/Slim drives. In case of malware-induced data loss, you can retrieve lost data with a combination of antivirus software to eliminate the threat and recovery software to restore your files.
- 📀 Logical corruption/Formatting. If your Seagate Backup Plus is not showing up in Windows Disk Management, you first need to fix that, and then scan your drive for missing data. Data loss from logical damage, such as a corrupt file system, can also be reversed. You can recover data from a formatted hard drive, but only if you performed a Quick Format. Quick Format erases the file directory but leaves the actual data intact until something overwrites it. A Full Format, on the other hand, overwrites all the data, which makes it impossible to recover your files because the original data gets replaced.
- ⚔️ Physical damage. A physically damaged Seagate Backup Plus drive should ideally be dealt with by a professional data recovery service. If you attempt to recover data from a Seagate Backup Plus drive that is physically damaged, you can make things worse.
As soon as you realize you’ve lost data, unplug your Seagate drive right away. Using it after data loss risks overwriting the space where your lost files are stored. Once that happens, no recovery software can get them back.
Which Seagate Backup Plus Recovery Software to Choose?
There are many options for data recovery software on the market, and it might be hard to determine which tool is best for your situation. Let’s break down what to look for in Seagate Backup Plus recovery software:
- The first thing to check is compatibility. The software needs to support the file systems commonly used on Seagate Backup Plus Portable and Slim drives, like NTFS, exFAT, and FAT.
- The next thing to check is the scanning methods the software offers. A good recovery tool should have both Quick Scan and Deep Scan options. Quick Scan works well for recently deleted files, and Deep Scan is designed for more complicated scenarios, like formatting or corruption.
- If the file system is badly damaged or lost, the software should have a strong signature scanner. It can recognize files based on their unique data patterns instead of relying on the file system. It can recover files even when the names and folder structure are gone. It allows it to restore data even from drives that show up as RAW.
- A tool should have a solid track record with external drives like Seagate Backup Plus.
- The software should also have an intuitive and modern interface to make it accessible for anyone, regardless of their technical expertise.
We’ve tested and reviewed a lot of data recovery software over the years, and a few stand out for recovering data from Seagate Backup Plus drives. Top contenders include Disk Drill, DiskGenius, Stellar Data Recovery, and R-Studio.
Out of these, we recommend Disk Drill as the best choice for most users. Here’s why:
- Stellar Data Recovery while capable is slow and relatively expensive.
- DiskGenius and R-Studio are powerful but overly technical for most users.
Disk Drill offers the perfect mix of capability and simplicity. It’s highly effective, with a proven track record with Seagate Backup Plus drives. Plus, it includes many useful extra tools.
5 Steps to Recover Data from Seagate Backup Plus
Let’s break the Seagate recovery process into 5 simple steps. Whatever caused your data loss—whether deletion, formatting, or corruption—the process stays the same. Here’s a detailed guide on how to recover your files using Disk Drill.
Step #1: Connect and Confirm Drive Recognition
First, connect your Seagate Backup Plus drive to your computer and check if it’s recognized. For any data recovery software to work, the drive must appear in Disk Management.
It’s okay if the drive doesn’t show up in File Explorer—as long as it’s visible in Disk Management with the correct size and basic information, recovery tools like Disk Drill can still detect it and recover your data.
Here’s how to check in Disk Management:
- Right-click the Start Menu and select Disk Management.
- Look for your Seagate Backup Plus drive in the list of connected drives.
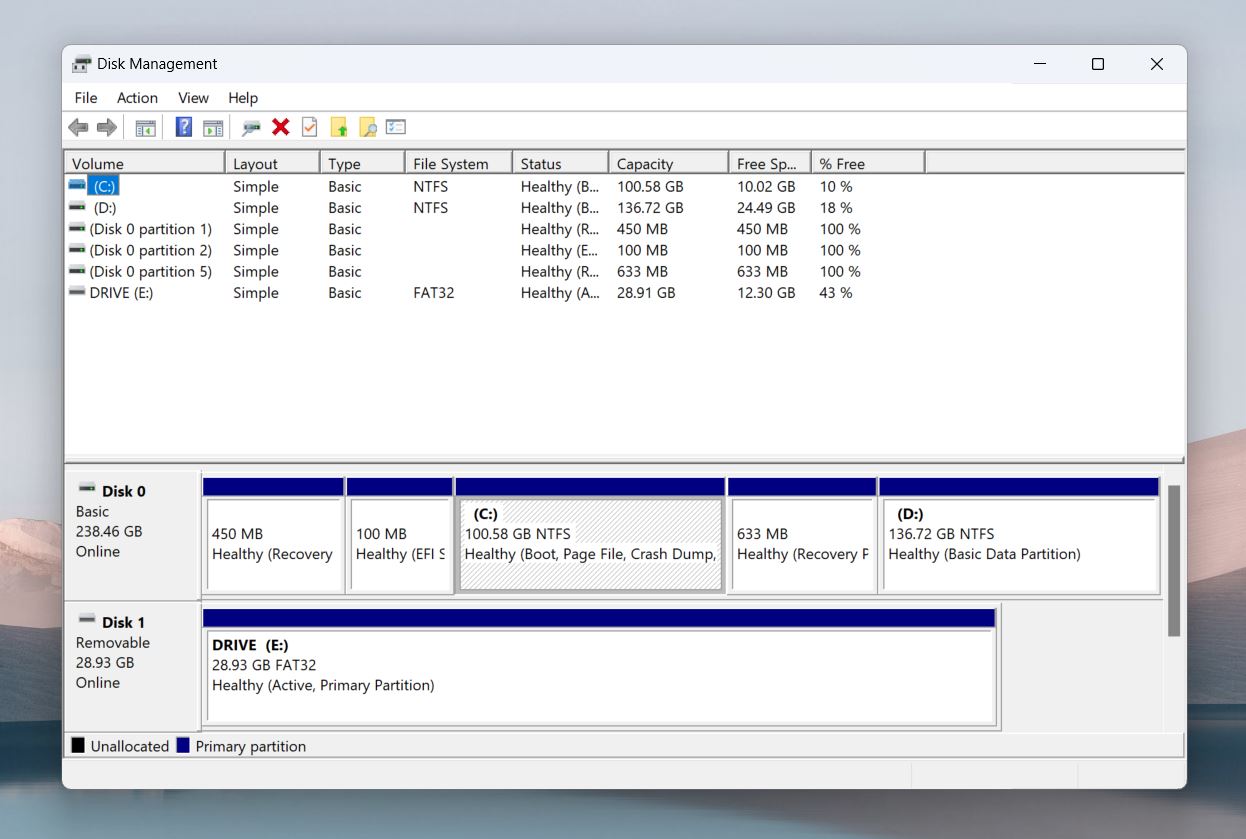
If the drive is missing or shows no size in Disk Management, do-it-yourself solutions won’t work. This usually indicates severe hardware issues or physical damage. In such cases, professional data recovery services are your best option.
Note. If your Seagate Backup Plus isn’t showing up, check out our guide on how to fix the “external hard drive not recognized” issue on Windows 10/11. It covers troubleshooting steps to help you make your drive visible again.
Once your drive shows up in Disk Management, even if it’s listed as RAW or unallocated, you’re good to go to the next step.
Step #2: Install and Open Your Recovery Software
To install Disk Drill, visit its official website and download the latest version. Disk Drill supports multiple Windows versions, so make sure to choose the right one for your operating system:
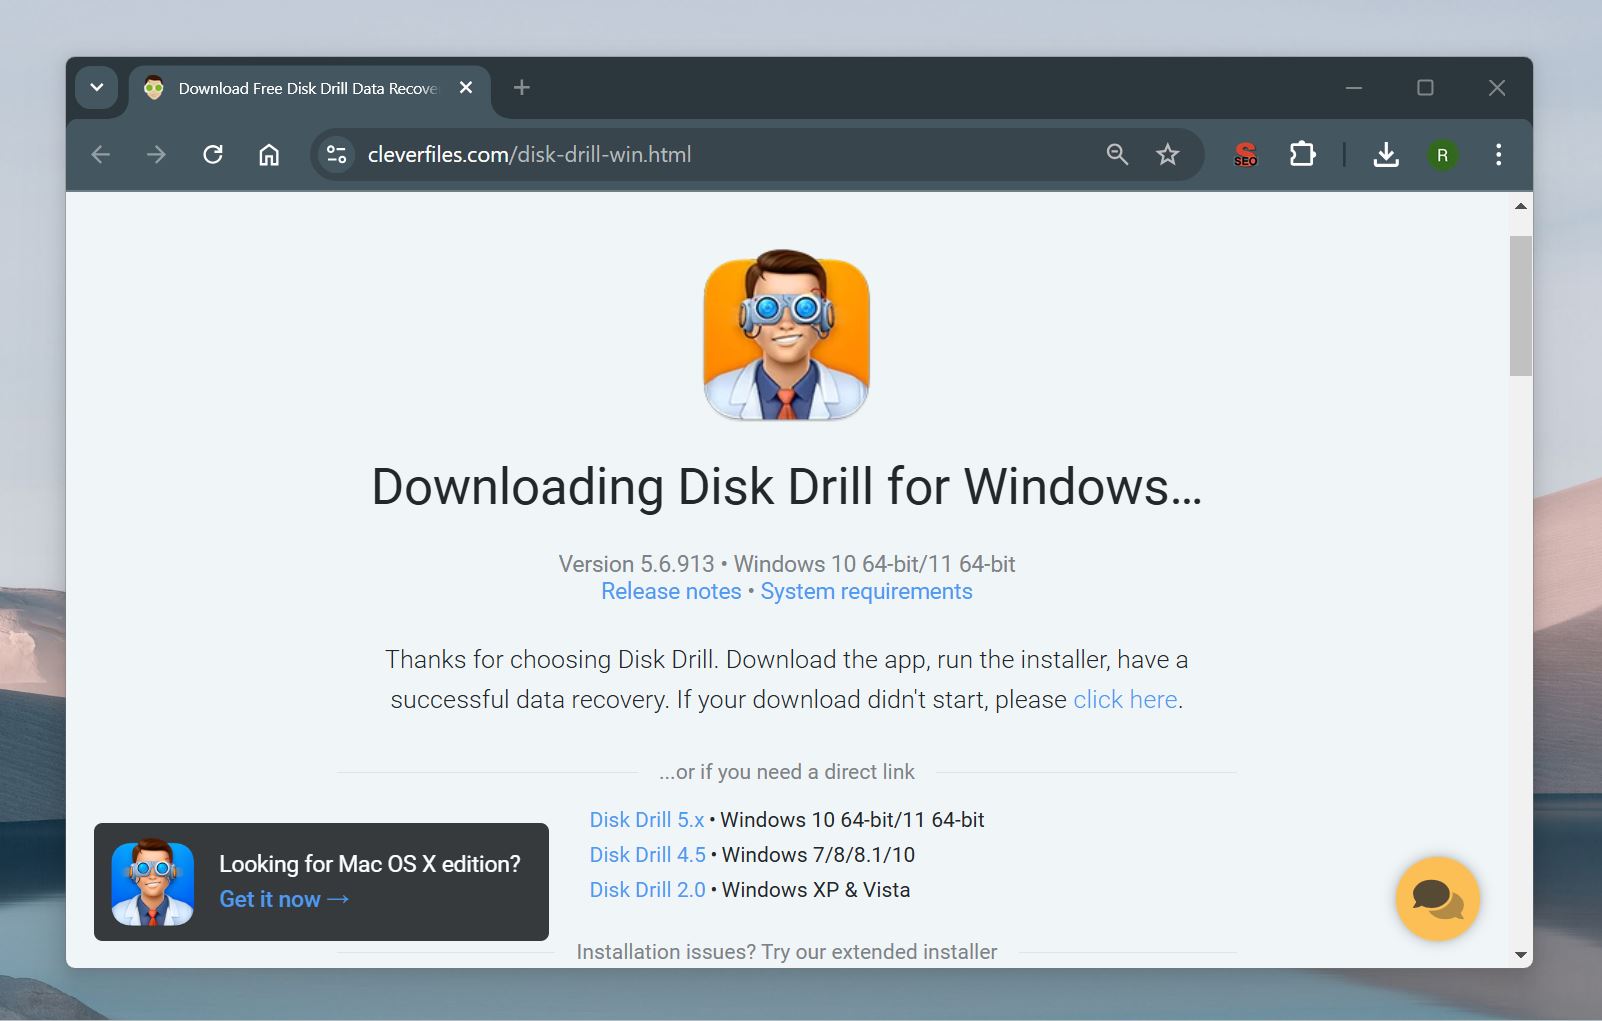
- Disk Drill 5.x: The latest version, compatible with Windows 10 (64-bit) and Windows 11 (64-bit).
- Disk Drill 4.5: Designed for older systems, this version works with Windows 7, 8, 8.1, and 10.
- Disk Drill 2.0: For Windows XP and Vista users.
We’ll demonstrate the recovery process using Disk Drill 5. While the interface may look different across versions, the overall recovery process is the same.
Now, run the installer and launch Disk Drill. It might ask for permissions to access your system and drives. Go ahead and allow it—Disk Drill is safe and has been tested for reliability and security.
Note: Disk Drill offers three versions to meet different needs:
- Basic version. Recovers up to 500 MB of data at no cost, making it a good option for small recovery tasks or testing the software.
- Pro version. Priced at $89.99, it offers unlimited data recovery for one user on up to three devices.
- Enterprise version: Designed for businesses, it costs $499 and includes unlimited activations for up to 10 users.
Step #3: Select Drive and Launch Scan
When you open Disk Drill, the first thing you’ll see is a list of all connected drives. This includes your computer’s internal drive and any detected external devices, like USB drives and external hard drives.
To start a scan, simply select your Seagate Backup Plus from the list and click the Search for Lost Data button.
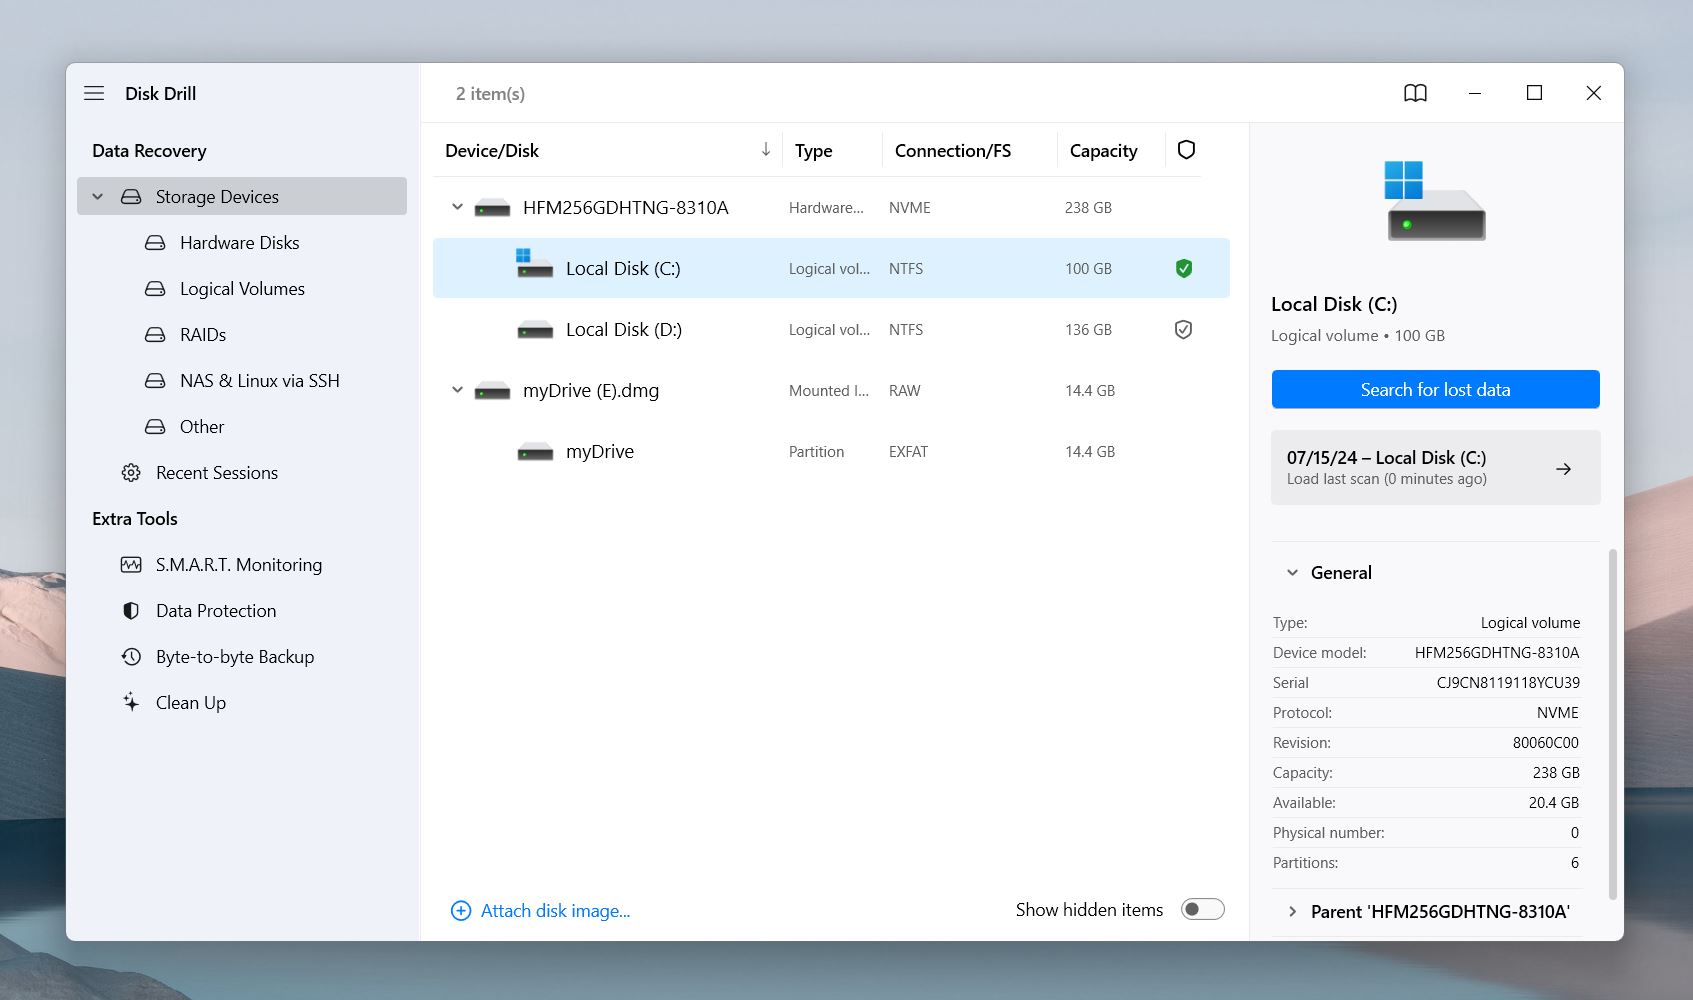
(Alternative) If you suspect that your Seagate Backup Plus is in bad shape—perhaps due to physical issues or severe corruption—there’s another way to handle the recovery. We’ve used Disk Drill’s byte-to-byte backup in these situations to avoid extra strain on the drive. A byte-to-byte backup creates a complete image of the drive that you can scan instead of the Seagate Backup Plus drive itself.
Here’s how to create a byte-to-byte backup in Disk Drill:
- On Disk Drill’s main screen, click the Byte-to-Byte Backup option in the menu bar.
- From the list of connected drives, choose your Seagate Backup Plus.
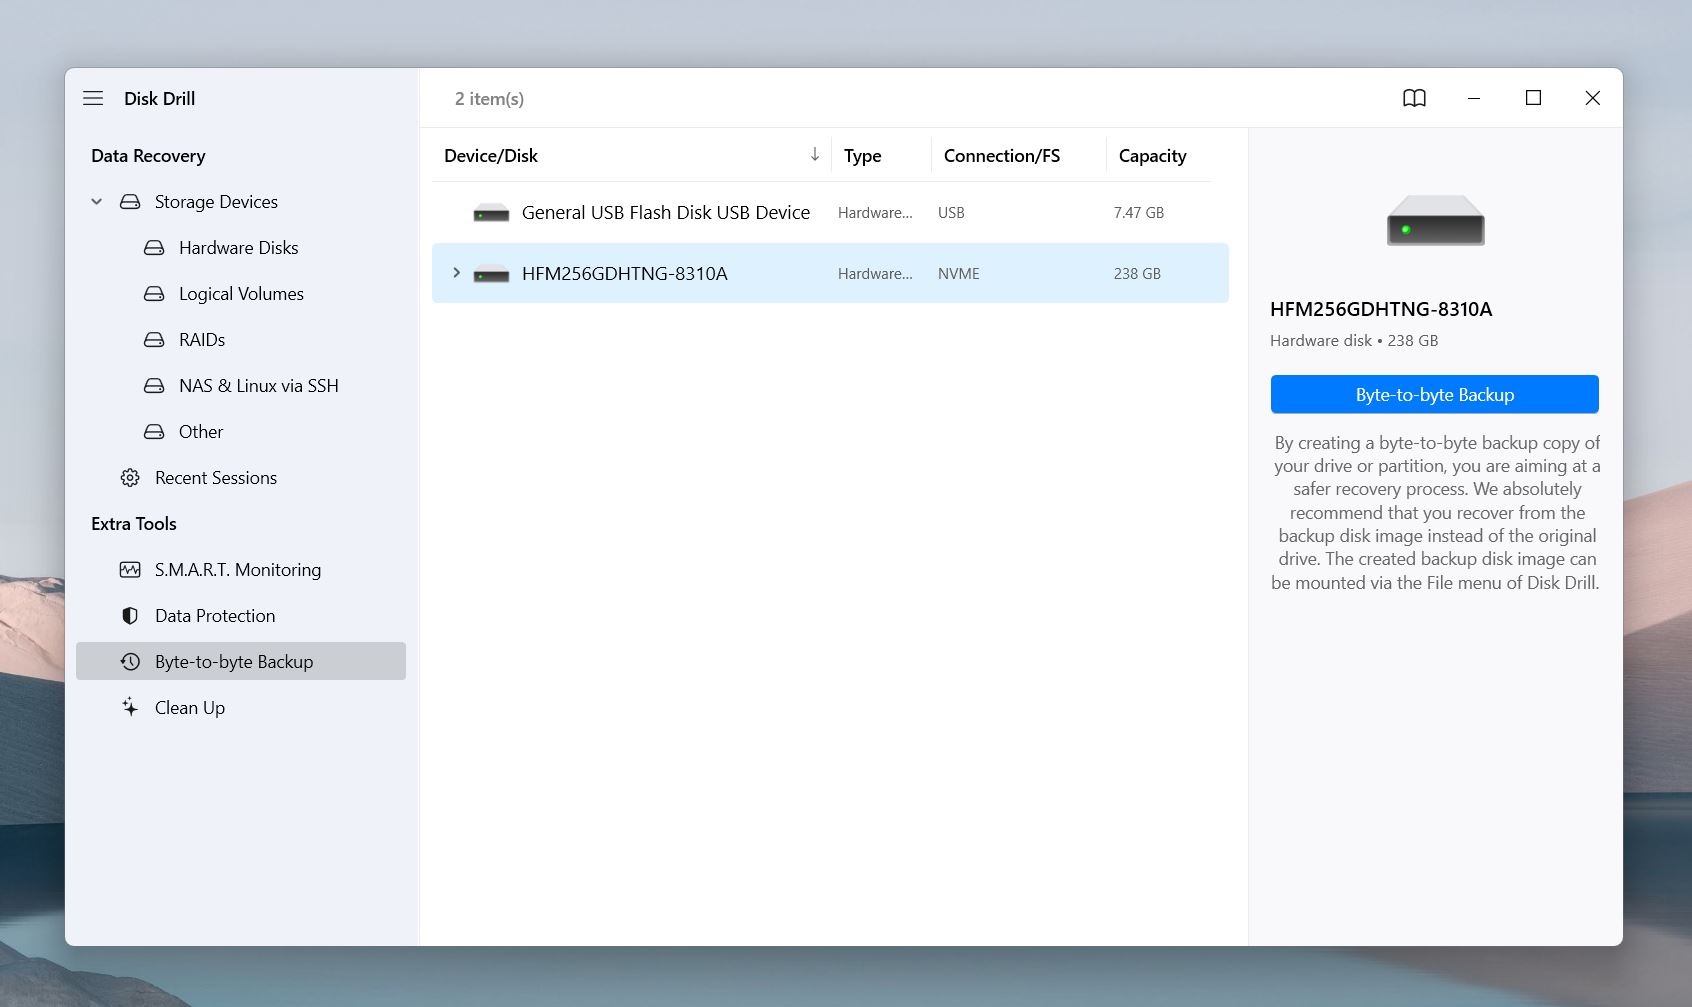
- Disk Drill will prompt you to select a location to save the byte-to-byte backup file. Choose a reliable storage device with enough space to hold the entire drive image. For example, if your Seagate drive is 1TB, the destination must have at least 1TB of free space.
- Once the backup is complete, go to the Data Recovery section, click Attach Disk Image, and select the created image file.
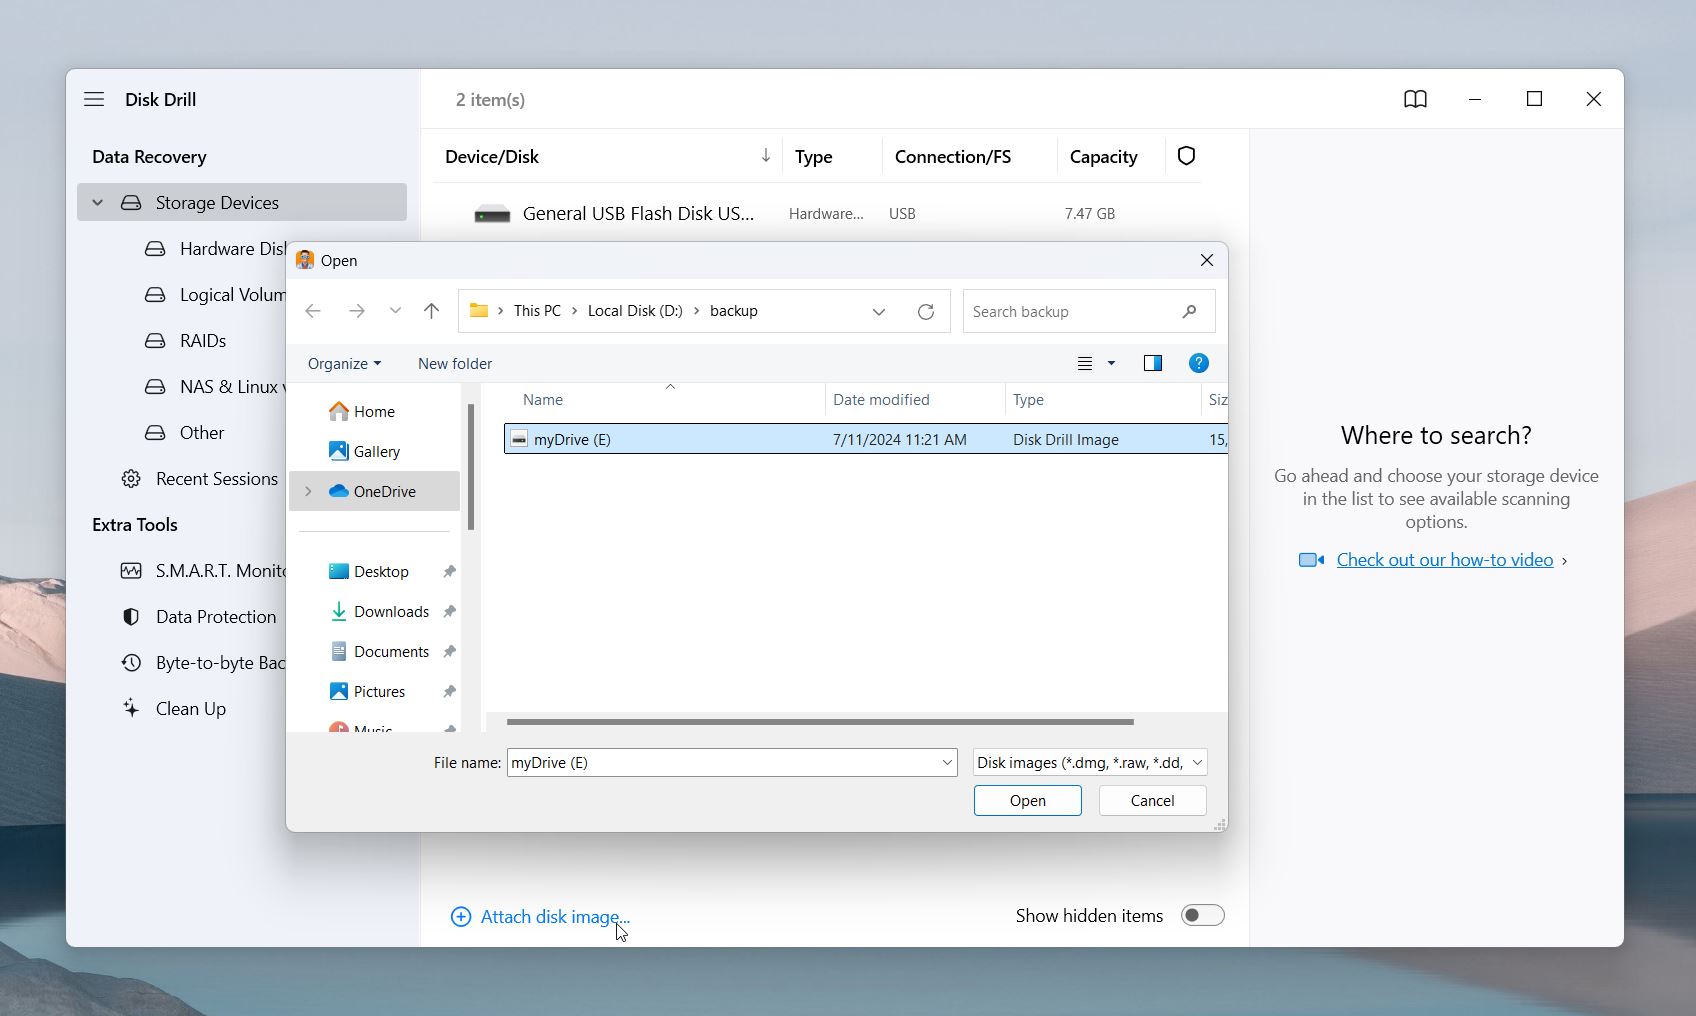
- Once the image is loaded, you can scan it with the Search for Lost Data button, just like you would with a regular drive.
Why use a Byte-to-Byte Backup?
- It reduces strain on a damaged drive.
- It preserves the drive’s current state, even if its condition worsens later.
- It allows multiple recovery attempts without the risk of additional damage to the physical drive.
Step #4: Preview Your Files
As Disk Drill scans your Seagate Backup Plus drive or its backup image, it organizes the files it finds into categories like Pictures, Videos, Audio, Documents, and more.
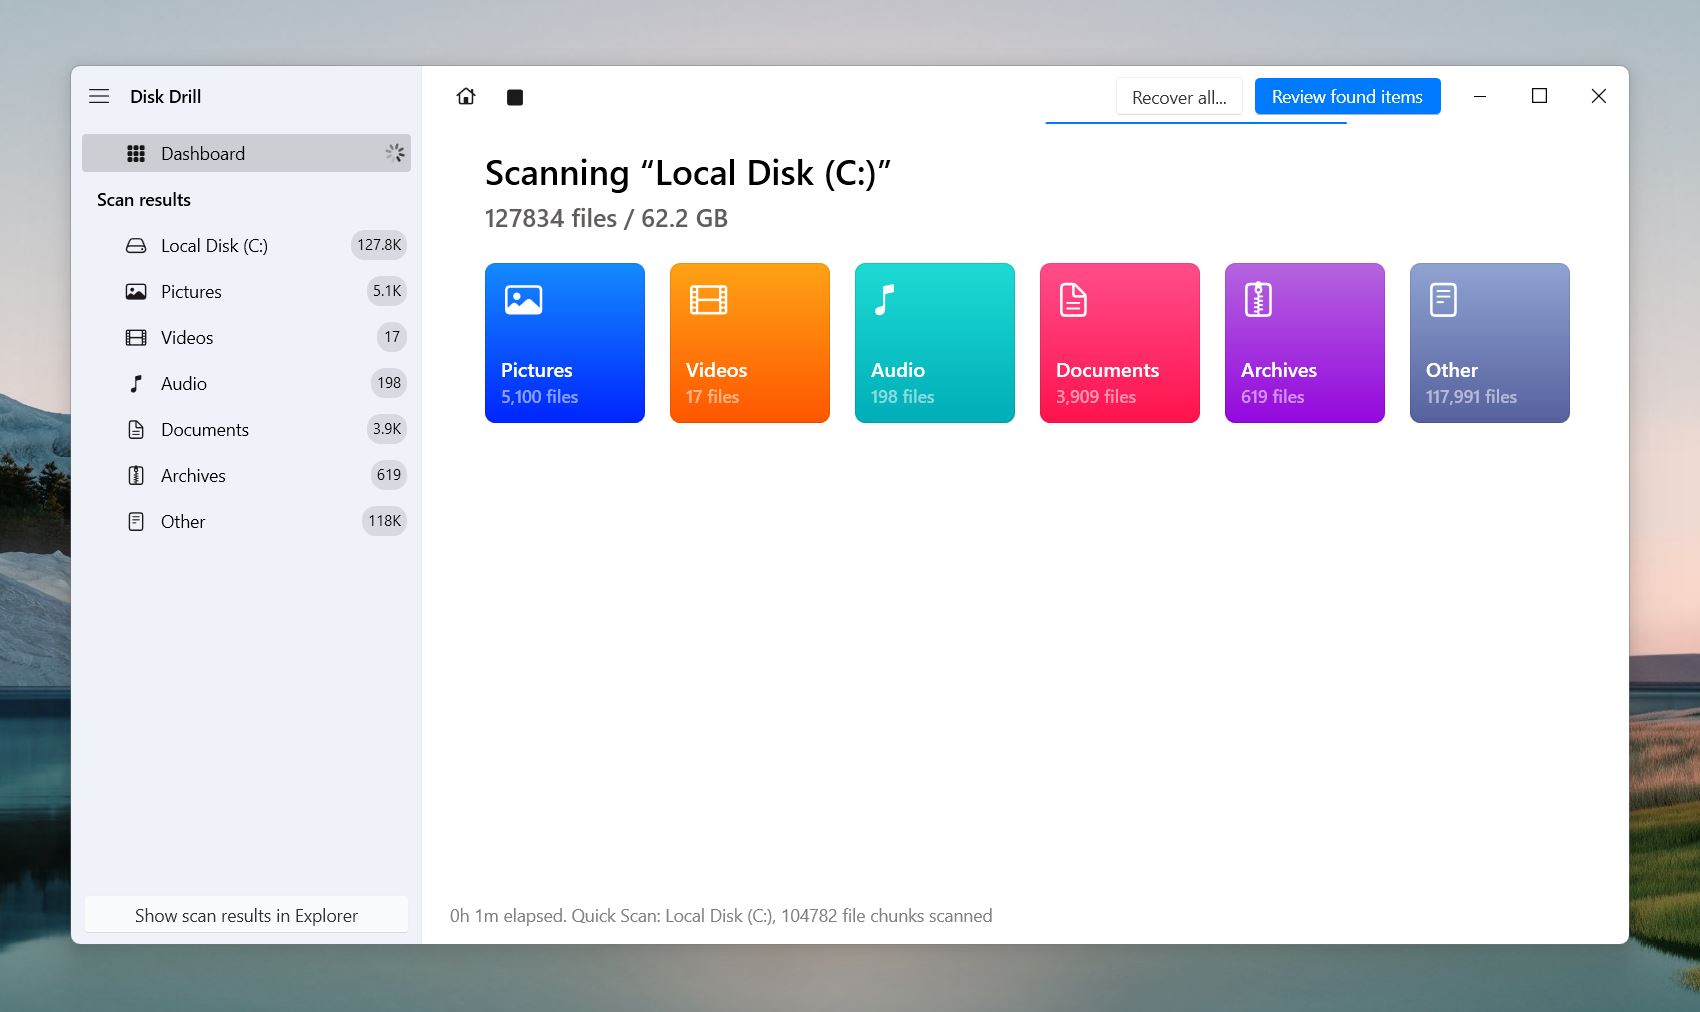
You can preview files as they show up during the scan and even recover them before the scan finishes. If you prefer, you can wait until the scan is complete to see the full list of recoverable files. If you need to pause the scan, just click the Pause button at the top, and you can pick up where you left off when you’re ready.
You can select a specific category, like Pictures or Videos, or click Review Found Items to see all file types at once.
Disk Drill offers several filters to make it easy to find the files you’re looking for. You can filter by file size, date modified, or recovery chances to narrow down your results quickly.
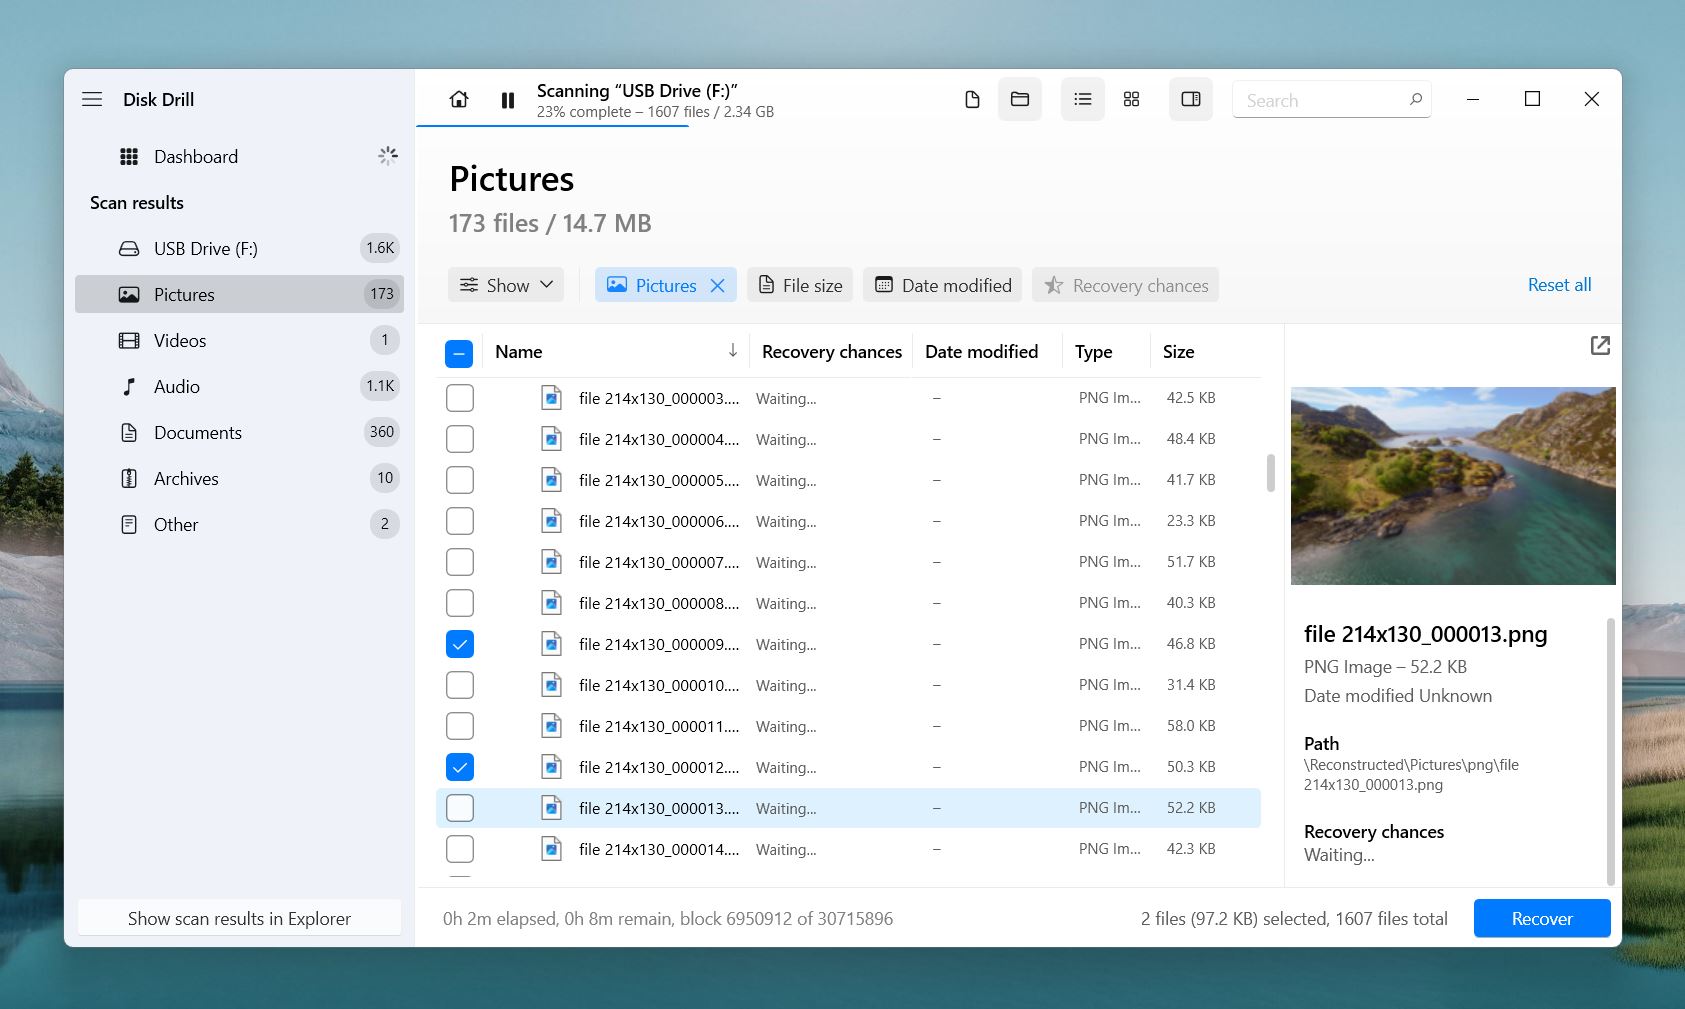
Make sure to check the Recovery Chances column. This shows the likelihood of recovering each file, labeled as High, Average, or Low. Files marked High are more likely to be fully intact, while those labeled Low may be partially overwritten/corrupted.
If you search for a specific file type, like .CDR (CorelDRAW graphics file) or .CPT (Corel Photo-Paint image file), you can use the search bar at the top.
Step #5: Recover Your Data
Once you’ve selected all the files or folders you want to recover, click the Recover button at the bottom of the screen. Disk Drill will ask you to choose a destination folder for the recovered files.
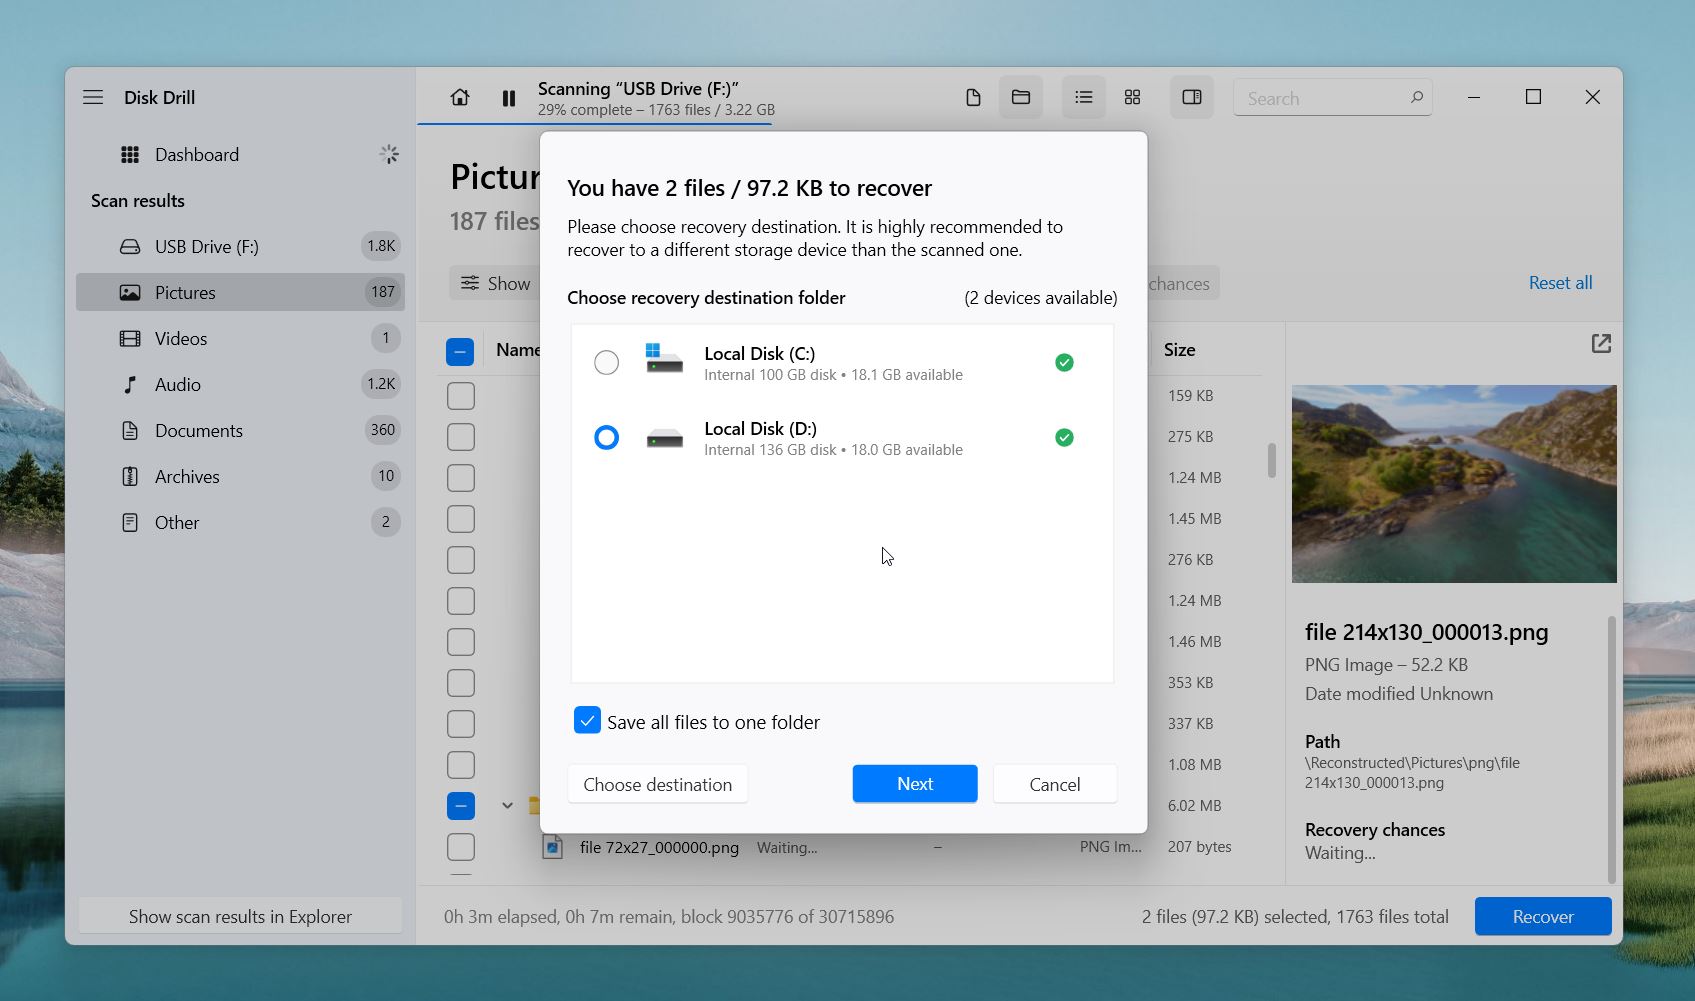
Tip. Always save the recovered files to a different storage device—not your Seagate Backup Plus drive. Writing to the same drive could overwrite other recoverable data.
The recovery process might take some time, but the important thing is that recovery is possible. We’ve recovered plenty of files with this method, but it’s important to set realistic expectations. If you’ve used your Seagate Backup Plus drive after the data loss, some files may be partially or completely overwritten.
No recovery software can guarantee 100% success, and any tool that claims otherwise shouldn’t be trusted. The best tools, like Disk Drill, maximize your chances of recovery, but the results depend on the drive’s condition and how much data has been overwritten. Be ready for the possibility that some files may not be recoverable.
FAQ
How do I access my Seagate Backup Plus files?
To access the files in your Seagate Backup Plus drive, simply connect it to your computer, open the File Explorer, and double-click on the Seagate Backup Plus drive to view its contents. Your backed up files can be found in either the Toolkit folder on your drive or the Seagate Dashboard folder, depending on which software you used to set up the backup.
How much does it cost to recover data from a Seagate hard drive?
Users have two options if they want to recover data from a Seagate hard drive–data recovery software and professional data recovery services. Data recovery software is cheaper and usually costs a maximum of $300 depending on the program and subscription plan you choose. There are numerous free, open-source data recovery programs available as well. Professional data recovery services cost anywhere from $400 to more than $3000 depending on the extent of data loss.
How do I use the Seagate Backup Plus mirror?
To use the Mirror folder feature on your Seagate Backup Plus drive, follow these steps:
- Download and install Seagate Toolkit.
- Open Toolkit and select Mirror Activity in the main menu.
- Click on Mirror Now.
This article was written by Manuviraj Godara, a Staff Writer at Handy Recovery Advisor. It was recently updated by Roman Demian. It was also verified for technical accuracy by Andrey Vasilyev, our editorial advisor.
Curious about our content creation process? Take a look at our Editor Guidelines.
