If you accidentally deleted your music collection from an SD card—or any audio file, really—this text is for you. SD card music recovery often feels tricky, as seen in the many questions flooding forums and online communities. But it doesn’t have to be complicated, we’ll break it down into five simple steps that anyone familiar with Windows can follow to recover deleted music from an SD card with minimal effort.
What SD Card Audio Recovery Tools Are There?
To retrieve deleted music files from a memory card, you’ll need SD card recovery software. These tools scan your SD card for traces of deleted/lost data, even if the files no longer show up on your phone, camera, digital audio recorder, or file manager on your computer. When a file is deleted, the system only marks its space as available for new data but doesn’t erase the content right away. Recovery software finds and restores those files before anything overwrites them.
If you’ve lost music or other files, take the SD card out of your device right away. Don’t record, save, or transfer anything to it. Don’t touch it until you’re ready to start the recovery process. If you keep using it you risk overwriting the deleted audio files, and once that happens, no recovery software—no matter how good it is—can bring them back.
Let’s look at some popular SD recovery options that can retrieve deleted music files from your SD card. Not all recovery tools are built the same, and their ability to retrieve files often depends on the methods they use and the audio formats they support. Here’s a breakdown
- Windows File Recovery is a free tool from Microsoft that supports basic audio formats like MP3, WAV, and WMA. While it’s suitable for simple recovery tasks, its command-line interface is a no-go for many people. Tests show that the software works best with deleted files from NTFS drives, which aren’t commonly used with memory cards—they usually use FAT32 or exFAT. The results, also, suggest it struggles with signature-based recovery.
- Disk Drill is a versatile and user-friendly tool that supports a wide range of audio formats, including MP3, WAV, FLAC, AAC, AIFF, and M4A. It uses both signature-based and file-system recovery methods, which often allows it to recover files with names and folder structures intact. It shows excellent results with FAT32/exFAT file systems (and all other file systems used by memory cards), both with deleted file recovery and data recovery from reformatted SD cards.
- PhotoRec is a powerful open-source tool with extensive format support, including MP3, WAV, FLAC, AAC, and OGG. However, it uses only the signature-based scan method, which has its limitations. This method looks for file headers and footers to identify recoverable files. While effective for basic recovery, it cannot reconstruct file directory structures or recover file names. This can leave you with a long list of generic files that require manual sorting, especially if the SD card had many different file types.
- R-Studio is designed for professionals, it supports various audio formats, including MP3, WAV, FLAC, AAC, and WMA. This tool also shows great results, similar to Disk Drill, but its performance with FAT32 and exFAT is not as strong. While it excels with severely damaged or inaccessible SD cards, it requires some level of technical expertise due to its complex interface.
Supported audio formats comparison:
Tool Name |
Star Rating |
Supported Audio Formats |
Disk Drill |
★★★★★ |
AA, AAC, AIF, AIFC, AIFF, ALP, AMR, ASF, AU, AWB, CAF, CDA, CPR, DS2, ENS, FLAC, FLP, IDF, M4A, MID, MP3, MP2 (recovered as MPA), MPA, MPC, MUS, NGRR, OGA (recovered as OGG), OGG, PTF, RA, RFL, RNS, RPP, RX2, SIB, VOC, WAV, WMA, ZRV, SESX |
PhotoRec |
★★★★☆ |
AIF, AU, CAF, CDA, DS2, DSS, FLAC, IDF, MP3, MPA, MUS, OGG, RA, RX2, SIB, WAV, WMA |
R-Studio |
★★★★★ |
AIFF, AVR, AY, ASF, Audacity audio, AudioCD, Battery 3 sample, CMF, Creative voice, Digital Speech, EA ASF/MUS, FLAC, KaraBox, MIDI (Instrument definition, music, stream), MP1, MP2, MP3, MUS, Monkey’s audio, Musepack, Ogg Vorbis, OptimFROG, RIFF MIDI, WavPack, TTA, WMA, WAV, X-MIDI, VQF, aPac |
Windows File Recovery |
★★★☆☆ |
MP3, WAV, WMA, ASF, and M4A |
For a balance of ease of use and strong performance, Disk Drill is an excellent choice. It supports a wide range of audio formats and provides great recovery results in all scenarios. Next, we’ll explain how to use it in five simple steps to recover deleted music files from your SD card.
How to Recover Deleted Audio Files From SD Card in 5 Steps
Here are the 5 steps we promised. All you need is your SD card, a way to connect it to your PC, a keyboard, a mouse, and a few minutes of your time. Let’s get started.
Step #1: Connect Your SD Card to a Computer
To start, insert your SD card into a card reader or your computer’s SD card slot, if it has one. Open File Explorer and check if the card shows up with a drive letter, like D:\ or E:. If it does, you’re good to go.
If it doesn’t show up in File Explorer, don’t panic. Right-click the Start button, select Disk Management, and look for your SD card in the list of drives. Even if it doesn’t have a drive letter, as long as it’s listed with the correct size, recovery software can still access it and scan for deleted files.
Once you confirm the SD card is visible in Disk Management, you’re ready for the next step.
Step #2: Install Data Recovery Software
Once your SD card is connected, download Disk Drill from its official website to get a secure and up-to-date version. Disk Drill comes in three versions:
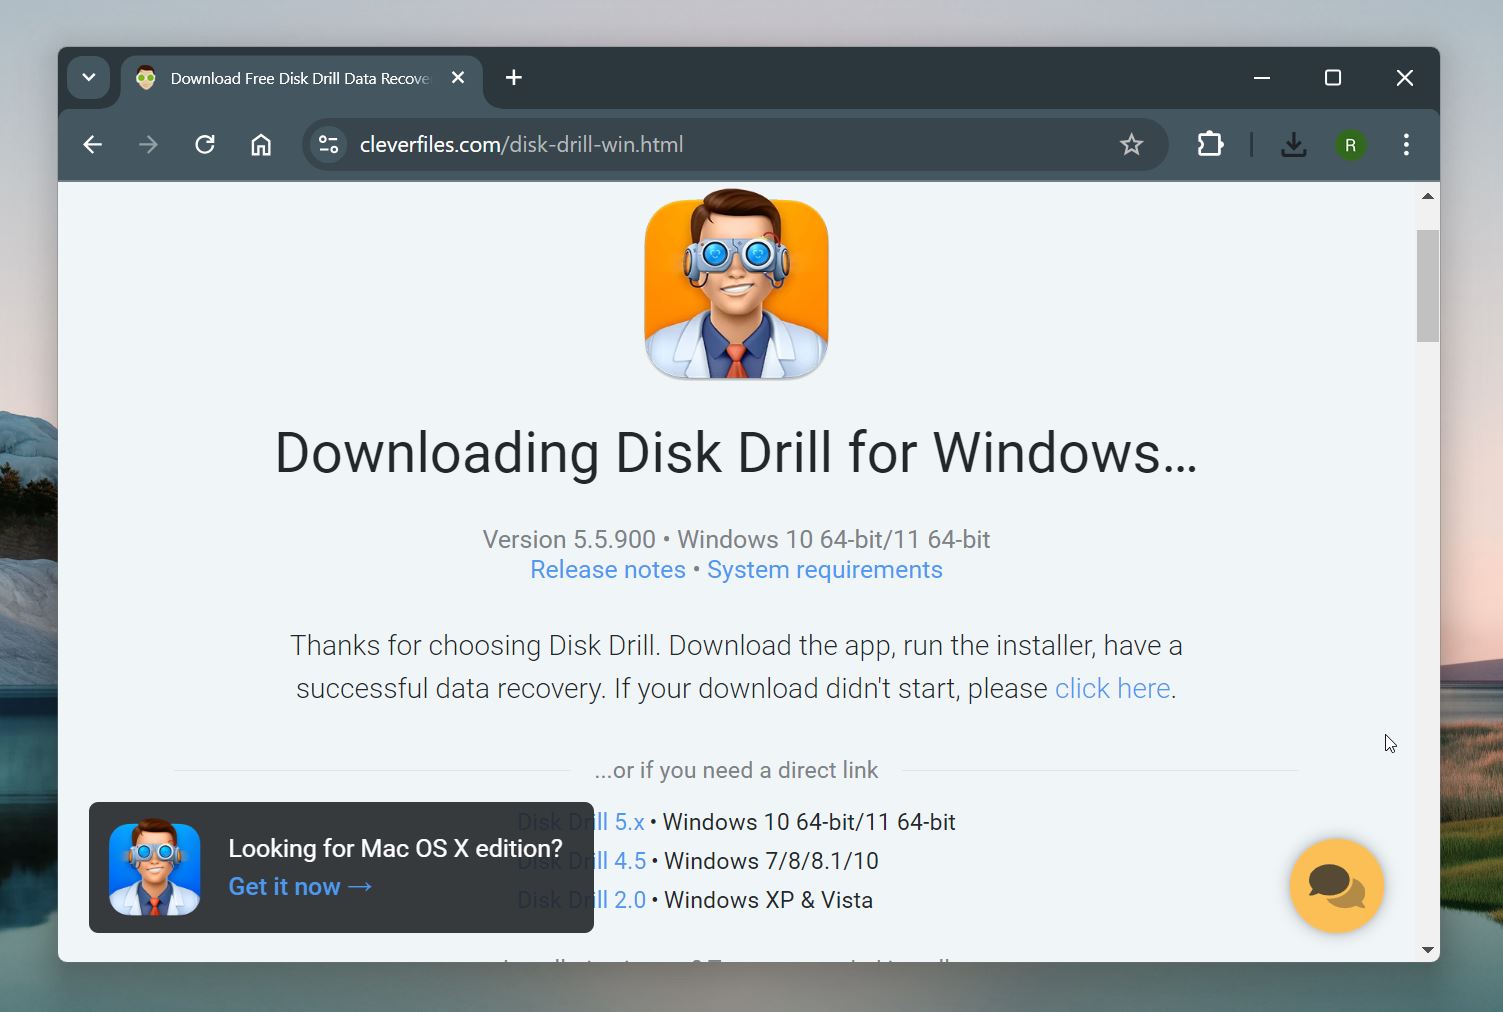
- Basic (Free) version. Recovers up to 500 MB of data and includes some extra data protection tools.
- PRO version. Offers unlimited data recovery and advanced features, perfect for personal use.
- Enterprise version. Built for businesses, with enhanced recovery capabilities and multi-user support.
Pick the version that fits your needs. Your computer might ask you to confirm the process—go ahead and do it. Disk Drill is safe, and we’ve tested it ourselves to make sure of it.
Install Disk Drill on your computer’s main drive or another external drive. Once the installation is complete, you’re ready to start scanning your SD card for deleted audio files.
Step #3: Scan the SD Card for Deleted Audio Files
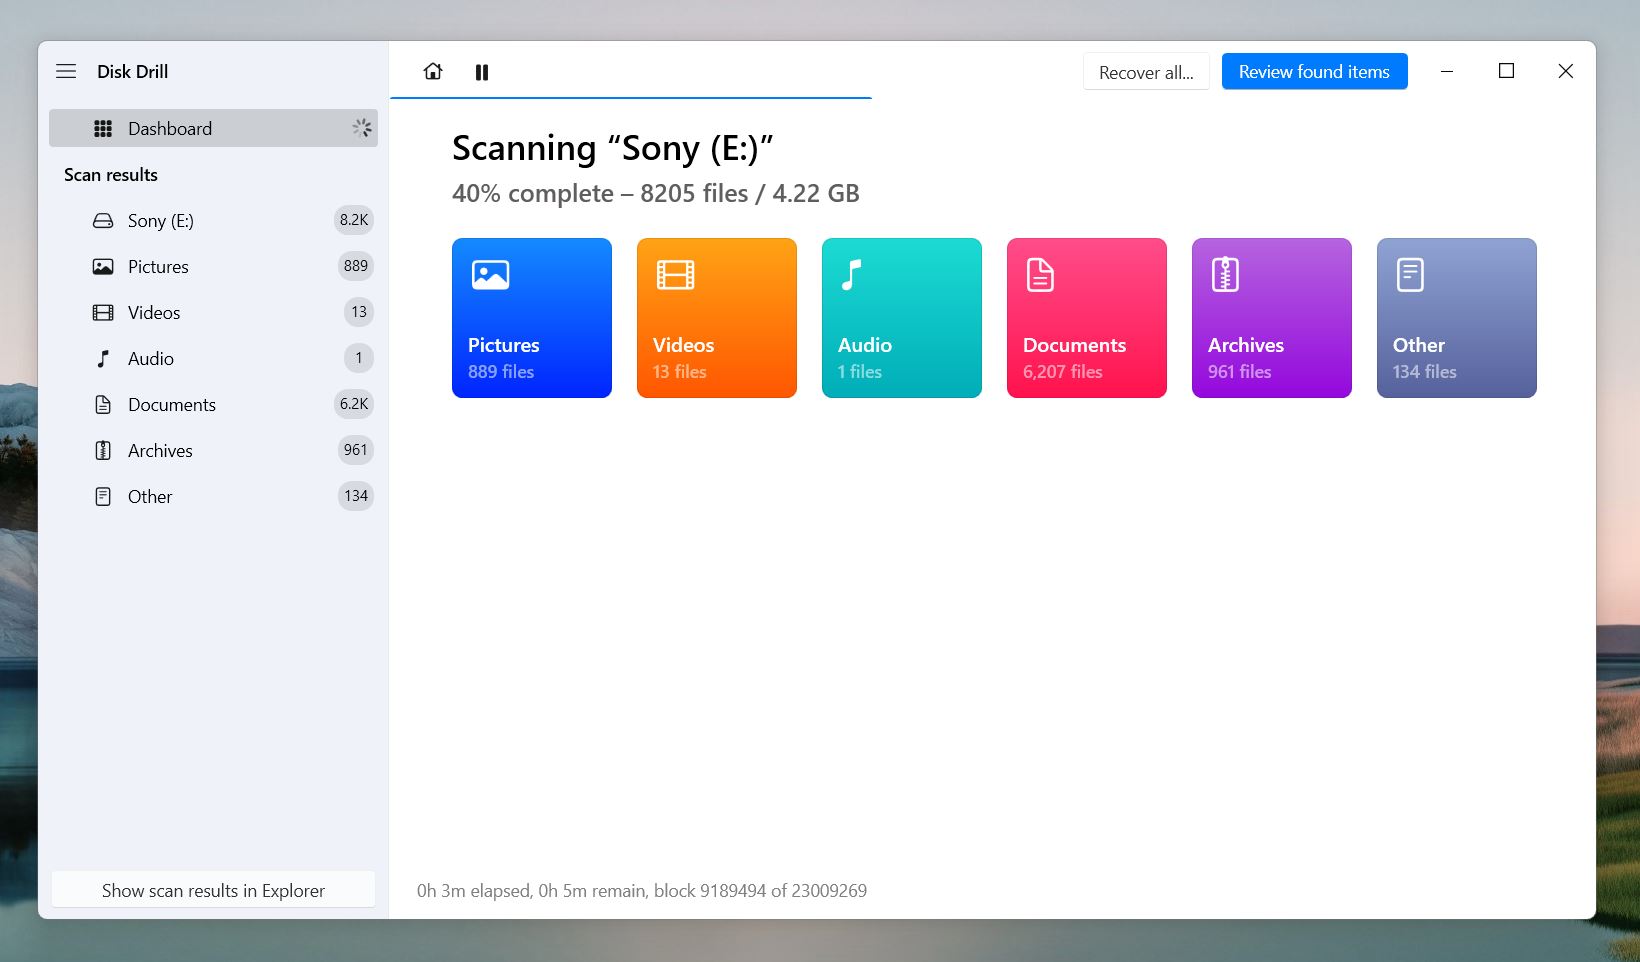
With Disk Drill installed, it’s time to scan your SD card for the files you want to recover. Open the app, and you’ll see a list of all recognized devices. Select your SD card and click the Search for Lost Data button. Once you do, Disk Drill will start scanning immediately. You’ll see real-time updates, the progress percentage, and categories of files it finds as it works.
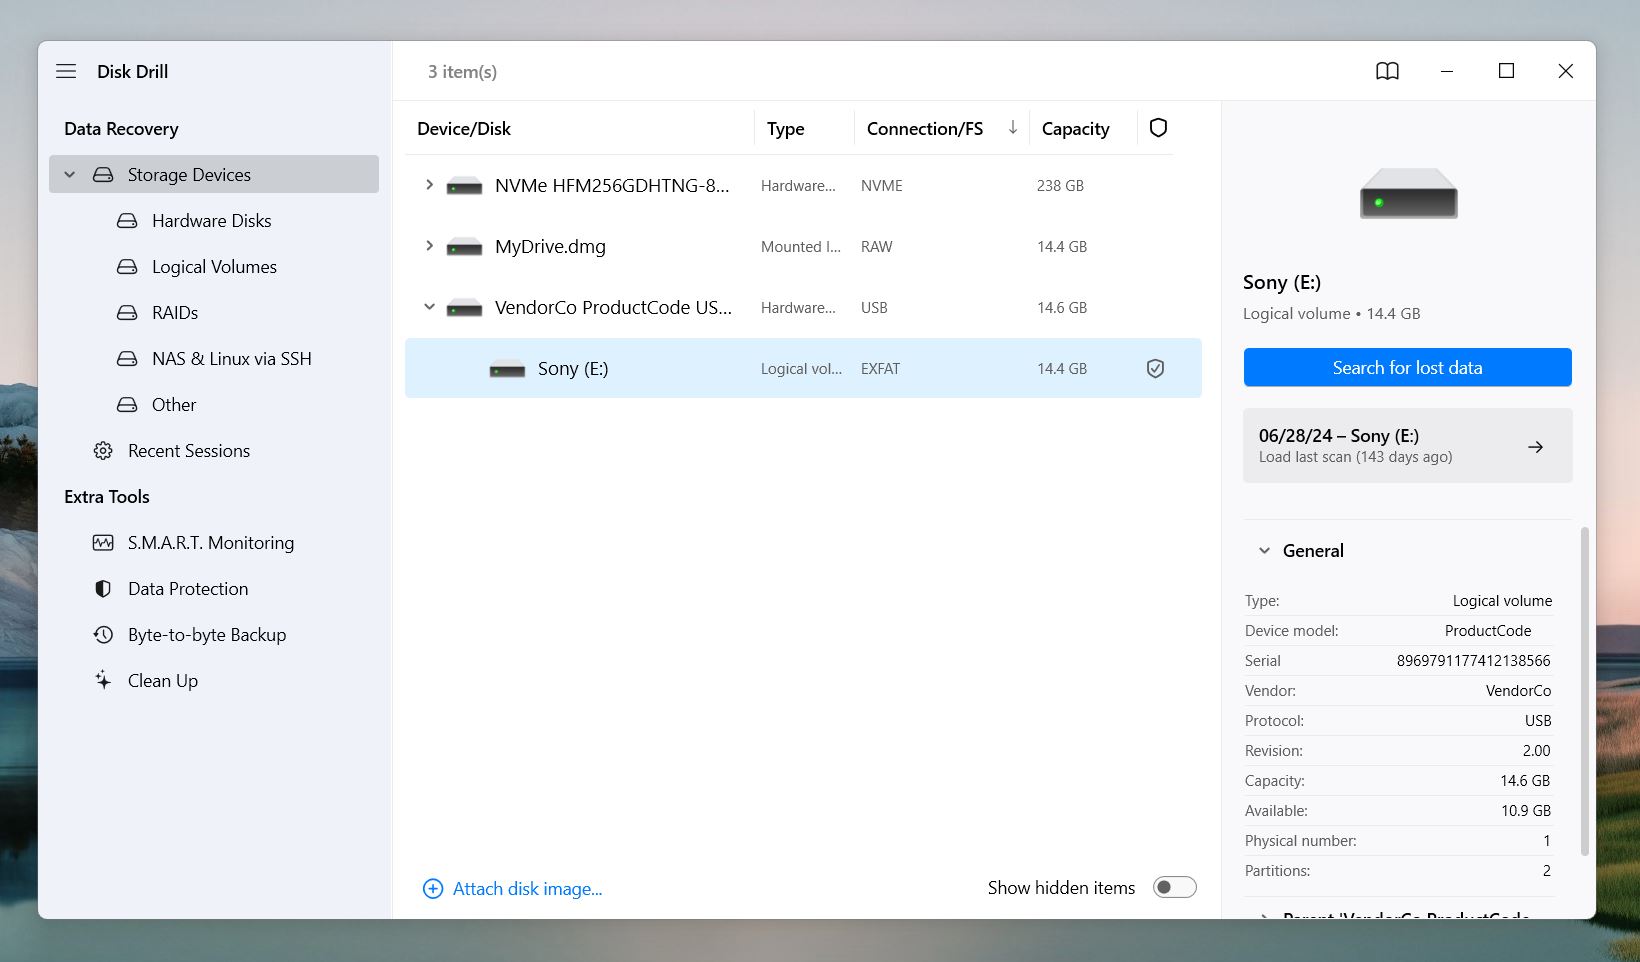
Disk Drill runs through several scan modes automatically:
- First, Quick scan. This mode searches for recently deleted files. It’s fast and works best for data lost due to accidental deletion without major changes to the SD card.
- Then, the Deep scan goes deeper into the card’s file system. It’s ideal for formatted SD cards, damaged file systems, or more complex data loss situations.
- And, as we mentioned before, it can also use Signature scan to identify files based on their unique data signatures. It can recover files even when the file system is missing entirely.
As the scan continues, Disk Drill will organize the found files into categories like Audio, Videos, and Documents. You can wait for the scan to finish for a complete list, or you can click on the Audio category while the scan is running to see all the audio files it has already found.
Step #4: Preview and Select Recoverable Files
Now you’ll see a list of audio files, organized into categories like Deleted or lost, Existing, and Reconstructed:
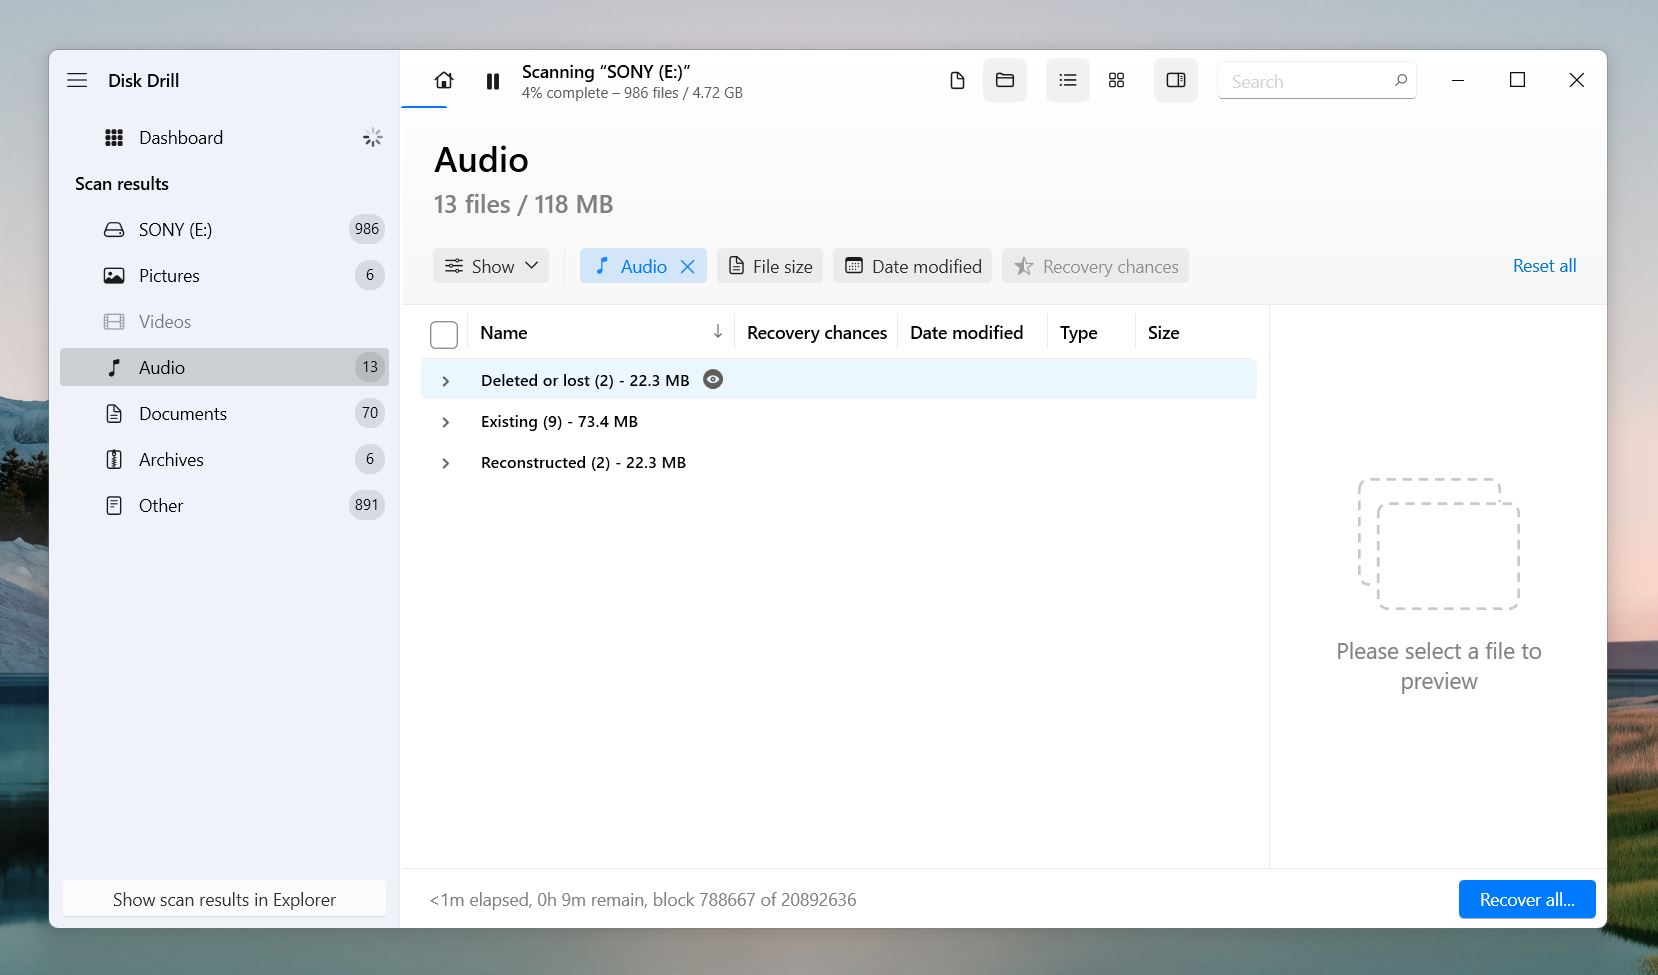
- Deleted or Lost: These are files that were deleted or became inaccessible but can still be recovered.
- Existing: Files that are still on the SD card and haven’t been deleted but showed up during the scan.
- Reconstructed: Files pieced together from raw data when the file system is damaged or missing.
If you’re not sure which files to recover, hover over any file to see an eye icon. Click it to preview the file and listen to the audio. This can help you figure out if it’s the file you’re looking for.
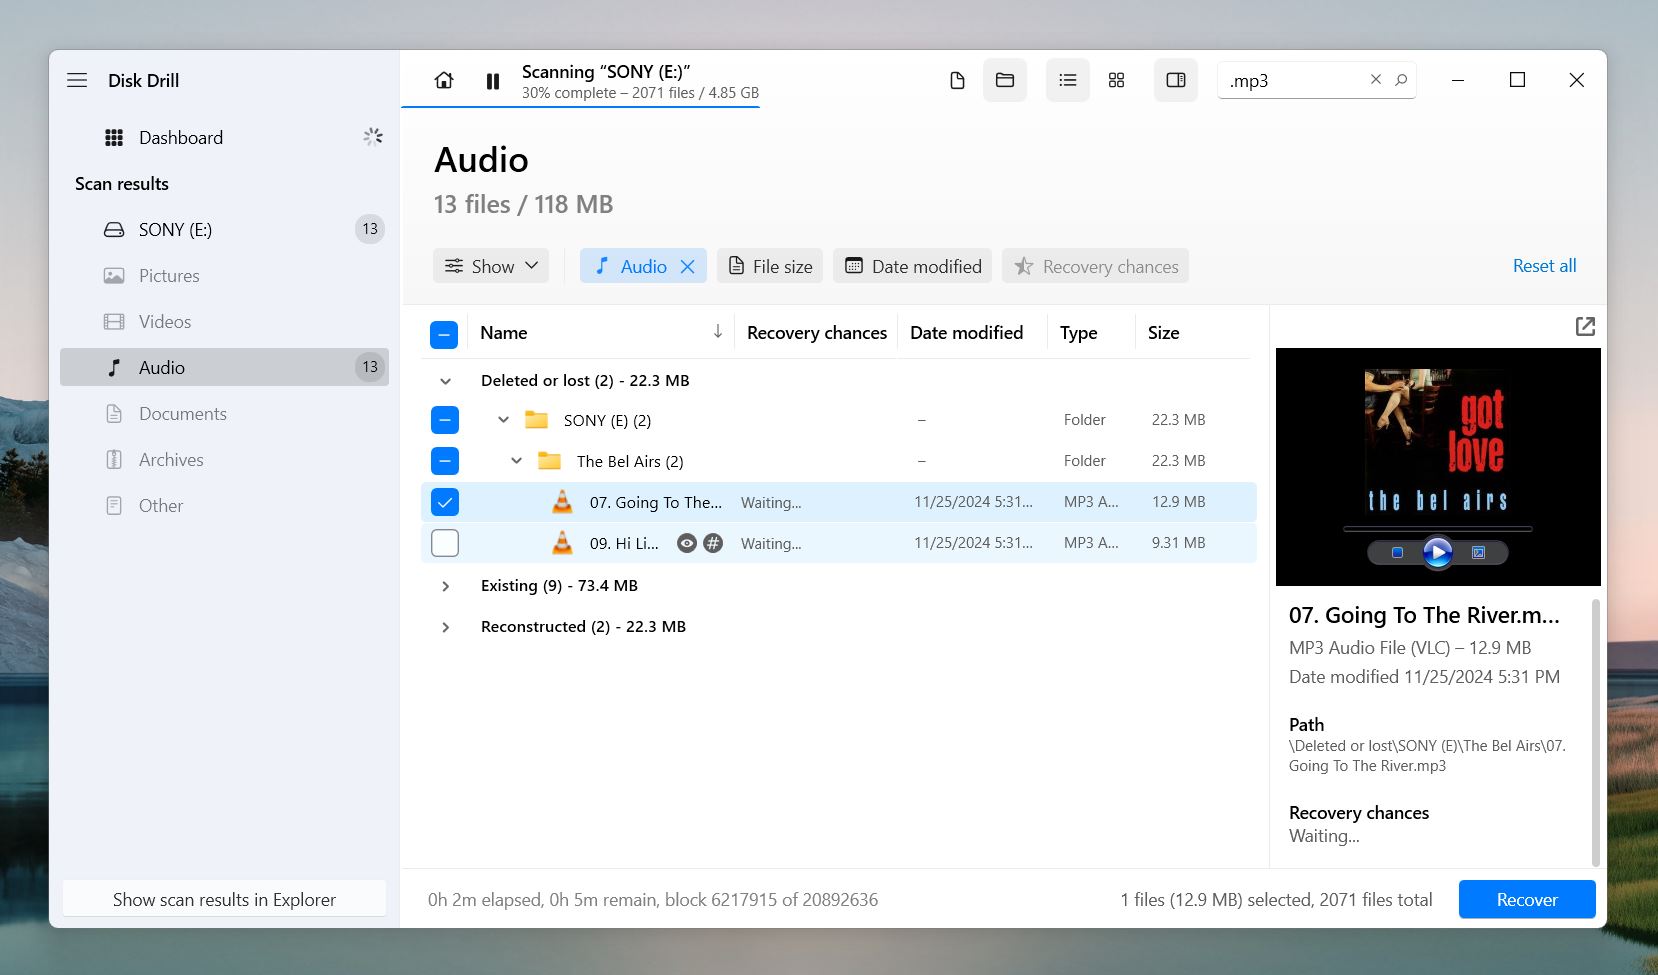
If you remember the file name or extension (e.g. mp3, flac), use the search bar at the top right to find it quickly. Once you’ve identified the files you want, check the boxes next to them.
Step #5: Recover and Save the Audio Files
Once you’ve selected your files, click the Recover button. You’ll find it at the bottom of the screen. Pick a folder on your computer to save the recovered files.
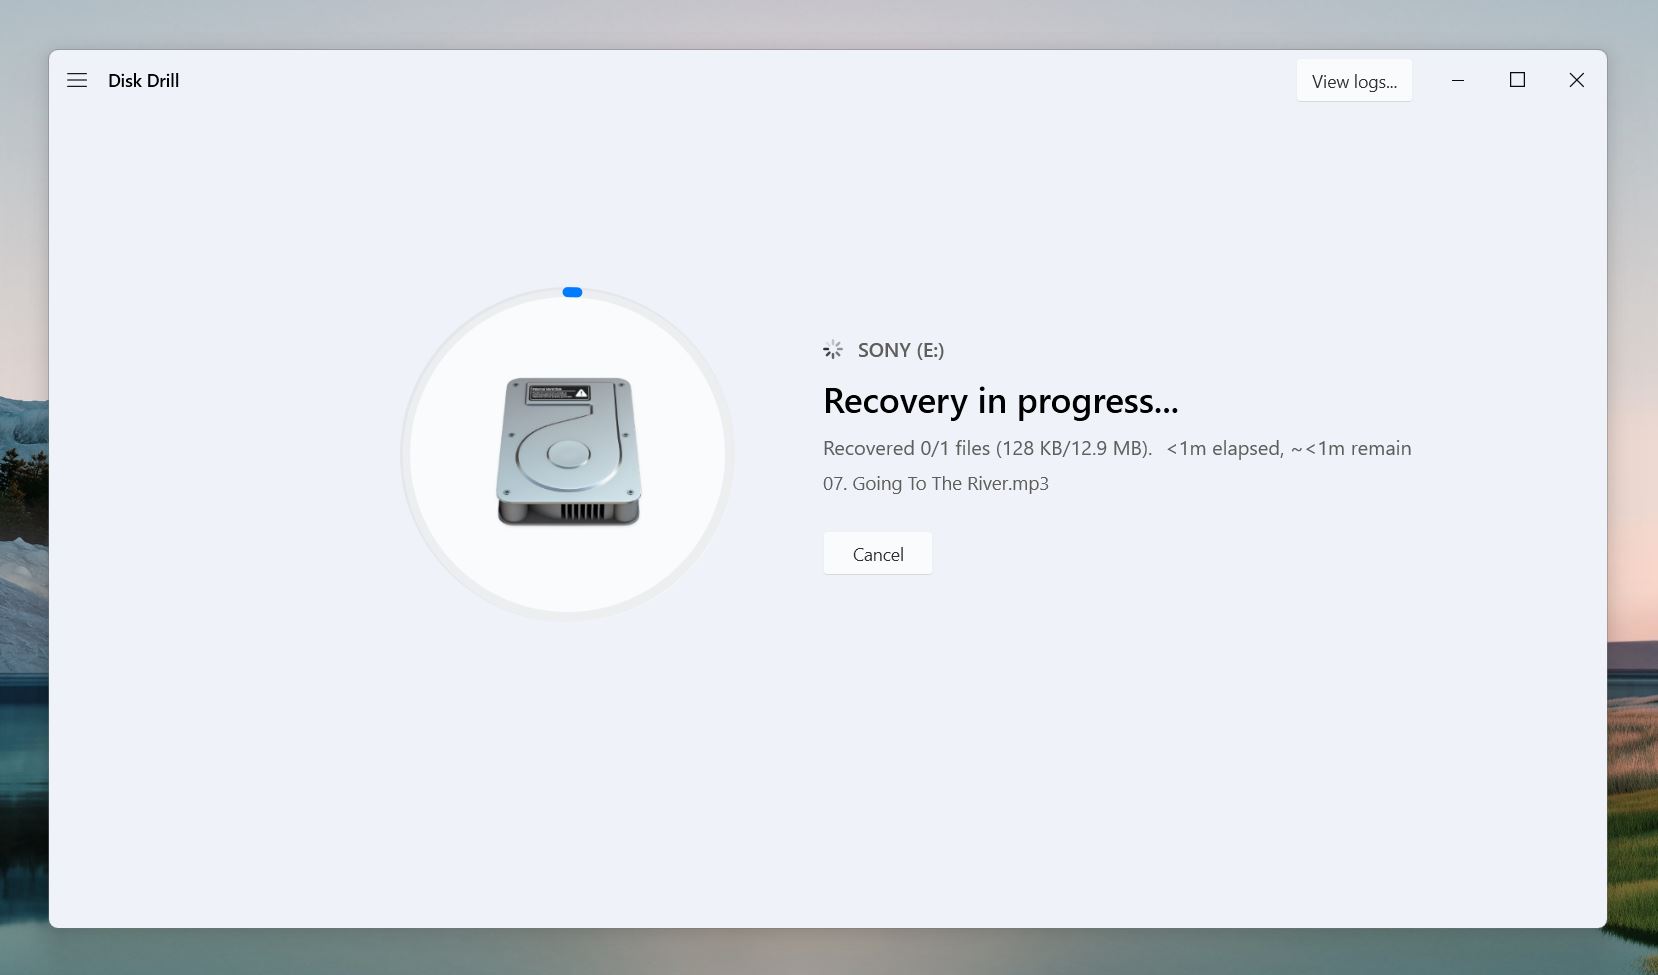
Don’t save the files back to the SD card. This could overwrite other recoverable files and make them unrecoverable.
Go to the folder where you saved the files and make sure they’re there. Play the audio files to confirm they work properly.
That’s it! Your audio files should now be fully recovered and ready to use.
The recovery process is pretty similar across most tools, so if Disk Drill isn’t your style, there are more alternatives to consider. In fact, there are many more options than the ones we’ve covered earlier in the article.
How to Recover Permanently Deleted Audio Files From SD Card on Android
Many Android devices have an SD card slot (for microSD cards) that can be used to expand the total storage capacity.
To recover deleted music from an SD card that was used inside an Android device, you can either remove the card from the device and use data recovery software on your computer, or you can use a deleted music recovery app for Android.
Option A: Scan the SD Card on a Computer
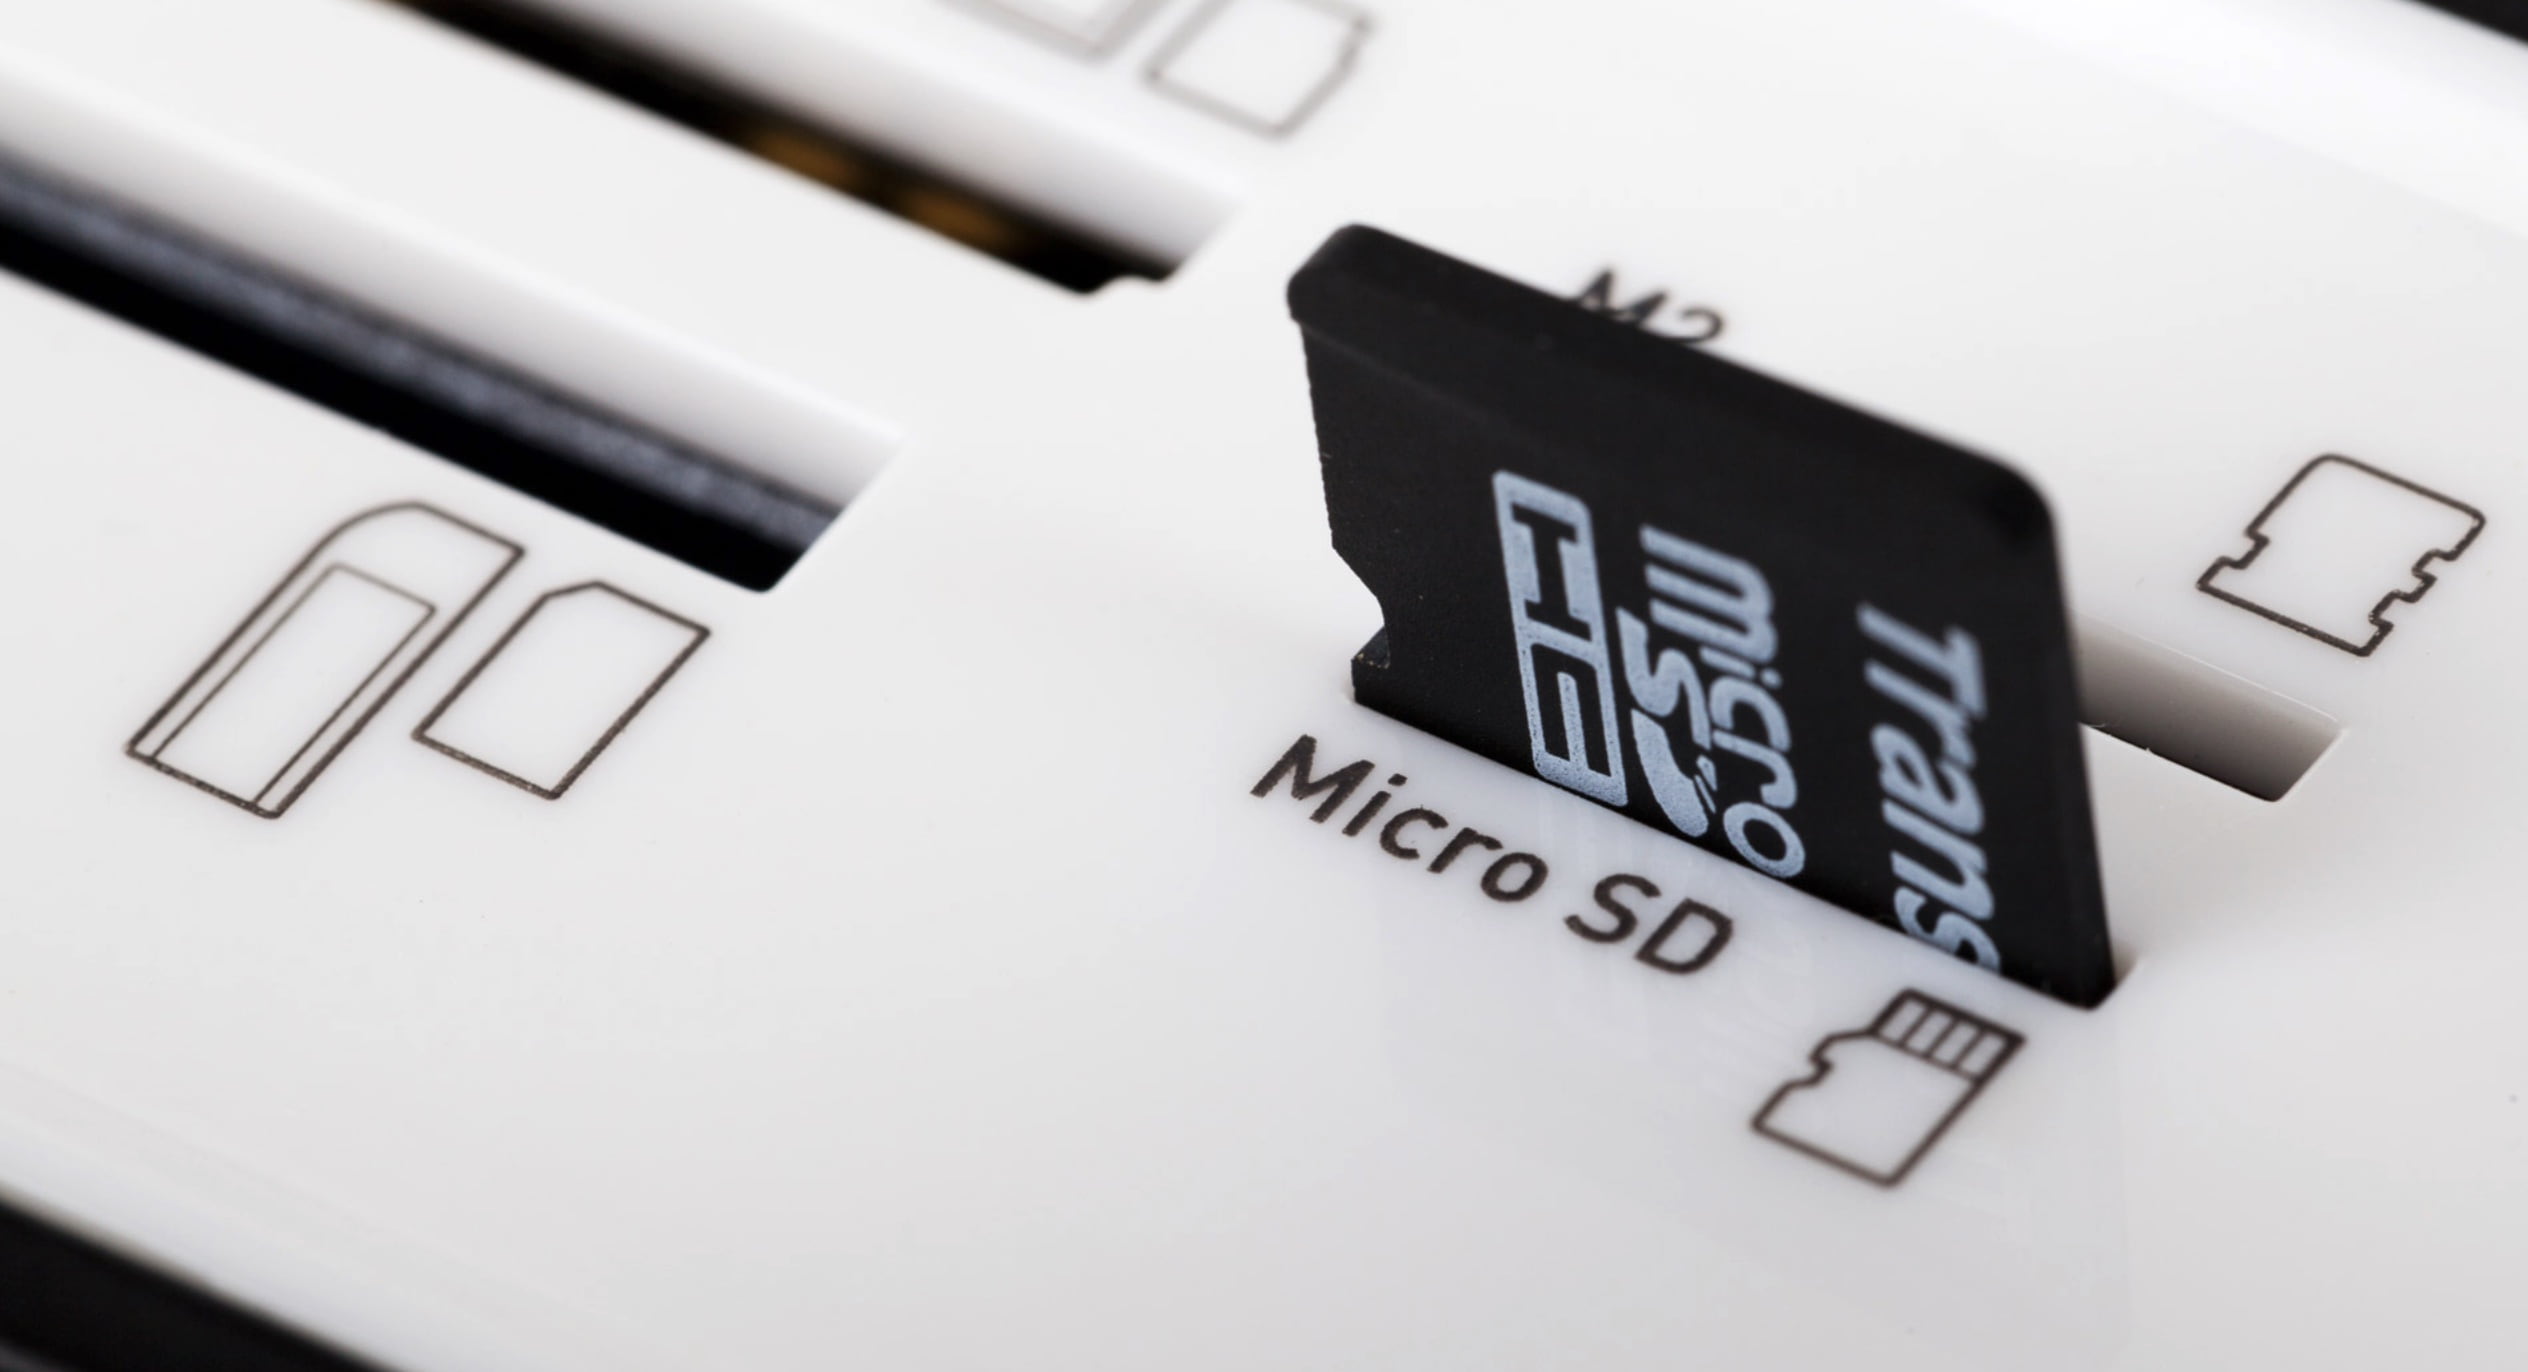
Do you have a PC? If so, then we recommend you remove the SD card from your Android device, connect it to the computer, and follow the steps provided in the previous recovery section of this article to recover permanently deleted audio files from it using Disk Drill.
Option B: Use SD Recovery App for Android
The Android OS gives the users of rooted devices low-level access to the file system, which makes it possible to use the SD card recovery apps for Android to restore missing audio files.
Recovery of audio files is only possible on a rooted device. Without root access, the recovery apps will only be able to perform a basic scan for photos and media files.
If you plan to root your device, take the SD card out before you begin and keep it disconnected until you’re ready to start the recovery process. Only reconnect it when it’s time to scan. This simple step helps protect your data from being overwritten.
If your SD card functions as part of your phone’s system memory (adoptable storage) and the phone is not rooted, recovery is not possible. Rooting the phone with the SD card inside will overwrite data and make recovery impossible. Removing and reconnecting the SD card will also fail because system encryption ties the card to the phone. Without root access before the data loss, recovery from an SD card used as system memory cannot happen.
If your device is already rooted, you can use apps from the Google Play Store. Based on our experience, DiskDigger Pro can reliably undelete music files in most popular audio file formats, and the app is straightforward to use.
Here’s how to use DiskDigger:
- Download DiskDigger Pro from the Google Play Store.
- Launch the app.
- Scan your SD card.
- Select the audio files you want to recover.
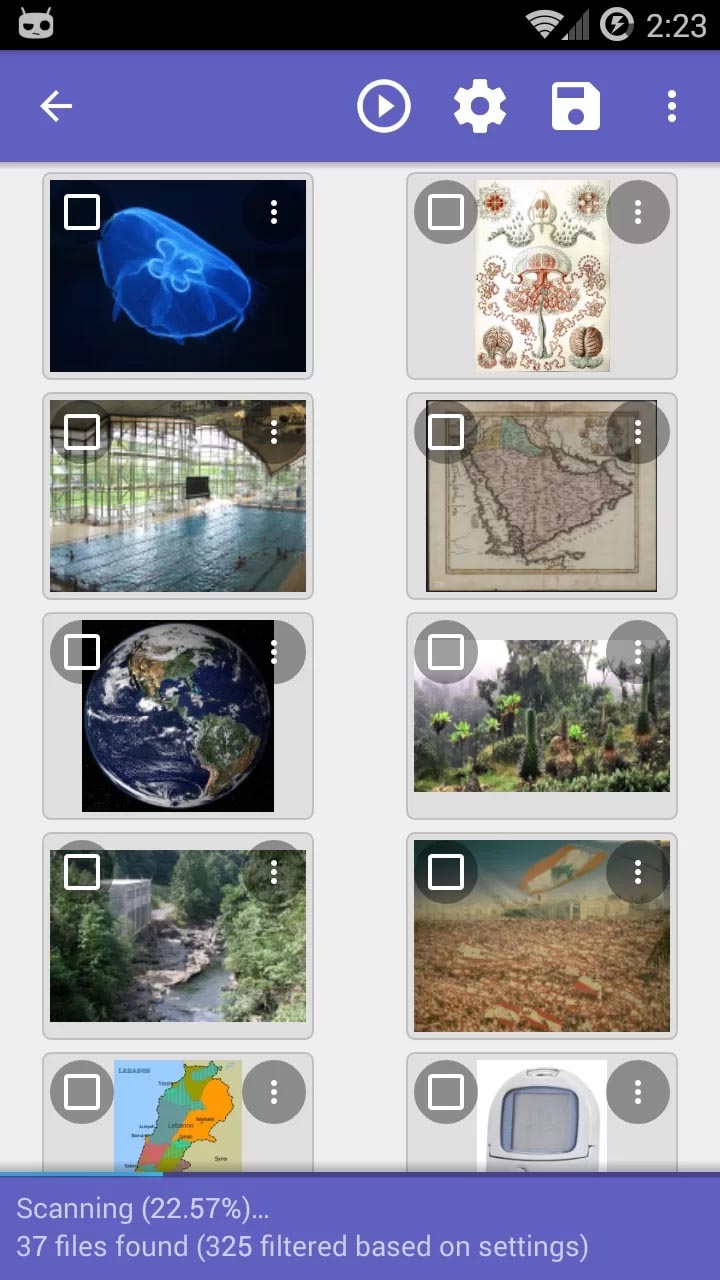
- Restore them to your device’s internal memory.
By the way, DiskDigger has a PC version too, and we’ve reviewed it. If you need a recovery tool that works on both Android and PC, it’s a solid option to consider.
Common Problems You Might Encounter With SD Card Music Recovery
Over the years, we’ve come across all kinds of challenges during SD card music recovery and helped many people solve them. To make things easier for you, we’ve compiled a list of common problems and included suggestions on what you can do to fix them.
Problem 1: My SD Card Isn’t Recognized by My Computer
Your computer doesn’t detect the SD card in File Explorer, so you can’t access it.
What you can do:
- Try a different SD card reader or USB port. Sometimes the issue is with the hardware, not the card.
- Right-click the Start button and select Disk Management. If your SD card is listed there but doesn’t have a drive letter, right-click it and assign a letter.
- Insert the SD card into another computer or device to see if it’s detected.
- If the SD card appears in Disk Management but not in File Explorer, recovery tools like Disk Drill can still scan it for lost files.
If your SD card is not detected in Disk Management no matter what you do, it may be in too bad of a condition for DIY recovery. In this case, it’s best to seek professional SD card recovery services.
Problem 2: I Can’t Find the Audio File I’m Looking For
The scan finishes, but the file you’re trying to recover doesn’t show up in the results.
What you can do:
- Make sure you’ve filtered the results correctly to include audio file types like MP3, WAV, or FLAC.
- Some tools work better than others depending on the type of corruption or data loss. If one tool doesn’t work, try another.
- If you’ve written new data to the card after losing the file, it may be overwritten and unrecoverable.
Problem 3: I Recovered My Audio Files, but They Won’t Play
The recovered files appear on your computer, but they won’t play in any media player.
What you can do:
- Use a player like VLC, which supports a wide range of audio formats.
- If the file is corrupted, it may be incomplete. You can try to run it through an audio repair tool such as: 4DDiG Audio Repair or Audacity.
- Run the recovery process again, this time using a more thorough scan method.
- Use an audio converter (VLC can do it as well) to change the file to a playable format like MP3 or WAV.
Problem 4: The Recovered Files Have Generic Names
The recovered files are named randomly (e.g., File0001.mp3), which makes it hard to figure out what’s what.
What you can do:
- Use the preview feature in your recovery tool to identify files and rename them manually after recovery.
- Organize the files by type or size to narrow down the list.
- Use better software. Some tools, like Disk Drill, can recover files with their original names and folder structures when possible.
Problem 5: My Recovery Tool Crashes During the Scan
The recovery software keeps freezing, stopping the scan, or your PC itself becomes unresponsive.
What you can do:
- Close other programs to make sure your computer has enough memory and CPU power for the recovery tool.
- A heavily corrupted or physically damaged SD card can cause software to fail. If nothing works, you may need professional recovery services.
- If your PC freezes, it’s possible the SD card is too corrupted to scan directly. In this case, use Disk Drill to create a byte-for-byte backup of the SD card. This backup acts as an image of your card, which allows you to scan the copy instead of the fragile SD card. This method is highly recommended for damaged or unstable SD cards.
Here’s how to make a byte-for-byte backup and scan it:
- In Disk Drill’s left panel, choose Byte-to-Byte Backup.
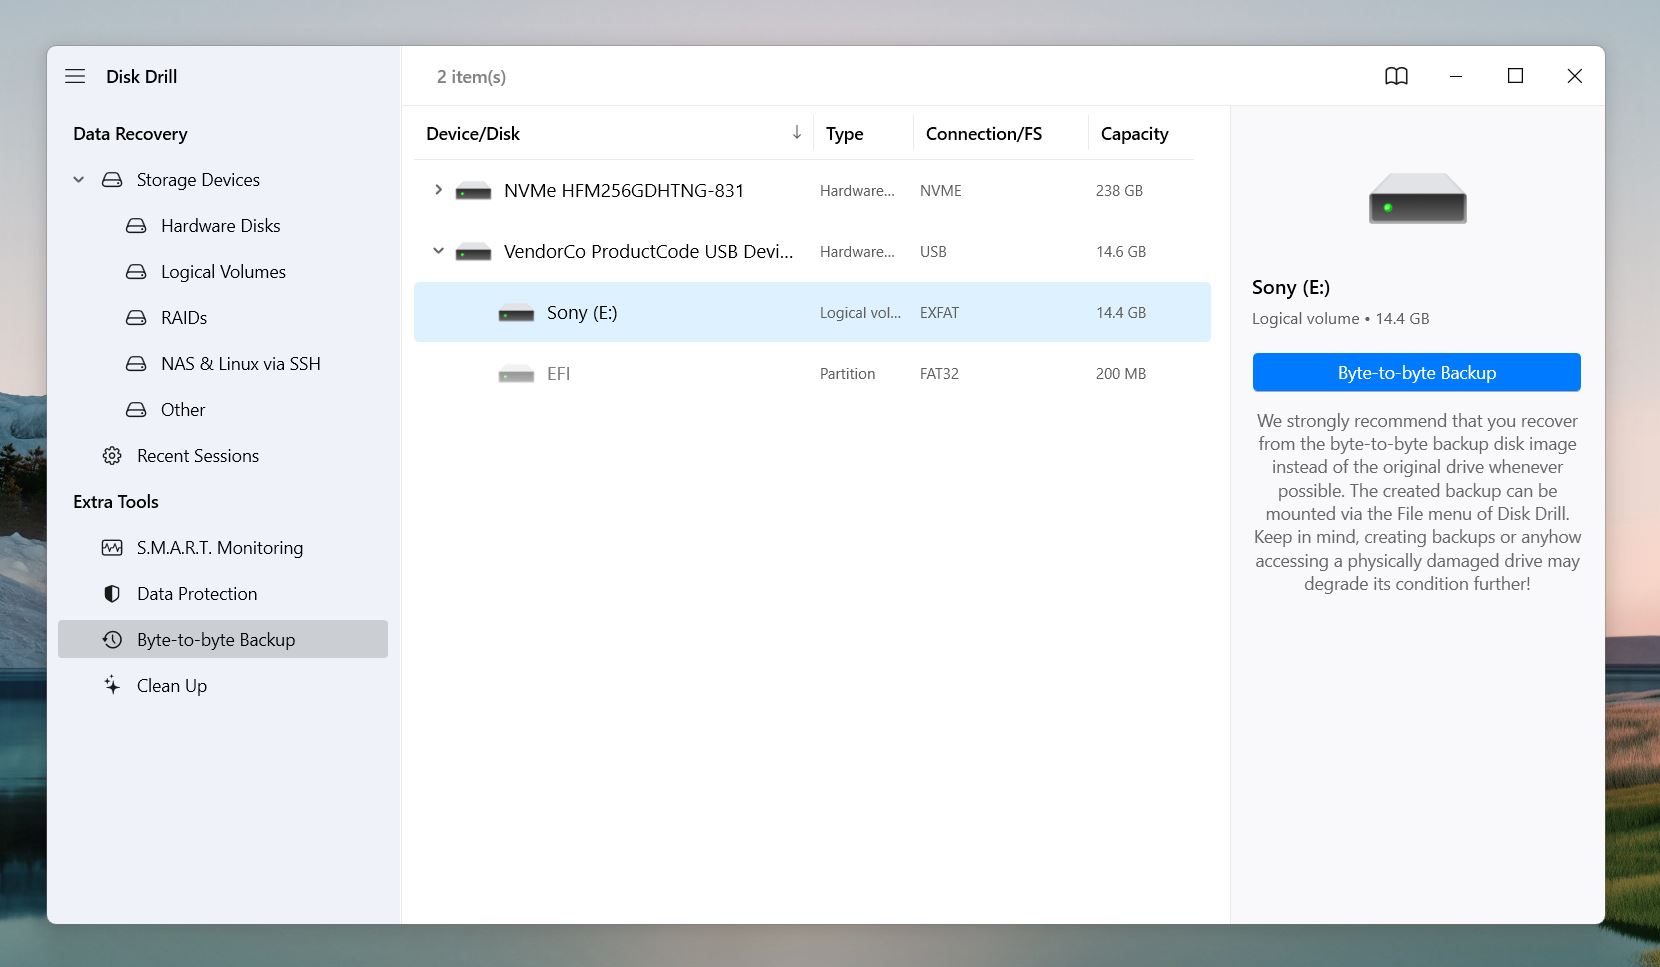
- Select the SD card you want to back up.
- Chose a location with enough space for the backup.
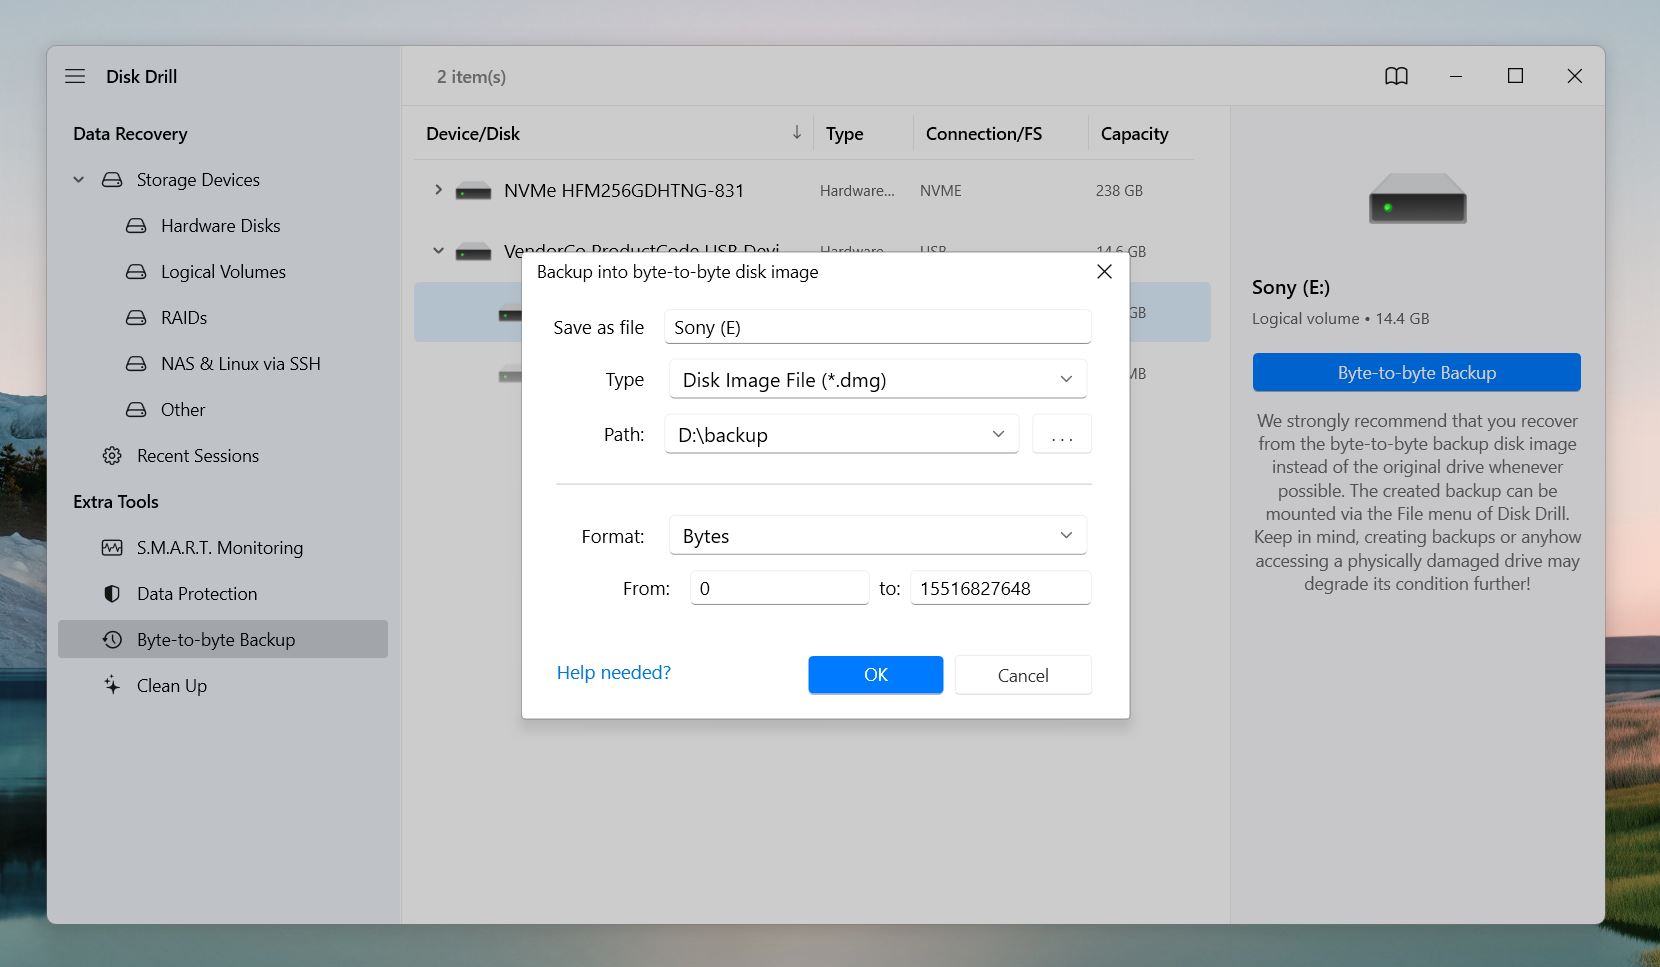
- Once the backup is complete, go to the Data Recovery section, click Attach Disk Image, select the backup file and click Search for lost data to begin the recovery from the card’s image instead of SD card.
FAQ
Why do music or audio files disappear from SD cards?
Music or audio files never disappear from SD cards without a reason. Here are some of the most common reasons you may encounter:
- 🤦♂️ Accidental deletion. While Windows and macOS make it easy to recover accidentally deleted music or audio files from the Recycle bin, many mobile devices and portable audio players and recorders don’t provide this functionality, which makes accidental deletion a huge problem.
- 🧹 Formatting. You definitely don’t want to format the wrong SD card because that would cause all files stored on it to instantly disappear. Fortunately, it’s often possible to recover data from a formatted SD card.
- 💔 Corruption. When a poorly written software attempts to write data on an SD card or if you remove the card from your device without properly ejecting it, it may corrupt existing files, which makes them impossible to open.
- 🦠 Malware. There are many nasty strains of malware that can cause music and audio files to disappear or become unreadable. While most malware targets the Windows OS, mobile malware is a growing threat that’s expected to impact more and more people every year.
- 🧑💻 Daily wear & tear. Most SD cards are not engineered to be durable. If you regularly remove your SD card from your device, then you subject it to considerable wear and tear. Over time, this may make the SD card unreadable and your files inaccessible.
- 💧 Physical damage. Every SD card hides a tiny flash memory chip inside. This chip is where your music and audio files are actually stored. If it becomes damaged, you’re unlikely to ever see your files again. However, even less serious damage, such as a broken connector pin, can be difficult to deal with without the right equipment and repair skills.
How to recover deleted music from an SD card on Android without a PC?
If you don’t have access to a computer and want to recover deleted music files that are stored on your Android SD card, you can use an Android data recovery app like DiskDigger:
- Download DiskDigger.
- Launch the app and use it to scan your SD card.
- Recover your deleted music files.
How to restore deleted music on a Samsung phone without a computer?
The My Files app on Samsung devices supports Trash functionality. When enabled, this functionality lets you recover recently deleted files, including your music:
- Launch the My Files app.
- Open the Trash folder.
- Recover your music.
If your music isn’t in the Trash, you can use recovery apps like DiskDigger directly on your phone. It can scan your device’s storage for deleted files and often recover them.
How to recover deleted music on Android without root?
If the deleted music files were stored on an SD card, then you can simply remove the SD card and scan it on your computer with data recovery software like Disk Drill or PhotoRec.
This article was written by David Morelo, a Staff Writer at Handy Recovery Advisor. It was recently updated by Roman Demian. It was also verified for technical accuracy by Andrey Vasilyev, our editorial advisor.
Curious about our content creation process? Take a look at our Editor Guidelines.
