Are you still using a hard drive with a SATA (Serial Advanced Technology Attachment) interface and need to recover data? Or maybe you’ve found an old SATA drive you want to extract data from? If so, you’ve come to the right place. We’ll walk you through everything you need to know about SATA and show you, step-by-step, how to recover data from SATA hard drives in just five simple steps.
Want to skip the theory and jump straight to the recovery part? Click here.
Is It Possible to Recover Data From a SATA Hard Drive?
In most cases, yes. You can recover data from SATA hard drives with a proper data recovery software solution. However, there are a few important factors to consider, as SATA is an older technology, and the computers using it are likely aged as well. Here’s what can impact SATA hard drive data recovery:
Healthy SATA Drives
A healthy SATA drive is the best-case scenario because data recovery from it is usually straightforward. But here’s the catch: SATA drives often serve as internal system disks, so if you delete or format files on a drive with Windows, the OS itself can overwrite data—especially when those files were on the same partition. Windows constantly creates temporary files, which may overwrite the data you want to retrieve.
It gets even trickier if your Windows becomes unbootable or if you format the OS drive. In those cases, extra steps are needed. You could connect the SATA drive to another computer as an external drive and run recovery software there. Another option is to reinstall the OS on the same PC and then run the recovery software, though this risks overwriting some of the recoverable data on the SATA drive.
Failed or Corrupted SATA Drives
If your SATA drive has become corrupted and doesn’t appear in File Explorer when connected—data recovery might still be possible. The important part is that the drive is recognized in Disk Management. Issues like abrupt power loss, faulty Windows updates, or malware can lead to corruption, but as long as the drive shows up in Disk Management, you still have options to recover your data.
To check if your SATA drive is recognized in Disk Management, follow these steps:
- Right-click the Start button and select Disk Management from the menu.
- In Disk Management, look for your drive in the list of disks at the bottom of the window.
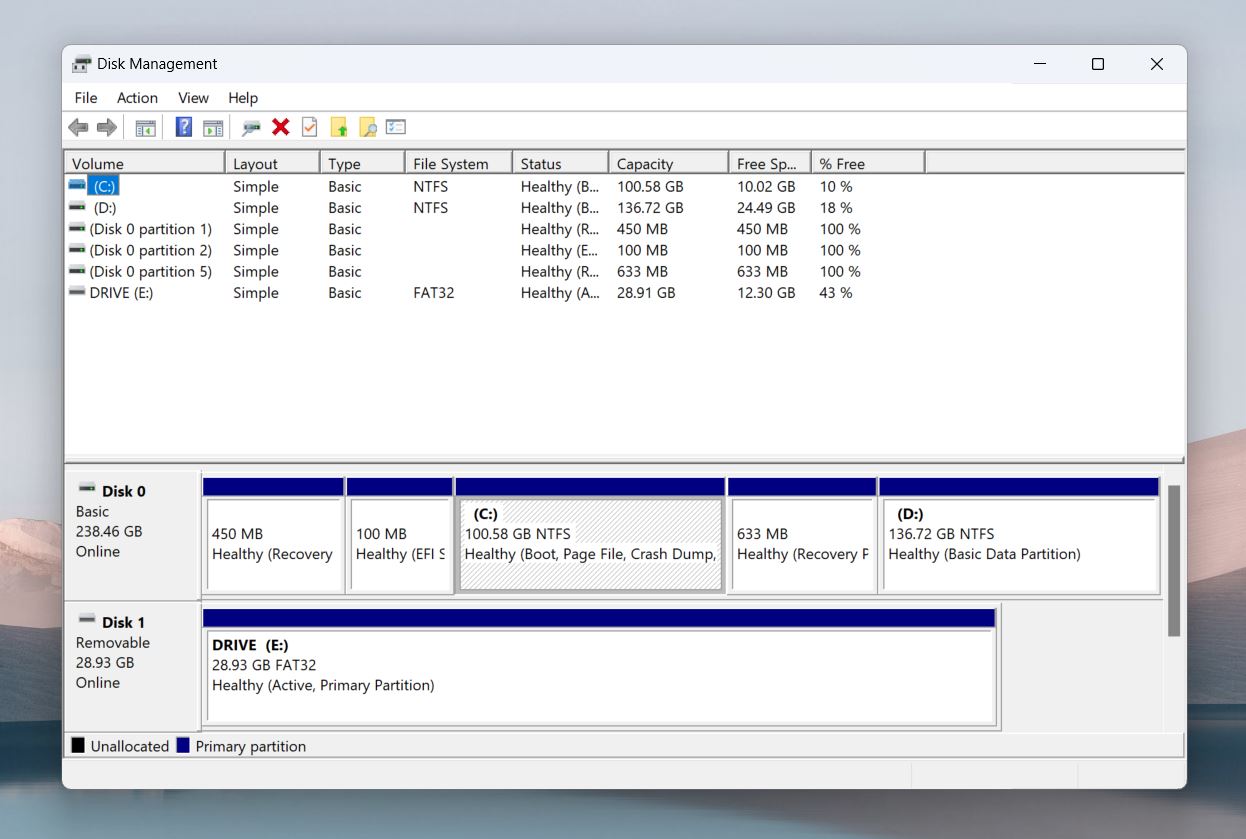
- If the drive appears and shows its correct size, that’s a good sign—it means the drive is recognized, and data recovery options are more likely to succeed.
If the drive doesn’t show up at all, go to What If My Computer Doesn’t See My SATA Drive At All?
Damaged, Broken, or Dead SATA Drives
SATA hard drive not working? In cases of severe physical damage, the SATA drive may die and stop working entirely. Unlike in the case of logical corruption, you usually can’t recover data from a dead hard drive, except in a few cases.
It can be tricky to tell if your drive is logically corrupt or physically damaged, but these signs can help you get a clearer idea of its condition:
Signs of Physical Failure |
Signs of Logical Failure |
You hear or feel vibrations or noises coming from the SATA hard drive. |
Your OS’ core files have become corrupt and you see multiple errors when running the OS. |
Your computer takes excessive time to display a folder’s contents when you open it. |
Specific files, folders, or programs have become corrupt and don’t function properly. |
Your hard drive is overheating / Your computer randomly shuts down. |
Frequent BSOD (Blue Screen of Death) errors. |
When you scan your drive with specialized software, it may show hard bad sectors—often a sign of permanent physical damage to the hard disk. |
When you scan your drive with specialized tools, soft bad sectors may appear. These are signs of logical errors that can usually be repaired. |
These are common signs, but often these symptoms can co-exist. For example, you might experience BSOD errors because of physical damage or your computer may run slow because of logical corruption.
What Software to Use for SATA Hard Drive Recovery?
There are many data recovery tools available for Windows, which makes it tough to pinpoint exactly what you need. So, what tool works best for SATA hard drive recovery? Let’s break down the features to look for:
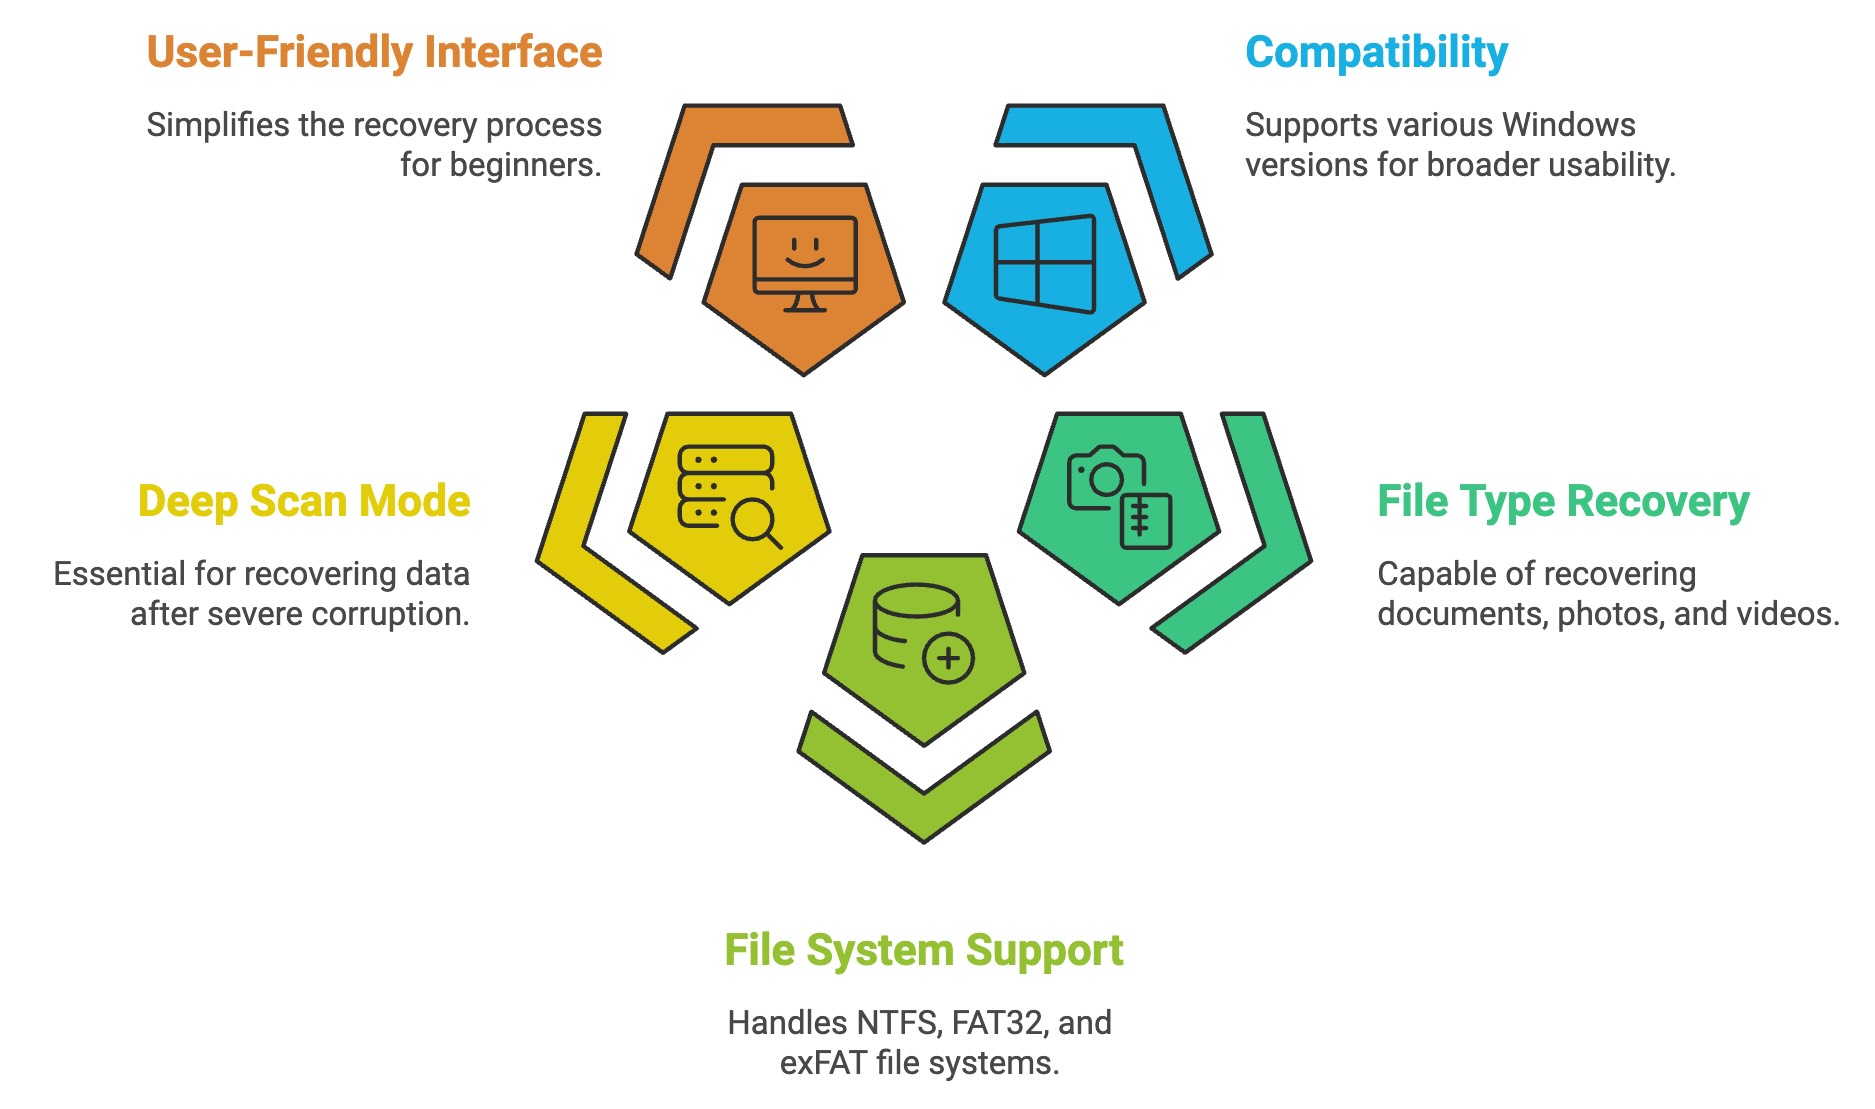
- Since SATA drives are often used on older PCs, the ideal recovery software supports a wide range of Windows versions—from Windows XP to Windows 11—if you plan to perform recovery on the same old PC.
- Look for software that can recover various file types, like documents, photos, and videos. It should also handle different file systems, such as NTFS, FAT32, and exFAT, to cover any storage format.
- A deep scan mode is a must for data recovery in the most extreme situations, like after severe corruption, accidental reformatting, or system crashes.
- Look for software that includes a drive backup feature, which allows you to create a full disk image of the SATA drive. This approach lets you scan the disk image rather than the physical drive, useful in cases where the SATA drive itself is too fragile for a scan.
- If you’re new to data recovery, a clean, easy-to-use interface is a big help.
- A file preview feature is super useful, especially if you deal with an old SATA drive packed with years of data.
- Most data recovery tools are paid, so it’s ideal if the software offers a free or trial version.
There are a few tools that meet all these criteria and are well-suited for SATA hard drive recovery, including Disk Drill, EaseUS Data Recovery Wizard, PhotoRec, and UFS Explorer.
Disk Drill’s deep scan mode, file preview, broad file system support, and safety make it a top choice, backed by a stellar track record for recovery. EaseUS Data Recovery Wizard also offers solid features and an intuitive design, though it doesn’t go quite as deep as Disk Drill. PhotoRec, a powerful free tool, works well for multimedia recovery but lacks a practical interface and preview feature. UFS Explorer, with its extensive control, is ideal for complex cases but is more suited to advanced users. For the best all-around experience, Disk Drill is our top recommendation.
5 Simple Steps to Recover Data from SATA Hard Drive
Let’s start with the recovery process! To make things straightforward, we’ll break it down into 5 simple steps and use Disk Drill as an example for each. You’ll see exactly how to recover data from a SATA hard drive.
Step #1: Install Data Recovery Software
To start the SATA data recovery process, head to the official CleverFiles website and download Disk Drill. You’ll see several versions available, each designed for different Windows systems:
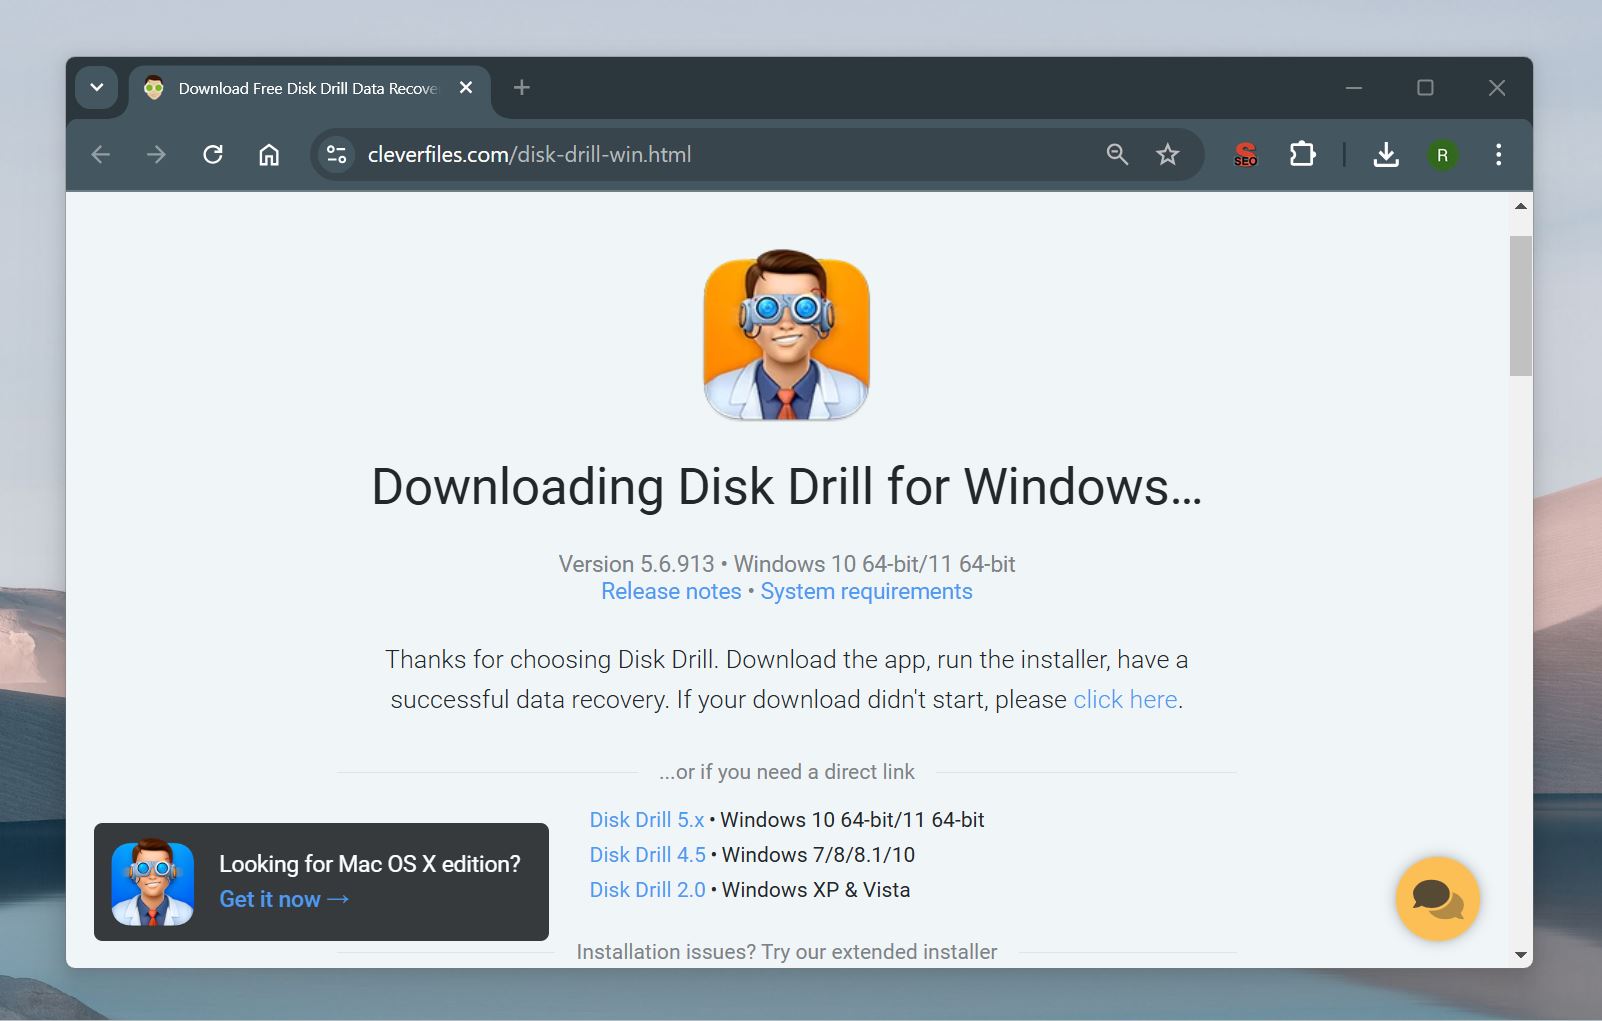
- Disk Drill 5.x: Compatible with Windows 10 (64-bit) and Windows 11 (64-bit). This is the latest version.
- Disk Drill 4.5: Suitable for older systems, this version works with Windows 7, 8, 8.1, and 10.
- Disk Drill 2.0: This version is for Windows XP and Vista users.
If you encounter installation issues, there are extended installers available for both Disk Drill 5.x and 4.5, designed for Windows 10 (64-bit) and Windows 7/8/8.1/10, respectively.
To prevent overwriting any files on your SATA drive, it’s a good idea to install Disk Drill on a different hard drive. The free Basic version of Disk Drill will let you recover up to 500MB of data.
Step #2: Connect the SATA Hard Drive to Your Computer
Next, you’ll need to connect your SATA hard drive to your computer. If it’s a SATA drive from another PC that won’t boot, you have a couple of options. You can connect it directly to your motherboard if you’re comfortable opening your computer case, or you can use a SATA-to-USB adapter to connect it to your computer or laptop. It’s best to avoid USB hubs, as they can sometimes cause connection issues. A direct connection will give you a more stable link for the recovery process. Once the drive is connected, power on your computer and check Disk Management. If it shows up there, you’re all set to move on to the next step.
Step #3: Scan the SATA Drive
Launch Disk Drill after you’ve installed it. You’ll see a list of internal and external drives on the home screen. Select the SATA drive and click on the Search for lost data button to start the scan.
In cases where a drive is in bad shape, we would recommend you create a byte-for-byte backup and scan the backup instead of the physical drive. This method minimizes the risk of further damage to the SATA drive:
- In the left panel, choose Byte-to-Byte Backup.
- Select the SATA drive you want to back up.
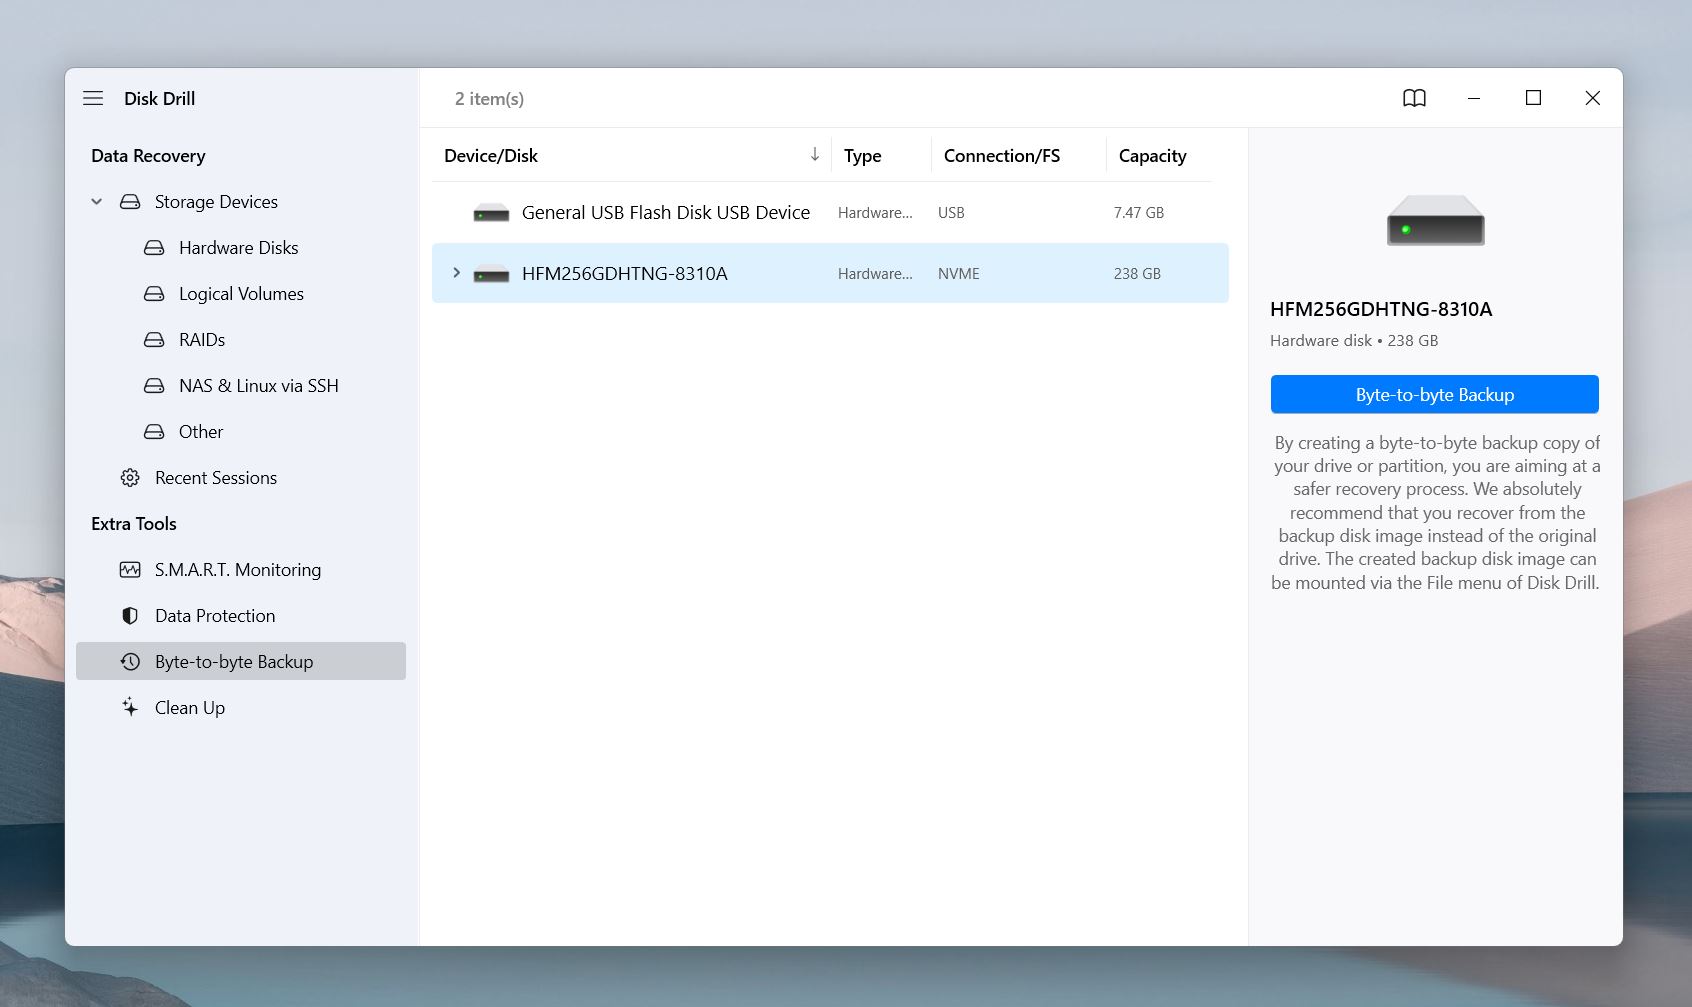
- Specify a healthy storage device with enough space for the backup.
- Once the backup is complete, go to the Data Recovery section, click Attach Disk Image, and select the backup file to scan for recoverable data. If you choose not to create a backup, you can simply select your drive here and click Search for lost data to begin the recovery process directly from the original drive.
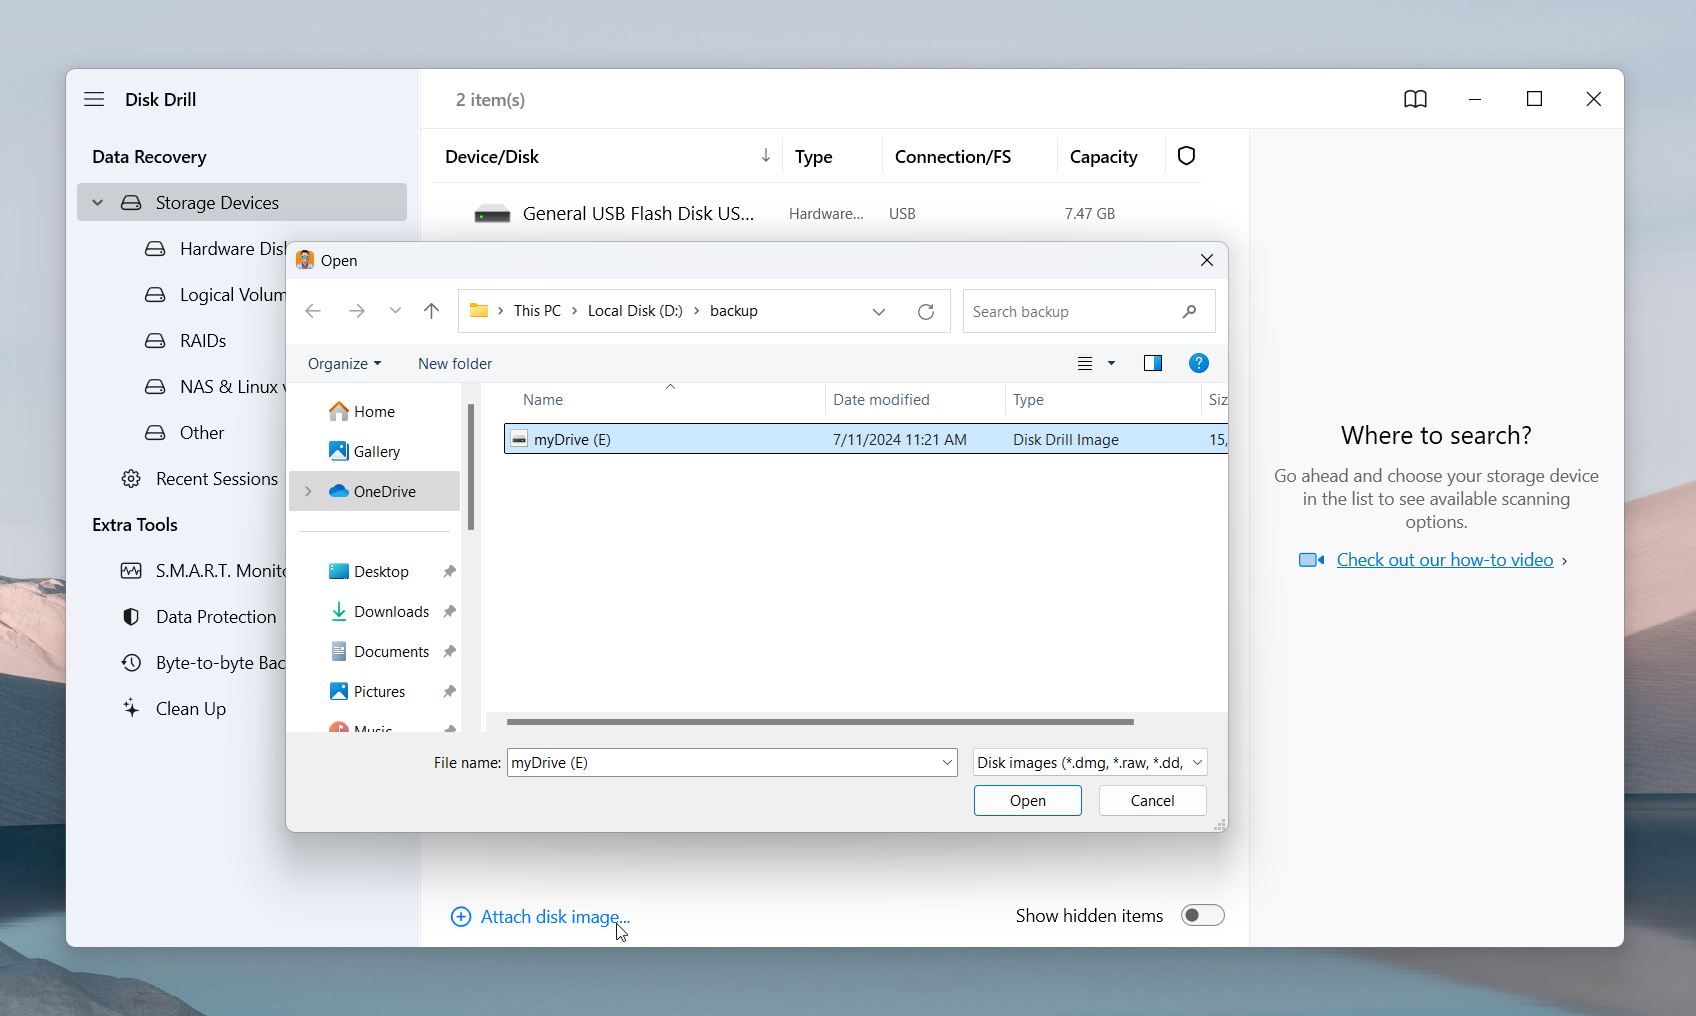
Disk Drill will go through several scanning modes, each designed for different data loss situations. These modes include:
- Quick Scan: This mode quickly searches for recently deleted files; it is ideal for data lost situations due to accidental deletion.
- Deep Scan: This thorough scan digs deeper into the drive’s file system, which is great for recovering data from formatted drives, severely corrupted files, or more complex data loss scenarios.
- Signature Scan: This mode identifies files based on their unique signatures, which will allow you to recover files even if the file system is heavily damaged or missing.
Step #4: Select Files to Recover
You can wait for the scan to finish or click on Review found items to see what the software has already discovered.
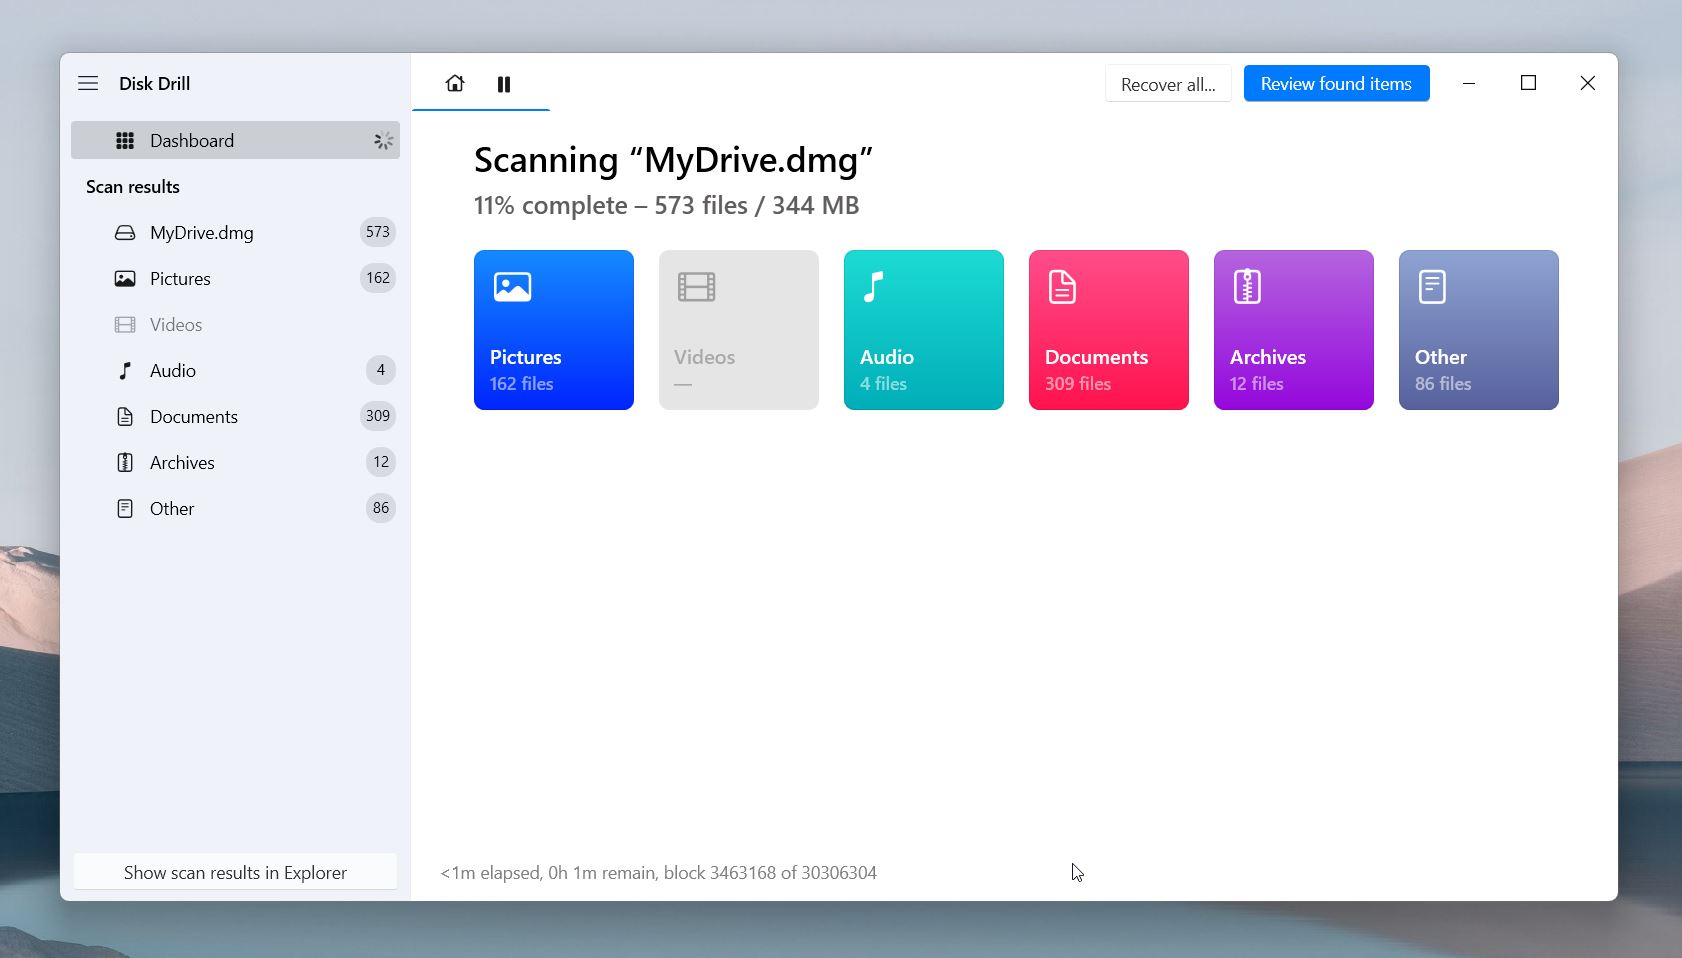
You can use the left sidebar to filter results by file type, such as Photos or Documents. If you seek something specific, like Photoshop projects with the .psd extension, enter the file names or extensions in the search bar at the top-right corner.
Next to each file, a Recovery Chances indicator shows how likely it is that the file can be successfully recovered.
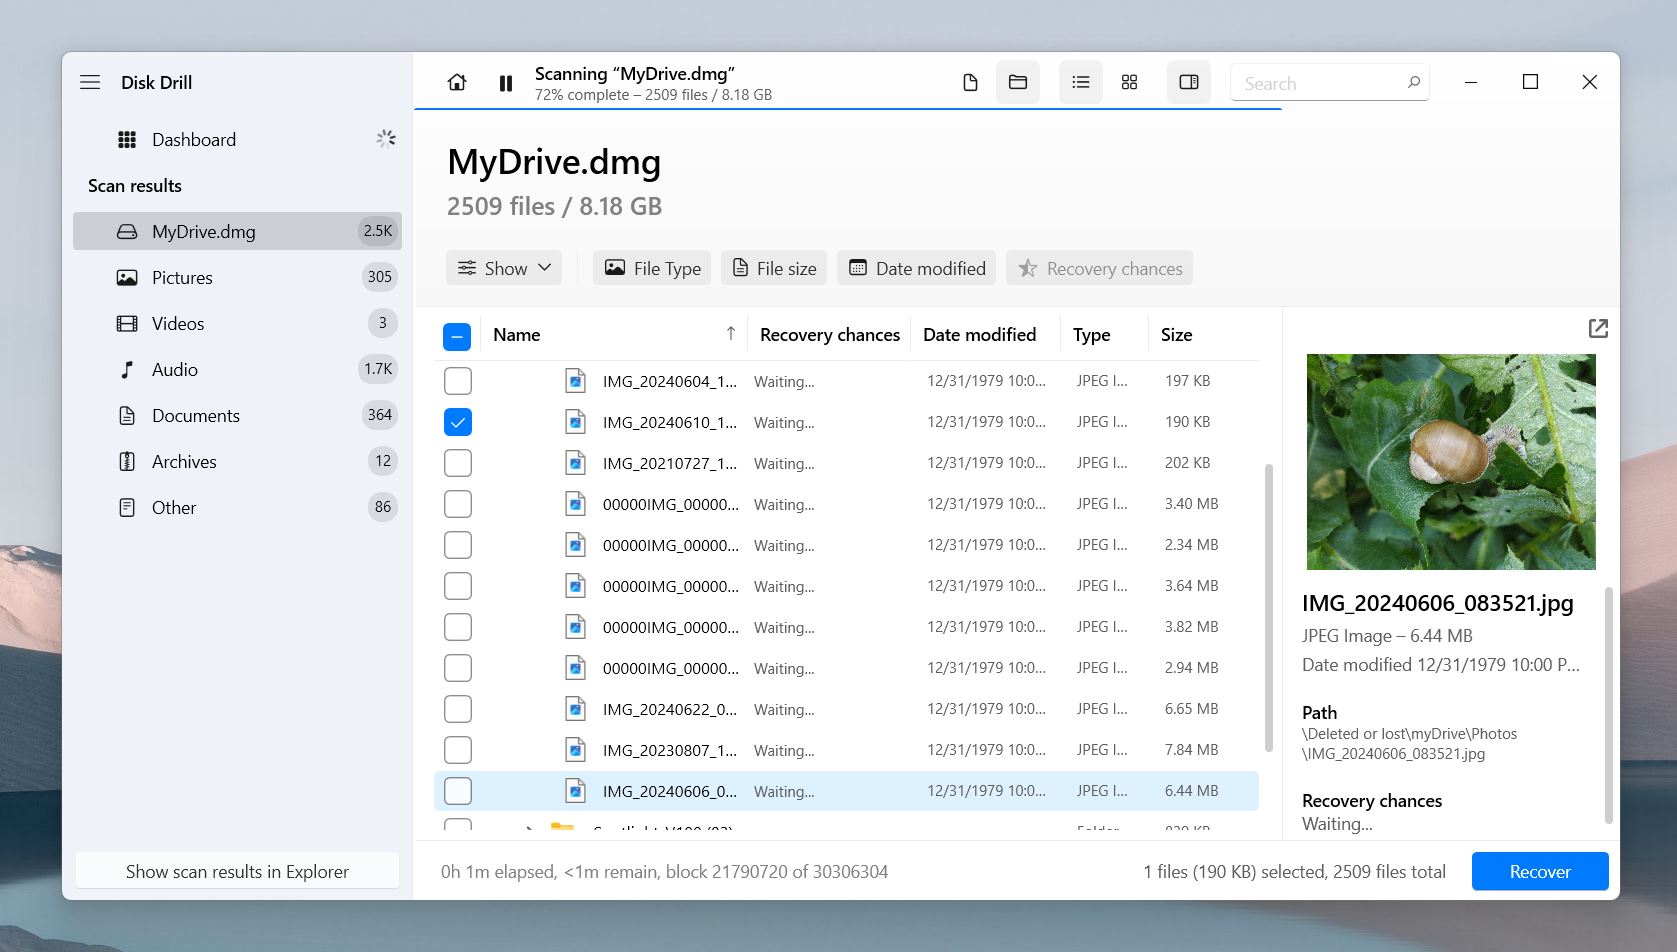
To see exactly what you are recovering, click the small eye icon next to each file. Disk Drill can show previews for all kinds of files, from simple JPGs to RAW image files. If your Windows system supports it natively or has the appropriate third-party software installed to handle these file types, you can preview any type of file before recovery.
Step #5: Recover Data
Select each file or folder you want to recover, then click the Recover button at the bottom. A new window will pop up and ask you to choose a location to save the recovered files.
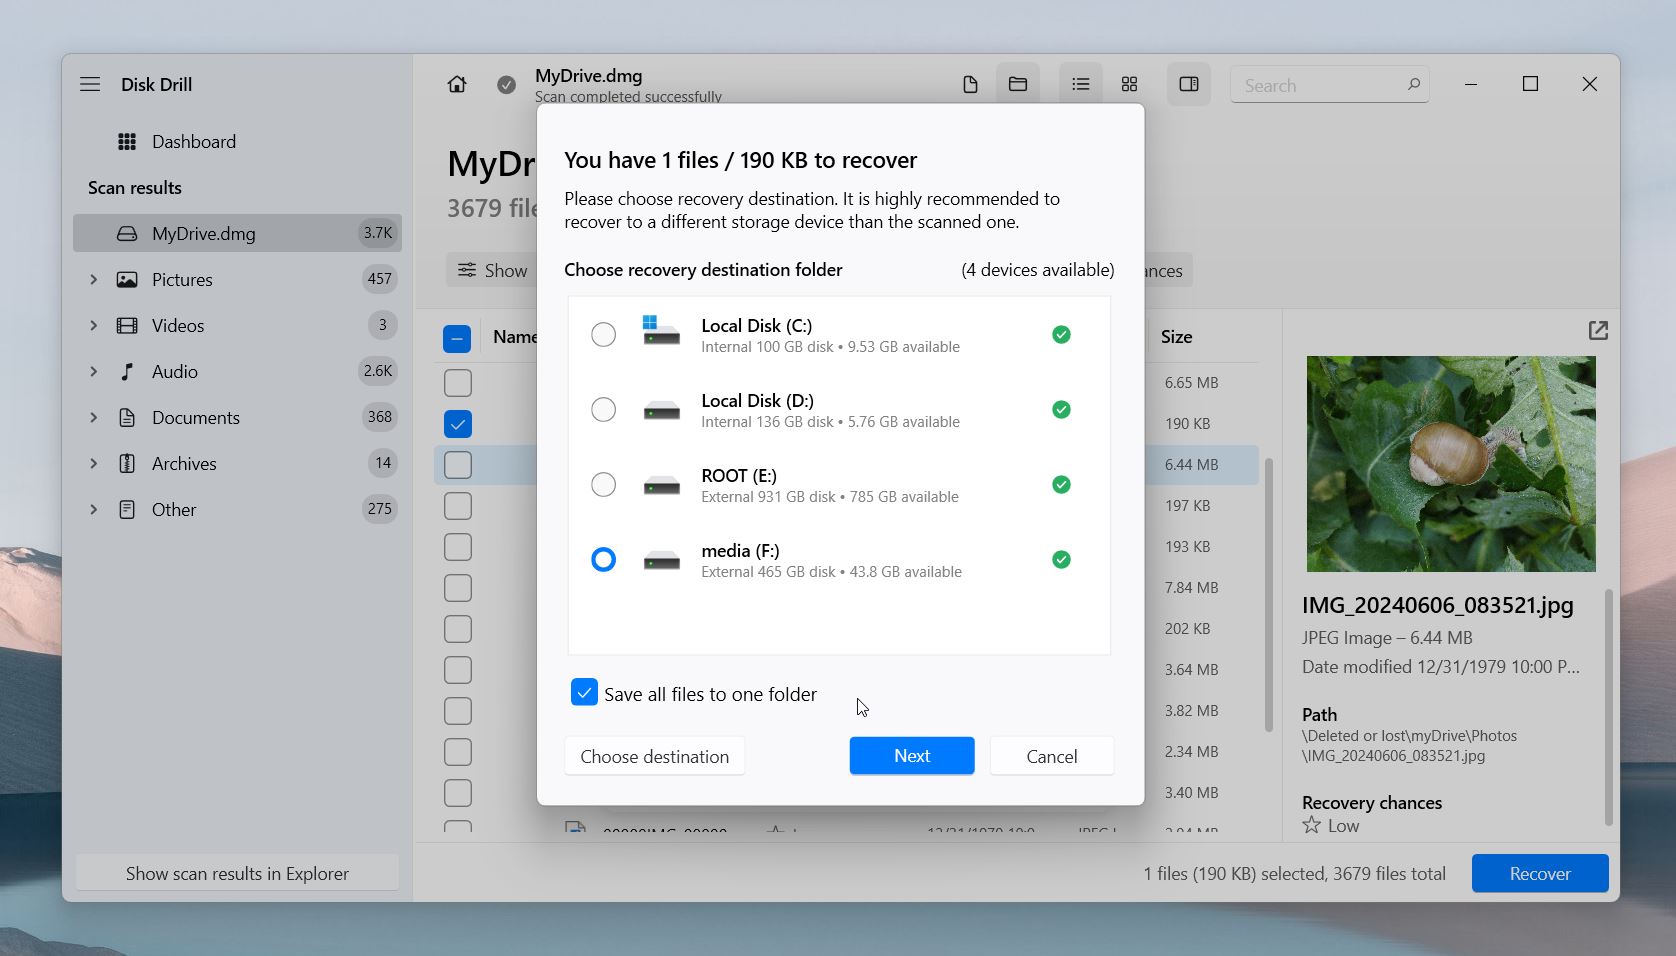
Make sure to pick a different drive than your SATA hard drive to avoid overwriting any remaining data on it. Once you’ve chosen a safe location, click OK to start the recovery process. Disk Drill will restore your selected files to the chosen location.
What If My Computer Doesn’t See My SATA Drive At All?
If your computer doesn’t recognize your SATA drive at all, there are a couple of things you can try.
Since SATA drives can stop working and lose data because of multiple reasons, it’s important to take a systematic approach. Below, we explain the process for recovering SATA drive and bringing it back to its normal, operational condition and recover data you may have lost.
We have detailed guides on how to fix hard drives that don’t show up and repair corrupted hard drives. You’ll find tons of useful info that can help you troubleshoot and resolve any issues with your SATA drive.
Check Your SATA Connectors

Check the SATA connectors on your motherboard to make sure the cables are securely attached. A typical motherboard has four to eight SATA ports, but the exact number depends on its size and chipset. If you know which connector needs attention, focus on that one; if not, check all of them.
Note that you should be extra careful with SATA ports, as they can be easily damaged.
You can identify the ports by their L-shape design. The ports are generally labeled as SATA1, SATA2, etc. Once you find the ports, make sure the connectors are firmly seated. Give it a wiggle (though gently) and tighten the ports. You might even want to remove the connectors to clean any debris that may have built up.
If the drive lacks power, it will not be detected, even if the SATA connectors are properly secured.
Check Your BIOS Settings
In some cases, the problem may be related to the BIOS settings. Check your motherboard manual for instructions on how to enable the SATA connection. This process can vary by manufacturer, but it usually looks like this:
- Restart your computer and enter the BIOS/UEFI. To do that you can press the designated key at the startup (commonly F2, DEL, or ESC).
- Navigate to a section labeled “Integrated Peripherals” or “Storage Configuration.”
- Look for options related to SATA configuration, such as “SATA Mode” or “SATA Controller,” and make sure the SATA ports are enabled.
If nothing worked, it may indicate that your SATA drive is too damaged to recover at home. SATA drives usually have a lifespan of 3 to 5 years, but some can last longer or shorter; it depends on usage and conditions. In this case, consider reaching out to a professional data recovery service. They’ll have the experts and equipment required to physically recover data from your disk, and they’re your last resort.
FAQ
Can data be recovered from an old generation SATA hard drive?
Yes, you can recover data from an old generation SATA drive. The only difference in the SATA revisions is the transfer rate. While the connector remains unchanged. However, if your hard drive uses an old (P)ATA (also known as IDE) connector you may need to use a USB or PCIe adapter.
What is the best free SATA data recovery software?
One of the best free options is the basic version of Disk Drill. While it has some limitations, it offers a user-friendly interface and effective recovery for SATA drives. Other notable free tools include: PhotoRec, TestDisk, and Recuva.
How to get data from a SATA hard drive that won't turn on?
If your SATA hard drive won’t power on, data recovery can be tough but not impossible. Here are some steps you can try:
- Make sure the power supply is working properly and all connections are secure. If you’re using an external enclosure, try a different power adapter or USB port.
- Connect the SATA drive to another computer. Sometimes, a different system can recognize the drive when your original computer can’t.
- If you haven’t already, use a SATA-to-USB adapter to connect the drive to your computer. This method can help bypass any issues with internal connections.
Can you repair a SATA hard disk?
Yes, in many cases, you can repair a SATA hard drive. However, the success of the repair largely depends on the reason the drive isn’t working. If the issue is due to filesystem corruption, and you can use the error-checking tool built into Windows to help with this. On the other hand, if the drive has experienced severe physical damage, the chances of successful repair drop significantly, and you might need professional help.
How do I fix SATA hard drive failure?
Failed SATA hard drives can often be fixed, but it depends on whether the failure is logical or physical.
- Logical failure happens when the file system gets corrupted due to issues like power surges, system crashes, or bad sectors. On Windows, you can often fix this with built-in tools like CHKDSK.
- Physical failure is caused by hardware damage. It is possible to replace the circuit board or free up locked heads, among other things. However, these are not methods we recommend to try at home.
If your SATA drive has physical damage, or if you’re unsure what’s causing the issue, it’s best to consult an expert and seek help from a professional data recovery service—especially if the drive holds important files.
What is the best hard drive data recovery software?
We have already done a review on the best data recovery software, where we looked in detail at such programs as Disk Drill, PhotoRec, R Studio, Recuva, and Data Rescue.
However, with Disk Drill, you get unmatched data recovery capabilities paired with built-in features like Byte-to-Byte backup and Data Protection to prevent future data loss. But if you’re looking for something different, you can try these Disk Drill alternatives.
Is it possible to recover data from the internal SATA hard drive?
Yes, it’s possible to recover data from the internal hard drive. There are a few additional considerations with an internal hard drive as we discuss in our guide on recovering data from an internal hard drive.
How long does a SATA hard drive last?
It’s safe to assume that most hard drives last an average of three to five years. However, hard drives fail based on usage rather than age, so the exact answer could look very different for you depending on how much you use your hard drive.
This article was written by Arjun Ruparelia, a Contributing Writer at Handy Recovery Advisor. It was recently updated by Roman Demian. It was also verified for technical accuracy by Andrey Vasilyev, our editorial advisor.
Curious about our content creation process? Take a look at our Editor Guidelines.
