Burdened with a corrupted or damaged video file? That feeling of disappointment at the discovery of an unplayable video is all too familiar. Before trashing it and starting over, did you know that it might just be salvageable? We have several ways you can fix corrupted video files, all of which prove indispensable in one situation or another. Read on to learn about them.
Looking for something more specific to the file type you’re trying to fix? We have dedicated guides on how to fix corrupted MP4 files, as well as how to repair MOV files that have become corrupted or damaged.
How to Repair Damaged Video Files Online
The appeal of online video repair is plentiful. You don’t have to download software, it’s oftentimes very fast, and you can be done in mere minutes. While online video repair tools may not be best suited for tackling extreme cases of corruption, they’re an essential ‘first step’ in trying to fix corrupted videos.
Option A: Clever Online Video Repair
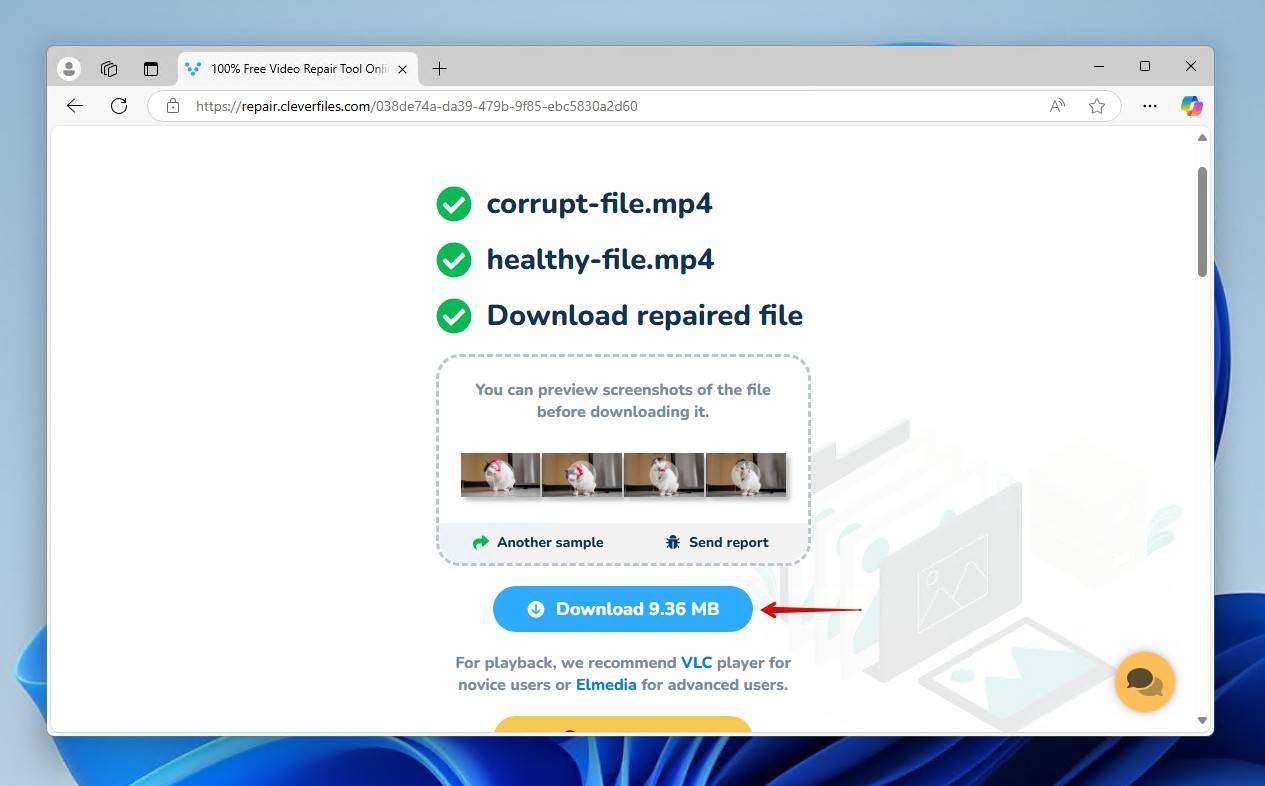
Clever Online Video Repair specializes in repairing truncated files, which are video recordings or transfers that were interrupted prematurely. Truncation can result in a number of issues, a popular one being the “Moov atom not found” error. It’s the first solution we recommend because it has proven useful to others, and it’s completely free – all you need to do is register.
The tool itself works with many video formats, including MP4, MOV, DAT, 3GP, 3G2, M4V, M4A, M4R, M4B, F4V, F4A, F4B, GIFV, and QT. You can upload files up to 5 GB in size, which should prove useful for repairing footage shot in 4K. It requires a healthy (working) video recorded by the same device, from which it can extract essential information necessary to repair the damaged file.
Follow these instructions to fix videos using Clever Online Video Repair:
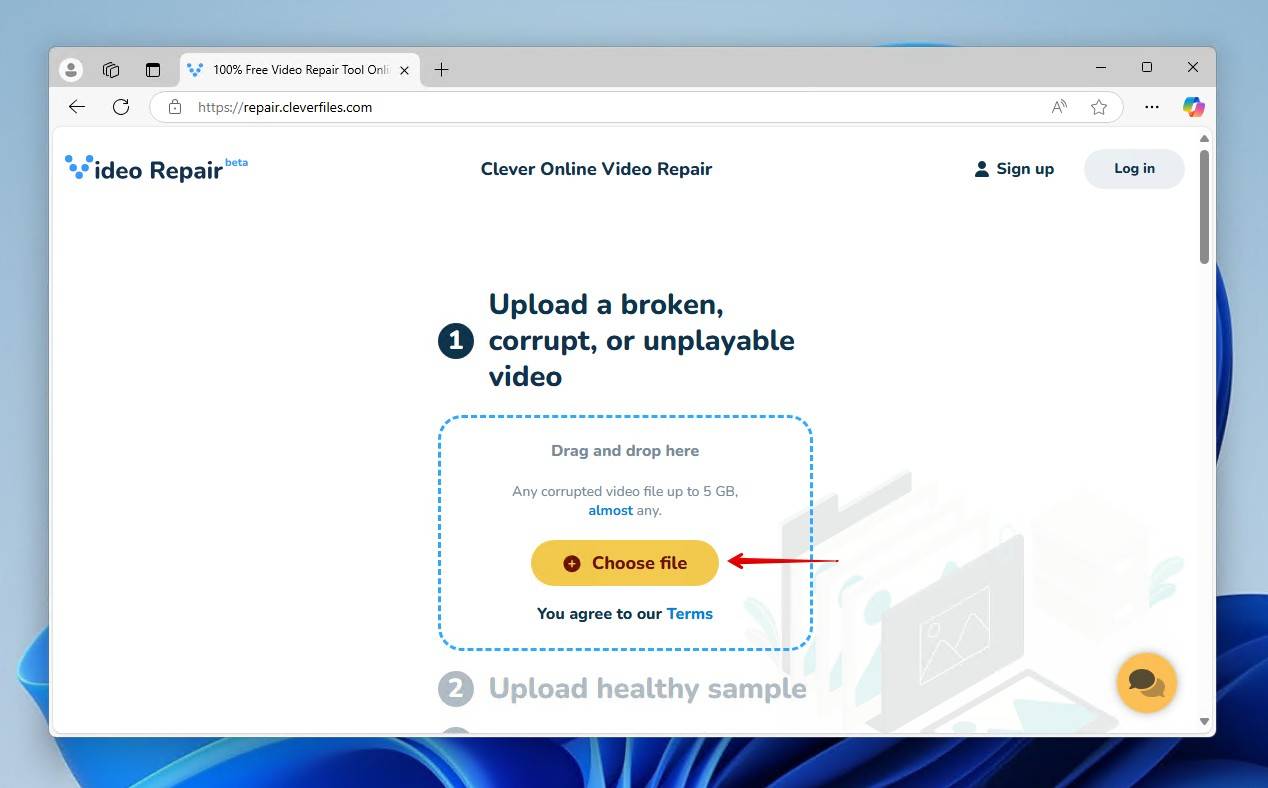
- Go to repair.cleverfiles.com and click Choose file.
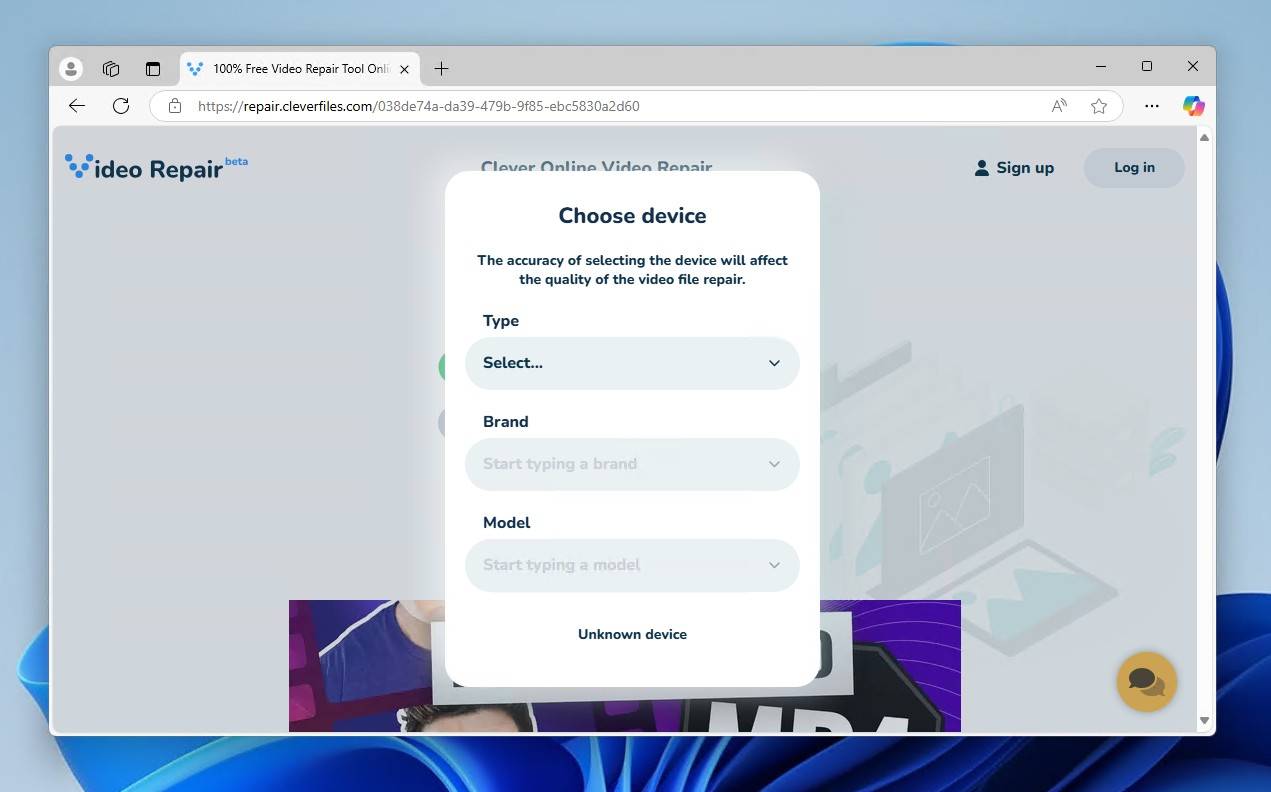
- Choose the type, brand, and model of the device used to record the video. If you’re unsure, click Unknown device.
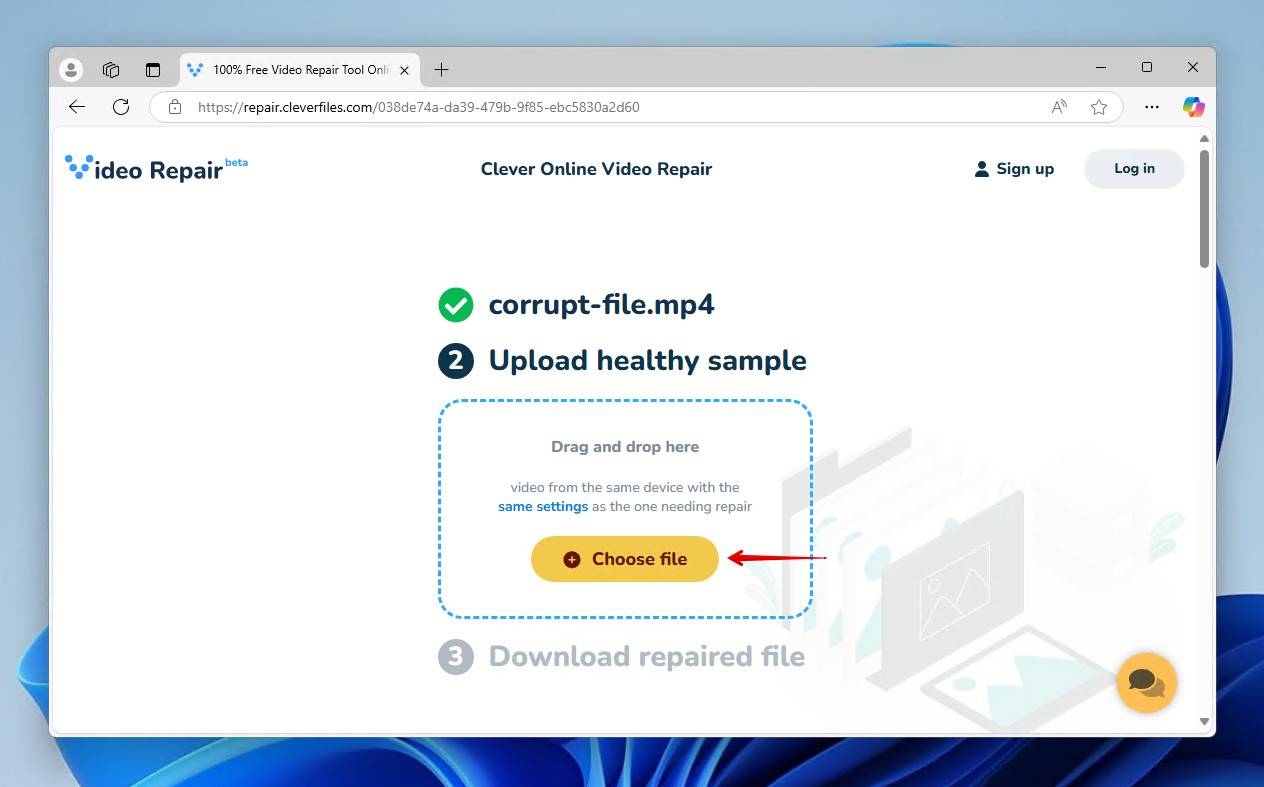
- Upload the healthy sample video and wait for it to be analyzed.
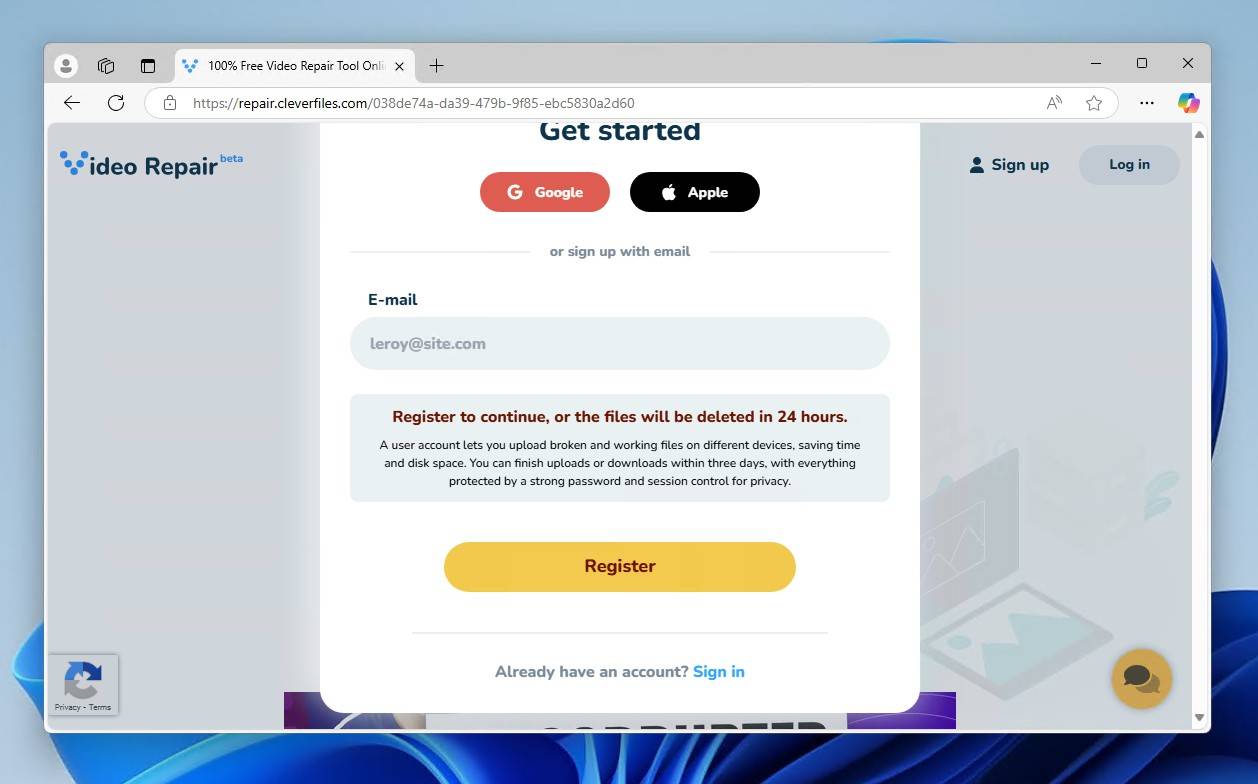
- Create an account or sign in.
- Let the repairs take place, then download the repaired video.
Pros:
- Free – No payment is required to perform repairs – all you need to do is create an account.
- Quick and simple – The repair interface is very straightforward and it doesn’t take long for repairs to complete. Even larger files are relatively fast in comparison to their size.
- Supports many formats – In its current state, the tool supports a wide range of file formats (e.g. MP4, MOV, DAT, etc). This number will only increase as it develops.
- Allows uploads up to 5 GB – You can upload video files up to 5 GB.
- File retention – Repaired files will be tied to your account for a limited time, allowing you to download them again.
Cons:
- Requires a reference file – You must supply a healthy reference file in order for the corrupted video to be repaired.
- Internet dependency – This tool will not work without an internet connection.
Option B: FileConverto
FileConverto is another online-only repair solution you can use to repair damaged video files that are truncated. It differs from Clever Online Video Repair in that you don’t actually need a reference file. This is ideal if you don’t have another healthy sample to use for repairs, but the downside is that the repairs are less accurate.
The tool works exclusively with MP4 and MOV files. Additionally, it only supports files up to 500 MB in size. Despite this, it’s still a viable option for repairing truncated files, and the upside is that you don’t need to create an account either.
The below instructions will show you how to repair an MP4 or MOV video with FileConverto:
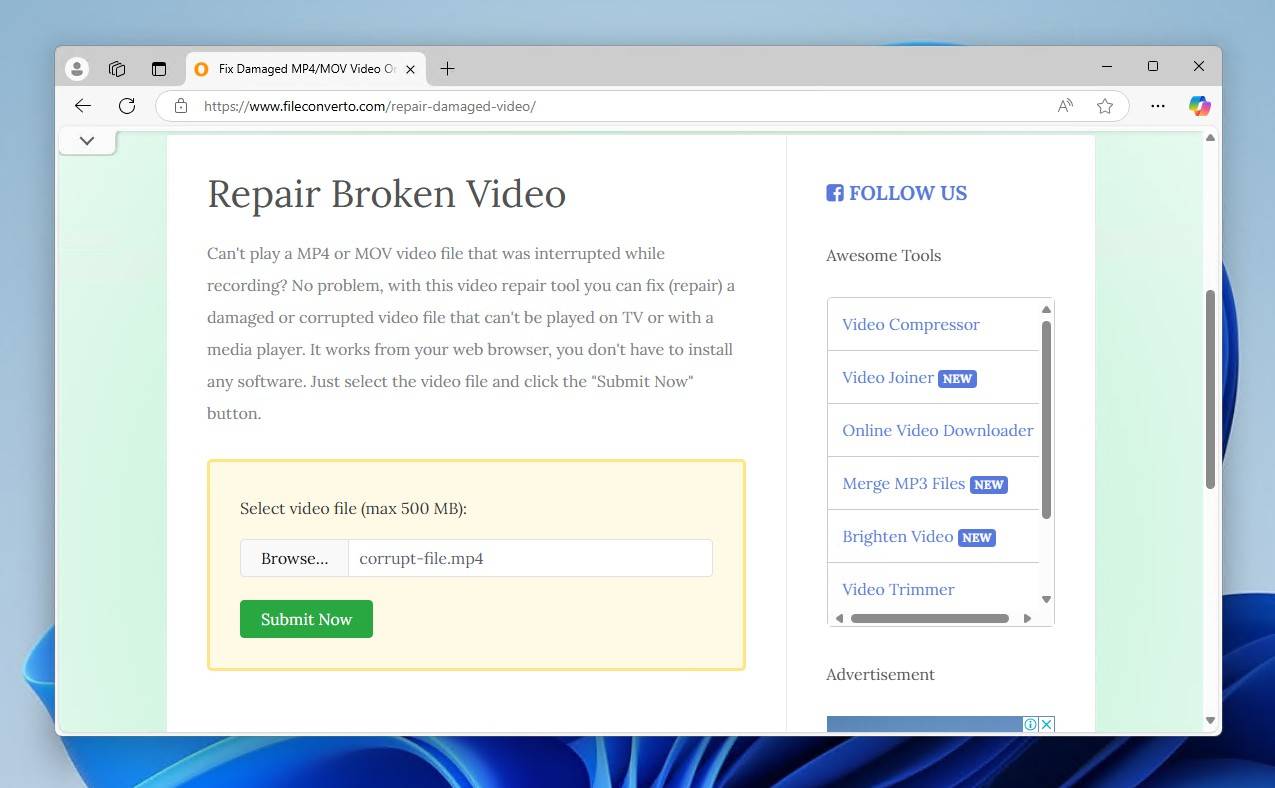
- Visit fileconverto.com/repair-damaged-video and upload your damaged video file.
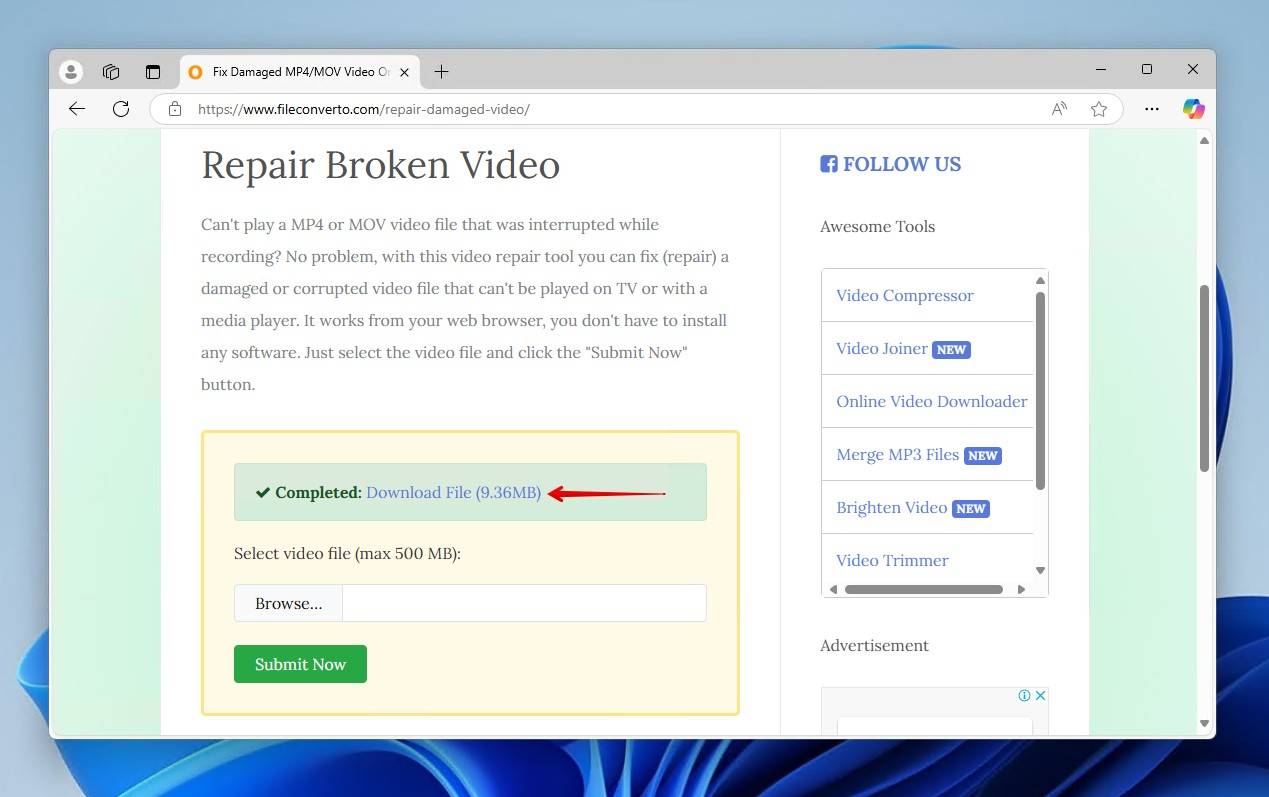
- Download the repaired file.
Pros:
- Free, no account required – The tool is completely free and doesn’t require users to create an account.
- No reference file is needed – A reference file is not needed in order to proceed with repairs.
- Simple to use – It’s extremely simple to use, with minimal input required. Simply upload your damaged video, click the button, then download the repaired file.
Cons:
- Limited file type support – You can only repair videos in the MP4 or MOV format. It will not recognize other file types.
- Small upload limit – Only files 500 MB or under can be uploaded. This limits users who need to repair footage shot in HD or UHD.
- No file retention – Because no account is required, repaired files must be downloaded then and there, otherwise they will be deleted.
How to Repair Video Files on Your Desktop
Online tools are ideal if you need to repair video files quickly, but you may find they’re not suitable for tackling other forms of video file corruption, or you may not be comfortable uploading your videos to the internet. This can range from missing metadata, like broken or improperly indexed headers, to container corruption, in which the container of your video file has become corrupted and unusable.
Option A: VLC Media Player
You may be surprised to learn that VLC Media Player is capable of fixing corrupted or damaged video files as well. Actually, it has two ways. The widely used multimedia player is commonly recommended as a free video repair solution because it’s readily available on a lot of computers already.
AVI Repair Function
VLC includes the ability to repair video files in the AVI format. However, your file doesn’t necessarily have to be AVI. Instead, you can get around this by renaming the file with a different format. In doing so, VLC will automatically attempt to fix it.
Here’s how you can do this:
- Download and install VLC.
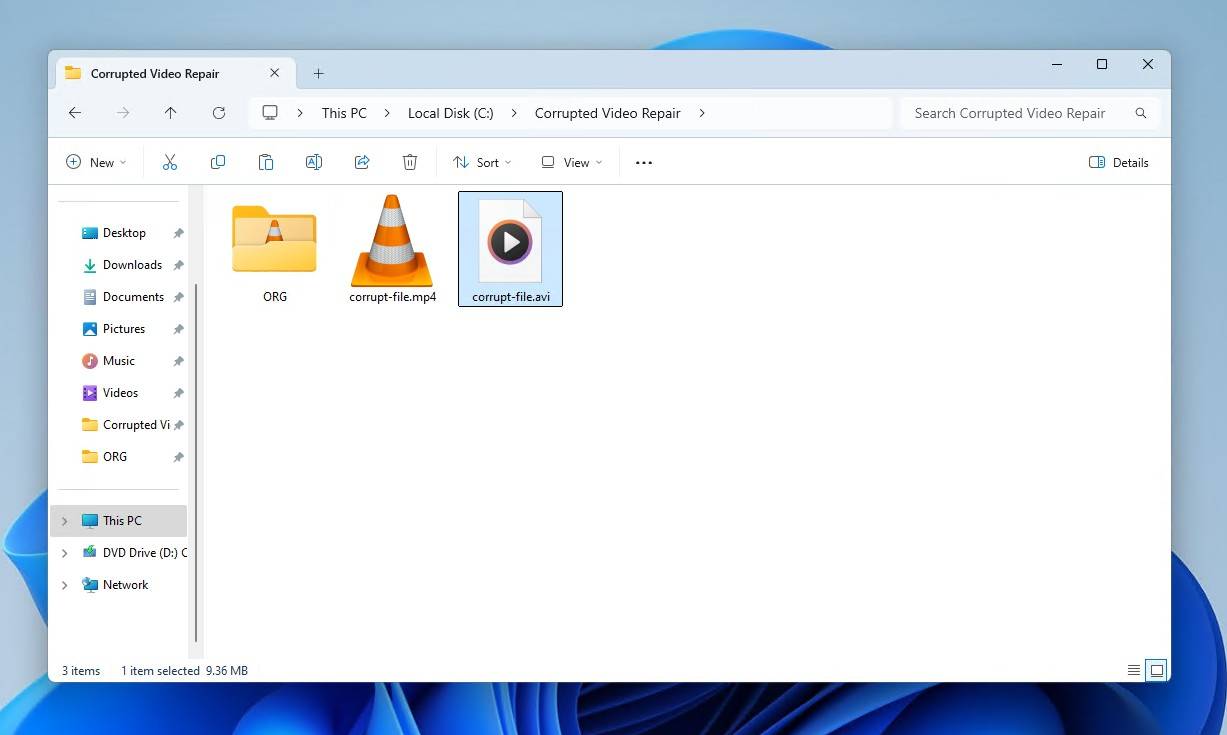
- Make a copy of your corrupted video file and rename it to AVI. For example, a file titled video.mp4 will become video.avi.
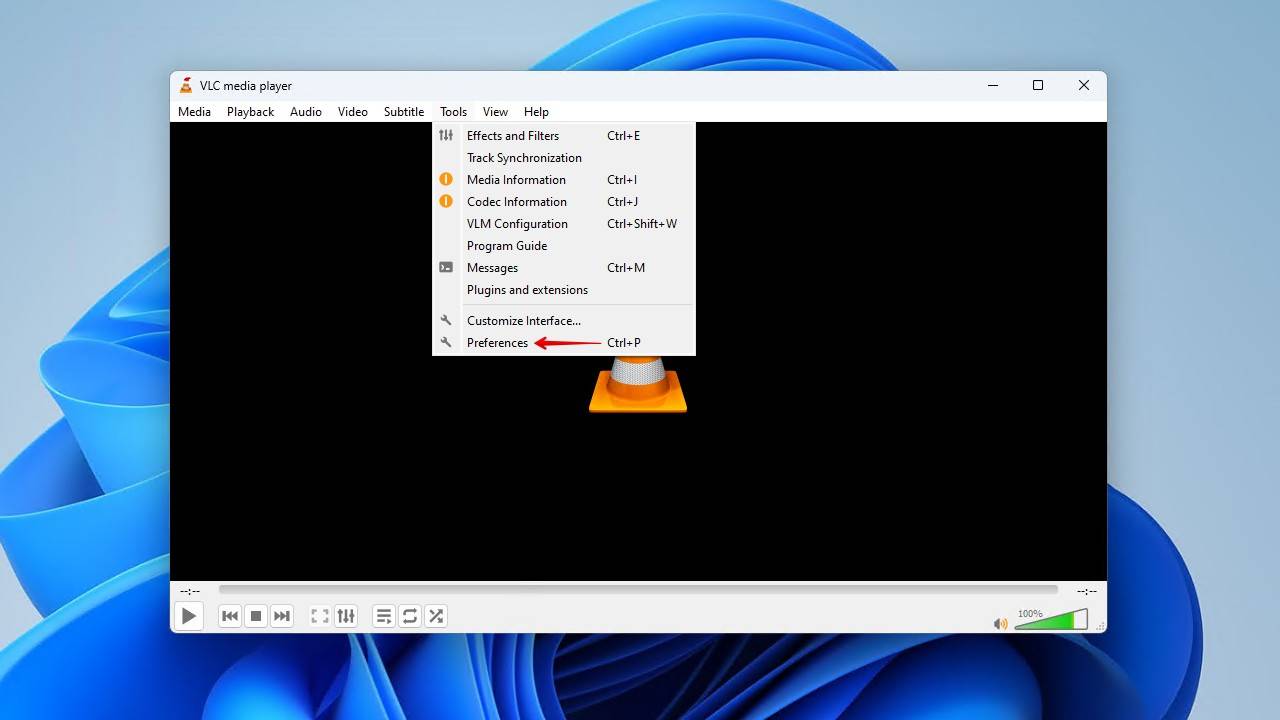
- Click Tools, then Preferences.
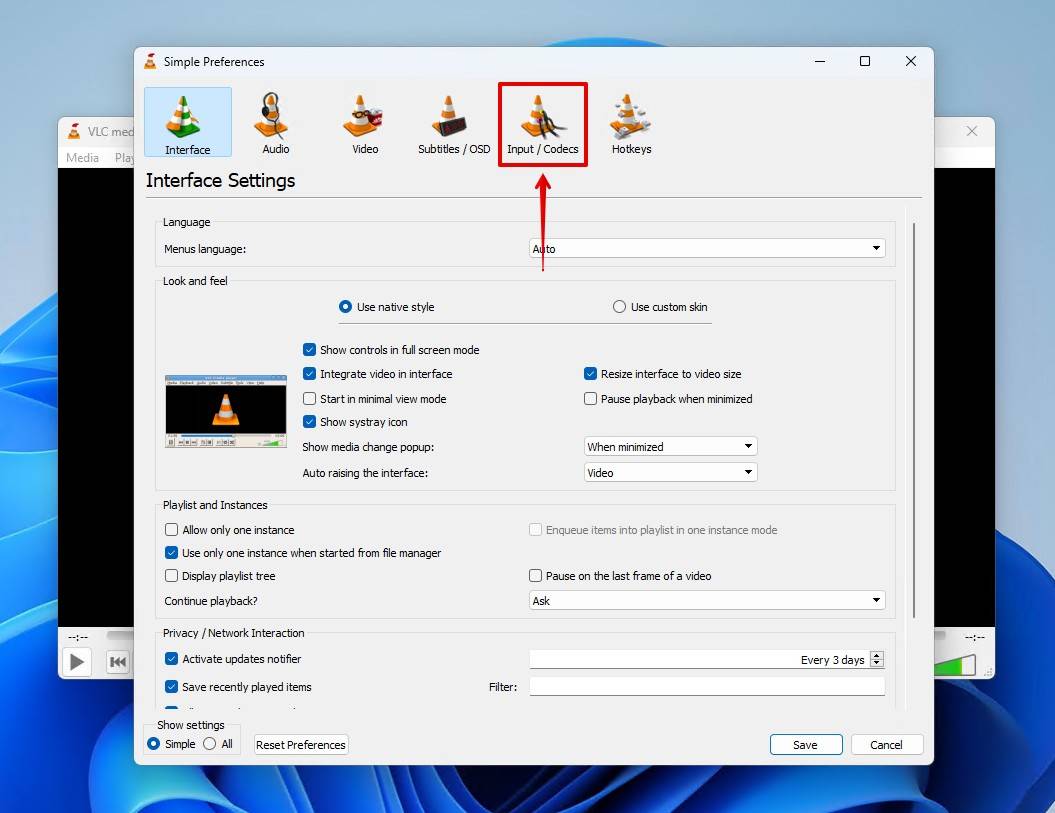
- Go to Input/Codecs.
- Change the dropdown for Damaged or incomplete AVI file to Always fix.
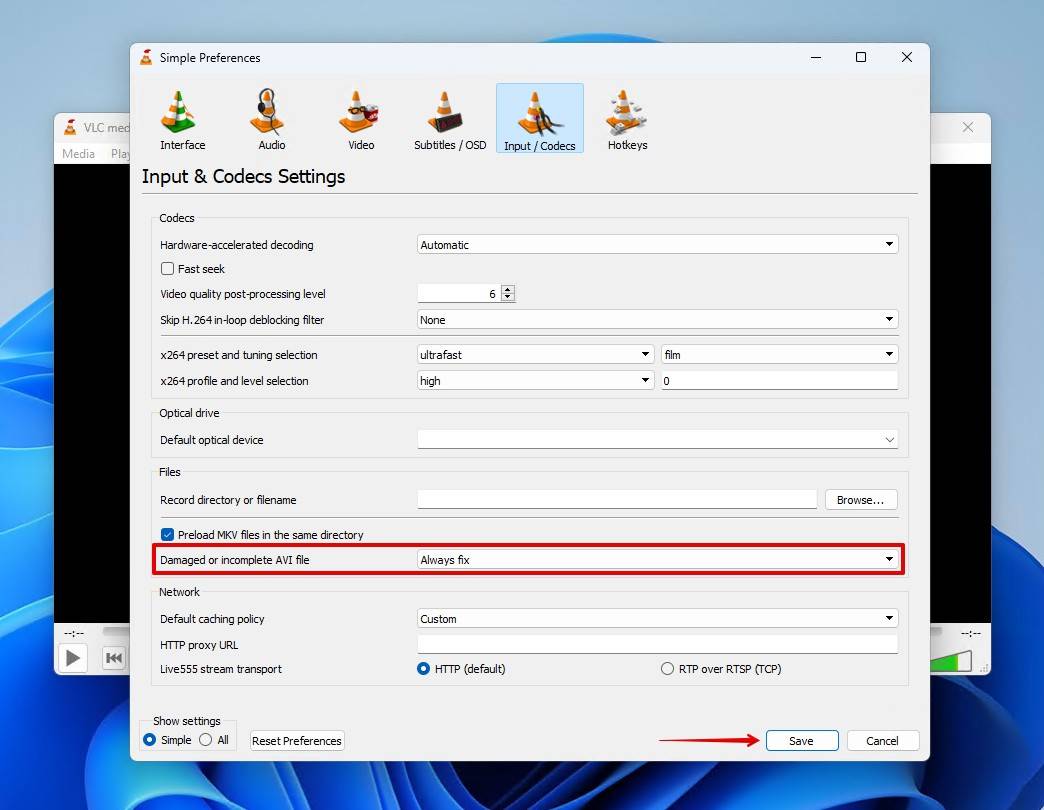
- Click Save and try to open the video.
Converting with VLC
Another great way of fixing corrupted or damaged video files is by converting them, something that VLC can do as well. The program comes with a number of preconfigured profiles to choose from, like H.264 + MP3, or you can create and configure a new profile with your desired settings.
This is how you can convert a video file using VLC:
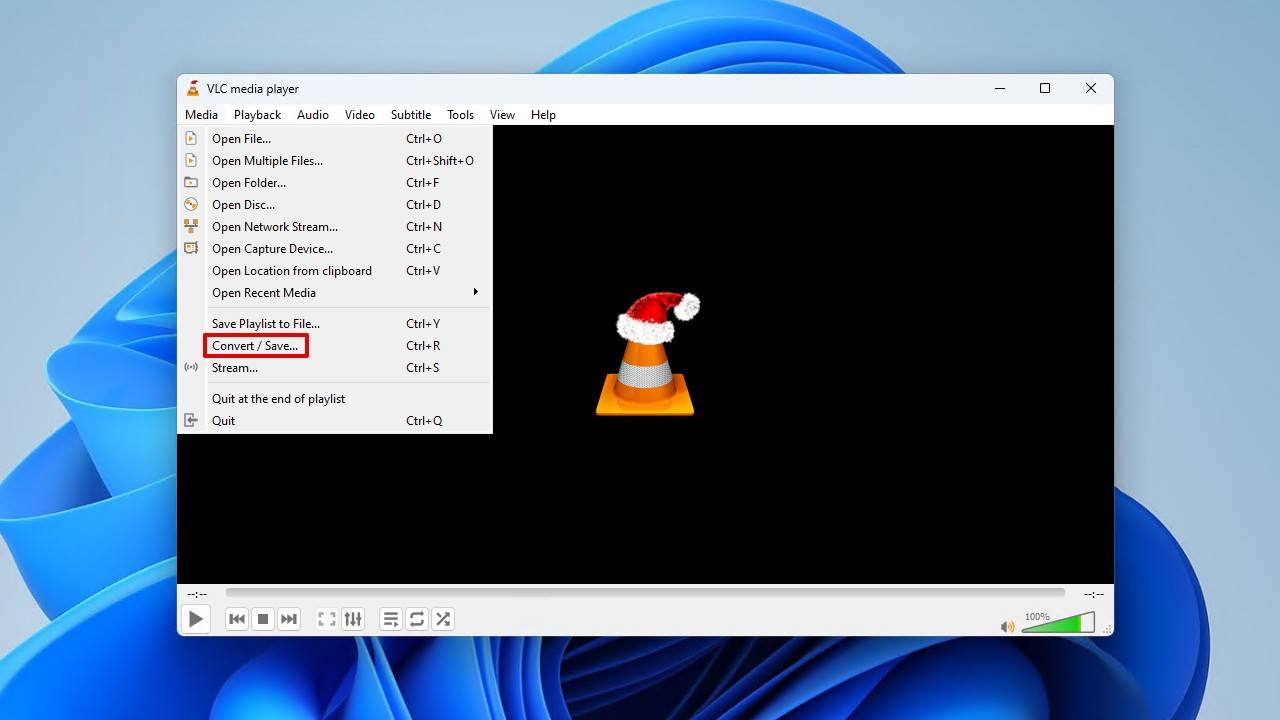
- Click Media, then Convert/Save.
- Click Add then select your corrupted video file.
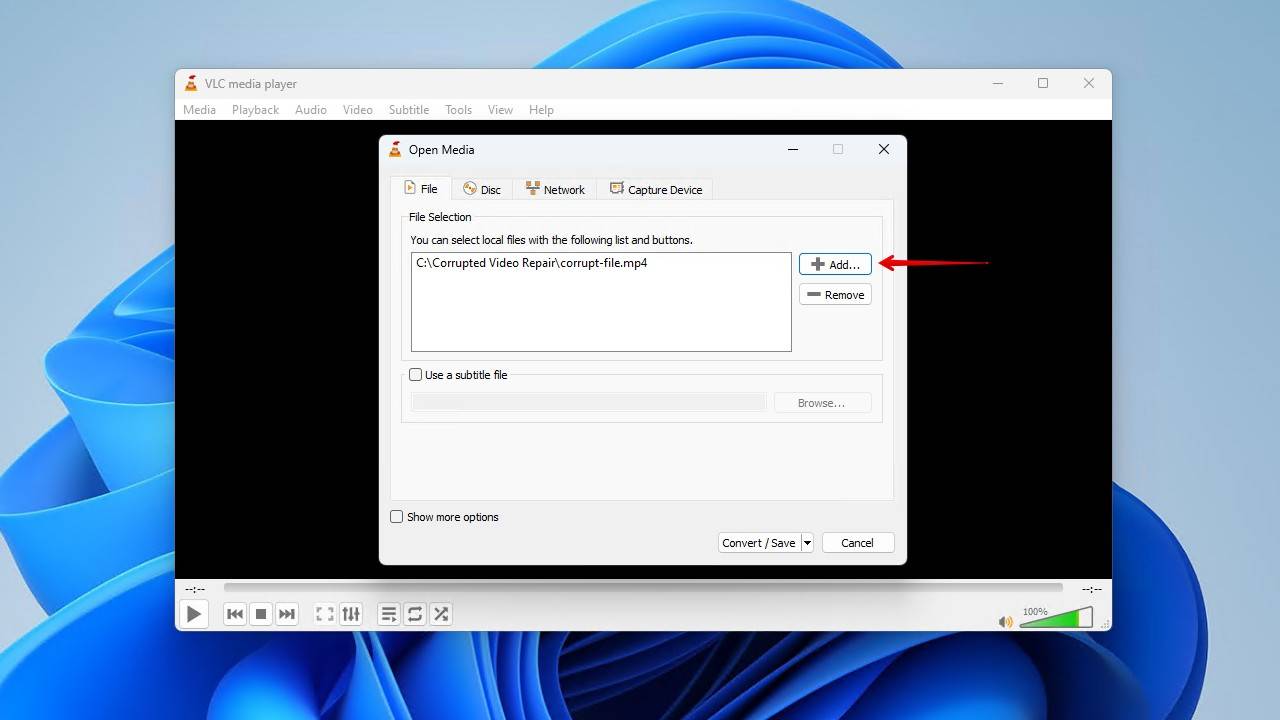
- Click Convert/Save.

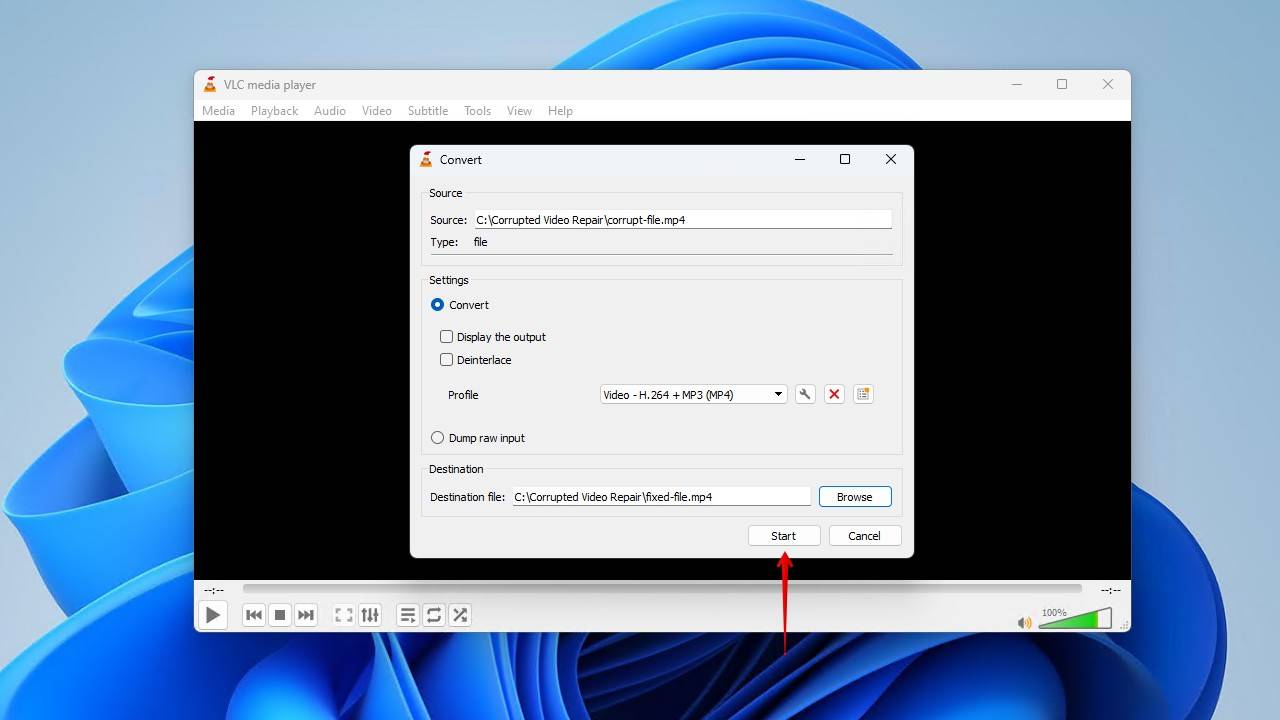
- Choose a profile, or create your own, and select a destination location. Click Start.
Pros:
- Free and open-source – Not a cent is required to download and use VLC.
- Customizable profiles – The ability to create unique profiles gives you control over how the application handles the video and audio tracks.
- Available on all major OS – VLC is available on Windows, macOS, and Linux.
Cons:
- Limited repair scope – Since it’s not technically a video repair tool, its repair scope is quite limited.
- No error reports – VLC does not provide any detailed error report specifying why the repair failed.
Option B: DivFix++
For AVI files specifically, you’ll want DivFix++. AVI is sometimes overlooked as it’s an older video file format, meaning it’s left out of software designed for video file error repair. This tool intends to fix that, as it only works with AVI file formats. It also includes some options for advanced users, such as the ability to strip the index, check for errors, and recover from key frames.
Take a look at how DivFix++ can be used to repair an AVI file:
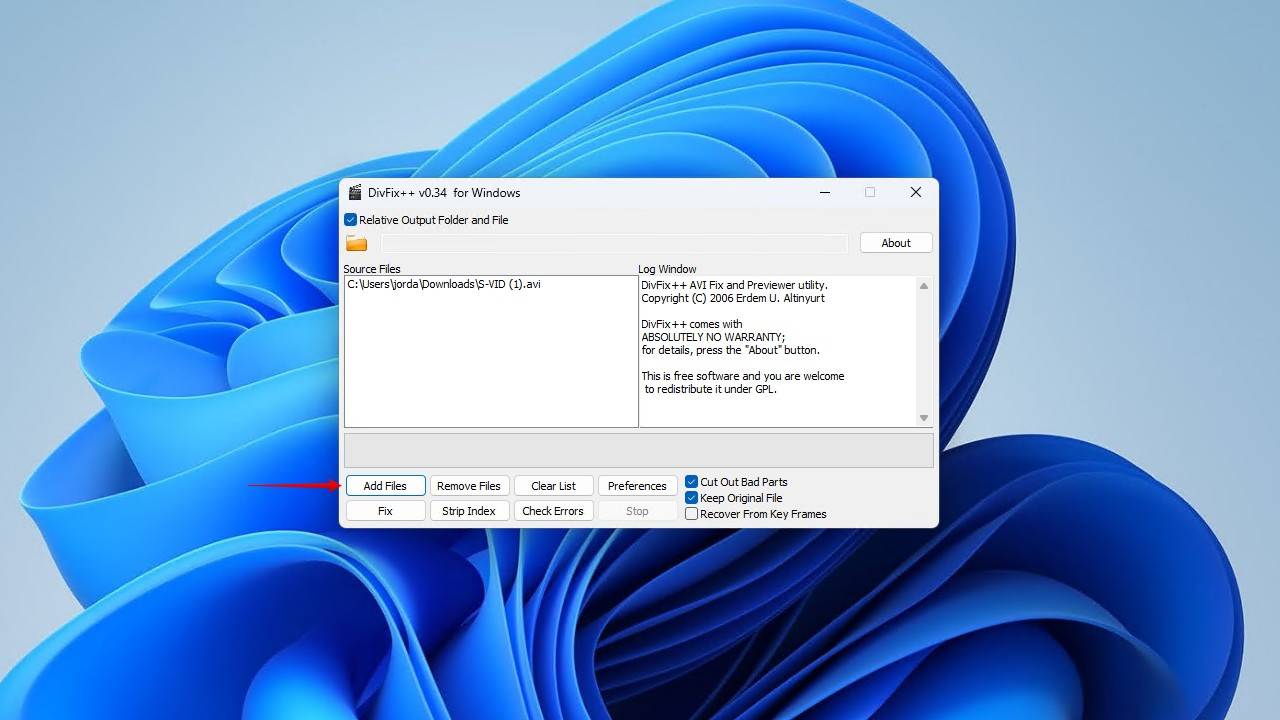
- Download and open DivFix++.
- Click Add Files and choose the corrupted video.
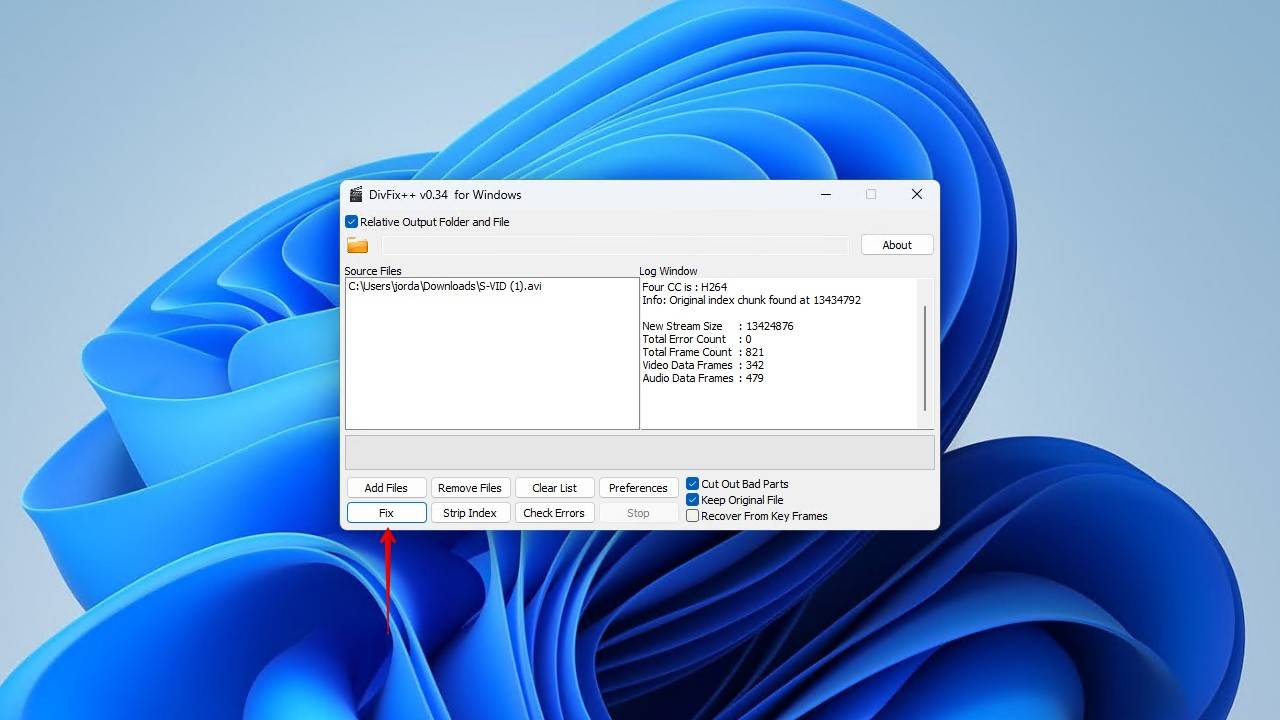
- Click Fix.
Pros:
- Specialized for AVI files – Designed specifically to fix corrupted or damaged AVI video files.
- Free and open-source – The tool is available completely for free and open-source.
- Available on all major OS – You can use DivFix++ on Windows, macOS, and Linux.
Cons:
- Only works with AVI – Only suitable for scanning and fixing AVI files. It will not work with other formats.
- Limited features – The tool is very lightweight, so you don’t get access to a lot of additional repair features.
We’ve tested a bunch of video repair tools. If you want to see more options, check out our list of the best video repair software which consists of both online and software-based solutions.
How to Fix Corrupted Video Using CMD
If you’re more comfortable working through a command-line interface (CLI), you still have some very reliable options available to you. Let’s take a look at Untrunc and FFmpeg, both of which can uncorrupt video files.
Option A: Untrunc
Untrunc is a command-line tool that focuses on fixing truncated videos. In order to do so, it will need a healthy sample video that was shot from the same device that recorded the corrupted video.
This is the basic structure of the command we’ll be using:
& “untrunc.exe” “reference.mp4” “corrupted.mp4”
As you can see it’s very straightforward, only requiring you to state where Untrunc is located and the paths to both the reference and corrupted files. We’ll just be using Untrunc straight out of the box, but you can also set up a PATH environment variable if it makes it easier for you.
Follow these instructions to uncorrupt a video file using Untrunc:
- Download and unpack Untrunc.
- Right-click Start and click Admin (Terminal).
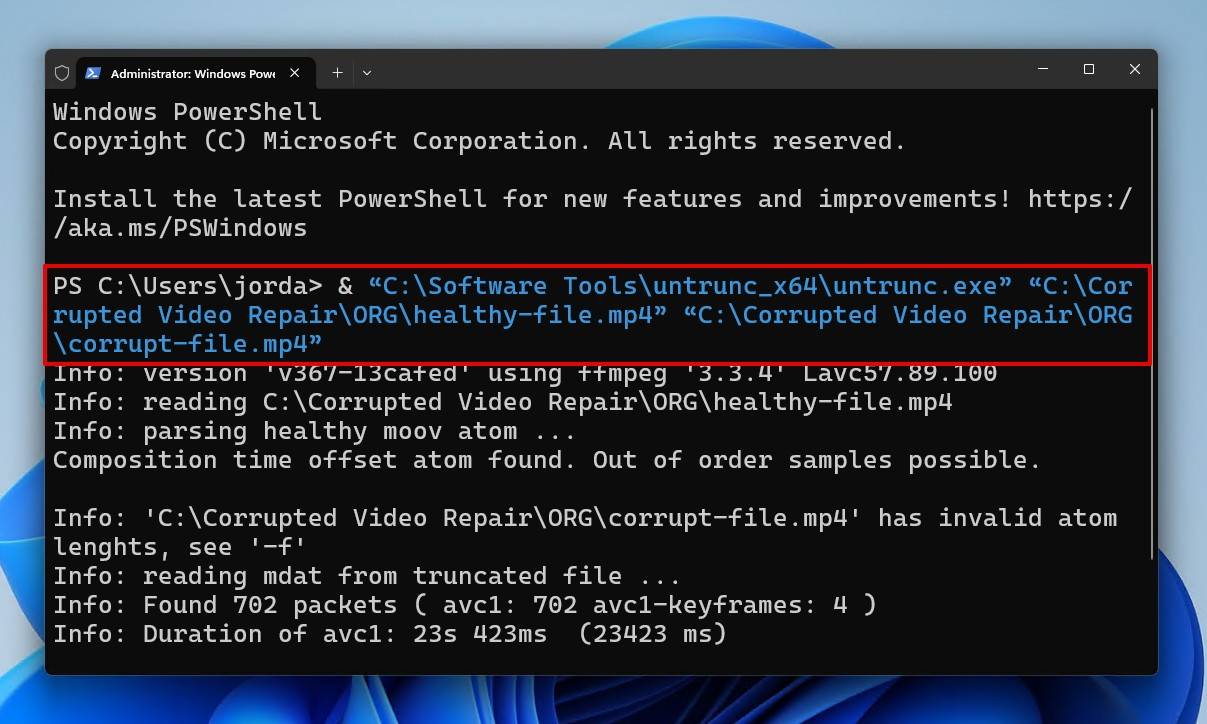
- Type the following command, but customize it so it includes your own paths to Untrunc and the two videos.
& “C:\Software Tools\untrunc_x64\untrunc.exe” “C:\Corrupted Video Repair\ORG\healthy-file.mp4” “C:\Corrupted Video Repair\ORG\corrupt-file.mp4”
Pros:
- Ideal for truncated files – Specializes in fixing truncated videos in the MP4, M4V, MOV, or 3GP format.
- Free and open-source – Open-source and available for free.
- Works on all major OS – Works on Windows, macOS, and Linux.
Cons:
- Difficult for novice users – While not extremely difficult, the CLI can prove difficult to use for some users.
- Only suitable for minor corruption – Only works for truncated files. For more advanced corruption, it needs to be paired with FFmpeg.
Check out the GUI version of Untrunc if you find the CLI too tedious.
Option B: FFmpeg
FFmpeg is one of the most powerful open-source tools for handling multimedia files. It was created to give users the ability to perform a wide range of tasks, like conversion, compression, editing, streaming, and most importantly in this case, repair. Because its functionality is so vast, there’s more than one way to fix corrupted video files. As such, I’m going to show you several.
Before we go through each FFmpeg fix, here’s how you can install it by setting up a PATH environment variable. This will make using FFmpeg much easier, especially for each step.
- Download the full build of FFmpeg from Gyan.dev and extract it (ideally somewhere it will stay).
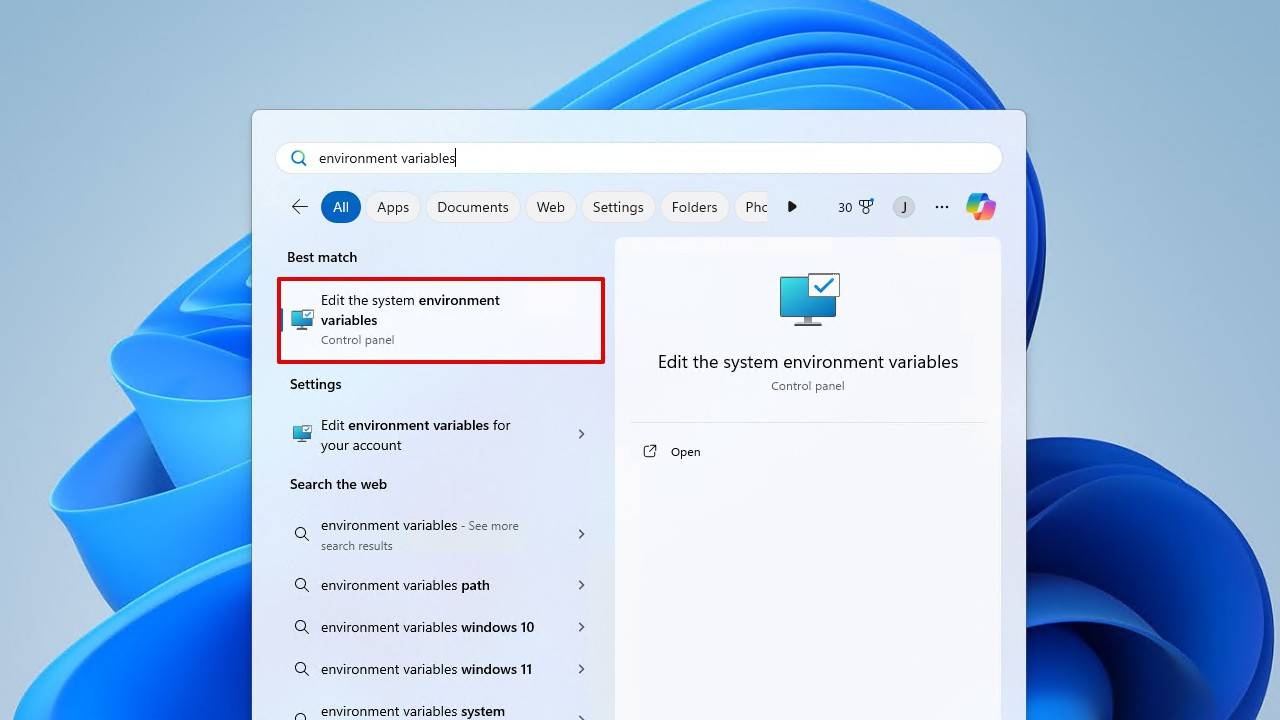
- Click Start and search “Environment Variables”. Open Edit the system environment variables.
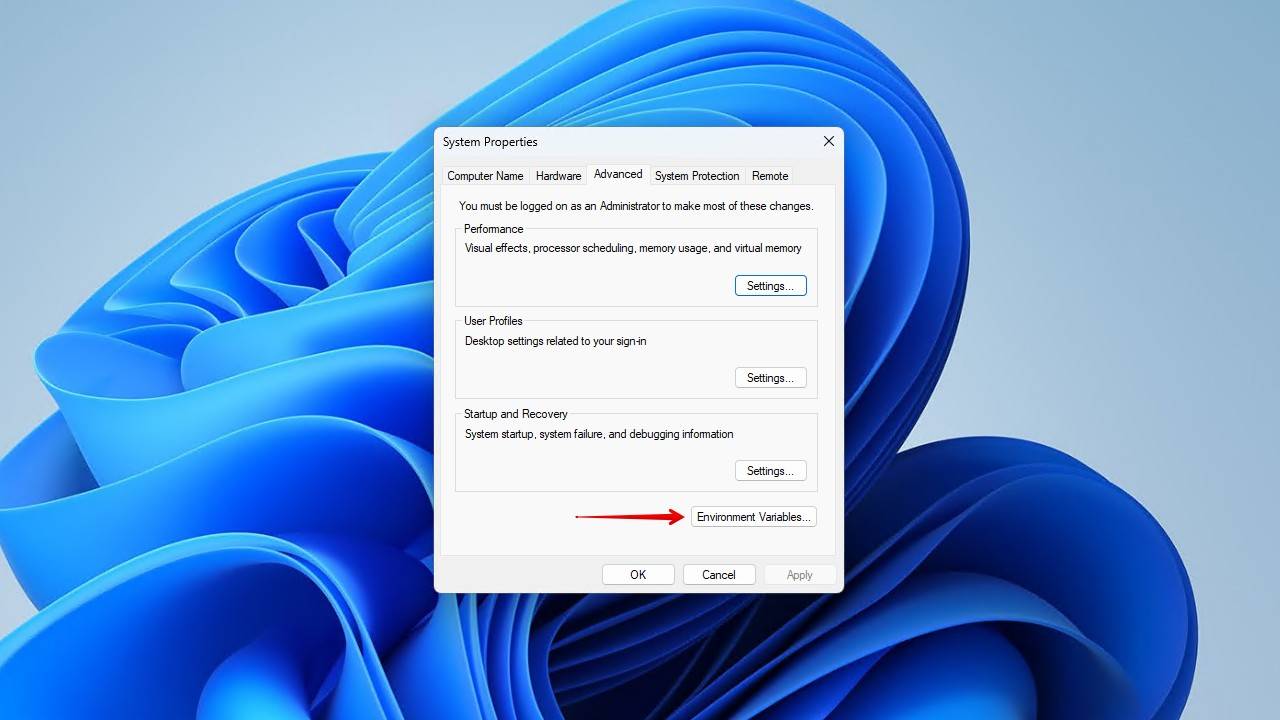
- Click Environment Variables.
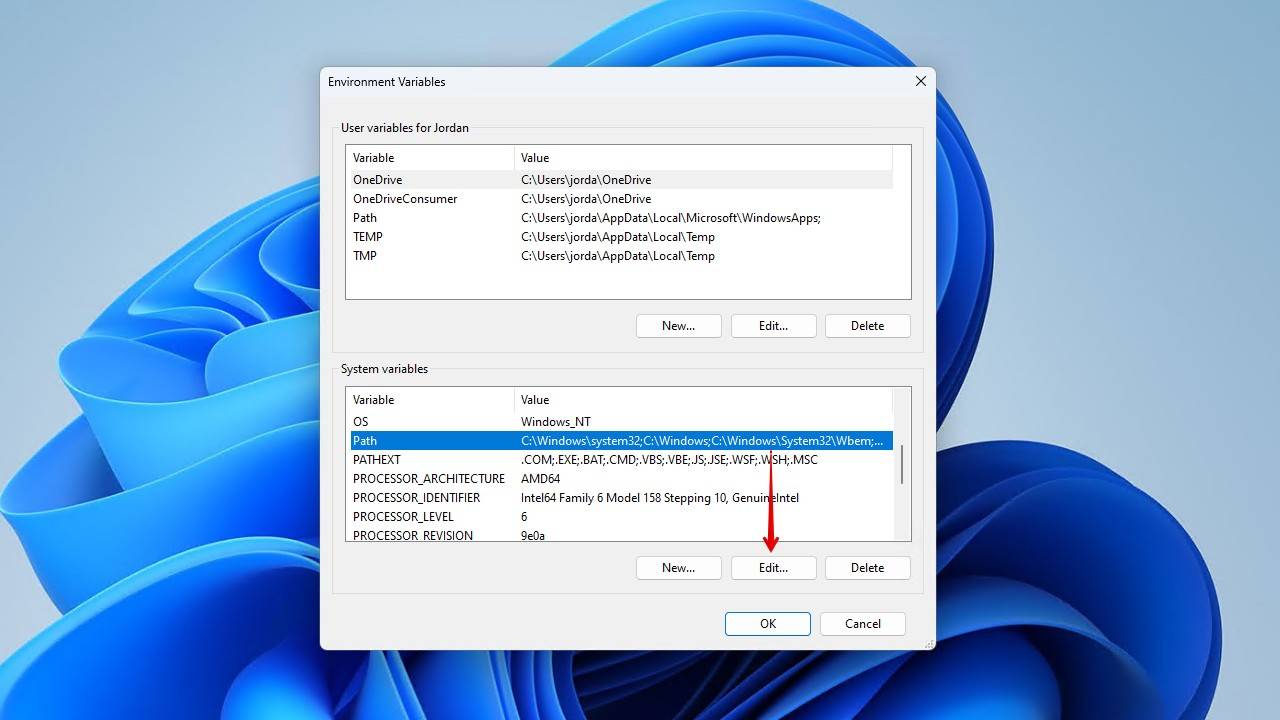
- In the “System variables” section, find and select Path, then click Edit.
- Click New and add the path of the FFmpeg bin folder. For example, if you extracted it to the C: drive, it will be C:\ffmpeg\bin. Once added, close all the open windows by clicking OK.
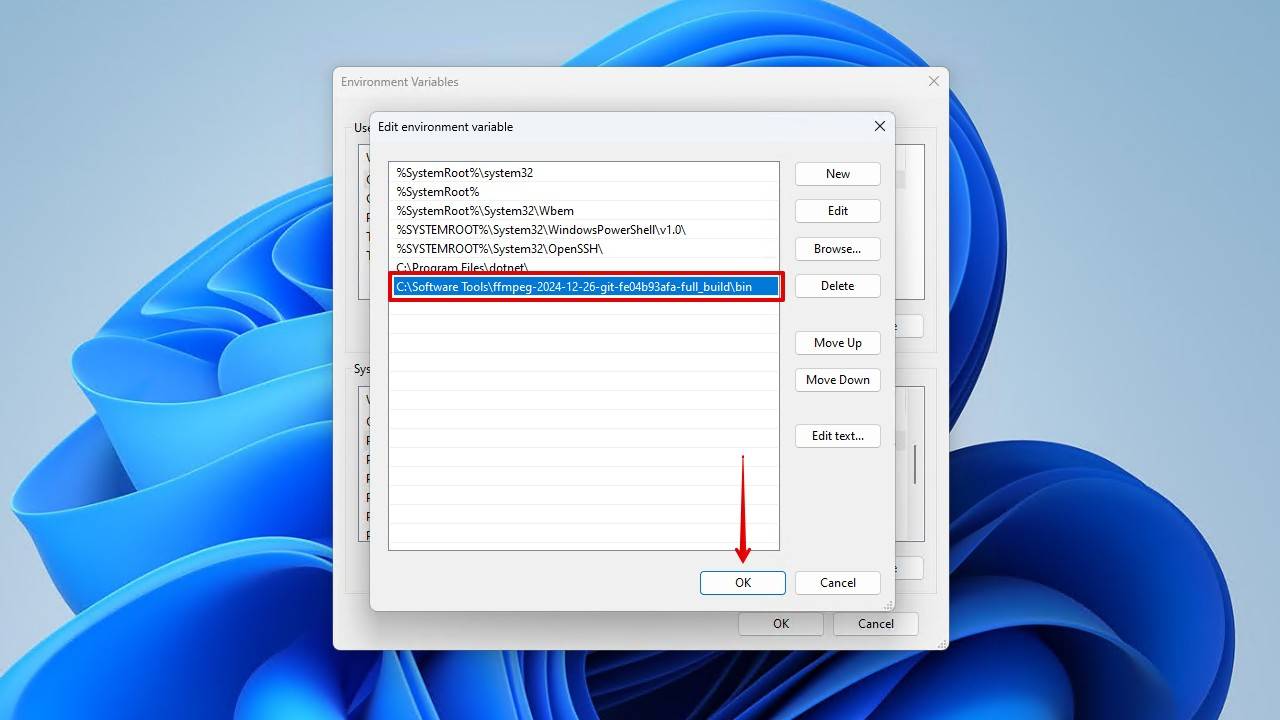
While each one is intended to solve a certain type of corruption, feel free to try each if you’re unsure what type of damage your video file has sustained.
Basic File Repair
Should the video file index be damaged, video players will be unable to seek within the file, disrupting playback. The same is true for other, smaller kinds of issues like missing metadata and timestamps.
Here’s the command we’ll be using:
ffmpeg -i corrupted.mp4 -c copy fixed.mp4
This command tells FFmpeg to take the contents of the input file (corrupted.mp4) and copy it to a new container (fixed.mp4) without re-encoding the video and audio streams. This will ensure the video file is fixed while preserving the original quality.
Here’s how to use it:
- Open the folder where your corrupted video is located.
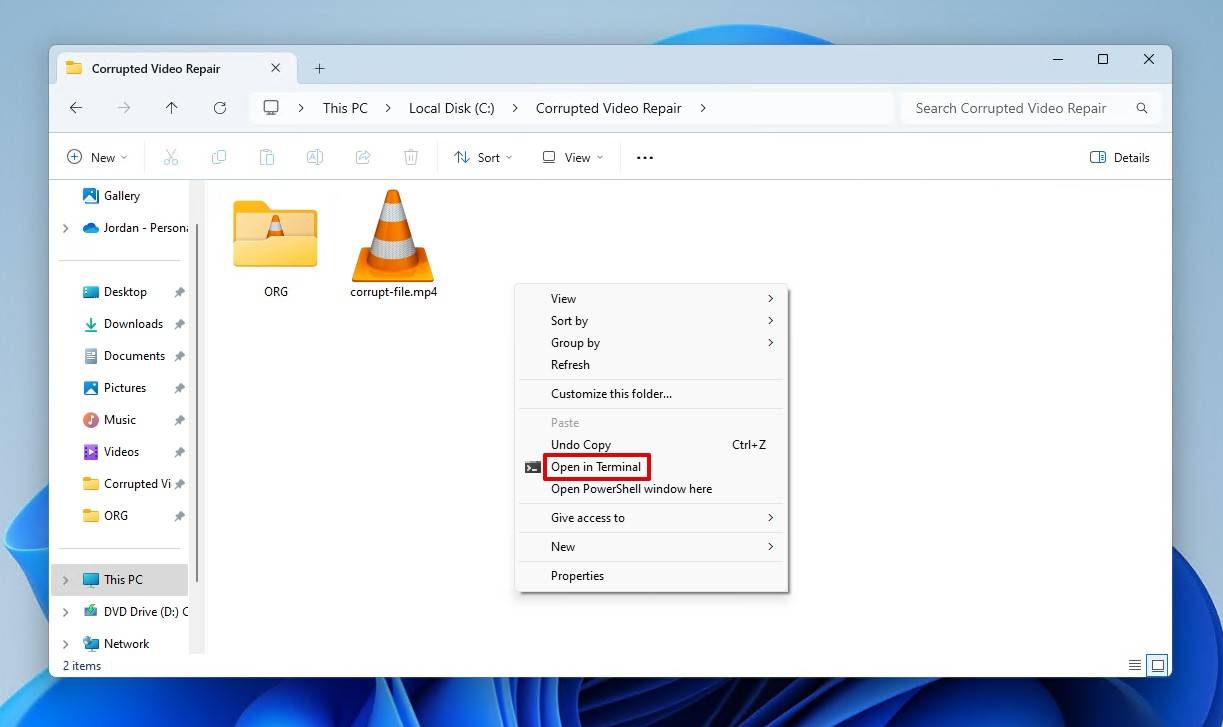
- Shift + Right-click an empty space in the window and click Open in Terminal.
- Type the below command, modifying it with the name of your corrupted file and the desired output location.
ffmpeg -i corrupted.mp4 -c copy fixed.mp4
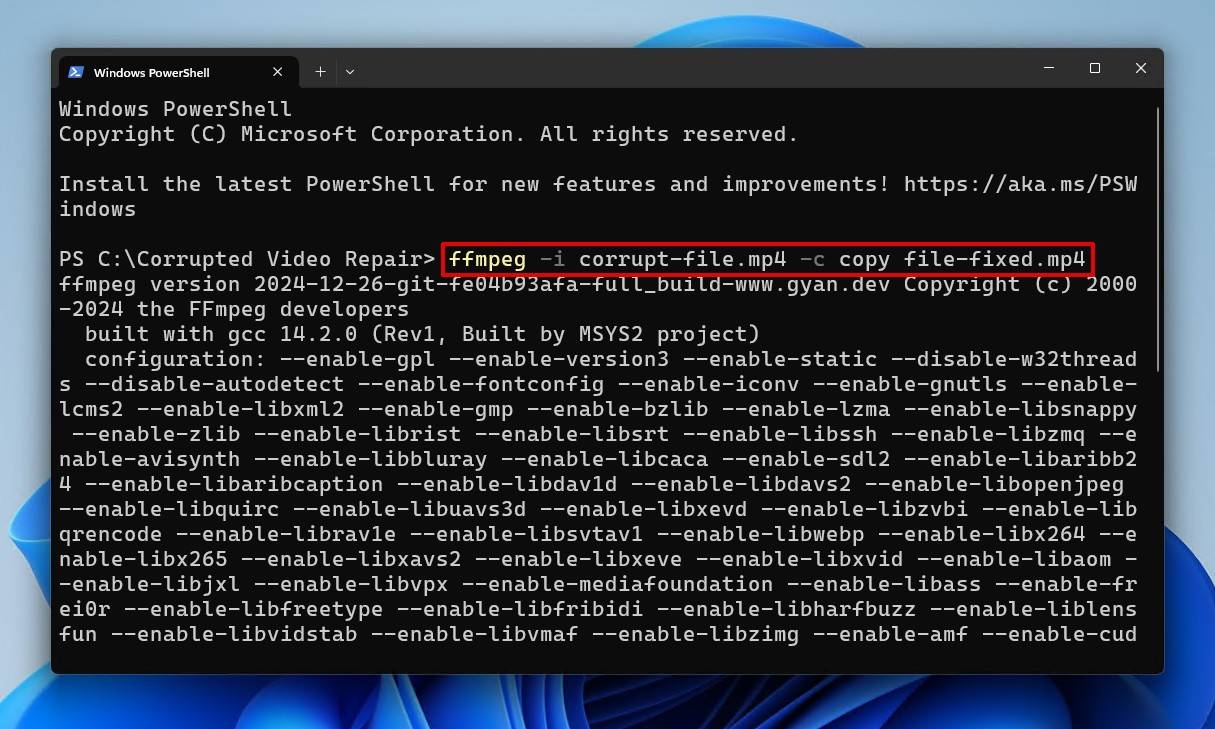
- Press Enter.
Advanced File Repair
For more elaborate types of corruption, re-encoding the video file may be necessary. Re-encoding the video involves decoding it and compressing it again, sometimes into a different format. This is the final solution as the command is a bit more complex and it will take some time to run, considering it’s reprocessing the entire video. Also, keep in mind that some quality loss is to be expected.
Here is the command we’ll be using:
ffmpeg -vcodec mpeg4 -b:v 7561k -qscale:v 2 -acodec aac -ac 2 -async 1 -strict experimental fixed.mp4 -threads 0 -i corrupt-file.mp4
This is what each parameter does, excluding the input and output:
- -vcodec mpe4 – Specifies the MPEG-4 codec.
- -b:v – Sets the bitrate to 7561 kbps.
- -qscale:v 2 – Specifies the video quality as 2 (in FFmpeg, lower numbers equate to higher quality).
- -acodec aac – Specifies the AAC codec.
- -ac 2 – Specifies that it has 2 audio channels (stereo).
- -async 1 – Synchronizes audio with the video.
- -strict experimental – Makes use of FFmpeg’s experimental features.
- -threads 0 – Enables FFmpeg to control how many threads are used to process the video.
This is how you can run the FFmpeg command:
- Open the folder where your corrupted video is located.
- Shift + Right-click an empty space in the window and click Open in Terminal.
- Input the command, modifying it to specify your input and output locations.
ffmpeg -vcodec mpeg4 -b:v 7561k -qscale:v 2 -acodec aac -ac 2 -async 1 -strict experimental fixed.mp4 -threads 0 -i corrupt-file.mp4
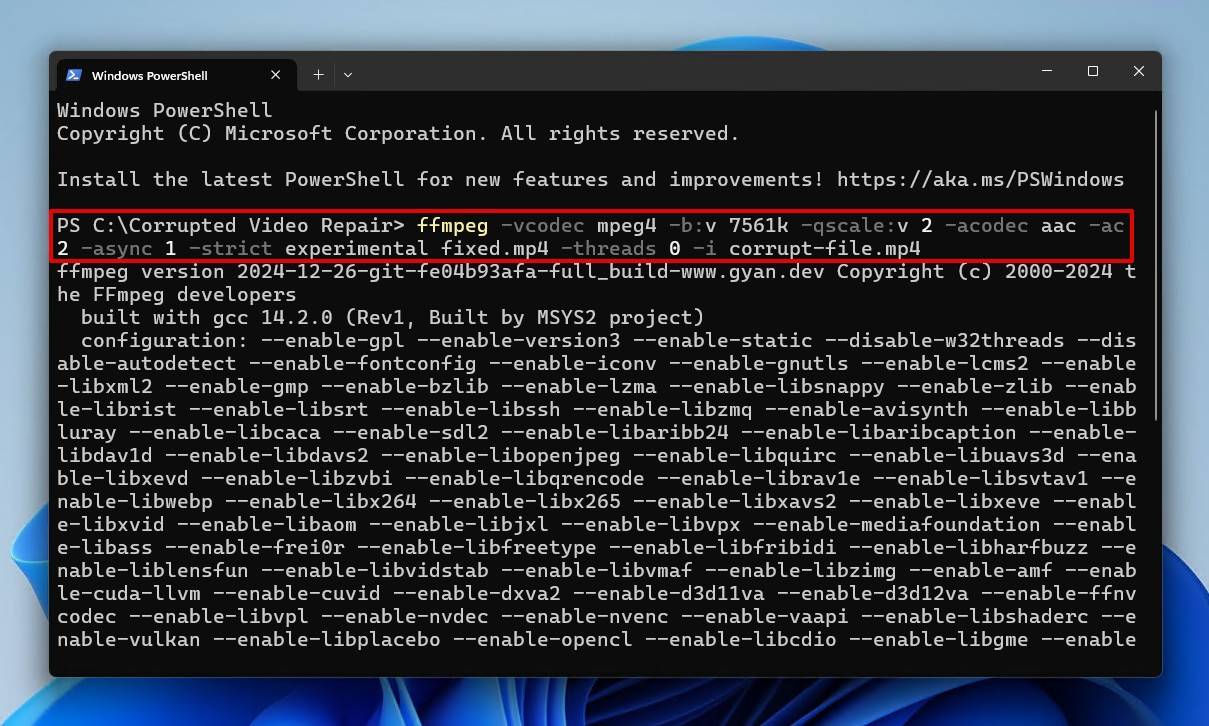
- Press Enter.
Pros:
- Extremely versatile – FFmpeg supports basically all video and audio formats and codecs, making it suitable for repairing almost any video file.
- Free and open-source – FFmpeg is free and open-source, allowing anyone to use it.
- Playback recovery – It can extract playable frames and skip over corrupted ones, allowing for at least partial recovery.
- Advanced options for custom repairs – Enables precise control over video and audio streams, allowing you to simply move them to a new container or completely re-encode the video.
Cons:
- Can be complicated – Even the simplest commands require some understanding of what each parameter does, and it can quickly become overwhelming.
- No graphical user interface (GUI) – Navigating such a tool from a terminal interface can be challenging, especially with the more complex commands.
Tried everything but still struggling to fix your corrupted video? Try reaching out to our Handy Recovery Advisor Community. There, our experts and experienced readers will be happy to give you a helping hand. Remember: the more details, the better. When posting, be sure to include what device recorded the video, the file format, as well as any other relevant information.
FAQ
Can I repair a video file for free?
Absolutely. You can repair corrupted video files using free tools like Clever Online Video Repair, DivFix++, and FFmpeg. There are plenty of free options out there, with many of them being more than suitable for the task.
Are online tools safe for repairing videos?
The vast majority of online tools for video repair will be safe, but there is always a risk factor involved. Do your due diligence by carefully reading how the online tool handles your data and consult reviews to see what other users have to say.
Can VLC Media Player fix all types of video corruption?
No. VLC can only fix minor issues with AVI files. Other forms of corruption may be fixed using its conversion feature, but it’s not enough to say that it’s capable of fixing all types of video corruption.
Can I use Untrunc if I don’t have a reference file?
Unfortunately not. A reference file is required from the same recording device in order for Untrunc to copy essential metadata over to the corrupted file.
Can I fix corrupted videos directly on my smartphone?
Yes, you can fix corrupted videos directly on your smartphone using online tools like Clever Online Video Repair and FileConverto. Such tools can be used from your smartphone’s browser.
Can I repair a partially downloaded video file?
Yes, it is possible. However, you will only be able to recover the parts you downloaded. In some cases, the partially downloaded file will need to be recovered before repairs can be made. For example, if you tried downloading a MOV video file, you would need to recover the deleted MOV file before you can repair it.
Will repairing a video affect its quality?
It depends on the repair that’s implemented. If you’re simply moving the contents of the file to a new container, also known as remuxing (or re-multiplexing), no quality loss will occur. However, if you re-encode the video, then some quality loss is to be expected.
This article was written by Jordan Jamieson-Mane, a Staff Writer at Handy Recovery Advisor. It was also verified for technical accuracy by Andrey Vasilyev, our editorial advisor.
Curious about our content creation process? Take a look at our Editor Guidelines.
