Your iCloud backup is supposed to protect your precious files against unexpected data loss, device malfunctions, or even theft. But accidents do happen, and iCloud backup data can be accidentally deleted. Thankfully, their recovery is possible, and we’re here to show you how to recover deleted files from iCloud backup using several time-tested methods.
Where Do Files Go When They Are Deleted from My iCloud Backup?
When you delete a file that’s included in your iCloud backup, two things happen:
- The file is moved to the Trash folder on macOS or (if it is a photo or video) the Recently Deleted album on your iPhone or iPad.
- The recently deleted files from iCloud Drive and other apps become available in the Data Recovery section of iCloud.com, and it stays there for 30 days.
While the file is in the Trash folder, the Recently Deleted album, or the Data Recovery section of iCloud.com, it’s not actually permanently deleted, and you can recover it even without a backup using native features and the best data recovery software for Mac.
Note: If you keep your Mac and iPhone/iPad synchronized using iCloud, then don’t be surprised to see the deleted email copy, document, video, picture, voice memo, or audio file disappear from both devices. That’s how iCloud synchronization is supposed to work, and it’s also the reason behind some complaints about iCloud files and Mac desktop files disappearing.
How Can I Recover Deleted Data from My iCloud Backup?
There are several methods that you can use to recover deleted iCloud data. Let’s guide you through each method, helping you find the best approach to save your lost files from permanent deletion.
Method 1: Retrieve Missing Files from the iCloud Recently Deleted Folder
iCloud maintains its own database of recently deleted files, making it easy for users to recover data that has been accidentally removed. The database includes files deleted from both iCloud Drive and other apps, such as your Calendar, Contacts, or Safari bookmarks.
Follow these steps to retrieve missing files from the iCloud Recently Deleted folder:
- Go to: https://www.icloud.com/
- Log in to your iCloud account.
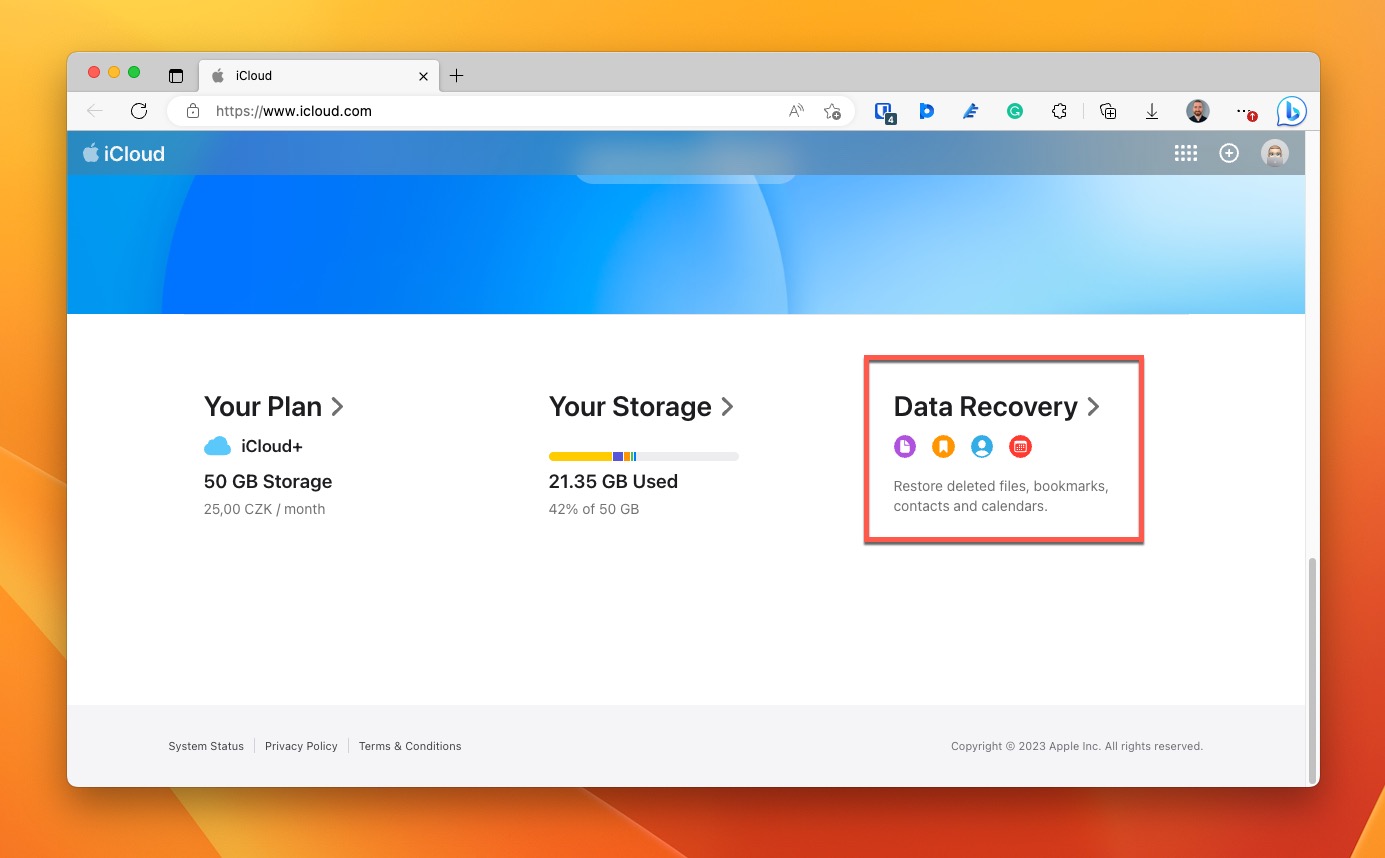
- Scroll down and select the Data Recovery option.
- Choose what you want to restore.
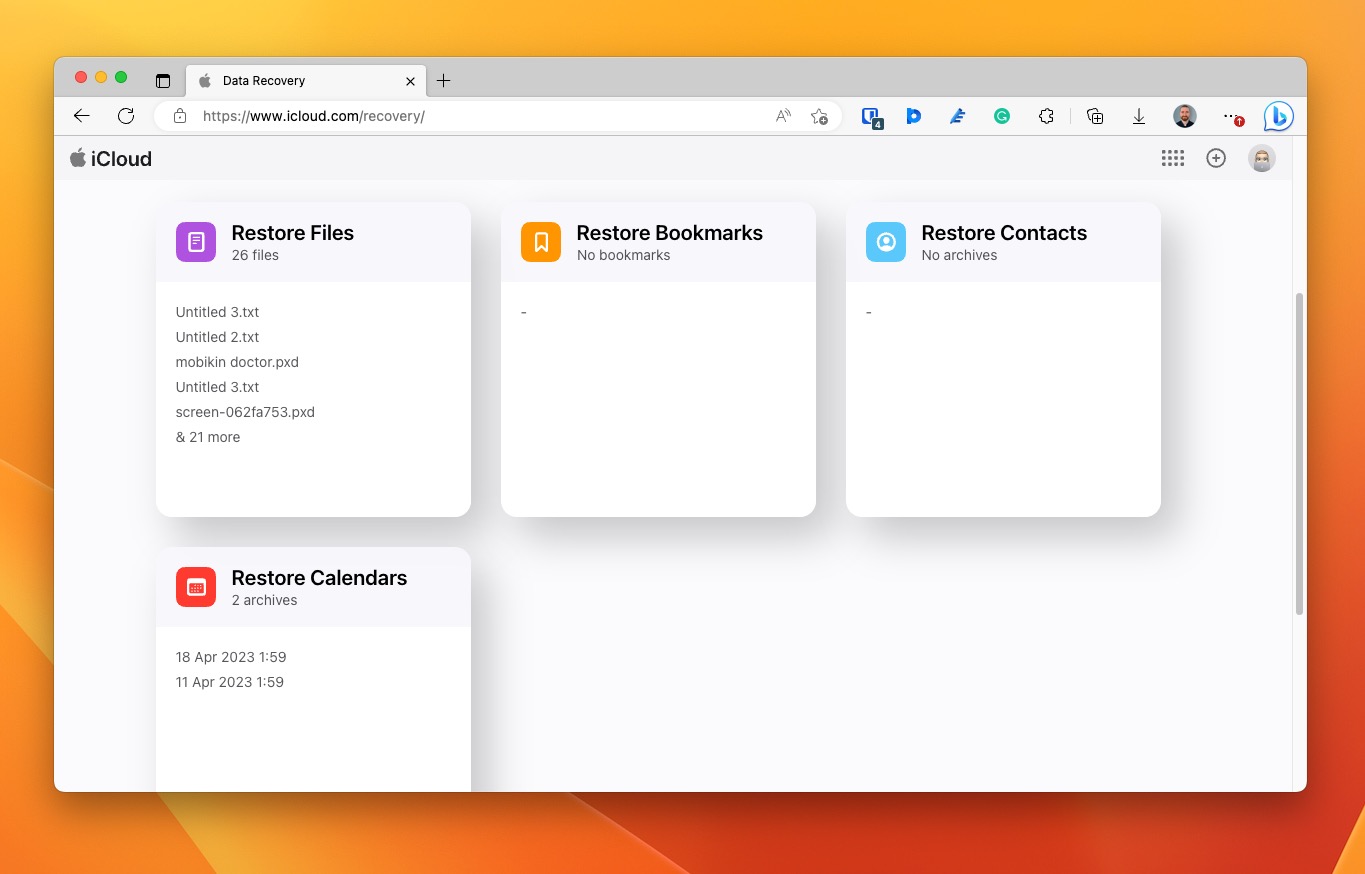
- Confirm your decision to restore the selected files.
Additionally, don’t forget to check the Recently Deleted folders in different sections of iCloud, such as iCloud Photos, iCloud Drive, or iCloud Pages, as files from these sections end up in the Data Recovery location only when they somehow bypass their own recovery locations.
Method 2: Restore Files from the Recently Deleted Folder on iPhone
When it’s not possible to recover deleted data from the iCloud Recently Deleted folder, it’s time to check your iPhone or iPad for the Recently Deleted folder within various apps, such as Photos, Messages, and Notes.
Restore files from the Recently Deleted folder in the Photos app:
- Launch the Photos app on your iPhone.
- Navigate to the Albums tab.
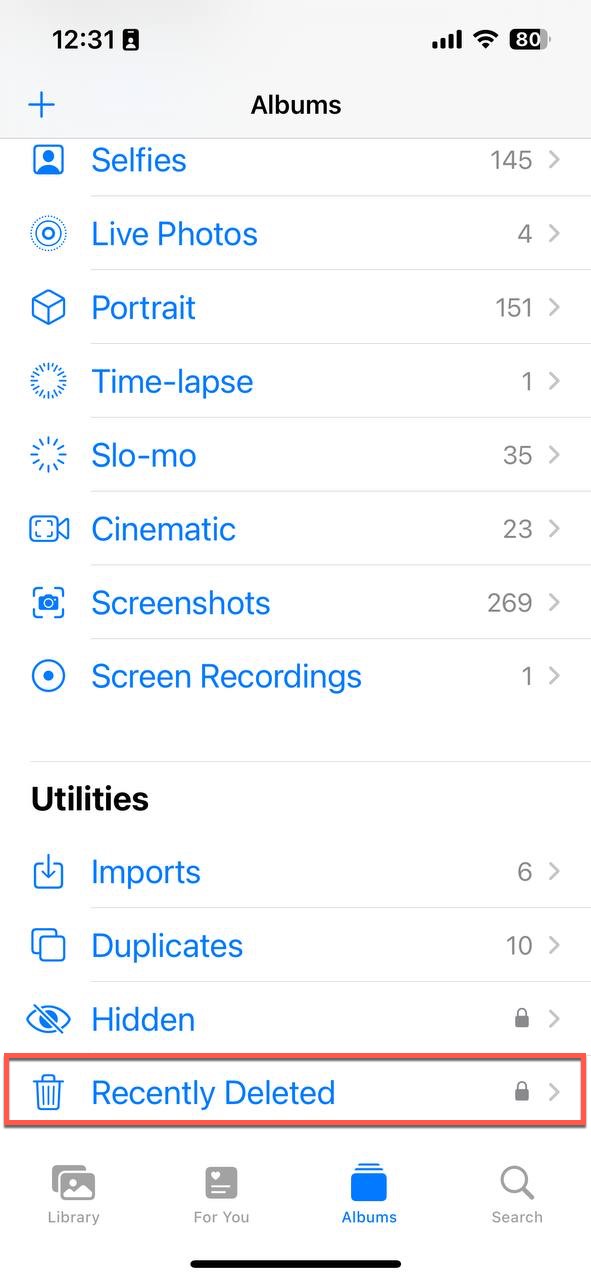
- Select the Recently Deleted folder in the Utilities section near the bottom.
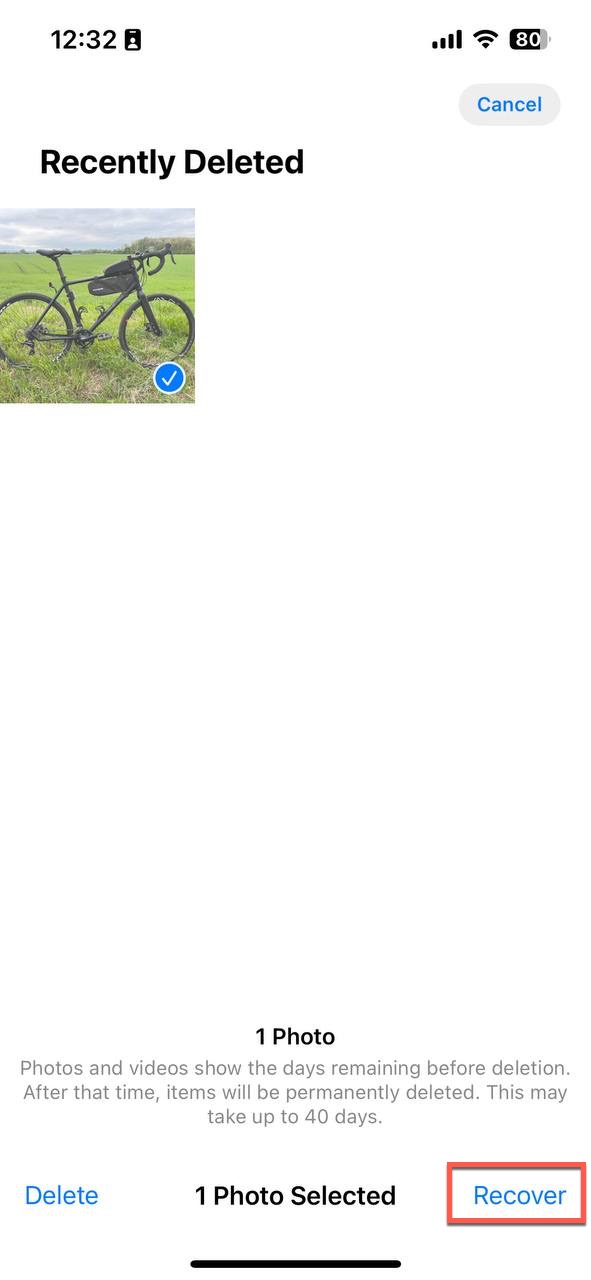
- Pick the photos you want to retrieve.
- Tap the Recover button to move them back to where they were originally.
Tip: There are several other ways to recover deleted photos from iPhone, and similar methods can also be used to recover deleted videos from iPhone.
Restore files from the Recently Deleted folder in the Messages app:
- Launch the Messages app on your iPhone.
- Tap the Edit button in the top-left corner.
- Tap the Show Recently Deleted option.
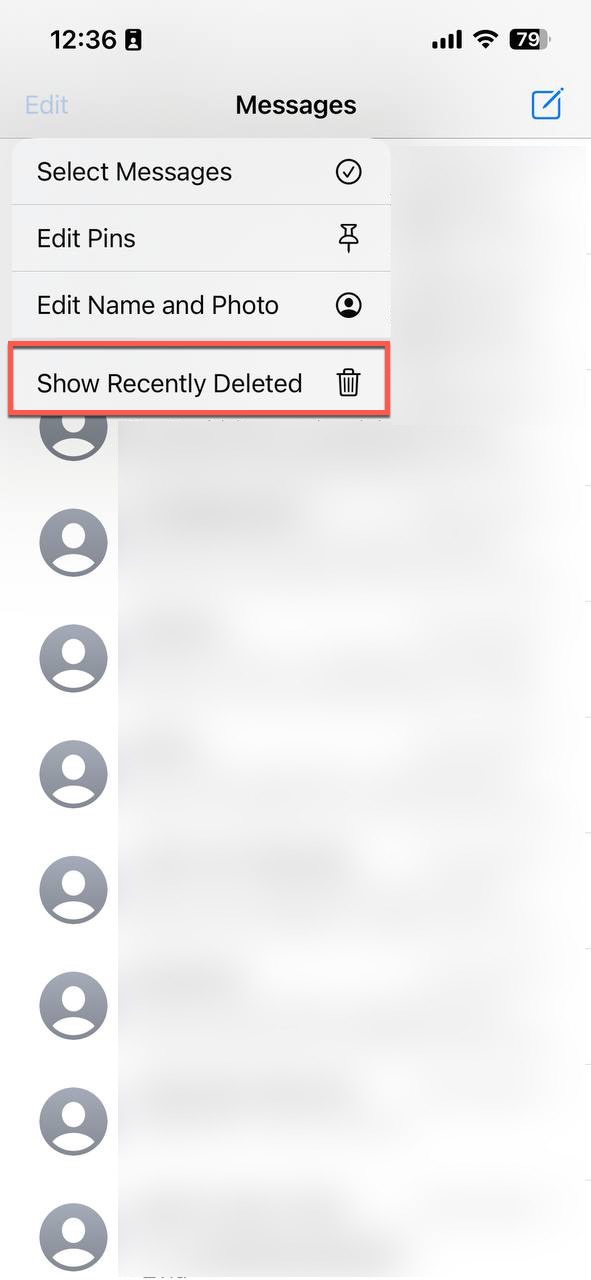
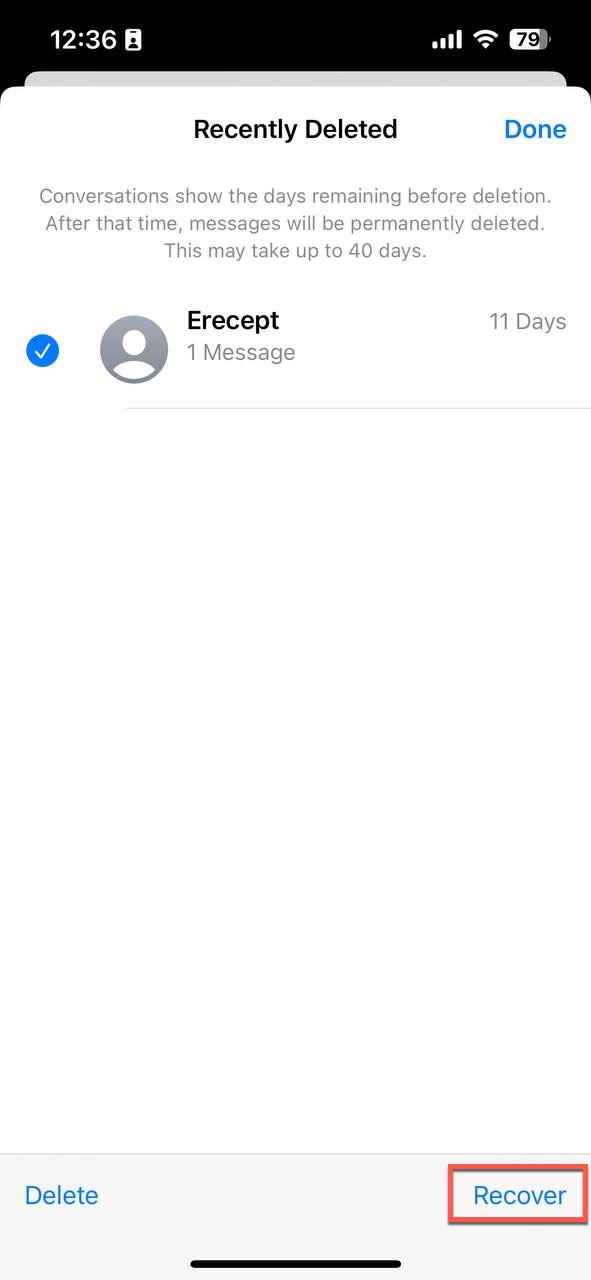
- Select the conversation you want to recover (alternatively, you can simply tap Recover All in the bottom-right corner to recover all recently deleted conversations in one go).
- Tap the Recover button.
Tip: Discover more solutions that can help you recover deleted text messages on iPhone.
Restore files from the Recently Deleted folder in the Notes app:
- Launch the Notes app on your iPhone.
- Select the Recently Deleted folder.
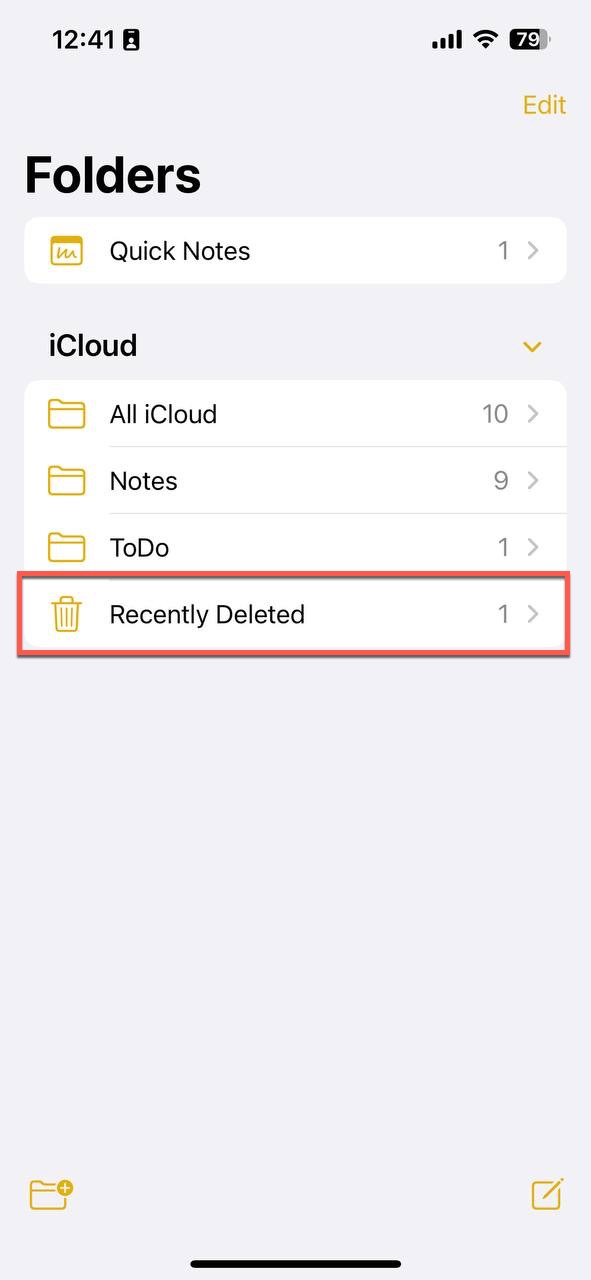
- Tap Edit in the top-right corner and choose the note or notes you want to recover.
- Tap the Move button in the bottom-left corner.
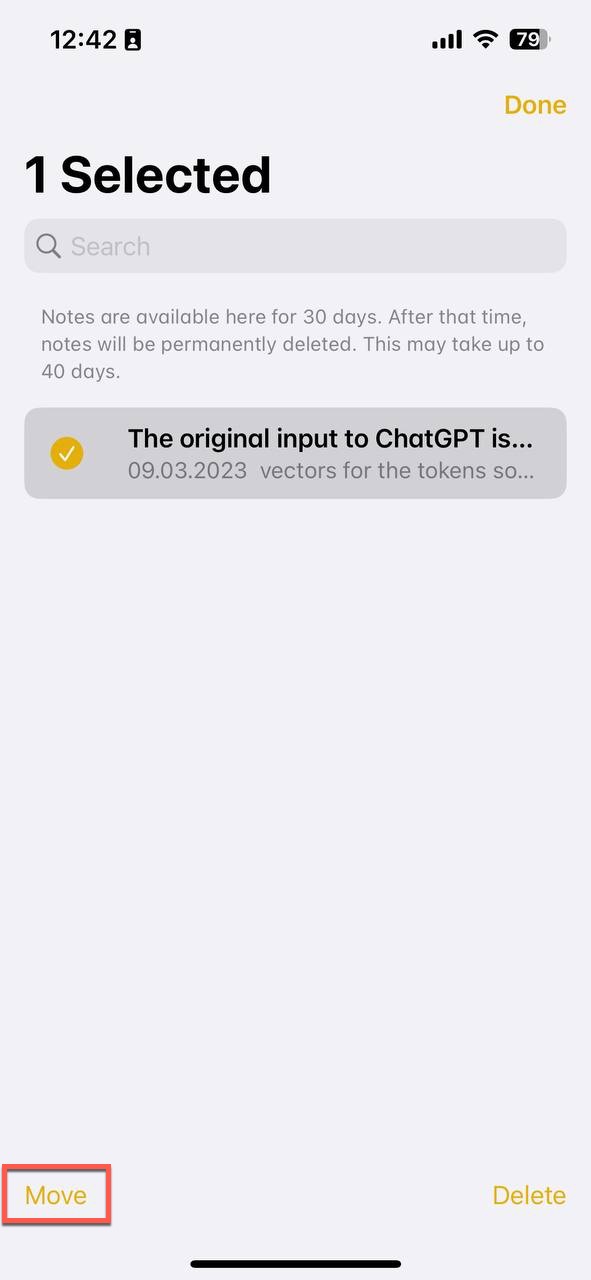
- Select the folder where you want to move the recently deleted notes.
Tip: Are your notes still missing? Then you can try to recover your deleted notes on Mac.
Method 3: Check the Trash Folder on Your Mac
Have you synchronized your iCloud with your Mac and then deleted an important file from your hard drive? Then you can check and recover the Trash folder on your Mac. The Trash folder is designed to temporarily store deleted files before they are permanently erased from your Mac, and retrieving files from it is as easy as it gets.
Here’s what you need to do to check the Trash folder on your Mac and recover lost files from it:
- Click the Trash icon on the right side of the Dock.
- Go through the Trash folder and look for your files. If you know what your files are called, then you can click the magnifying glass icon in the top-right corner and instantly locate them.
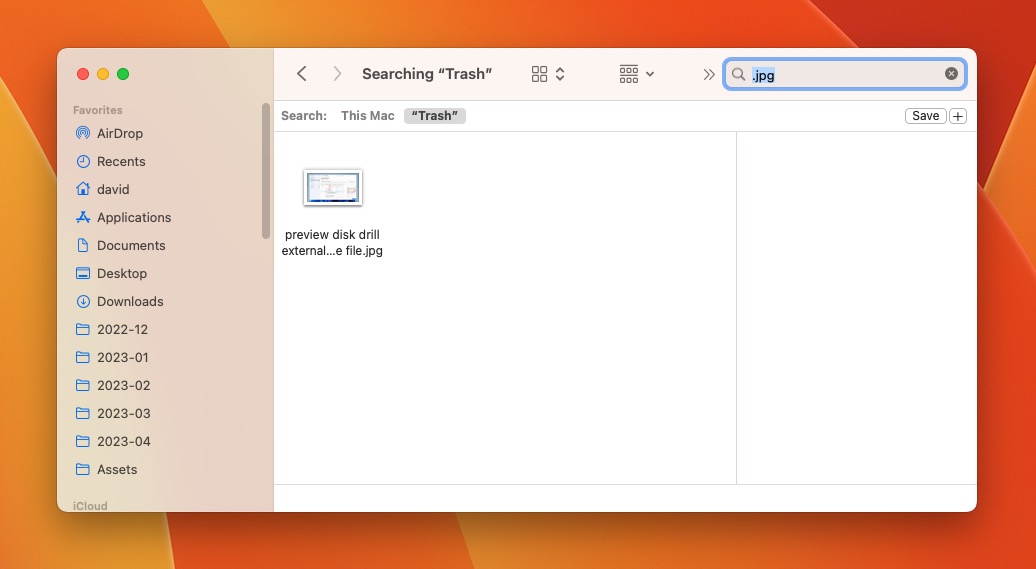
- Select the missing files.
- Click & drag the selected missing files to a safe location. You can also right-click any of the selected files and click the Put Back option. This will move them back to their original locations.
Method 4: Recover Deleted Backup Data on Mac
The files deleted from your iCloud backup may not be available, but that doesn’t necessarily mean they’re gone for good. There’s a good chance your files are still present on your Mac, and you can recover them using reliable data recovery software, such as Disk Drill.
We thoroughly reviewed Disk Drill not that long ago to test the data recovery application’s main and extra features, its recovery process, and usability. Here’s what we liked the most about it:
- Disk Drill has a gorgeous user interface that greatly simplifies the process of recovering deleted backup data on Mac.
- Disk Drill can recover photos and videos, contacts and calendar events, voice memos and text notes, bookmarks, chats, and other iCloud data.
- The free version of Disk Drill can preview an unlimited number of iCloud files.
- Included with Disk Drill are useful data protection features that can keep your iCloud Mac folder safe.
Disk Drill’s convenient interface makes it easy to scan the device where your deleted backup data was located, and its advanced data recovery algorithms can recognize hundreds of file formats and retrieve files even after the Trash folder has been emptied.
To recover deleted backup data on Mac using Disk Drill:
- Download and install Disk Drill for Mac. Make sure to install it on a different storage device than the one where your deleted backup data was located.

- Launch Disk Drill and scan the storage device with your deleted backup data.
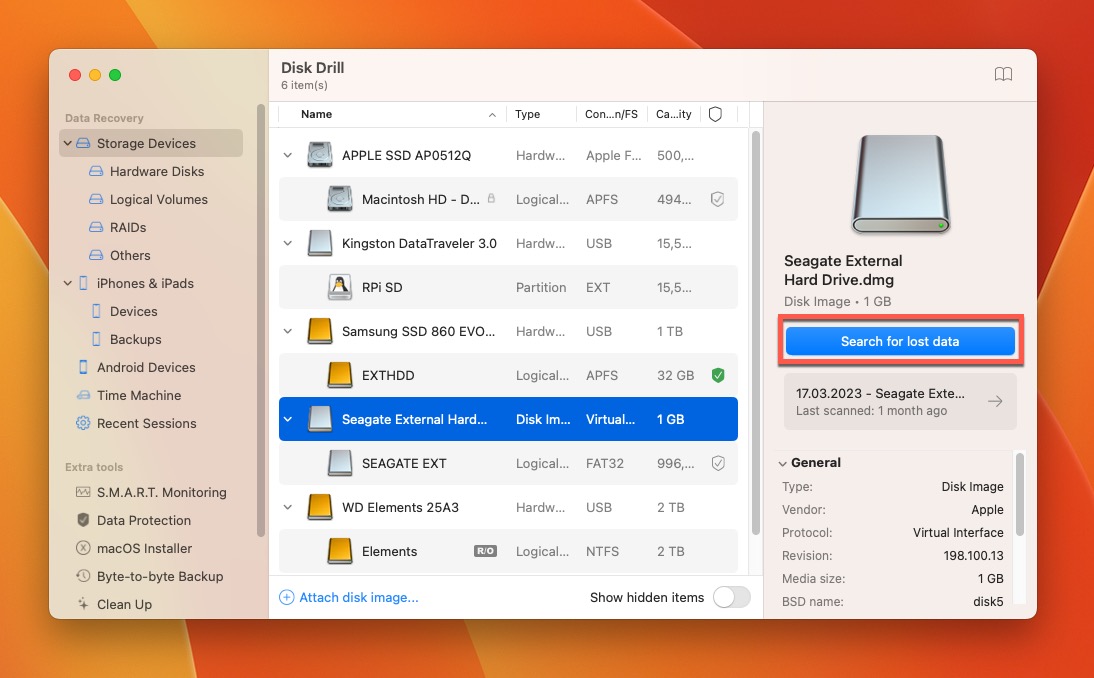
- Give Disk Drill all the time it needs to find your deleted backup data. If you want to, you can click the Review found items button to see scan results in real time.
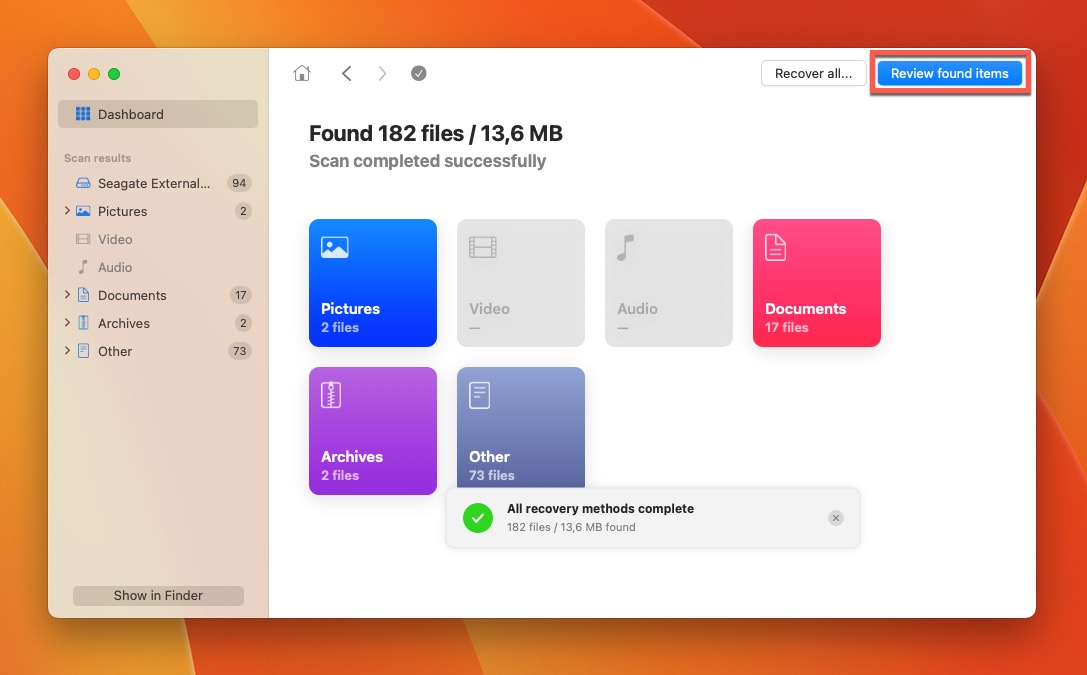
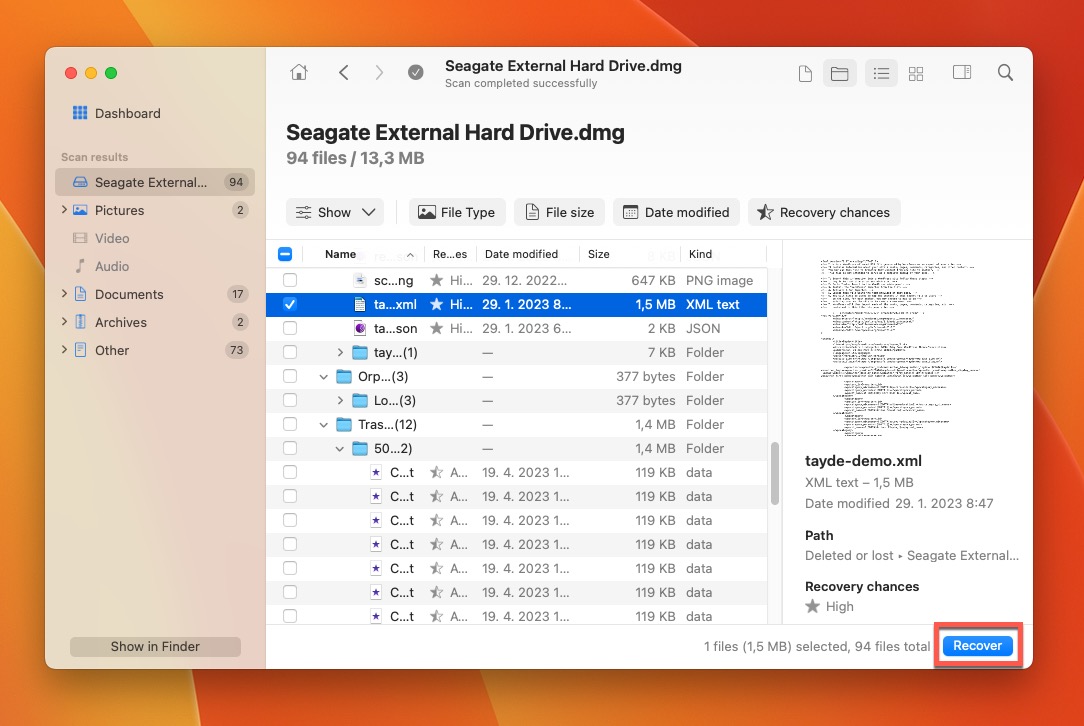
- Take full advantage of Disk Drill’s filters and preview capabilities to locate and select your missing backup data. For example, you can select the Pictures filter in the left pane to easily recover photos that have disappeared from your Mac.
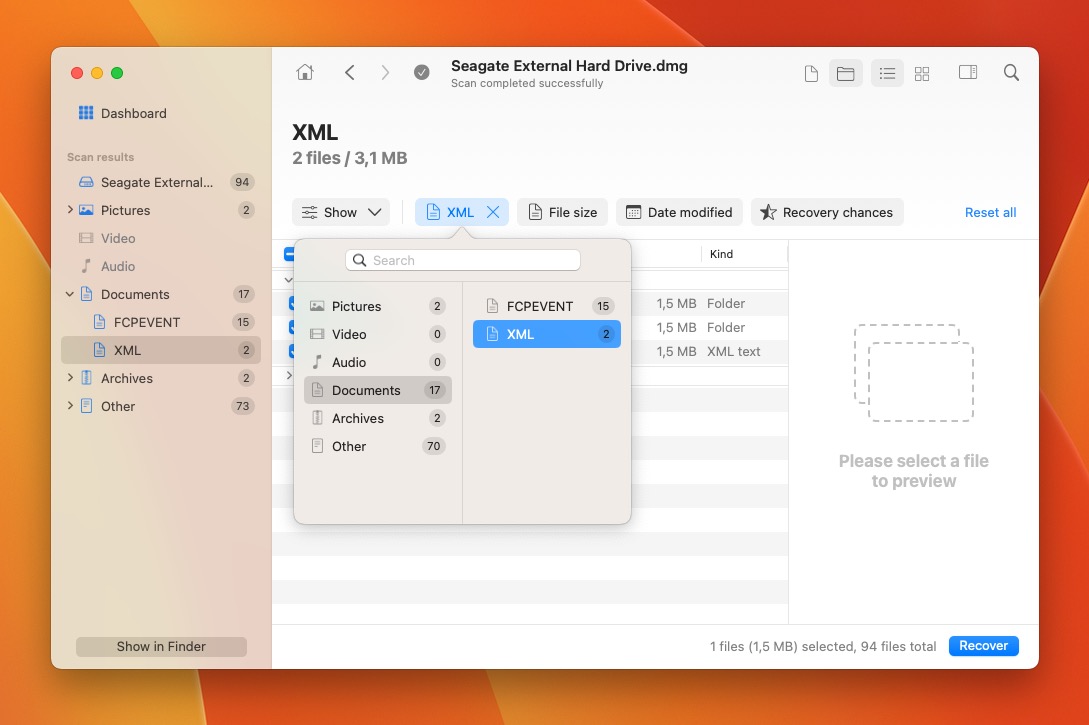
- Click the Recover button and tell Disk Drill where you want to recover your backup data.
Method 5: Scan Your iPhone for Missing Data
If your files are not present on your Mac, then you can scan your iPhone using data recovery software with support for iOS devices, and the top iPhone data recovery software currently available is Disk Drill.
Important: Disk Drill will be able to find more files from your iPhone if your backups are encrypted. To encrypt backups, go to Finder, select your iPhone, check the option “Encrypt local backups,” and choose a password. You will need this password later when interacting with backups and when scanning the device in Disk Drill.
Here’s how to scan your iPhone for missing data using Disk Drill:
- Start by downloading the free version of Disk Drill for Mac from its official website. Once downloaded, you can open the installer file and move Disk Drill to the Applications folder.

- Connect your iPhone to your Mac. Make sure to select the Trust option when asked if you want your iPhone to trust the Mac. Then, launch Disk Drill.
- Select the iPhones & iPads tab in the left pane. Choose your iPhone from the list of available devices and click the Search for lost data button to scan it. If Disk Drill reports the need for more free space on your Mac, connect an external disk and change the Workspace folder option accordingly in Disk Drill preferences.
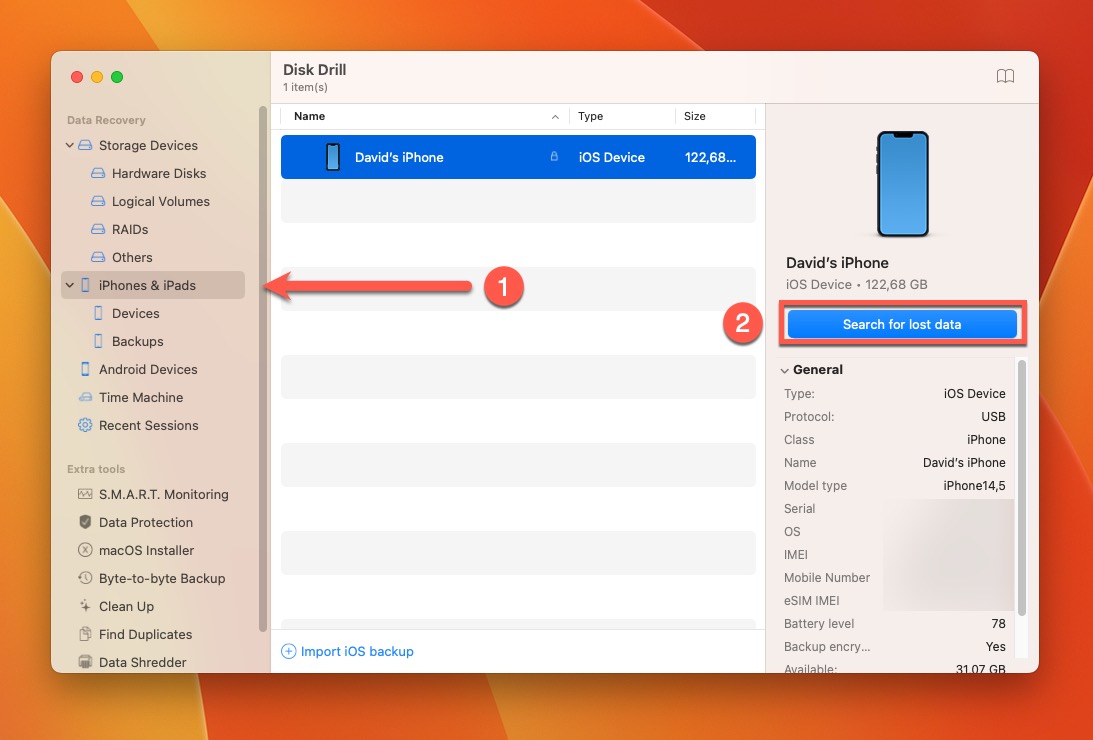
- Enter your password if your iPhone backups are encrypted and wait for Disk Drill to scan your iPhone using its advanced data recovery algorithms. You can then display all found files and conveniently narrow them down using Disk Drill’s filters and preview them to make sure they’re recoverable.
- Select all missing files and click the Recover button. Tell Disk Drill where you want to recover the selected files. You can then click Show results in Finder to instantly see your recovered files.
Keeping Your iCloud Backups Safe: Essential Tips
While it’s possible to recover deleted iCloud files, you should always do your best to prevent data loss and ensure that your valuable files and memories remain protected. Here are several essential tips to help you keep your iCloud backups safe:
- ☁️ Use multiple cloud backup services: iCloud isn’t the only cloud backup service available. There’s also OneDrive, Google Drive, Dropbox, Mega, and many other well-rated services that can provide an extra layer of security for your files. By diversifying where you store your data, you can minimize the potential impact of data loss from a single service.
- 📆 Maintain up-to-date local backups: We recommend you regularly back up your files to personal storage devices, such as external hard drives, flash drives, or memory cards. This way, you’ll be able to recover your data even in case of complete iCloud data loss or service unavailability.
- 🛡️ Protect your iCloud account: It’s paramount that you protect your iCloud account with a strong, unique password and enable two-factor authentication. Insufficiently protected iCloud accounts are prime targets for hackers, who can access and delete your important files or even lock you out of your account.
- 🔍 Review your backup settings from time to time: Make it a habit to periodically review your backup settings to ensure that all important files, folders, and applications are being backed up properly. If you’re not backing up some applications to save space, then you should consider if the risk is really worth the few dollars you save every month by not buying additional cloud storage capacity.
FAQ
How to recover deleted files from iPhone without a backup?
To recover deleted files from iPhone without a backup:
- Download and install the Mac version of Disk Drill.
- Connect your iPhone to your Mac and launch Disk Drill.
- Go to iPhones & iPads and scan your device.
- Select your lost data. You can use Disk Drill’s filters.
- Recover your data to a safe destination.
How to recover a deleted iPhone backup?
Unfortunately, deleted local iPhone backups are not recoverable. But if you need to recover a deleted file that was stored on your iPhone for backup purposes, then you can attempt to recover it using data recovery software.
How to recover permanently deleted photos from iCloud after 30 days?
After the 30-day grace period, it’s impossible to recover permanently deleted photos from iCloud unless you have a local backup somewhere. If your local backup has been deleted as well, then you can use data recovery software like Disk Drill to recover it.
How to retrieve deleted photos from the Recently Deleted album on iPhone?
To retrieve deleted photos from the Recently Deleted album on iPhone:
- Launch the Photos app on your iPhone.
- Go to the Albums tab.
- Scroll all the way down until you see the Recently Deleted folder in the Utilities section.
- Select the photos you want to retrieve.
- Tap the Recover button.
This article was written by David Morelo, a Staff Writer at Handy Recovery Advisor. It was also verified for technical accuracy by Andrey Vasilyev, our editorial advisor.
Curious about our content creation process? Take a look at our Editor Guidelines.
