Does your SD card act weird? Throwing errors or prompts to format it? Files suddenly missing? Or maybe it doesn’t even show up in File Explorer like it used to? These are all signs of corruption. While your specific case may have slightly different symptoms, the process for data recovery from a corrupted SD card usually follows a similar path.
Historically, corrupted SD card recovery has been one of the most popular topics on our site, and we’re giving this guide a major update to make sure it meets today’s standards—both ours and the industry’s.
DIY Corrupted SD Card Data Recovery Basics
So, if you don’t have a backup of the files that were on your SD card, the only option left is data recovery software. These tools are designed to retrieve lost, deleted, or inaccessible data from memory cards (and other storage devices).
But here’s the catch: your computer has to detect the card for the SD card data recovery tool to do its job. If you don’t see your SD card in File Explorer, it doesn’t automatically mean the computer isn’t detecting it. It could just be a visibility issue or a logical error. So, let’s tackle that first.
Right-click the Start menu and select Disk Management. Look for your SD card in the list of connected drives. If it appears with the correct size, that’s a good sign—it means the system recognizes it, and you should have no issues running a scan. If the card shows up but doesn’t have a drive letter, that could explain why it’s missing in File Explorer. This is a common issue, and the fix is simple. We’ll show you how to assign a new drive letter later in this article.
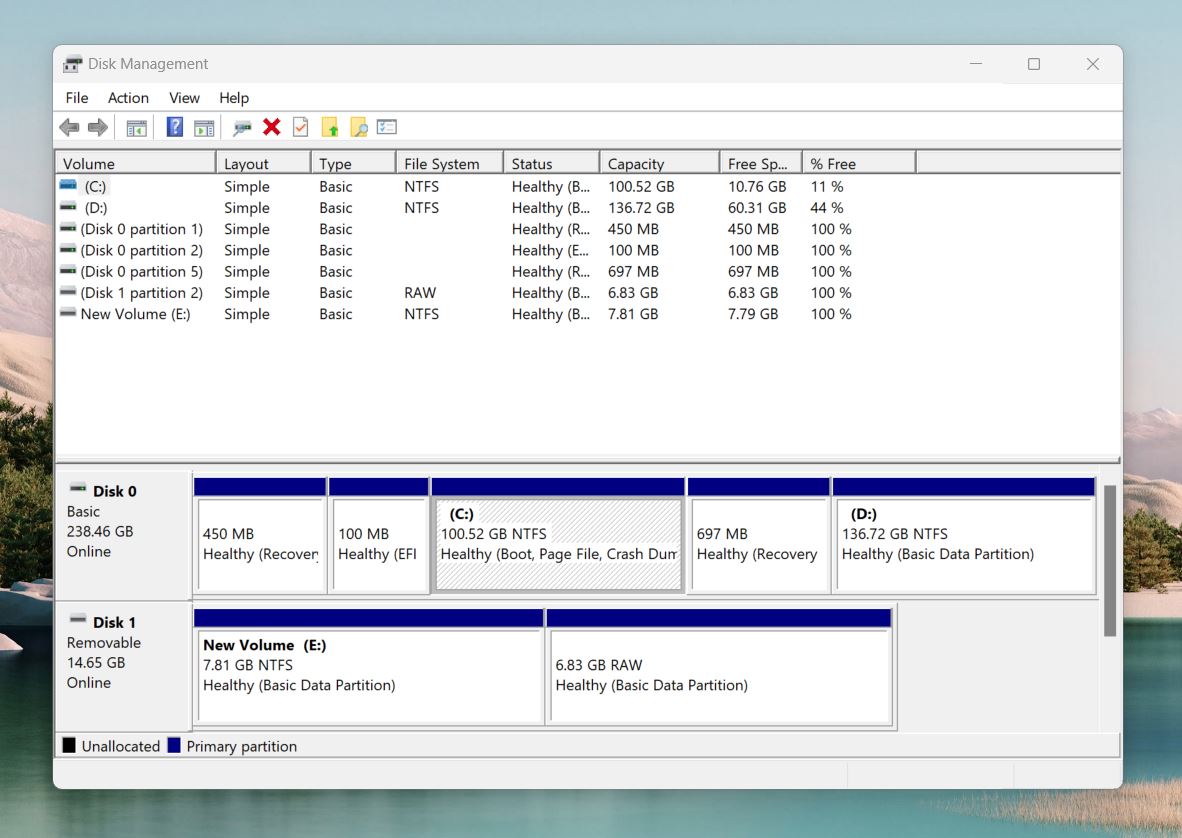
If the card doesn’t appear at all in Disk Management, that’s not a great sign. It could mean there’s a connection issue or physical damage to the SD card.
But don’t jump to the worst-case scenario just yet—this could just be a connection issue. Try these quick fixes:
- Try a different SD card reader or use a different USB port for the current one.
- If you’re on a desktop PC, plug the card reader into a USB port on the back of your system if you have one. These ports usually connect directly to the motherboard.
- Test the card on another device, to confirm whether it’s the card or the reader causing the issue.
If switching hardware doesn’t help and the SD card still doesn’t show up, you’re likely dealing with physical damage or internal failure. In this case, you may need to turn to professional damaged SD card recovery services. These services use advanced equipment to extract data, even from SD cards that seem dead. However, they can be expensive, so weigh the importance of your lost data against the cost.
If your SD card seems fine and appears in File Explorer but some files are missing, don’t forget to check if they’re simply hidden. To do this:
- Open File Explorer and navigate to your SD card.
- Click on the View tab at the top of the window.
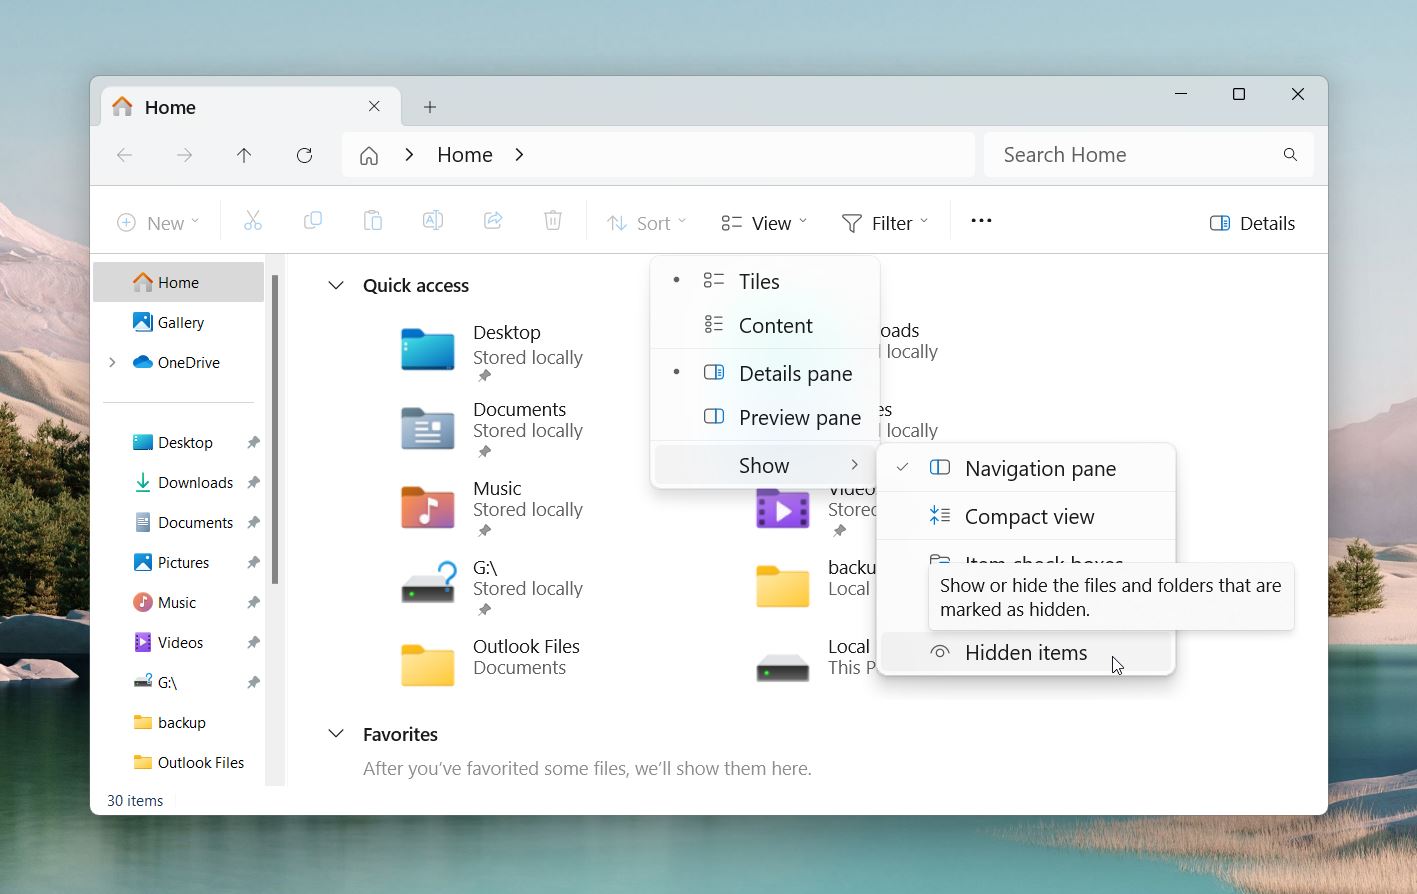
- Select Show and then click Hidden items from the dropdown menu.
This will reveal any hidden files or folders on your SD card. Sometimes, files become hidden due to errors or malware.
5 Steps To Recover Data From a Corrupted SD Card
Ok, so we’ll assume your computer detects your corrupted SD card. Now it’s time to move forward with the recovery process. Here are 5 steps you can follow to retrieve files from a corrupted SD card.
First, you’ll need a reliable SD data recovery tool. There are plenty of options, like Disk Drill, Recuva, or PhotoRec. For this guide, we’ll demonstrate the process on Windows using Disk Drill. Why Disk Drill? It delivers excellent results with FAT32 and exFAT file systems—common on SD cards—and handles a wide range of file types (for the cases when the file system is badly damaged). Plus, it offers a byte-to-byte backup option, which we’ll explain separately in the next steps.
If you’d rather watch a video than read through the steps, check out this video guide on how to recover files from a corrupted SD card. It shows you exactly what to do if you’re more of a visual learner.
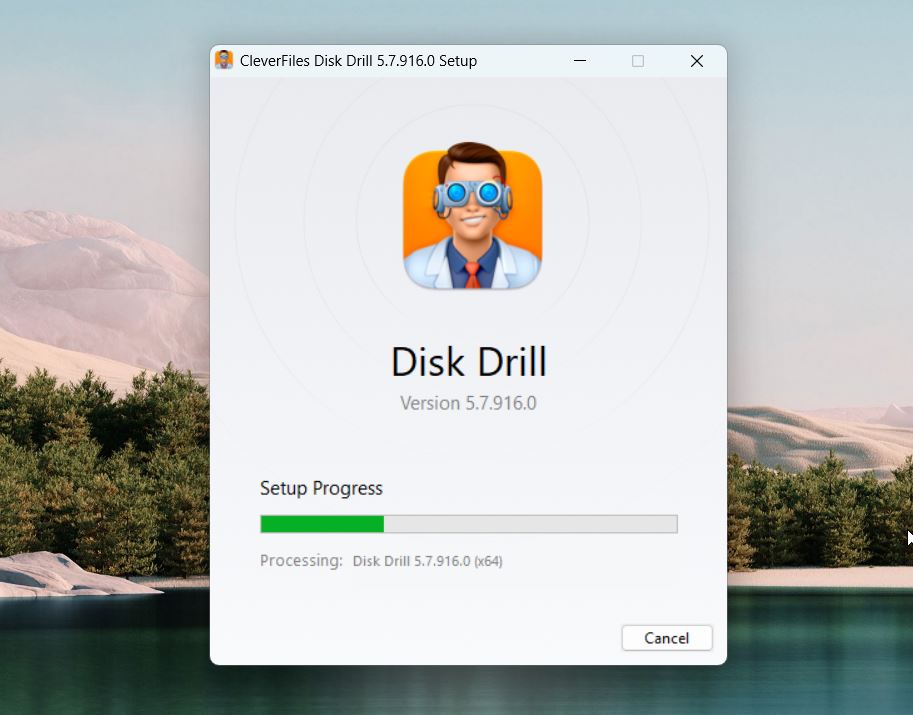
Step 1: Download and Launch a Data Recovery App
With your card plugged into your computer, the next step is getting the corrupted SD card recovery software ready. Head over to the official Disk Drill website to download the program. This guarantees you’re getting the latest version straight from the source, without worrying about malware or outdated files. Once it’s downloaded, run the installer and follow the simple instructions. It’s quick and doesn’t require any complicated settings.
You’ll see a warning not to install the program on the same device you’re trying to recover files from. This is standard with recovery software because installing it on the same drive can overwrite the very data you’re trying to retrieve. And this doesn’t just apply to installing programs—you should always keep activity on a storage device with data loss to an absolute minimum. Even something as small as saving new files or running unrelated tasks can reduce your chances of getting your data back.
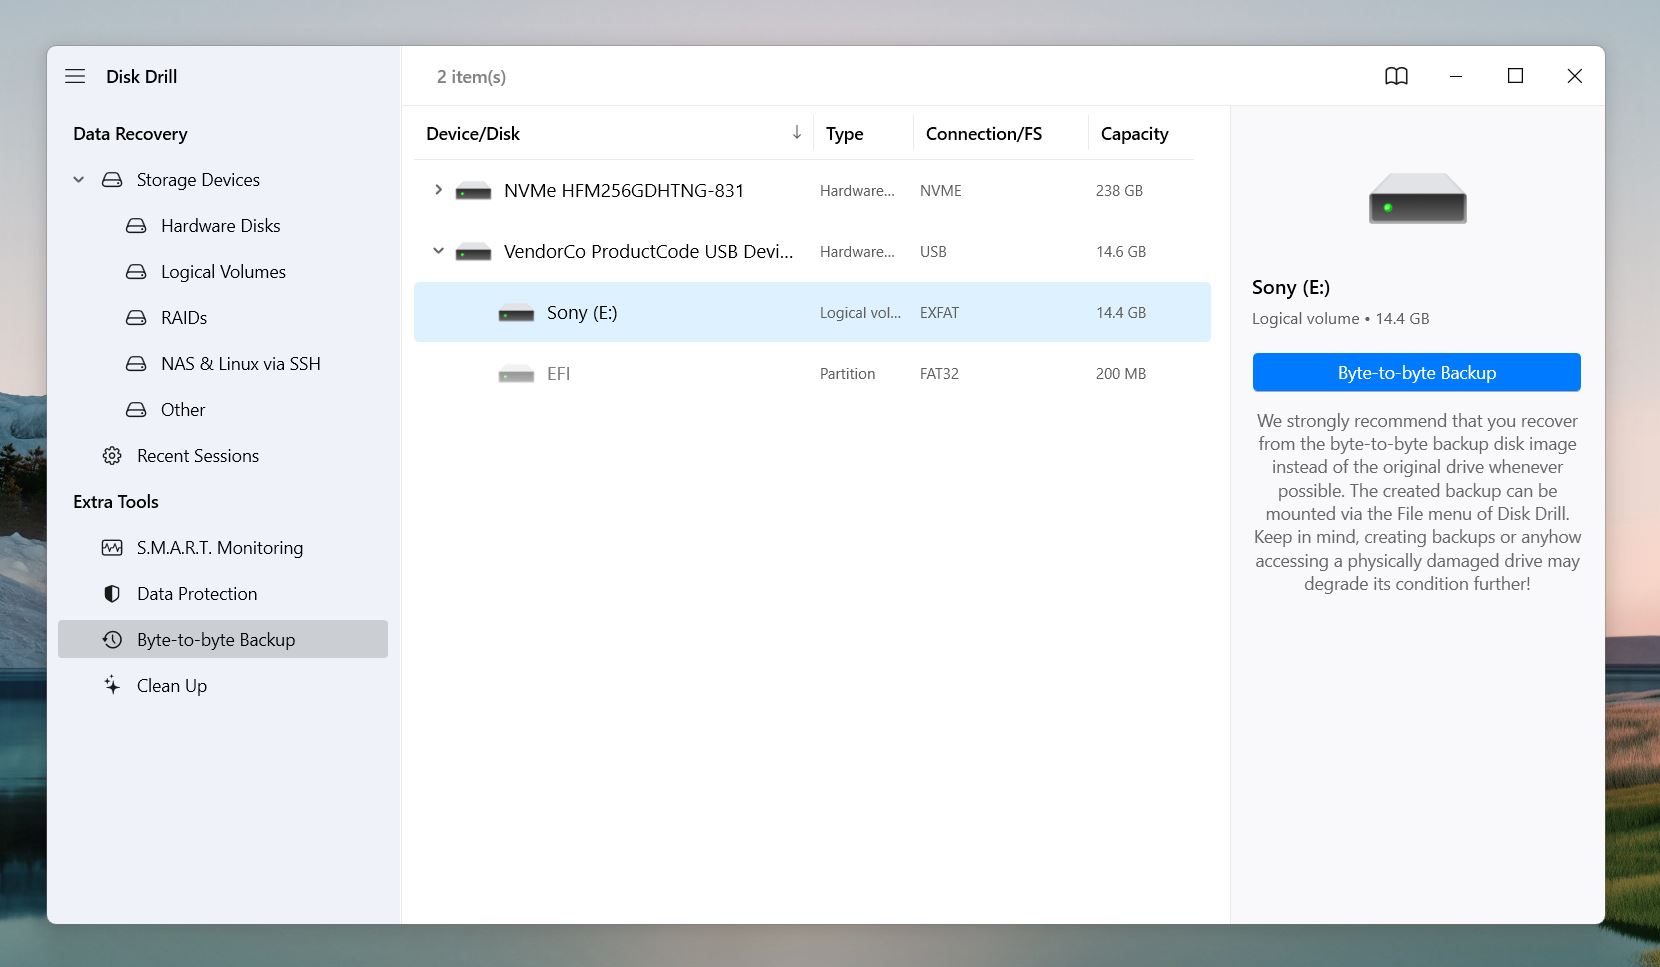
After installation, launch Disk Drill. You’ll see a list of all connected storage devices, including your computer’s internal drives, external drives, and your SD card.
Step 2: Create a Byte-to-Byte Backup (Optional)
As we mentioned earlier, Disk Drill includes an additional feature that can be invaluable when you restore a corrupted SD card—a Byte-to-Byte Backup. This feature creates a full copy of your SD card in its current state. This includes all existing, lost, or deleted data, as well as corrupted areas. This backup is helpful because it allows you to retrieve corrupted SD card data from the image file rather than directly from the SD card. It’s especially useful if the card is in bad shape or if you’re worried it might fail completely during the recovery process.
This step is optional, but we recommend it in certain situations:
- If your SD card is showing signs of severe corruption, such as repeated errors or unreadable files.
- If the card disconnects randomly or seems unstable when plugged in.
- If you want to minimize the risk of further damage to your SD card during recovery.
Keep in mind, though, that you’ll need enough free space on your computer or external storage for the backup file. The backup image will be the same size as your SD card. For example, if your SD card is 32 GB, you’ll need at least 32 GB of free space to create the backup.
If you’re short on free space or confident that your card is stable, you can skip this step and move on to scanning the card directly. But when in doubt, a backup is always the safer choice.
To create a Byte-to-Byte Backup in Disk Drill:
- Look for the Byte-to-Byte Backup option on the left-hand panel.
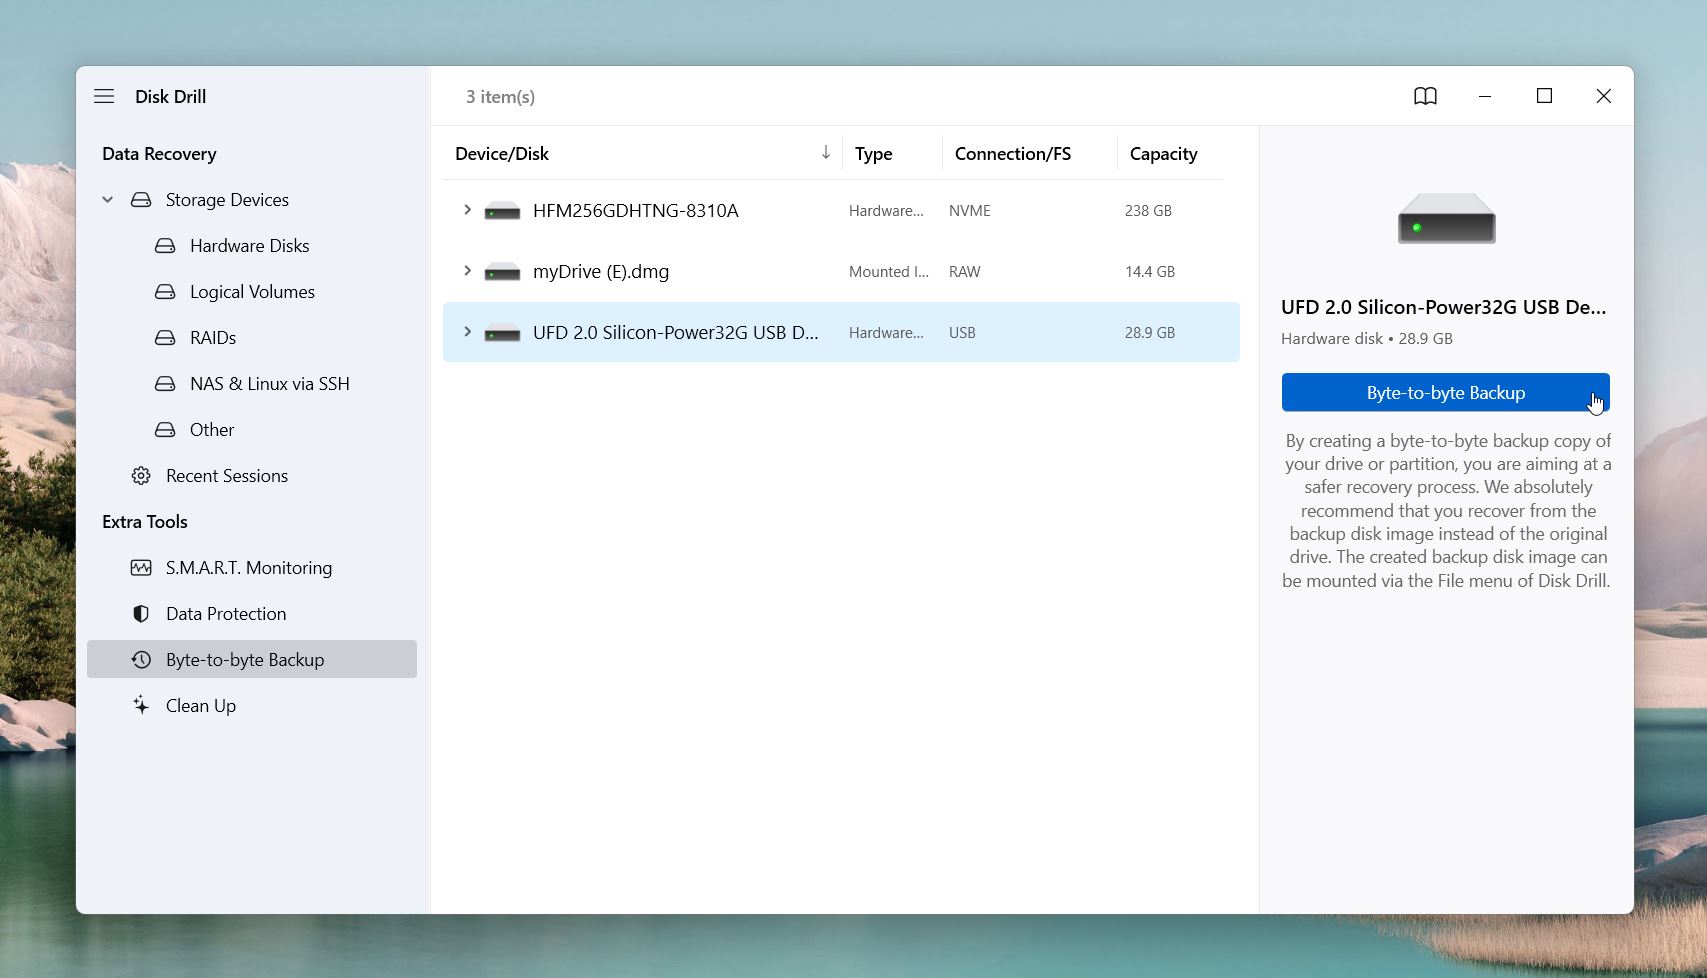
- Select your SD card from the list of connected devices.
- Click Create Backup and choose a location with enough free space to save the image.
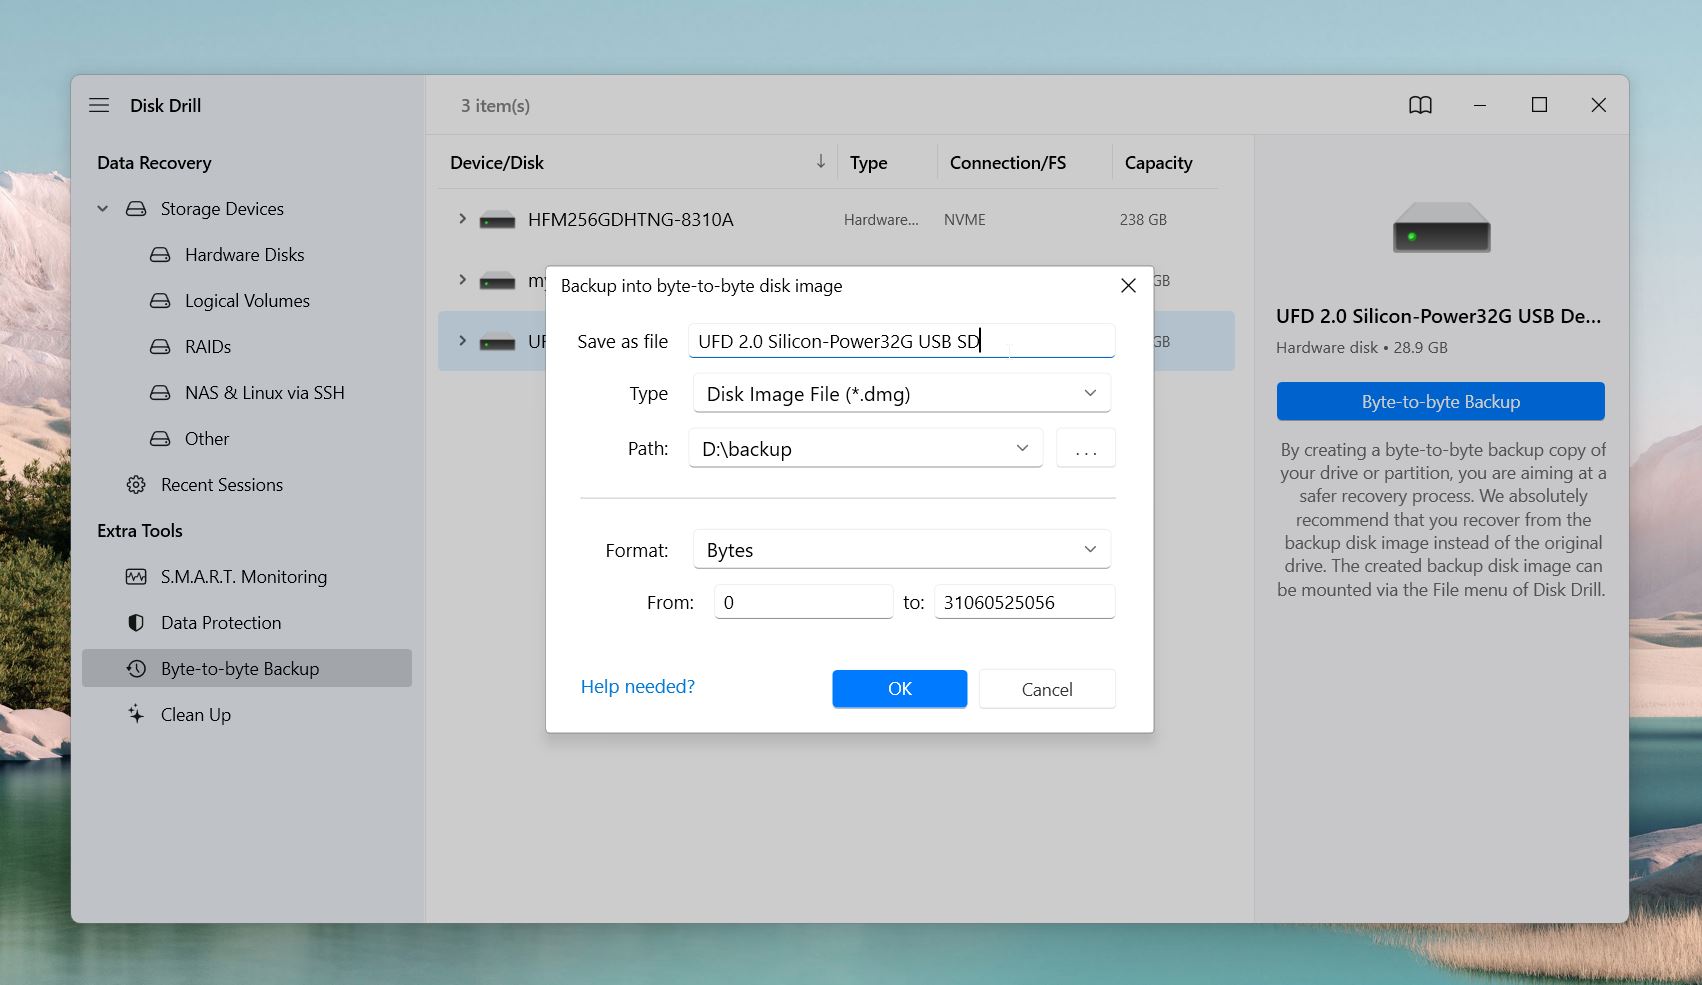
Once your Byte-to-Byte Backup is ready, you can scan it instead of the original SD card. To do this, you’ll need to mount the backup file in Disk Drill:
- Go back to the Data Recovery tab in Disk Drill, where all storage devices are listed.
- Scroll to the bottom and click on Attach Disk Image.
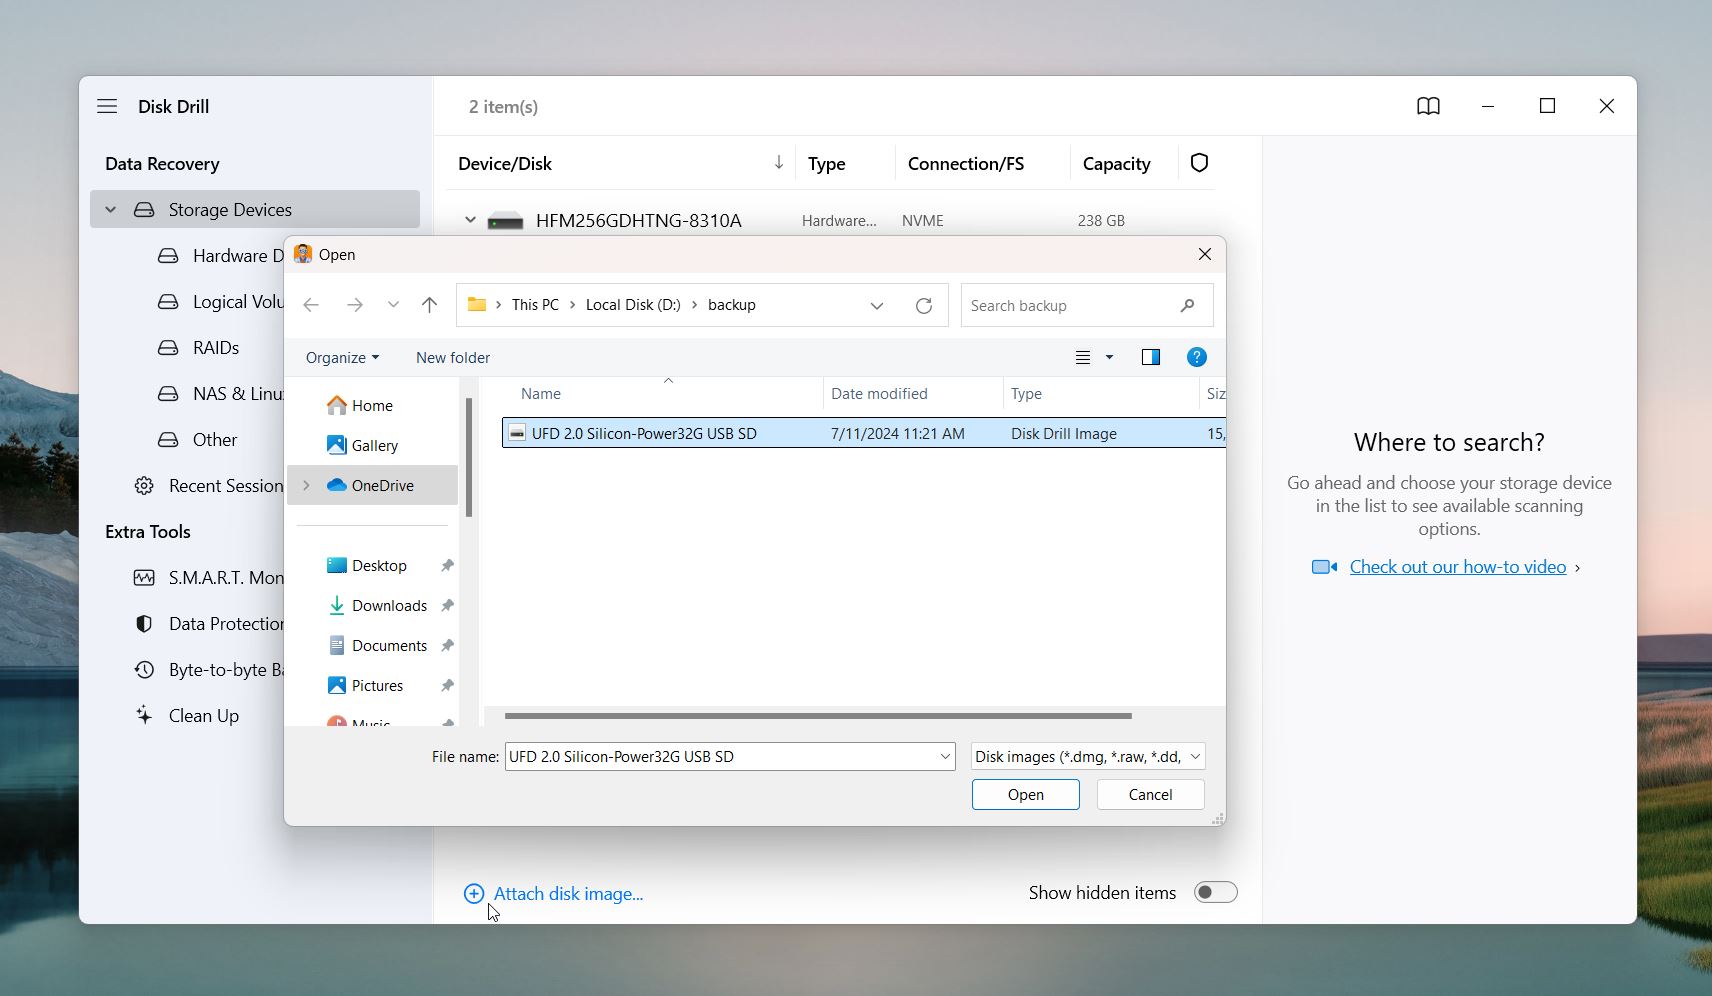
- Browse for the byte-to-byte backup file you just created and select it.
Disk Drill will add the backup to the list of devices, and you can proceed to scan it just like you would with the SD card itself.
Step 3: Scan the SD Card (or Its Backup File)
The next step is to run the scan. Select your corrupted SD card from the list in Disk Drill (or its backup if you didn’t skip Step 2) and click the Search for Lost Data button. Disk Drill will start analyzing the card or backup to locate deleted, lost, or inaccessible files.
During the scan, you’ll see a progress bar along with categories of files that have been found, such as Pictures, Videos, Documents, and more. You have a couple of options at this stage.
You can wait for the scan to finish and then click on Recover All to retrieve files from the corrupted SD card without sorting through individual categories and save everything that was found to a safe location. This is the quickest way to recover all files.

Alternatively, you can click on a specific category, like Pictures, Videos, or Audio, right away to see what has already been found while the scan is still running. If you prefer a broader view, click Review Found Items to see every file type that has been discovered so far.
When Disk Drill scans your SD card, it automatically goes through a few different modes. Here’s a quick breakdown:
- Quick Scan: This mode looks at your file system records to find files that were recently deleted. It’s enough for simpler cases, like when you accidentally delete something, and it usually keeps the original file names and folder structures intact.
- Deep Scan: This digs deeper into your SD card, it searches for file system records, even if they are damaged. It’s effective for cases where your card has been formatted, the file system is damaged, or it’s showing up as RAW. Deep Scan might not always recover file names or folder structures.
- Signature Scan: This is part of the Deep Scan process and comes in handy for the toughest cases—like when the file system is completely gone. It identifies files based on their unique “signatures,” essentially scanning for specific patterns in the data to figure out what’s recoverable.
Disk Drill handles all of this automatically. It runs through these modes in sequence to find as many recoverable data as possible.
Step 4: Filter and Preview Found Files
Once you open the list of found items in Disk Drill, you might notice that the files are organized into subcategories like Deleted or Lost, Existing, and Reconstructed. Here’s what each of these means:
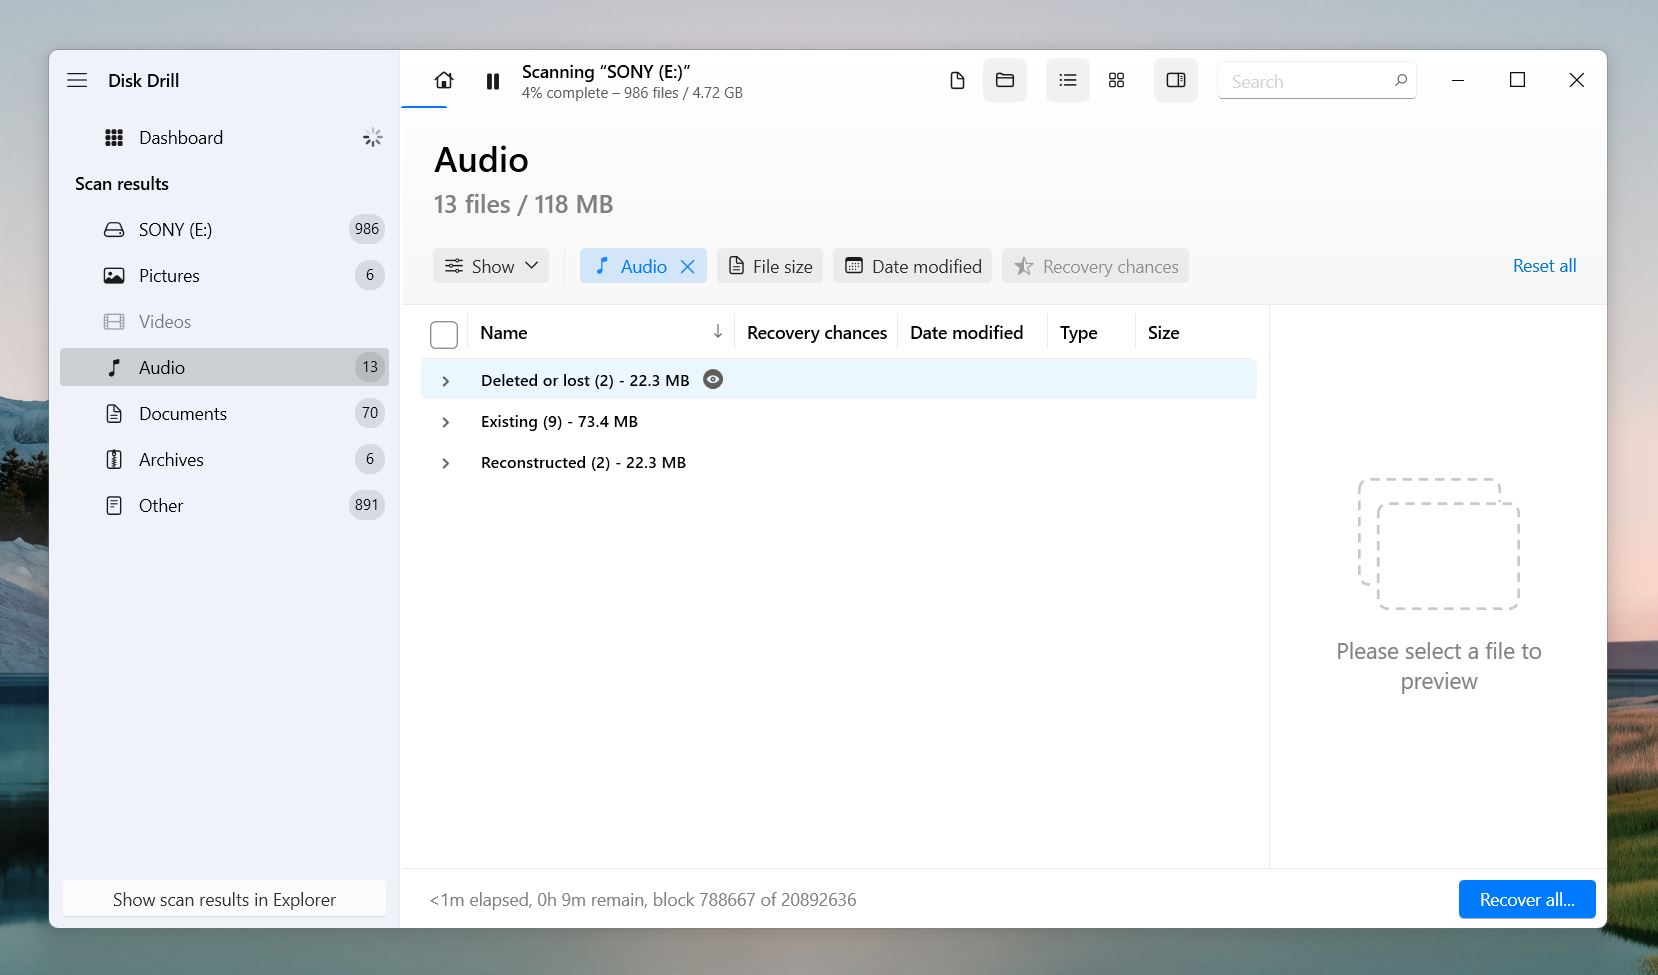
- Deleted or Lost: These are files that were intentionally or accidentally deleted or became inaccessible due to corruption. They usually retain their original names and folder structures if the file system isn’t too badly damaged.
- Reconstructed: These are files recovered from raw data fragments. They appear here when the file system is severely damaged, and Disk Drill had to identify the files based on their internal signatures (the unique data patterns that define file types). While they might not have original names or folder locations, they’re often the only way to recover files in extreme cases.
- Existing: These are files that are still on the SD card and would normally be accessible if the card wasn’t corrupted.
Disk Drill gives you several ways to narrow down your search. If your SD card has a ton of files, these can save you a lot of time.
Disk Drill supports a wide range of file types, especially the kinds of files commonly stored on SD cards, including photos, videos, and raw camera formats. Here are some examples:
- Video Files: 360 (360-degree GoPro videos), 3GP (videos for 3G UMTS services), AVI (Audio Video Interleave), MOV (Apple QuickTime), MP4 (MPEG-4), WMV (Windows Media Video), MKV (Matroska Video), MTS (Advanced Video Coding High Definition), and more.
- Photo and Image Files: JPG (JPEG images), PNG (Portable Network Graphics), RAW (unprocessed image data), NEF (Nikon RAW), CR2/CR3 (Canon RAW), DNG (Digital Negative), ARW (Sony RAW), and HEIC (High Efficiency Image File).
- Specialized Formats: BRAW (Blackmagic RAW), R3D (Redcode RAW), INSP (Insta360 panoramic images), and GPR (GoPro RAW).
- Audio Files: M4B (iTunes audiobooks), M4P (iTunes Music), and MPA (MPEG-2 Audio).
On the left-hand panel, you’ll see categories like Pictures, Videos, Documents. You can filter by these broad groups or dig into subcategories. For example, under Pictures, you can choose specific file types like JPG, PNG, or RAW formats. This way, you only see the files you’re interested in.
You can also filter by size, date, or recovery chances. Disk Drill ranks files with High, Average, or Low recovery chances. A High rating means the file is likely intact and should recover without issues. A Low rating means the file is damaged or incomplete.
For even more precision, use the search bar at the top. You can search by file name (if it was preserved), part of a name, or file extensions. For example, .zip will pull up only compressed files, .mp3 will show audio files, and .raf will show Fuji RAW image files from cameras.
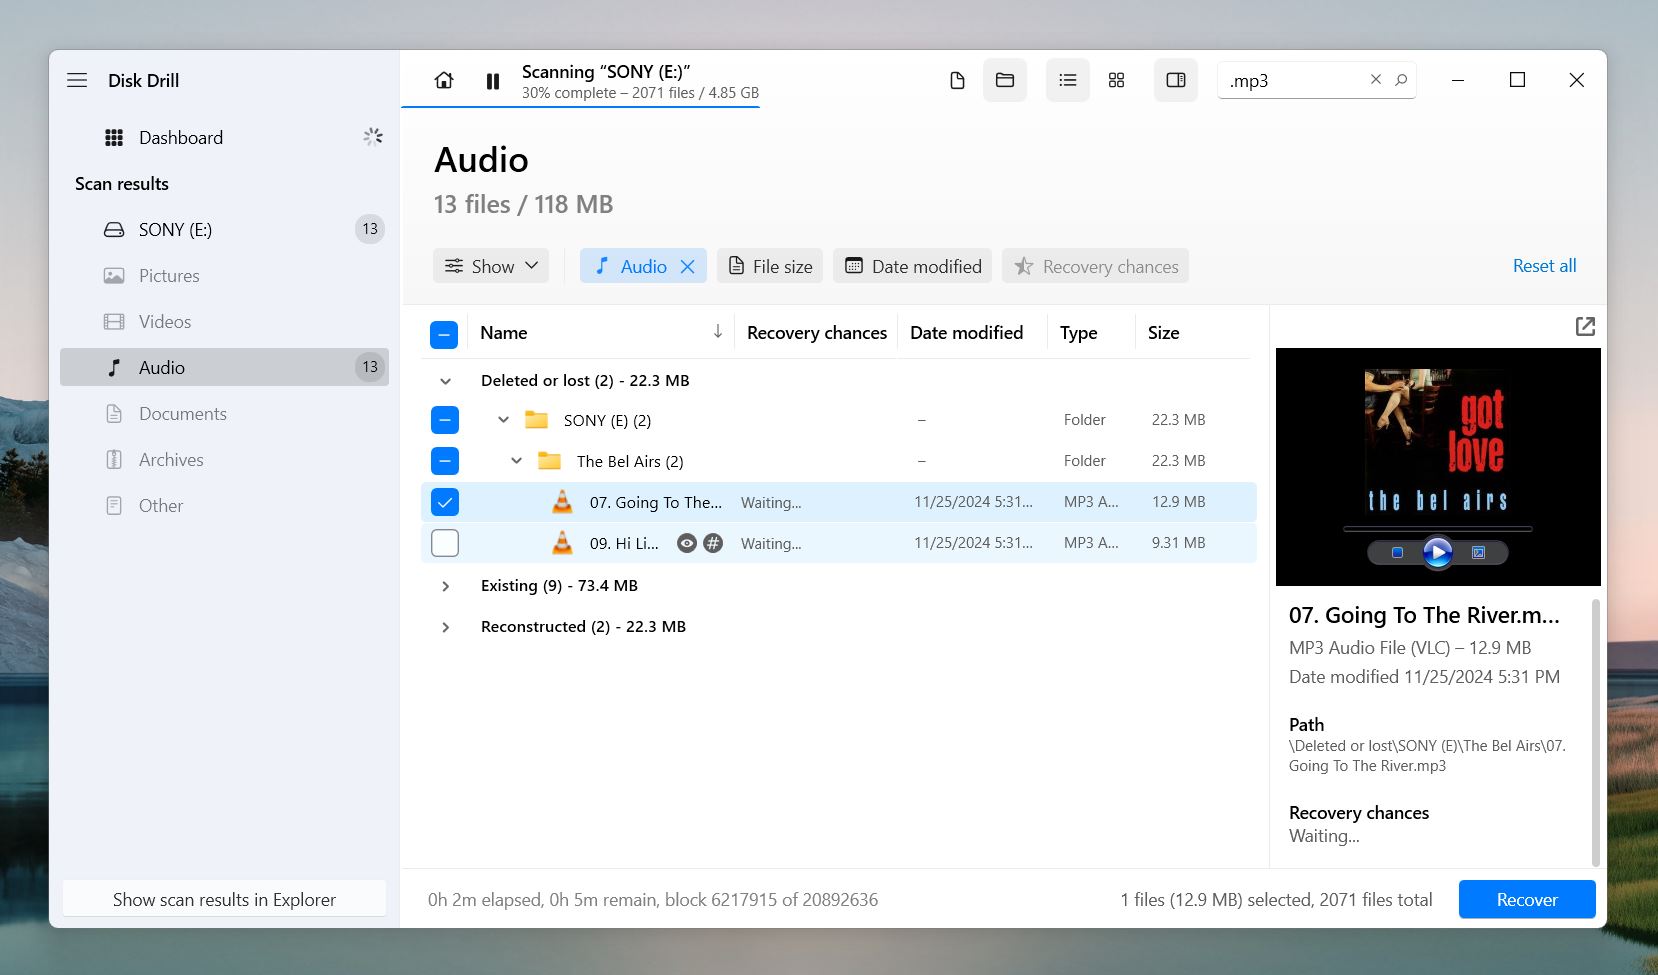
In cases where file names are missing or unhelpful, Disk Drill’s preview feature can be of help. When you click on a file, a small preview will appear on the right side of the screen. If that’s not enough, you’ll also notice an eye icon—it will open a full preview of the file. Disk Drill will play or display the file, as long as your OS can open it natively or with an installed viewer. This makes it much easier to confirm that the file is what you’re looking for, even if the original name or folder structure is gone. By the way, if the file is previewable, that’s a 100% guarantee it can be recovered without any issues.
Step 5: Select and Recover Files to a Safe Location
Now that you’ve filtered, previewed, and identified the files you want to recover, it’s time to save them to a safe location. This step is straightforward. Just check the boxes next to the files or folders you want to recover. You can choose individual files, entire categories, or even everything Disk Drill found. Once you’ve made your selection, click the Recover button.
Disk Drill’s Basic version, which can recover files from corrupted SD card for free, you can scan and preview files as many times as you want. However, the free version comes with a 500 MB recovery limit. This is usually enough to test the software and recover a small number of files. If you need unlimited recovery, you’ll need to upgrade to the PRO version.
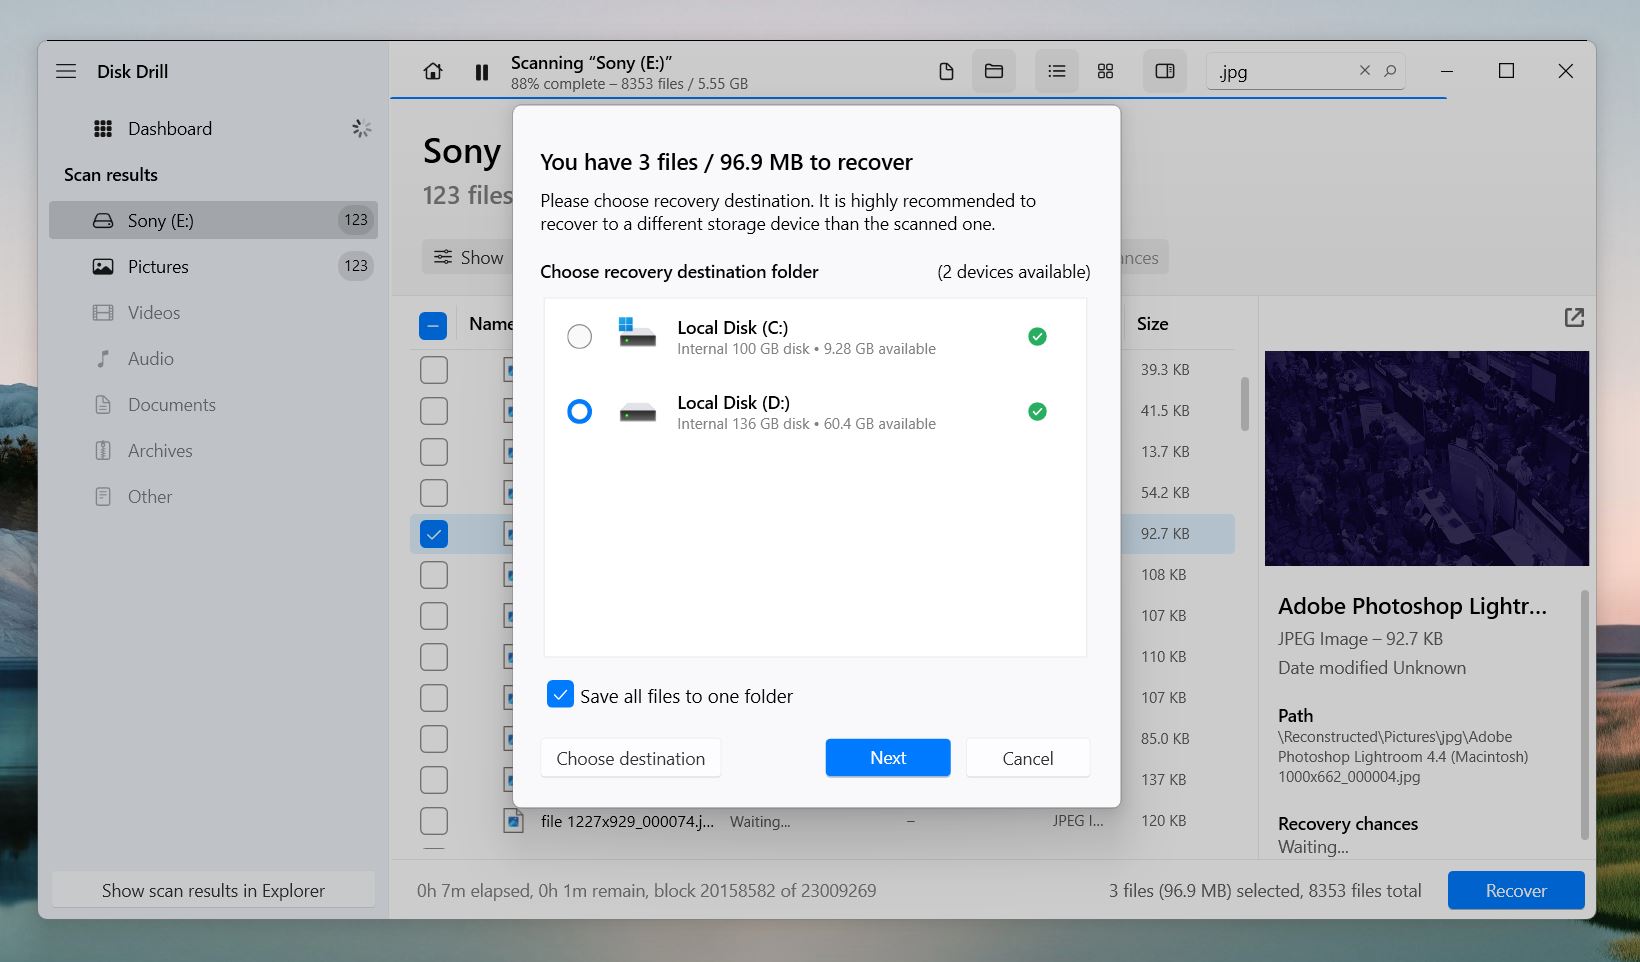
When prompted, choose a destination folder. It’s important to save the recovered files to a different location, not back to the SD card. For example, use your computer’s internal storage or an external hard drive. Saving files to the same card risks overwriting other recoverable data, and will make it impossible to recover those files later.
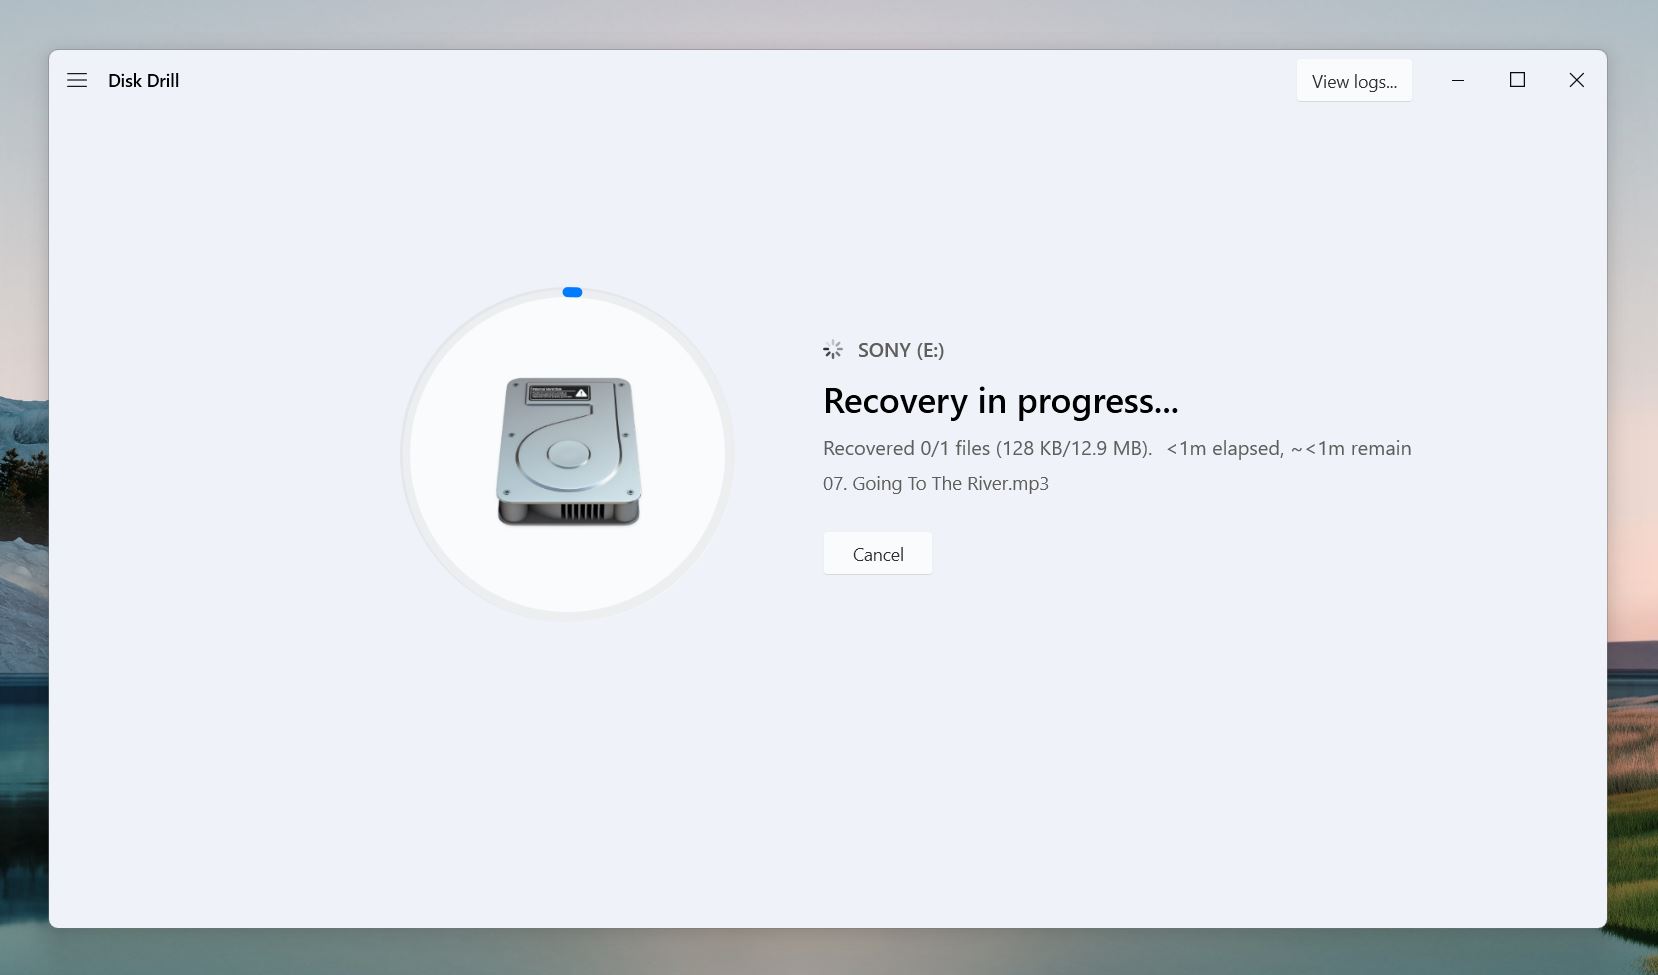
Once the corrupted memory card recovery finishes, Disk Drill will offer to open the folder in File Explorer so you can immediately check the files you just saved. The process is simple and as intuitive as it gets, which is exactly why we chose this tool for our demo—not to mention its recovery track record and safety.
That said, if you feel like Disk Drill isn’t quite what you’re looking for we have a list of Disk Drill alternatives that might suit your needs better. Check it out, there are plenty of other tools out there, so you’re bound to find one that fits your needs.
How to Make a Corrupted SD Card Usable Again After Data Recovery
Now your files are safe, but that’s only half the story. A corrupted SD card is still an issue, and you’ll need to fix it if you want to use it again. Here are three options that are likely to help, depending on your situation. At the start of each method, we’ll mention when it’s most suitable to use.
Option A: Assign a Drive Letter
Use this if your SD card is detected in Disk Management but doesn’t show up in File Explorer because it’s missing a letter next to its name in Disk Management.
This is the simplest fix. If you opened Disk Management like we showed you earlier and noticed that your SD card doesn’t have a drive letter—no G:, F:, or whatever it used to be—this is the reason it’s not showing up in File Explorer.
You can assign a new drive letter without any risk to your files, so this method is completely safe to try before data recovery. However, since this is rarely the issue, we’ve included it here with other repair methods.
Here’s what to do to recover corrupted SD card functionality:
- Press Win + X and select Disk Management from the menu.
- In the Disk Management window, find your SD card in the list of drives.
- Right-click on the SD card entry in the list. This action opens a context menu.
- Click on “Change Drive Letter and Paths” from the context menu. This opens a new window where you can add, change, or remove the drive letter.
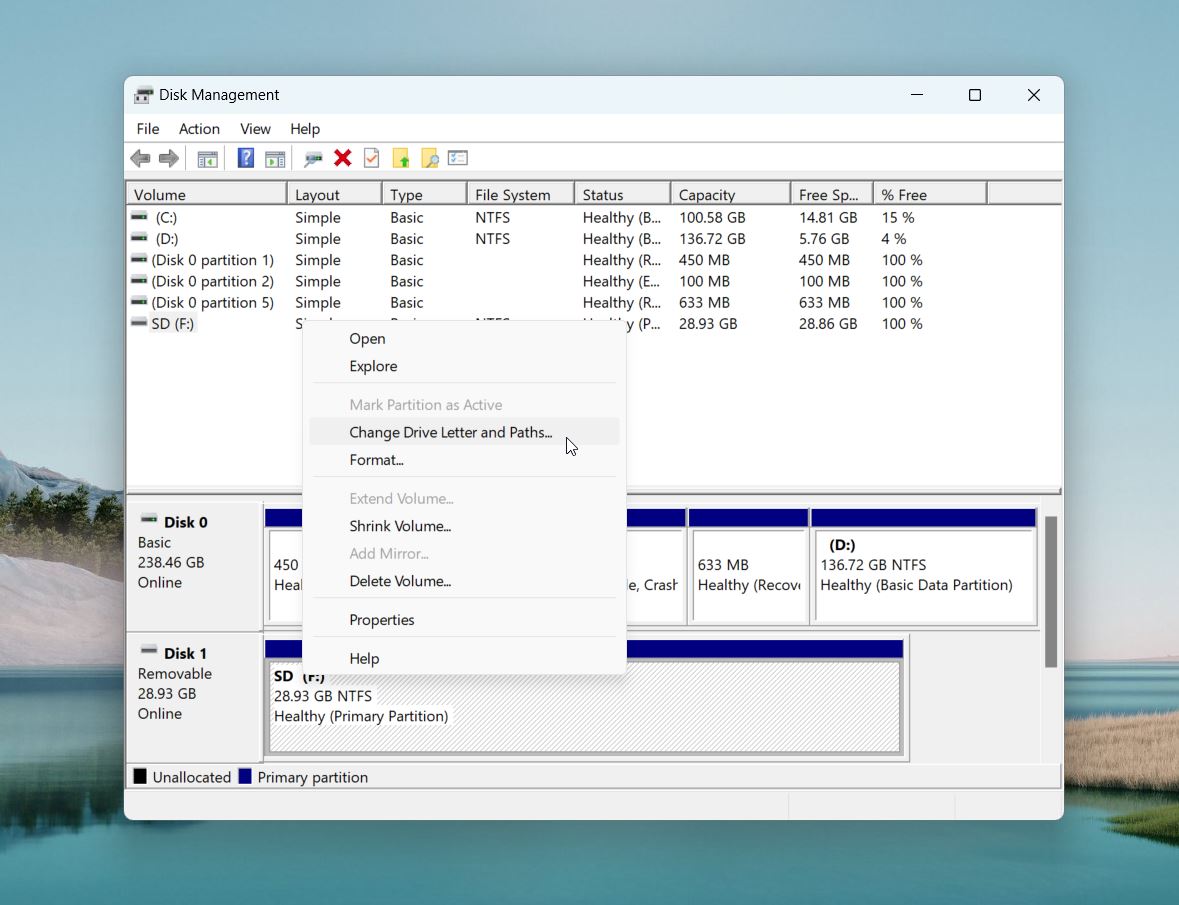
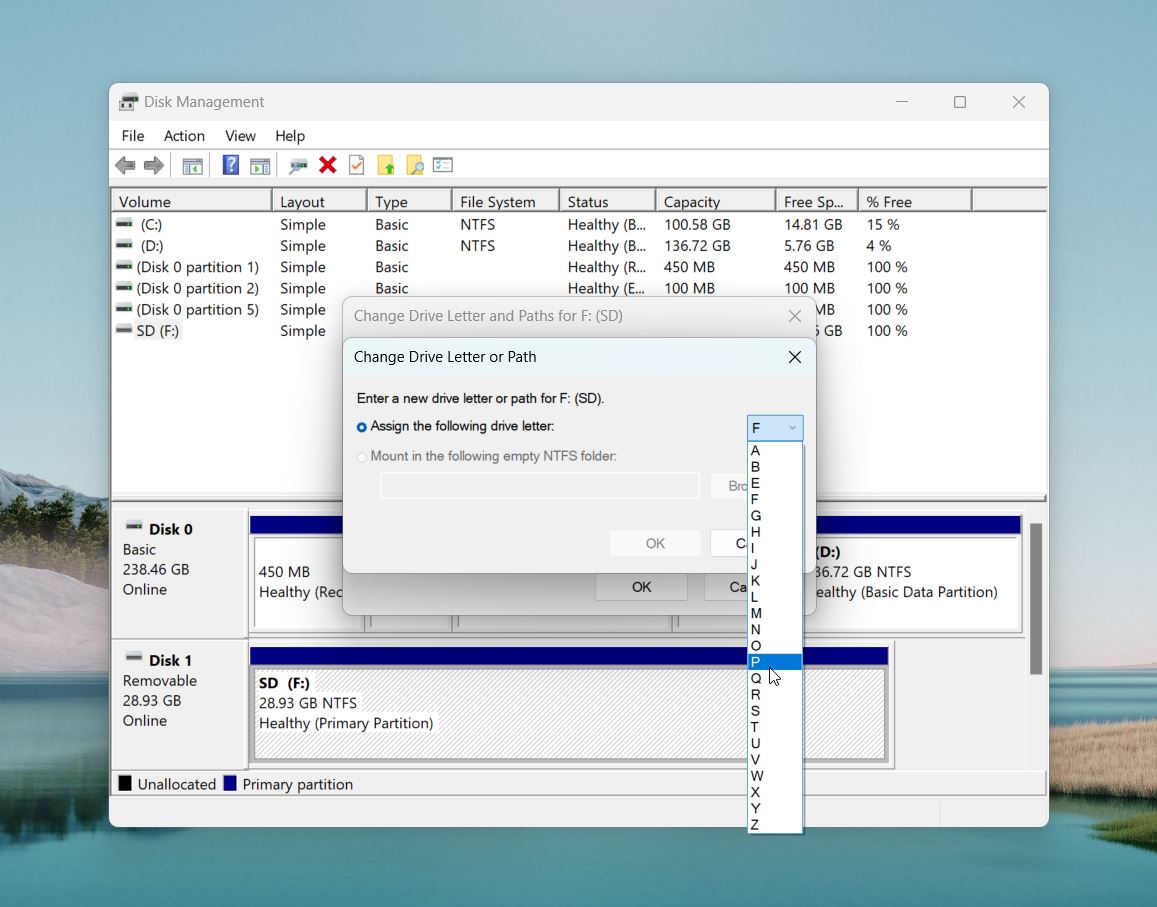
- Click the “Change” button. This action opens another window where you select a new drive letter for your SD card.
- Choose a new drive letter from the dropdown menu. Select a letter that is not currently in use by another drive on your computer. Click “OK” to confirm your selection.
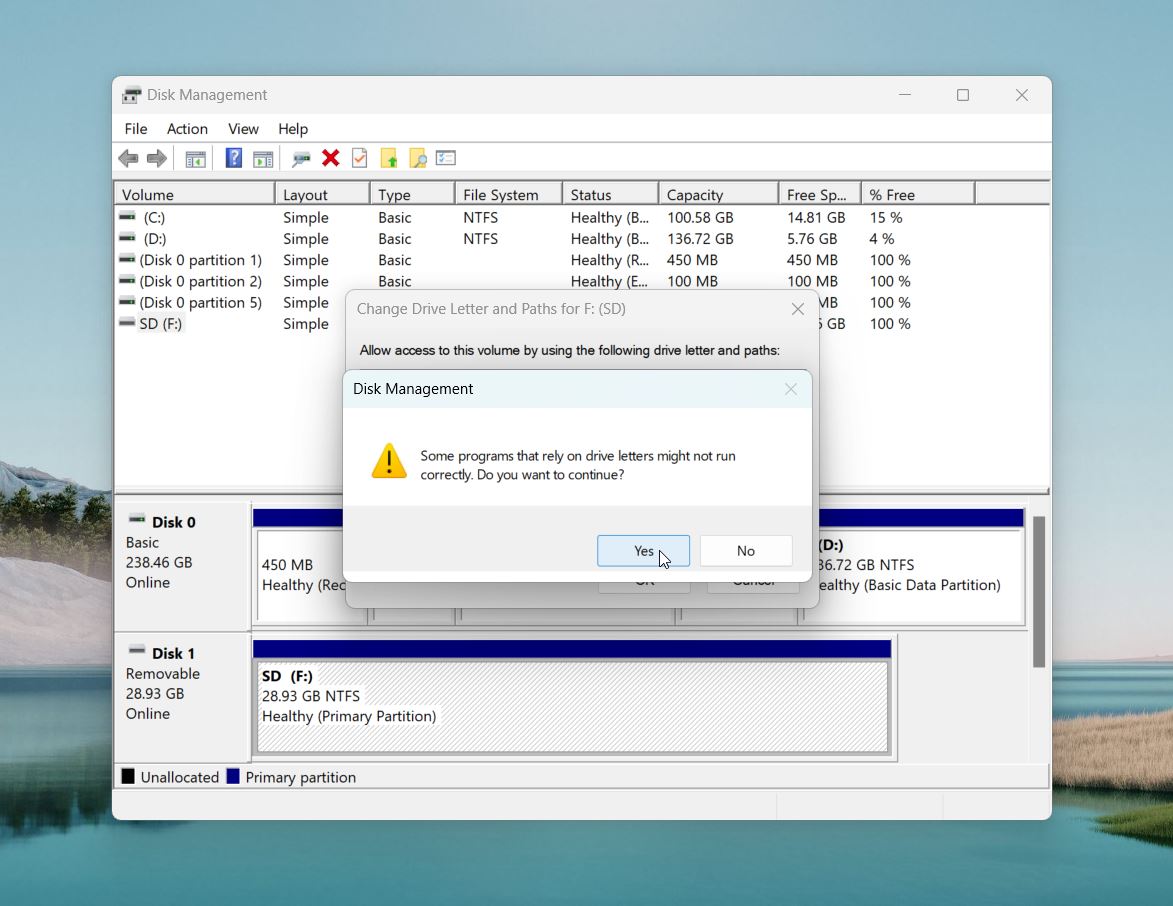
- A warning message may appear, indicating that changing the drive letter can cause programs that rely on the current letter to stop working. Click “Yes” to confirm the change.
- Open File Explorer and check if the SD card now appears with the new drive letter. You should be able to access the card and its contents if the issue was related to the drive letter.
If assigning a drive letter doesn’t work, make sure no software (like disk management utilities or antivirus programs) is interfering with the SD card’s recognition. Temporarily disable such software if needed.
Option B: Use the CHKDSK Command
Use this if your SD card appears in File Explorer but isn’t working properly—for example, it throws errors, files won’t open, or the card seems sluggish.
The Check Disk (CHKDSK) command in Windows is a built-in tool that scans your SD card (or any other drive) for errors and fixes them. To repair a corrupted SD card, we’ll use the /r parameter. This not only fixes errors but also looks for bad sectors and marks them as unusable, preventing future issues.
CHKDSK can sometimes delete damaged files during repairs. If you haven’t already backed up your SD card or recovered your data, go back to 5 Steps To Recover Data From a Corrupted SD Card. Once your data is safe, you can run CHKDSK without any risk.
How to run CHKDSK on your corrupted SD card:
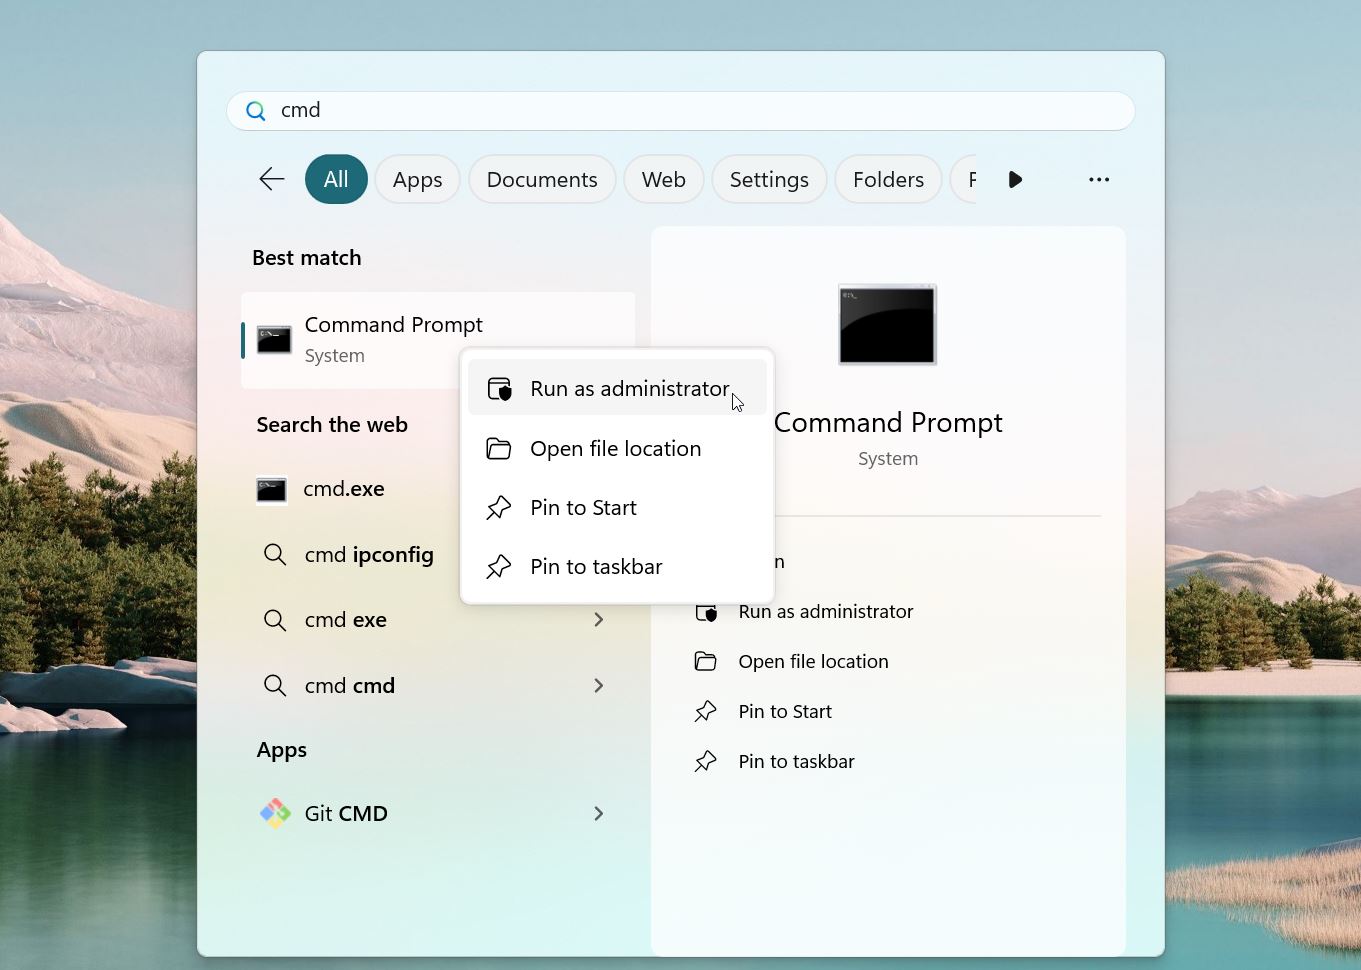
- Open the Start menu. In the search bar, type cmd to find the Command Prompt.
- When Command Prompt appears in the search results, right-click on it and select Run as administrator.
- In opened windows type chkdsk E: /r. Replace E with the drive letter of your SD card (e.g., G: or F:).
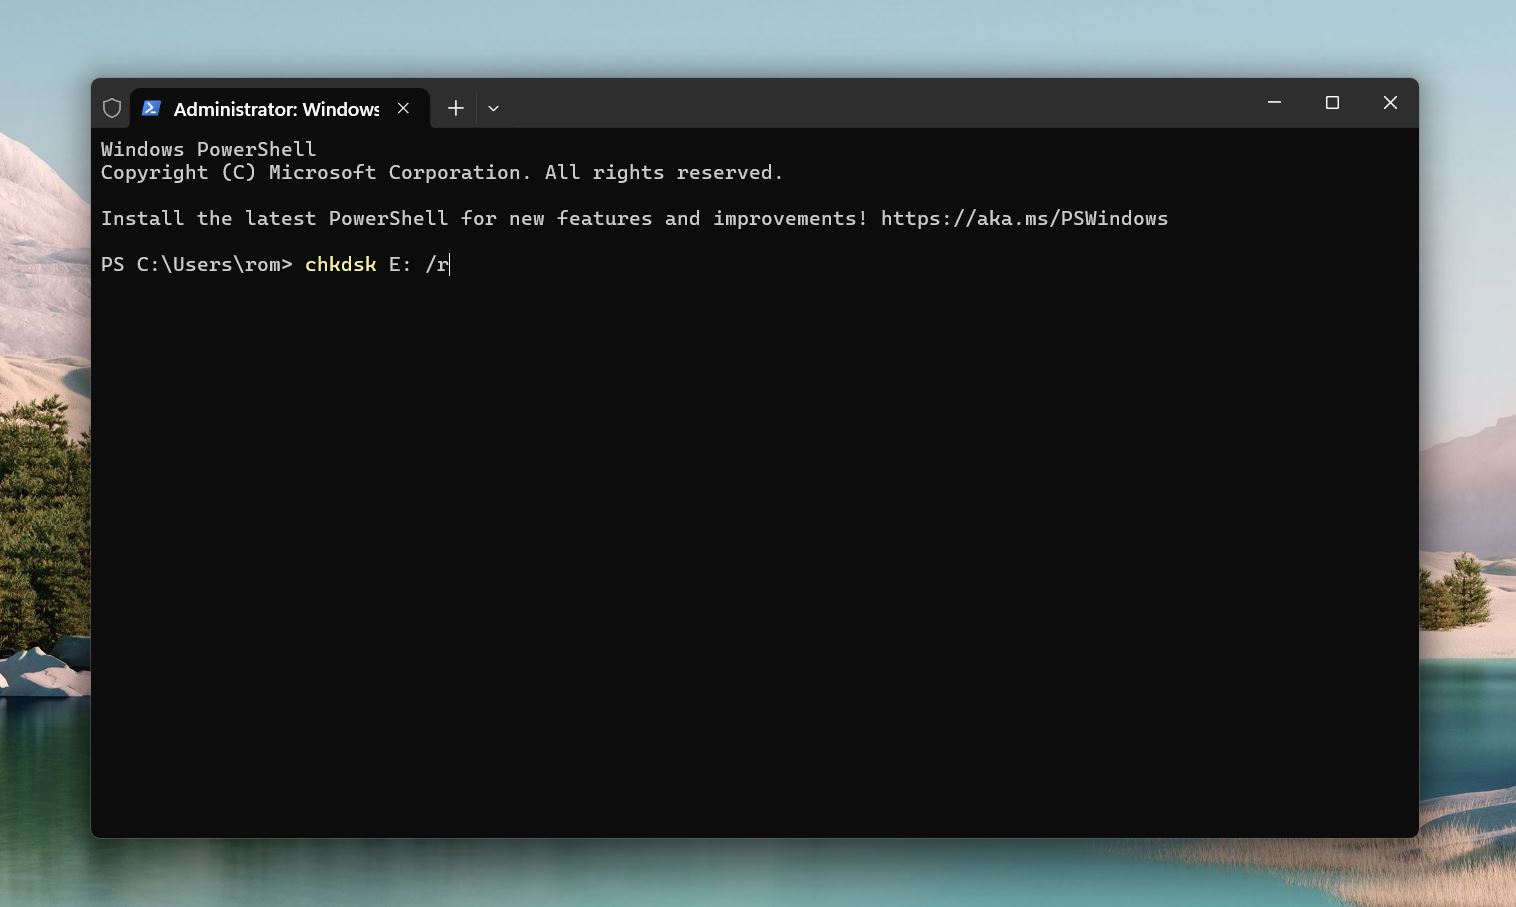
- Press Enter, and CHKDSK will start analyzing the SD card. This can take some time to complete. ⚠️
Let CHKDSK run uninterrupted. Do not close the window, eject the SD card, or shut down your computer while the process is running. Interrupting the scan can lead to further corruption or even permanent damage.
- Once CHKDSK completes, it will display a summary of its findings. This includes the number of errors fixed, bad sectors identified, and any remaining issues.
Option C: Format the SD Card
You can use this method instead of the previous ones, or if they didn’t fix the problem. This method is also necessary if the SD card’s file system is severely corrupted, it shows up as RAW, or it’s completely unreadable.
Formatting is a solution used to fix a wide range of non-physical problems, such as corruption or file system errors. It erases your SC card and puts a new, clean file system in place. It comes in two forms: quick format and full format.
We have a detailed article on the differences between quick and full formatting, but to put it simply: quick formatting only removes the file system references, it makes the space available for new data without actually erasing the existing files, while full formatting scans the card for bad sectors and wipes everything completely.
Technically, you can recover data after formatting your SD card—if you use quick format—but your chances are much better if you recover the files before it.
How to format your SD card:
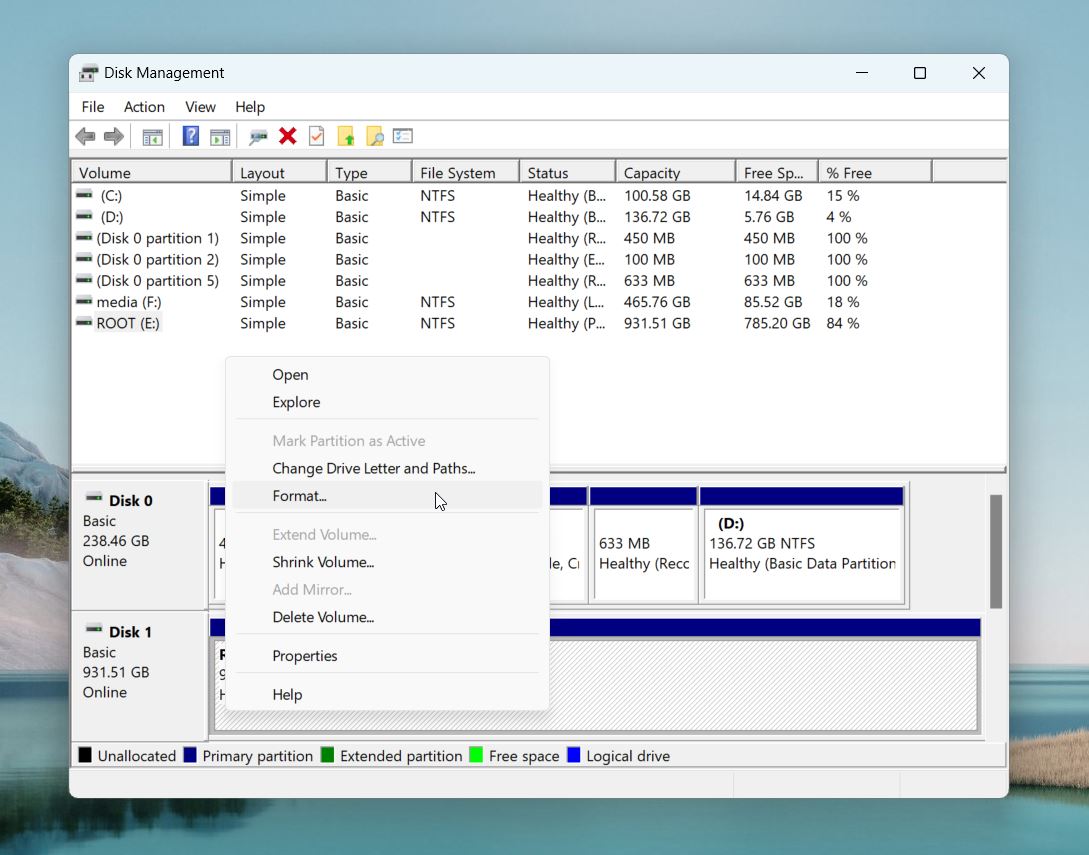
- Right-click the Start menu and select Disk Management from the list.
- Once you’ve identified your SD card, right-click it and select Format from the context menu. A pop-up window will appear with formatting options.
- Choose file system. Select FAT32 for cards up to 32 GB or exFAT for larger cards.
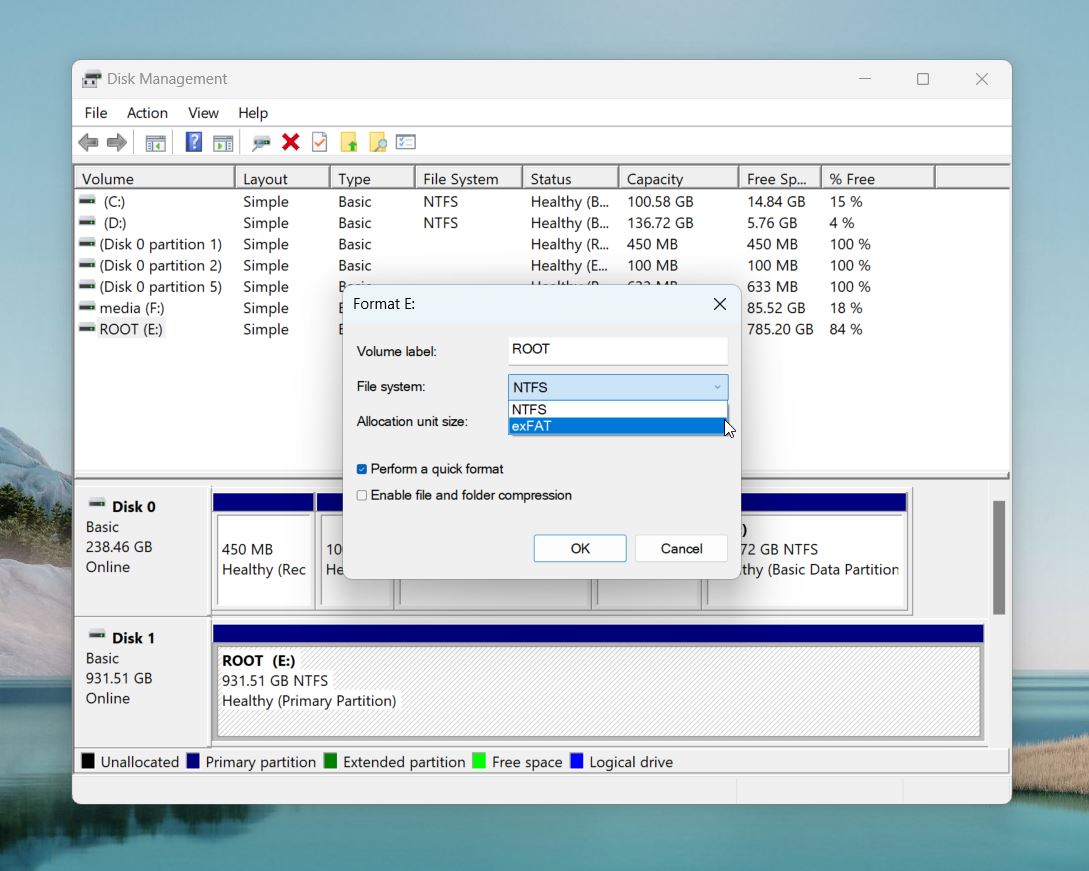
- You can assign a name to your SD card in the Volume Label field (e.g., “MySDCard”). This step is optional.
- If you want to perform a Full Format, uncheck Perform a quick format.
- Click OK to confirm. You’ll see a warning that formatting will erase all data on the SD card, click OK again to start the process. Formatting usually takes just a few seconds for smaller cards and a couple of minutes for larger ones. Once done, a message will confirm that the format was successful.
After formatting, your SD card is clean and ready to use. Copy a few files to and from it, or try using it in its original device, like a camera or smartphone, to confirm it works properly.
If the problem persists, it’s a sign the card may be on its way out, and it might be time to replace it.
Final Words and Tips
If you managed to retrieve files from your corrupted SD card but found some of them not opening, don’t stop here. This is a common issue, especially if you used the SD card after data loss or if a device error caused incomplete recordings. This often happens with video files, like those from cameras, where a power failure or interruption leads to corruption. If this happened to you, there are a couple of things you can try.
For videos, you can use free online tools like Clever Online Video Repair. It’s designed to recover damaged or incomplete video files. However, you’ll need a working video file from the same camera as a healthy reference to help repair the corrupted one. For a step-by-step guide, check out our dedicated article on video repair.
If the issue is with photos, there are great online resources to help. Communities like r/AskPhotography offer advice from experienced photographers who’ve dealt with similar problems. Sources like DiskTuna can also help with corrupted photo files. For example, their article, Recover Data from Corrupted RAW Photos is super helpful for working with RAW formats like CR2, NEF, and ARW. It explains how to extract embedded JPEGs from damaged RAW files. If that’s your case, this guide is worth checking out.
Need help? If you run into obstacles with the recovery steps—our community is here to assist you. Feel free to reach out, and we’ll do our best to help you troubleshoot. Just make sure to include as much detail as possible, like the type of SD card, the issues you’re experiencing, and what you’ve tried so far. The more information you provide, the easier it will be for us to guide you toward a solution!
FAQ
How to avoid SD card corruption?
Here are some tips to help you keep the data on your SD cards safe. Follow them to minimize the risks of your memory cards becoming corrupted.
- Use high-quality SD cards – Reliable market leaders like Kingston, Samsung, Lexar, Toshiba, PNY or Panasonic manufacture their SD cards to strict quality standards. Using these cards as opposed to inexpensive alternatives will result in less memory card corruption.
- Avoid viruses and malware – Running an effective antivirus package is imperative for all computer users. SD cards are often shared and used in different devices that may not be fully protected from malware infection. Only allow your cards to be used inserted into devices or computers that you are sure are clear of viruses to minimize the chances of your card catching one.
- Take care during data transfer – Don’t remove an SD card from a device or card reader while it is reading or writing data. Incomplete data transfers resulting from cards being removed from the device prematurely can lead to file corruption.
- Keep cards safe – Preventing physical damage by storing cards in protective cases is a good practice to follow. You should also keep the cards away from extremes of heat or moisture, as these factors can damage the storage media.
How long does it take to recover files from a corrupted SD card?
As you may have guessed, the time it takes to recover files from a corrupted SD card depends on several factors.
- The first and most common factor is the size of the SD card. Larger cards, like 64 GB or 128 GB, naturally take longer to scan because the recovery tool has to sift through more data.
- Another factor is the extent of the corruption. If the card has only minor issues, recovery might be relatively quick. However, if it’s heavily corrupted, has a damaged file system, or has been formatted multiple times, the process will take longer as the recovery software digs deeper to locate your files.
- Finally, the hardware connection can impact the process. A high-quality card reader and USB 3.0 ports can make a noticeable difference. On the flip side, a slow or unreliable card reader will only drag things out.
For most cases, you’re looking at anywhere from 5 to 30 minutes for a basic recovery. For larger or more damaged cards, it could take an hour or more.
Is it safe to use free SD card recovery software?
Yes, free SD card recovery software is usually safe to use as long as you download it from a trusted source or the developer’s official site. It’s also important to stick with read-only tools that won’t make changes to your SD card, which helps avoid overwriting the files you’re trying to recover. Many data recovery tools also offer backup features, like Disk Drill’s Byte-to-Byte Backup, which lets you create a full copy of your SD card for extra safety. Technically, Disk Drill is freeware, and other free options like Recuva and PhotoRec are also 100% safe (if you download them from a trusted source). However, unlike Disk Drill, these tools don’t include built-in backup features like Byte-to-Byte Backup.
Can I recover files from an SD card that’s been partially overwritten?
Data recovery from an SD card that’s been partially overwritten is tricky but not impossible. Once new data is written to the same sectors where deleted files were stored, those specific files are permanently lost. However, if only some parts of the SD card have been overwritten, recovery tools can still find and recover files from untouched areas.
Is it possible to fix a corrupted SD card on Android without a computer?
No. If the card is truly corrupted, you will need a computer to fix the issue.
Why is it recommended to format a corrupted SD card?
Formatting a corrupted SD card can be a quick way to allow you to fix the card and reuse it. Unfortunately, this process will delete the data on the card, so is not recommended until after you have used recovery software to recover your files. However, it is still possible to recover data from a formatted memory card if the “quick” format method was used to format the card.
Can I recover data from a corrupted SD card using CMD?
No, you cannot directly recover data from a corrupted SD card using CMD. While the CHKDSK command in Command Prompt can fix some file system errors and make the card accessible again, it doesn’t have the capability to recover deleted, lost, or corrupted files. Instead, it works to repair the card’s structure to allow normal access.
Is it possible to recover data from a damaged SD card?
It depends on the damage. If the card shows up in Disk Management with its correct size, you might be able to recover data with recovery software. This works for logical issues like corruption or file system errors.
If the card doesn’t show up at all, it’s likely a physical issue—like broken connectors, damaged circuitry, or worn-out memory chips. In that case, recovery usually requires professional services with the tools to handle physically damaged cards.
How to recover photos from a corrupted SD card for free?
You can recover photos from a corrupted SD card for free using tools like Disk Drill, Recuva, or PhotoRec. Among these, Disk Drill is the most capable, with excellent support for both common and less common image file types. However, its free version has a data recovery limit, which might not be enough for larger recovery needs.
On the other hand, free tools like Recuva and PhotoRec have no recovery limits. While they’re good tools, they’re not as advanced or beginner-friendly as Disk Drill. PhotoRec, in particular, uses a command-line interface (or a very basic UI in the Windows version), which might be challenging for less experienced users.
How to copy data from a corrupted SD card to my computer?
It depends on how bad the corruption is. First, insert the SD card into a card reader and connect it to your computer. If it shows up in File Explorer, try copying your files directly to a safe location.
If the card doesn’t appear or gives you errors when you try to open it, you’ll need to use recovery software. Free tools like Disk Drill, Recuva, or PhotoRec can help you recover files and save them to your computer. Just be sure not to save the recovered files back to the SD card itself, as this could overwrite any remaining data.
For more serious corruption, it’s a good idea to create a byte-to-byte backup of the SD card first. This makes an exact copy of the card, so you can recover files from the backup instead of working on the damaged card directly, reducing the risk of further problems.
If your SD card doesn’t show up at all, the issue might be physical, and you may need professional recovery services to get your data back.
This article was written by Robert Agar, a Staff Writer at Handy Recovery Advisor. It was recently updated by Roman Demian. It was also verified for technical accuracy by Andrey Vasilyev, our editorial advisor.
Curious about our content creation process? Take a look at our Editor Guidelines.