Have you downloaded a piece of software or an archive only to watch McAfee remove it without asking? Or maybe you tried to open a file, and McAfee flagged it as dangerous before it vanished from your system.
These situations happen more often than you think. Our team has dealt with this problem in various contexts and compiled simple, tested methods to help you recover McAfee-deleted files and, just as importantly, how to stop it from erasing files you trust again.
Can I Recover Files Deleted by McAfee?
Before we answer the question, it is important to understand how antivirus software works. Unlike us, tools like McAfee cannot tell the difference between files based on their importance to us. They are instructed to scan your storage regularly, and based on the preset parameters they classify files as harmful or safe.
Once a file is marked suspicious, the file might be cleaned, deleted, or sent to the quarantine zone and kept isolated from the rest of your data. The action taken depends on your settings and the type of threat.
If McAfee deletes a file you just downloaded from the Internet, you can simply try to re-download it again. But if the file was on a USB drive or another external device, or you can’t re-download it again, recovery becomes trickier, but not impossible. Deleted files often remain on your storage drive until they’re overwritten. Data recovery tools can scan for those traces and help you get the file back.
So, can you recover files deleted by McAfee? In most cases, yes. Whether McAfee quarantined or deleted the file, there are ways to retrieve it. In the next section, we’ll cover the exact steps you need to follow.
How to Recover Files Deleted by McAfee
So, as you see, there are two ways to restore files deleted by McAfee. The approach depends on McAfee’s actions—whether the file was deleted outright or stored in quarantine. First, we’ll cover files that were fully deleted, either immediately after detection or removed from quarantine. We’ll tackle this first because our internal statistics show that most people are dealing with “true” deletions and not quarantine cases.
Antivirus software quarantines suspicious files for a reason. Only proceed if you’re sure the file is harmless.
Method 1: Recover McAfee Deleted Files Using Data Recovery App
There are plenty of data recovery apps to choose from, and you can check our list of the best data recovery options, based on our tests. For this example, we’ll use Disk Drill—it’s one of the best apps of its kind, that constantly earns high marks for its recovery performance and is incredibly beginner-friendly. The recovery process usually takes just a couple of clicks and is pretty intuitive.
As we briefly mentioned earlier, deleted data is often recoverable because Windows doesn’t erase the actual data right away. Instead, the system removes the file’s reference in the Master File Table (MFT) or File Allocation Table (FAT), and marks the space as available for new data. The data itself stays on the drive until something overwrites it. Data recovery tools scan for these traces and restore the file.
The less you use the storage where the deleted data was located, the higher your chances of successful recovery. Avoid using the affected drive as much as possible. Do not download, install, copy, or move files on it. Install a data recovery app on a different drive or partition if you have one.
Here’s how to use Disk Drill to restore files deleted by McAfee:
- Download Disk Drill from the official website. Once the download is complete, install and launch the program.
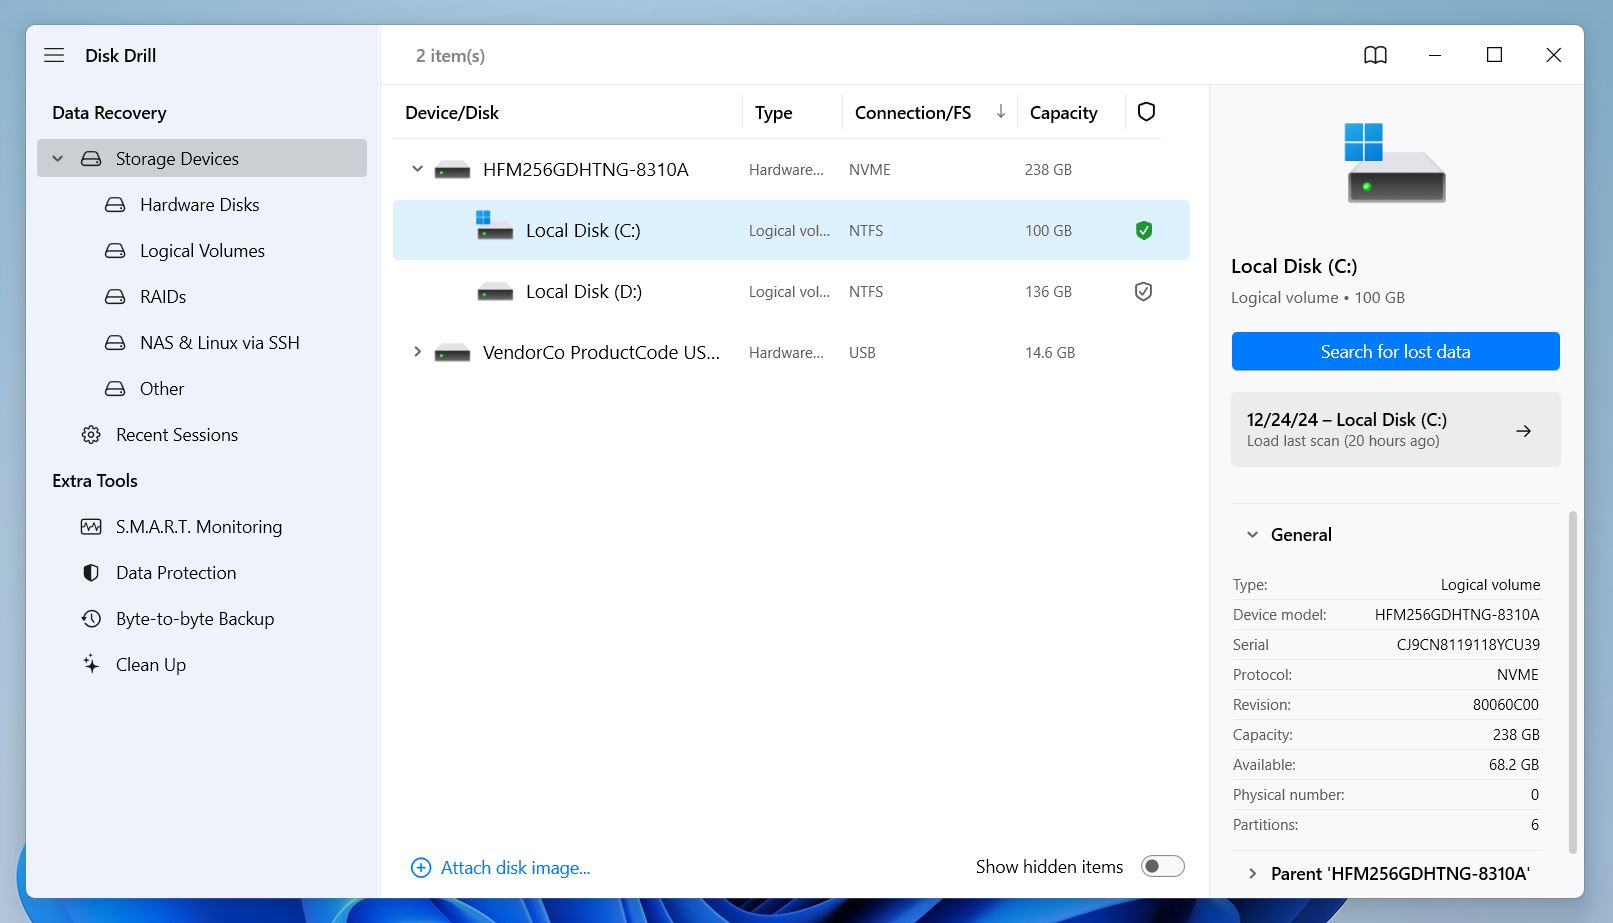
- On the home screen, you’ll notice your primary as well as all other storage drives connected to your PC. Select the drive/partition you want to perform recovery on.
- Click on Search for lost data to scan your storage for lost files.
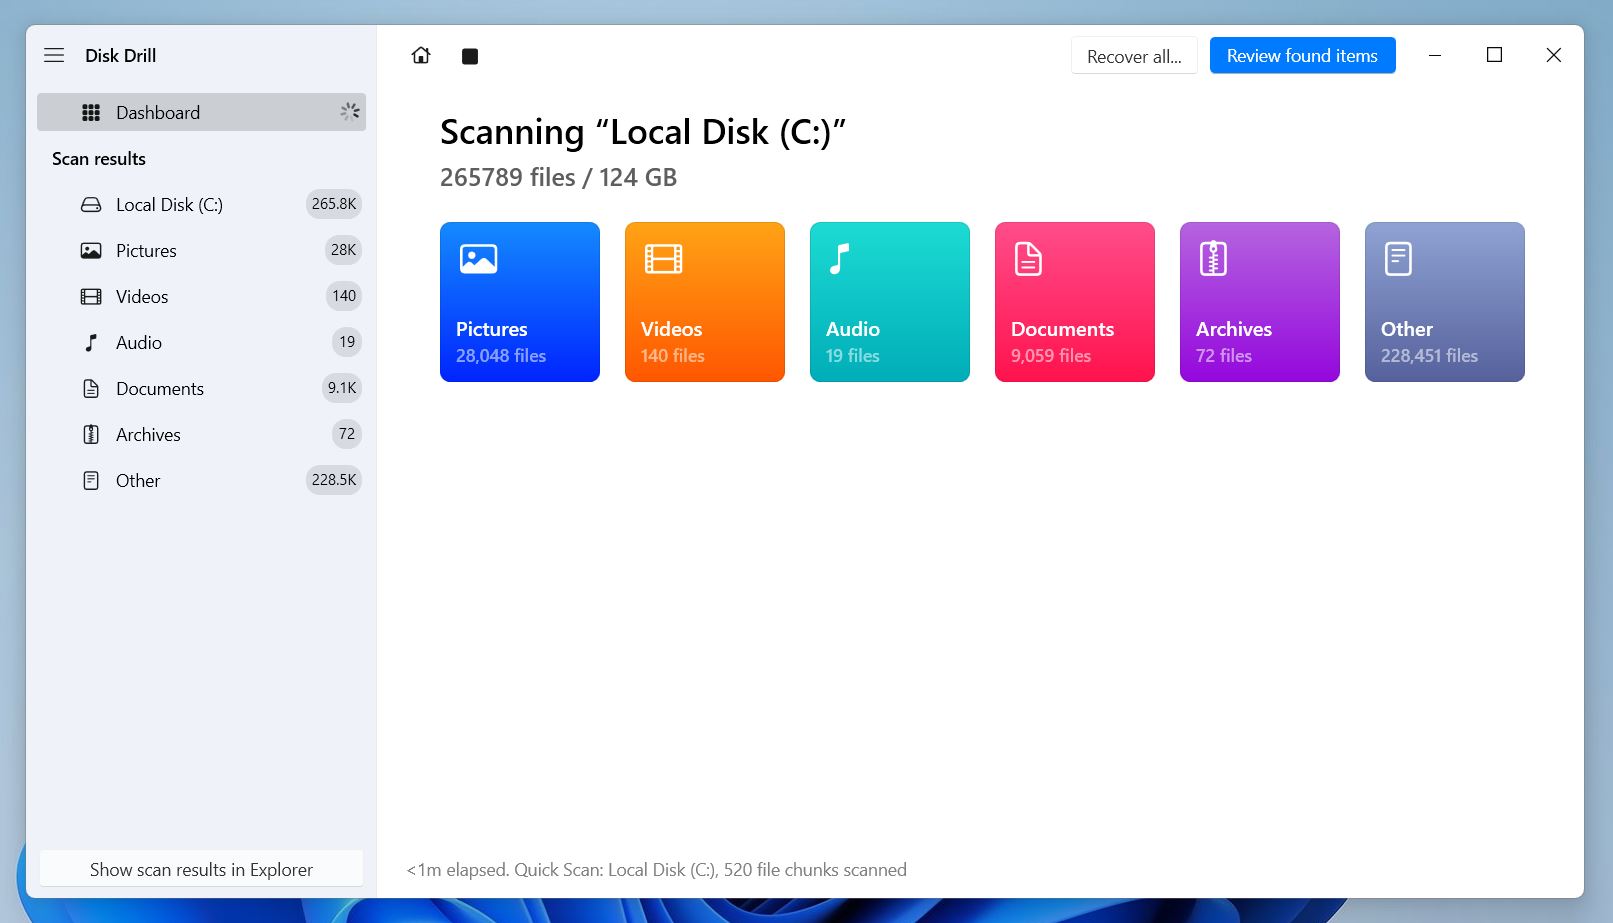
- Disk Drill will scan the storage for all lost files. You don’t need to wait for the scan to finish, as you can click on Review found items at any time and let the scan run in the background. Files will pop up in the list as Disk Drill finds them.
 👀
👀Disk Drill comes packed with features that make finding your files easy. You can filter recoverable files by type, size, or date modified. The search bar lets you type part of the file name or the full name to locate it faster. You can also search by file extension, like exe, dll, or zip/rar, which are commonly flagged as suspicious by antivirus programs.
- Next to each file, you’ll see its recovery chances marked as High, Average, or Low. From our experience, these ratings are usually accurate and give you a good sense of whether the file can be restored. Files with “High” chances are typically intact and easy to recover.
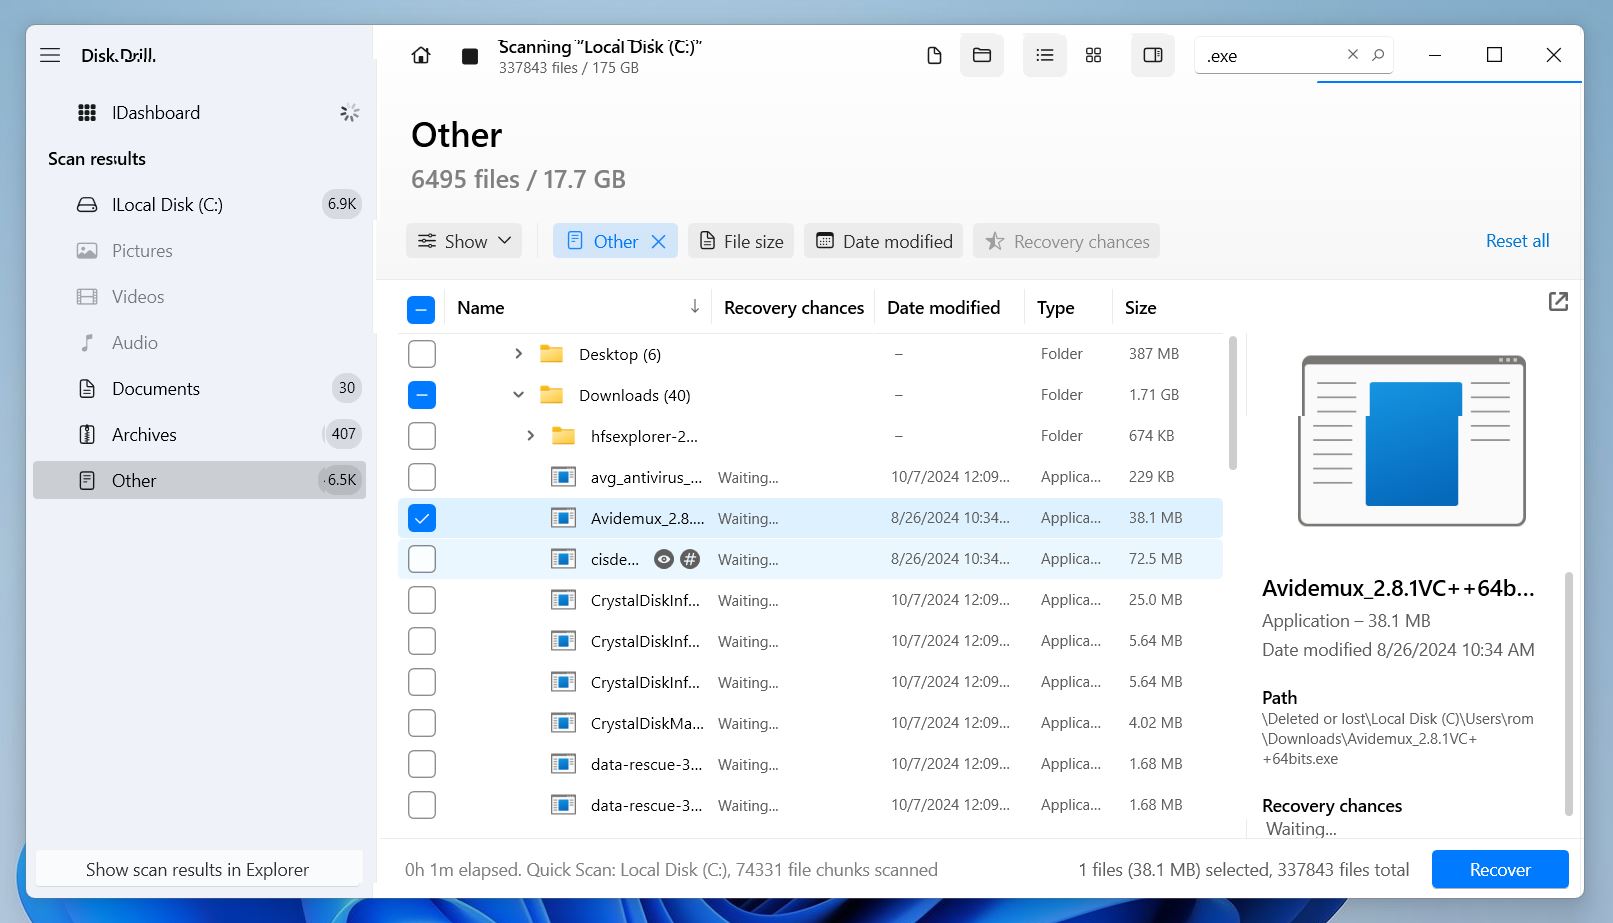
- You can also use the search bar to filter files by name to find them easily. You can also use it to find files with a specific file extension. Since we’re recovering video files, we’ll search for “.mp4”.
- You can also see the probability of a successful recovery next to each file.
- Find and select the files you want to recover. Then, press the Recover button to continue.
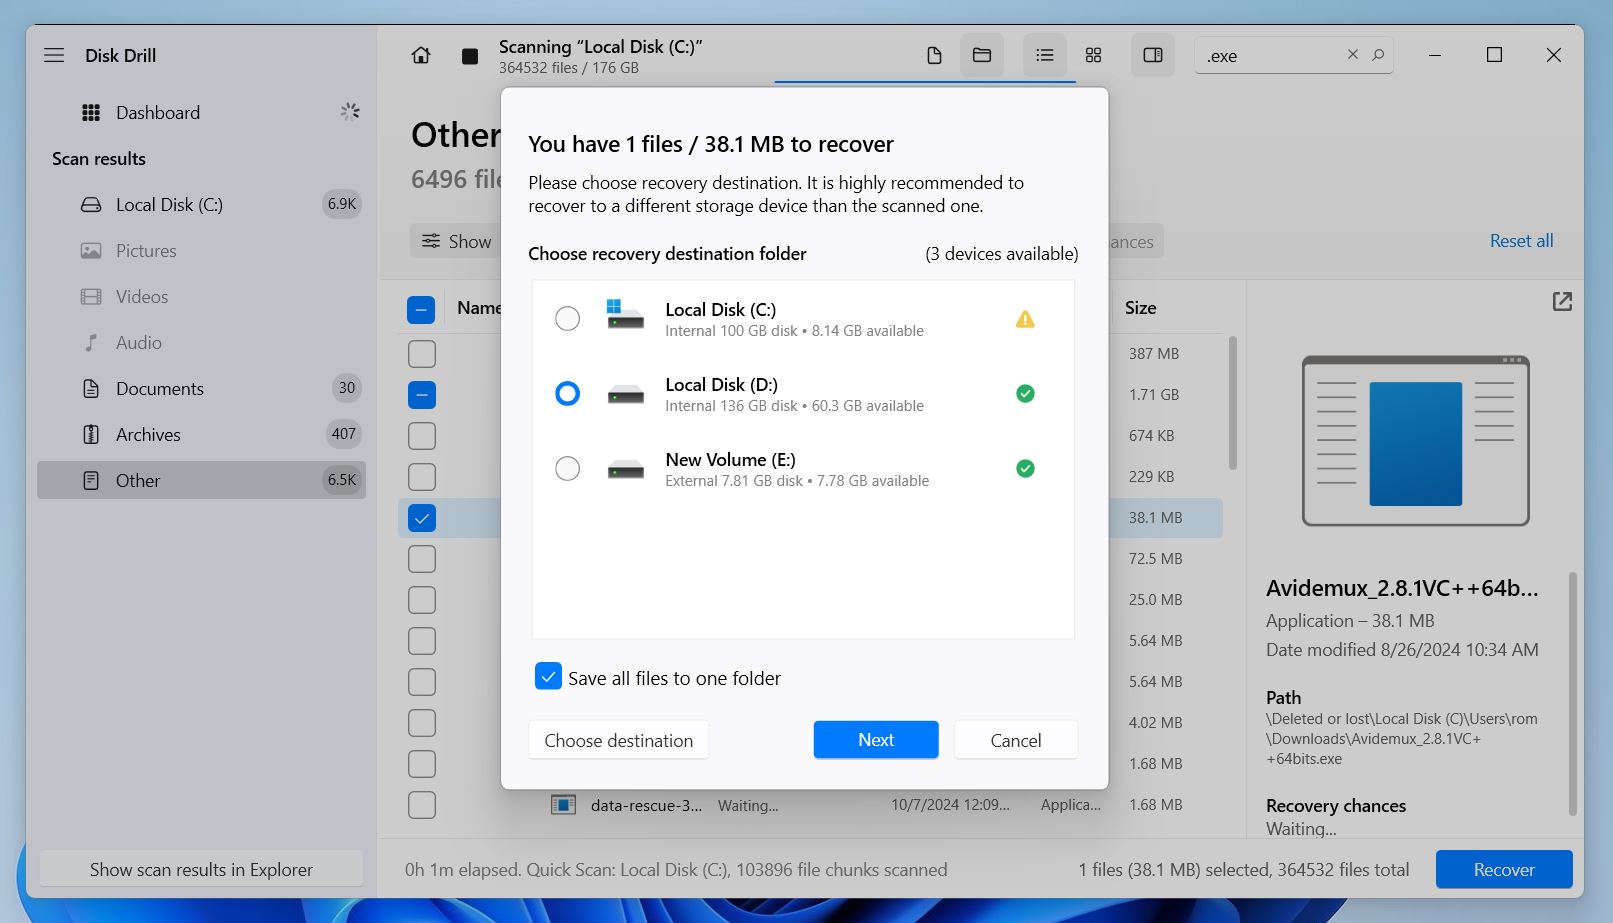
- Lastly, choose a destination for your recovered files and complete the recovery process. Like with the installation, make sure to pick a different drive or partition than the one you scanned (if possible).
Disk Drill, in its Basic version, lets you scan and preview as much as you want, but the actual recovery is limited to 500MB. For many cases, like small files McAfee might have mistakenly flagged and deleted, this limit could be enough. If you need more, you can always upgrade to the PRO version, which removes all limits.
Recovery of certain types of files, like .exe, which antivirus programs often delete, depends heavily on the integrity of the file system. Recovery works if the file system records are intact. If the file system is too damaged for that, the software will rely on a signature scan to identify the files. However, files like .exe are usually hard to detect—or even impossible—using this method, as their structures are more difficult for signature-based scans to identify accurately.
Now your deleted files are back, but that’s not the end of the story. McAfee can still flag and delete the same file during the next scan. To prevent this, go to I’ve Got My File Back—How Do I Stop McAfee from Quarantining It Again? and find out how to stop it from happening again.
By the way, to make sure your file is safe, you can upload it to services like VirusTotal. This platform checks files with over 70 antivirus scanners and URL/domain blocklisting services. It also uses tools to extract detailed signals from the content. If most antivirus scanners still flag the file as a threat, it’s best to delete it.
Method 2: Retrieve Files From McAfee Quarantine
If instead of straight-up deletion, McAfee has restricted your files to a secured location, you can recover those quarantined files from within the McAfee app itself.
Here’s how to do it:
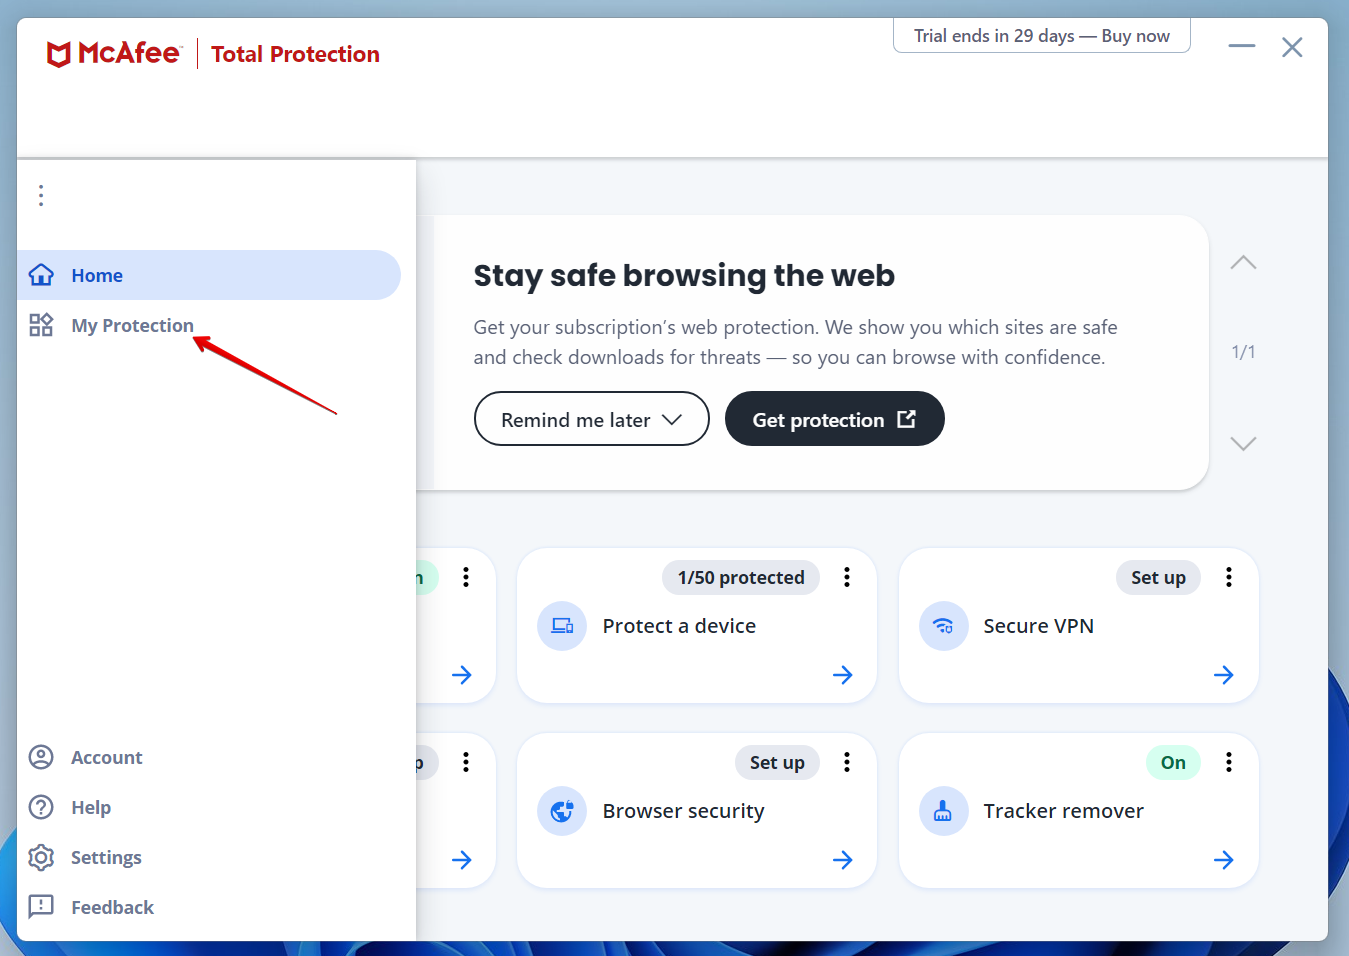
- Open your McAfee Antivirus software and click on the three-dot icon on the left side of your screen.

- Now, go to My Protection, located under the Home icon.
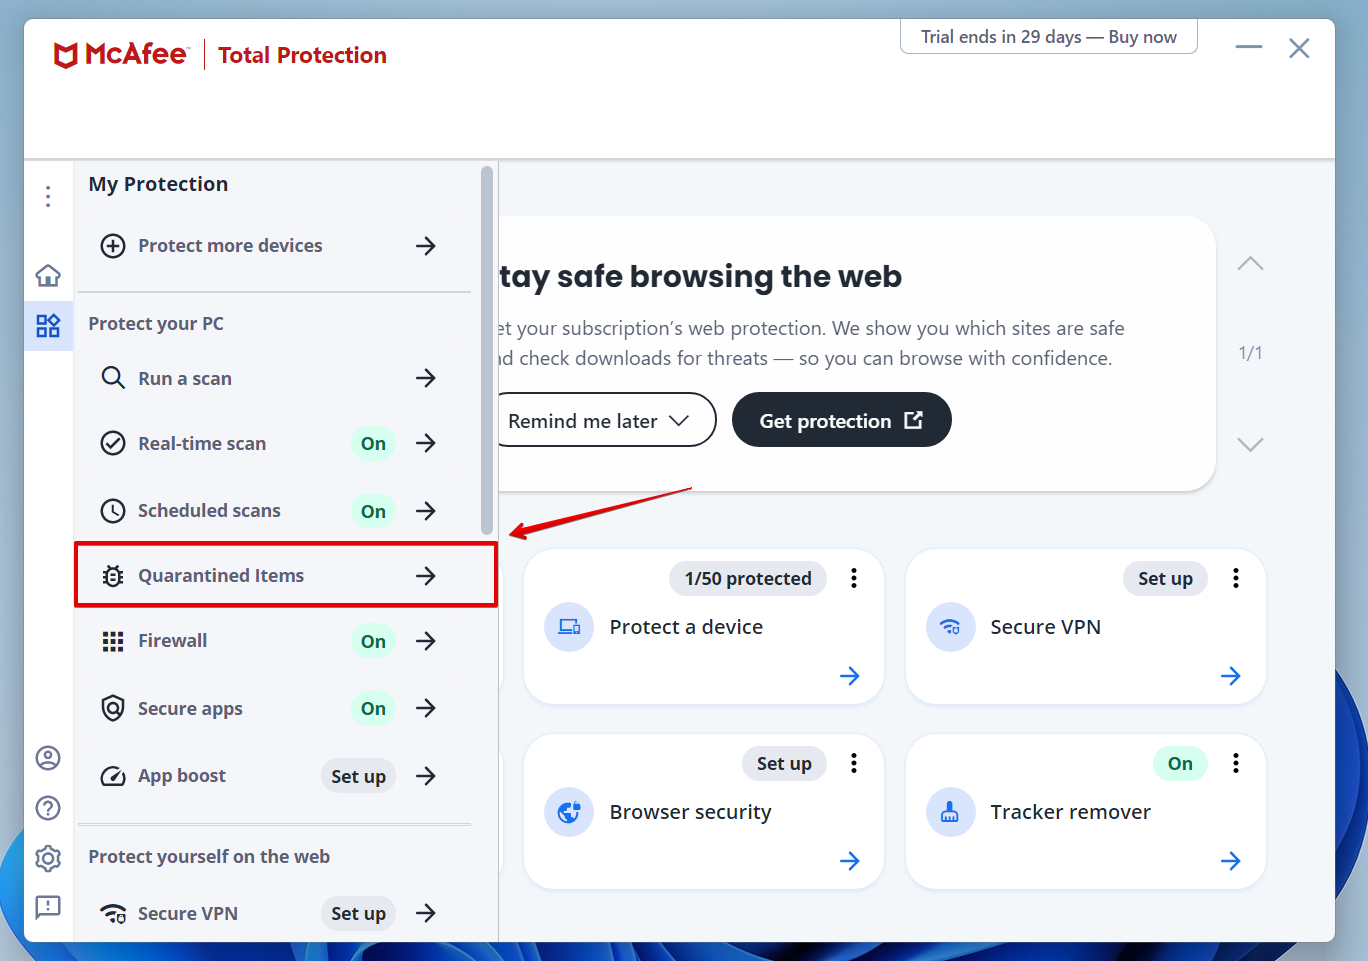
- In the My Protection menu, navigate to Quarantined Items.
- Now, all you have to do is select the files from the quarantine manager you want to recover and click on Restore. We didn’t have any files in the quarantine section, so our screen might look different. But it may show some files on your end.
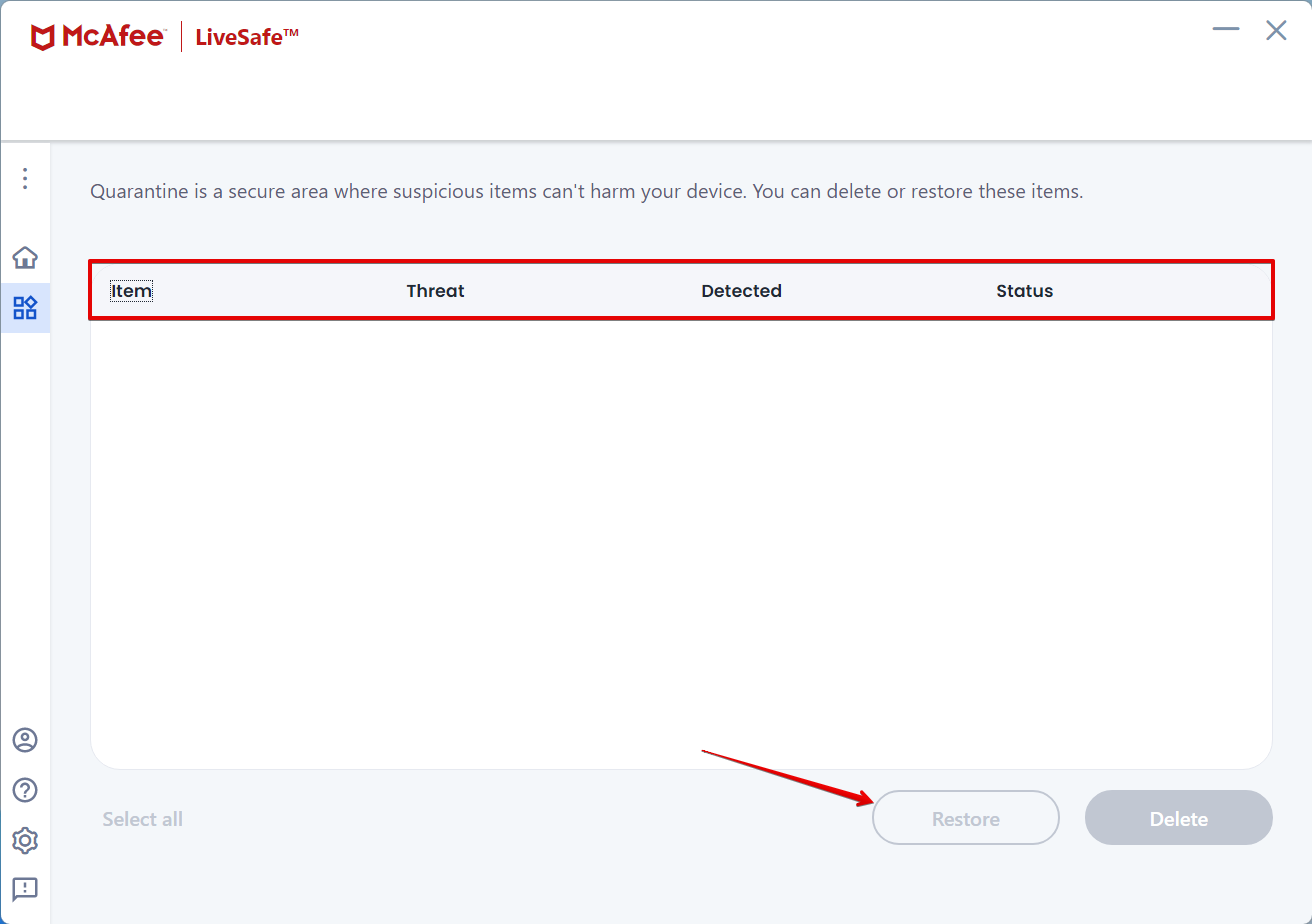
Just like with Method 1, your files are now back where they were before, but this isn’t the end of it. As McAfee warns: “The same file or app might be detected again as a potential threat when it is next accessed.” Keep reading—we’ll explain your options from here.
I’ve Got My File Back—How Do I Stop McAfee from Quarantining It Again?
So, your files are back, but that’s just the first step. Without further action, McAfee might flag and quarantine them again during the next scan. To stop this from happening, you’ll need to whitelist the file. It will give your file a quarantine exemption, so McAfee won’t automatically delete it again.
If McAfee has flagged a safe file as a threat (a false positive), you can report it to help improve their detection system. To dispute an incorrect classification, complete the Dispute a Detection & Allowlisting Data form on McAfee’s official website. Include all required information, attach the file (in ZIP or RAR format), and submit the form with the Captcha code. Make sure to include the extracted contents of any installation packages for software submissions. If your file exceeds 50MB, contact McAfee Customer Service for assistance.
Here’s how to achieve this:
- Launch McAfee Total Protection and click on the side-panel button.
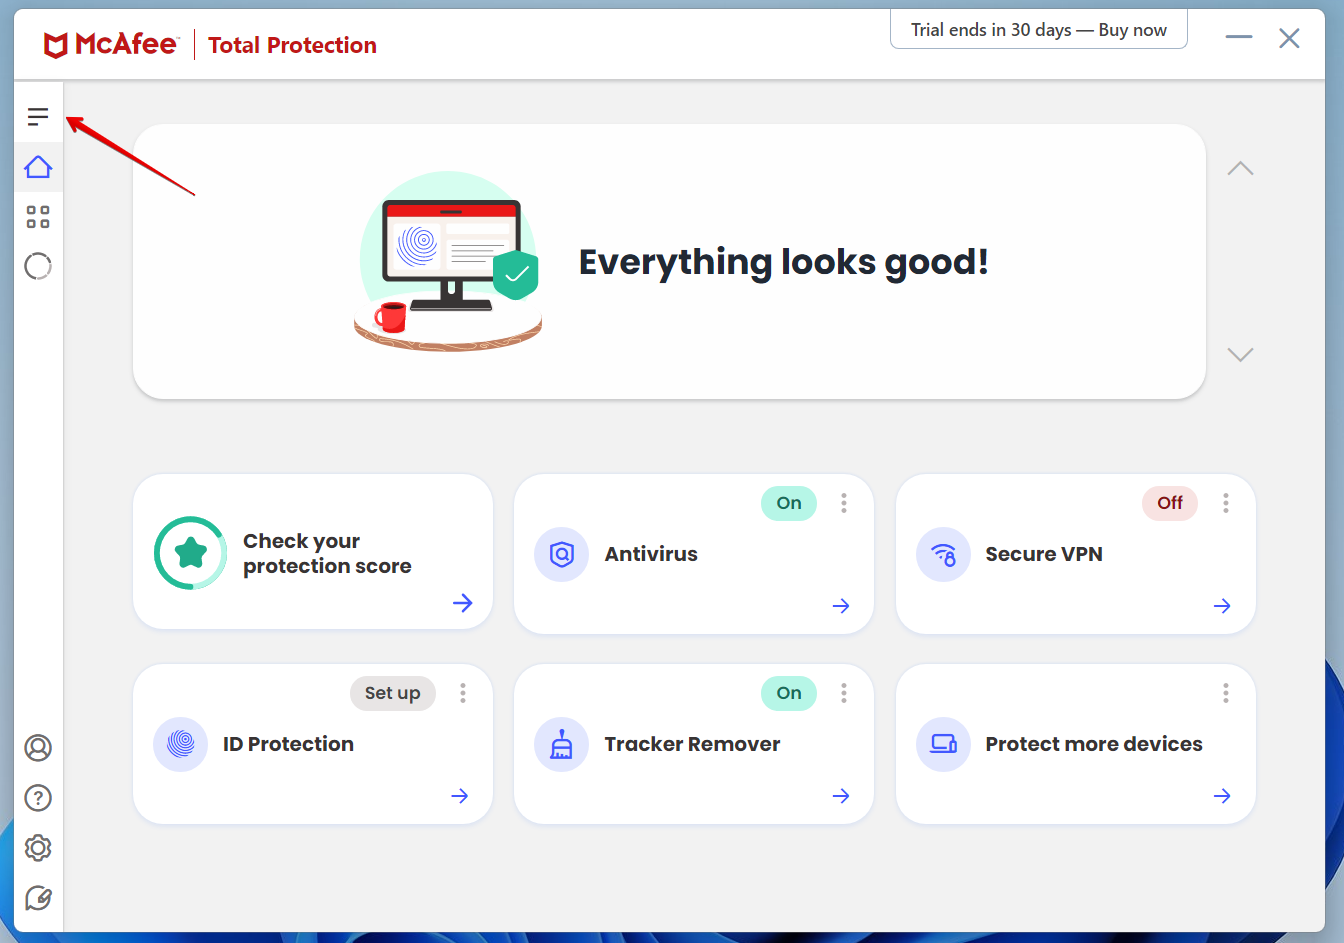
- Now go to My Protection.

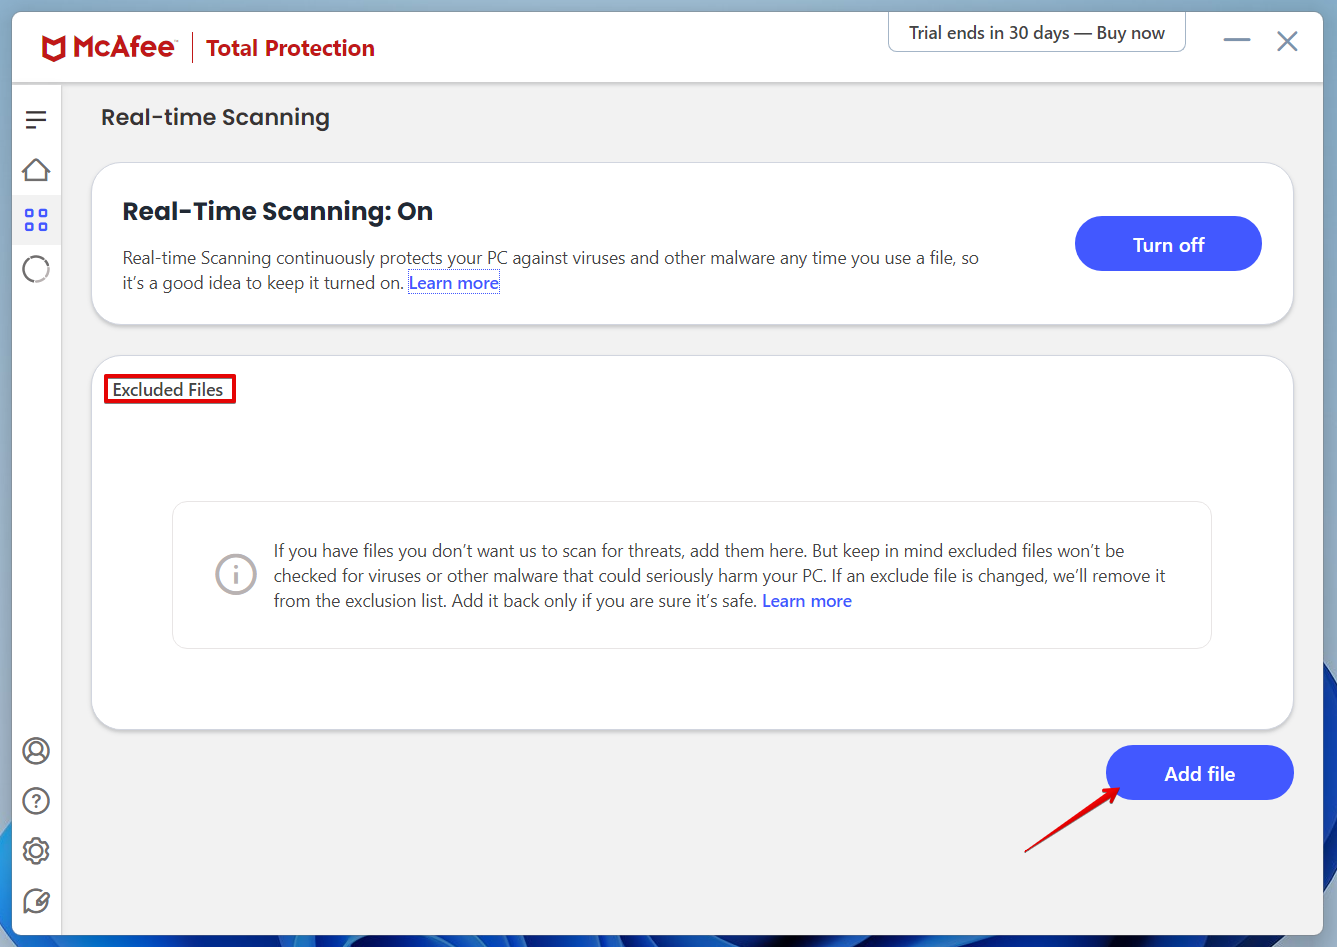
- Here, select Real-Time Scanning.

- You will notice a section called Exclude Files. This option will allow you to add files to a list, and that list won’t be put through the antivirus scan. Click on Add File to continue.
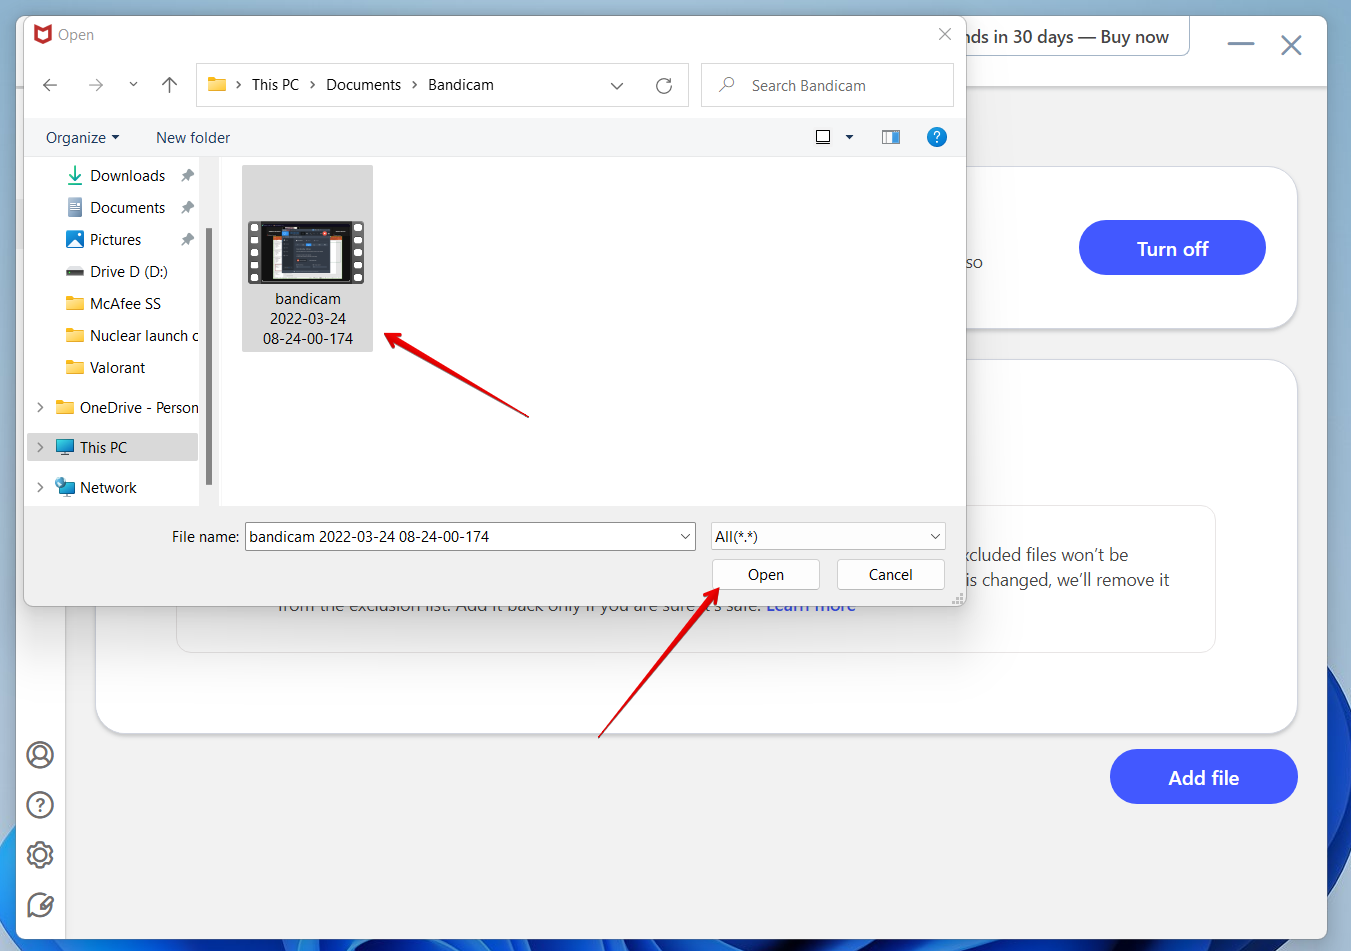
- Now, select a file and click on Open.
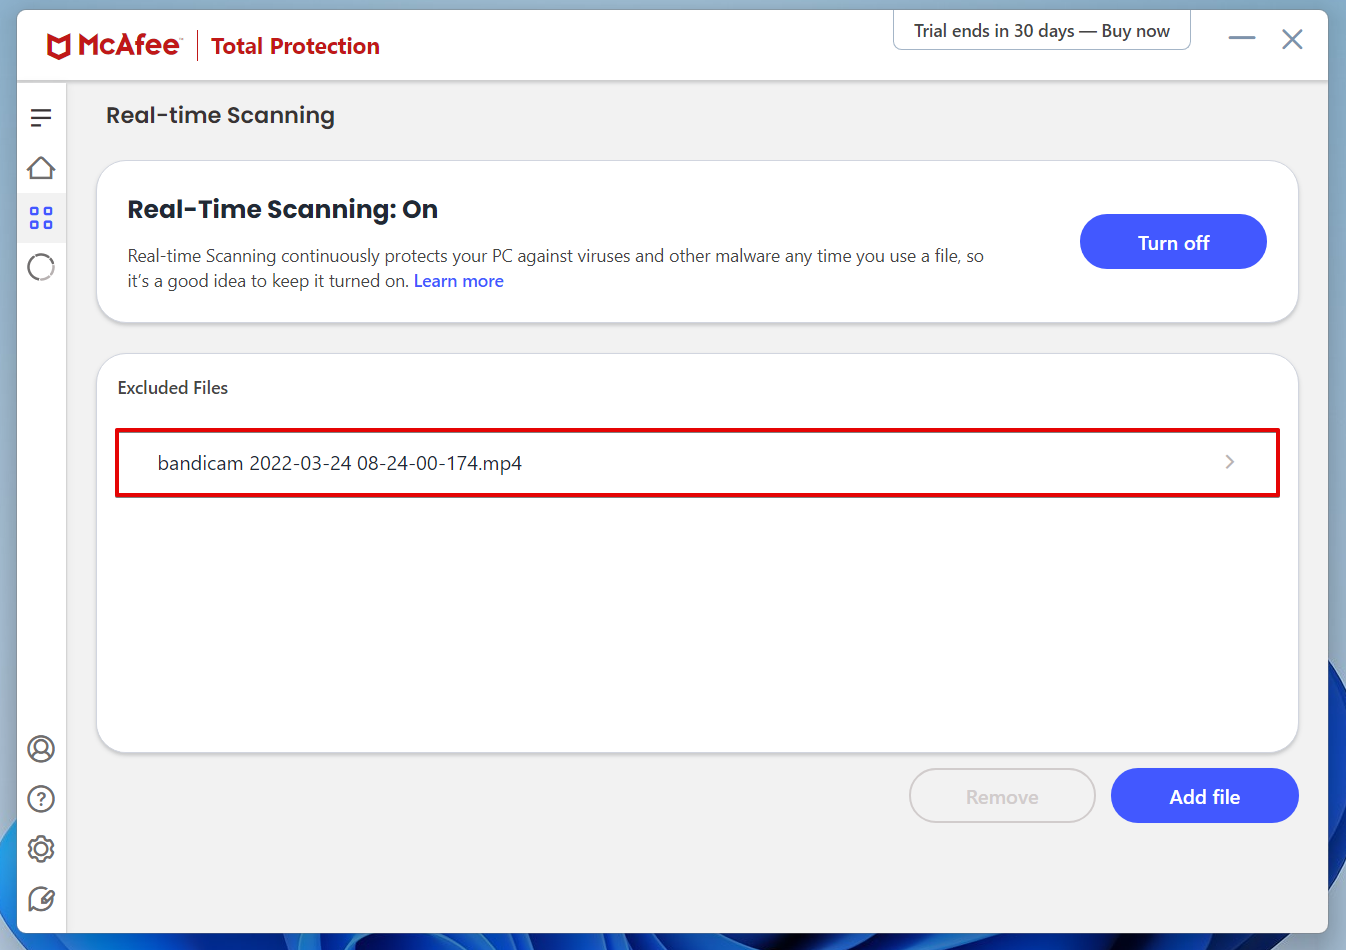
- Your file has been successfully added to the quarantine exemption list.
FAQ
Why does McAfee keep quarantining a file I need?
McAfee is designed to detect and remove viruses, worms, and other types of malware. However, sometimes it also detects and removes files that are known as “false positives.” A false positive is a file that is incorrectly identified as a virus, worm, or another type of malware.
There are a number of reasons why McAfee antivirus programs might see a normal file as a threat.
- 💽 If a file is corrupted, it can cause your computer to crash or freeze. McAfee is designed to scan for and remove corrupted files.
- ⚠️ Even if the file is not currently infected, it may still contain code that could infect your computer if you open it. McAfee is designed to detect and remove such kind of potential threats.
- ☠️ Files that might be trying to access sensitive information on your computer are also considered a potential threat sometimes as they might be acting as a gateway for other malicious files to enter your system.
- ❓ Finally, some files may be flagged as threats because they are simply suspicious. This could be because they are from an unknown source or because they contain strange or unexpected code. McAfee is designed to flag these files so that you can investigate them further.
Will McAfee automatically delete quarantined files after a certain period?
No, McAfee does not automatically delete quarantined files after a set period. Files in quarantine remain stored securely until you decide what to do with them. You can either restore the file if you believe it’s safe or delete it permanently if you no longer need it.
Where do quarantined files go?
If McAfee finds a potentially dangerous file or folder, it will move it to a secured location that is cut off from the rest of your storage. Here, all the quarantined items are encrypted so that no file, folder, or cookie can interact with files outside the quarantine and harm your PC.
How to find the McAfee quarantine folder location?
An easy way to locate the files quarantined by McAfee is to launch the app and click on the three-dot option on the homepage. Then, go to My Protection and scroll down to navigate to Quarantined Items. Here, you will find all the files that were marked as malware by your antivirus software.
How to recover files shredded by McAfee?
McAfee’s shredding process deletes files and overwrites the disk space multiple times, which makes recovery virtually impossible. McAfee offers three shredding options:
- Basic: Deletes the file and overwrites the disk space twice.
- Safe: Deletes the file and overwrites the disk space three times.
- Complete: Deletes the file and overwrites the disk space five times.
Once a file is overwritten, no data recovery tool—no matter how advanced—can retrieve it. Even professional data recovery services cannot recover overwritten data.
Can I recover McAfee-deleted files without any software?
Yes, you can recover McAfee-deleted files without using additional software if the files were not permanently removed and are in quarantine. Follow these steps:
- Launch the McAfee application on your computer.
- Go to the Quarantine or Threats section within the app.
- Look through the list of quarantined items to locate the file you need.
- Select the file and click the “Restore” option to move it back to its original location.
Where did my McAfee vault disappear?
It’s probably just hidden. To view it, simply open the McAfee program and click on the “Vault” tab. If you don’t see the Vault tab, click on the “Show Hidden Tabs” button at the top of the window.
How can I check if my file is really malicious or just a false positive?
To determine if your file is malicious or just a false positive, scan it with another antivirus program. We recommend uploading the file to VirusTotal, which uses over 70 antivirus engines and URL/domain blocklisting services to analyze the file. This scan will show you whether other scanners also detect it as a threat.
This article was written by Ojash Yadav, a Contributing Writer at Handy Recovery Advisor. It was recently updated by Roman Demian. It was also verified for technical accuracy by Andrey Vasilyev, our editorial advisor.
Curious about our content creation process? Take a look at our Editor Guidelines.
