Data recovery from a regular hard drive can already be tricky, but when the drive won’t boot at all, the challenge grows. That’s okay—“impossible” isn’t part of the equation here. With the right steps, you can retrieve data from a hard drive that won’t boot and, in some cases, even make it functional again. We’ll walk you through practical methods to recover files and repair your drive, one step at a time. Let’s get started.
Common Scenarios of Non-Bootable Hard Drives
When your hard drive won’t boot, the situation can vary widely. Let’s break down common scenarios, possible reasons behind them, and what you can do to fix the problem or get files off a hard drive that won’t turn on.
Scenario |
Possible Reasons |
What Can Be Done |
Internal Hard Drive Won’t Boot |
– Corrupted operating system files. |
– Check if the drive is detected in BIOS/UEFI. – Use bootable recovery tools to repair the OS or recover data. – Remove the drive and connect it to another computer as an external drive to access or recover data. |
– Damaged bootloader (e.g., MBR/EFI corruption). |
– Rebuild the bootloader using tools like Bootrec. – Connect the drive to another PC to recover important files. |
|
– Bad sectors causing critical files to become unreadable. |
– Connect the drive externally to another computer for data access. – Create a disk image to prevent further damage. – Recover data from the image. |
|
– Loose or damaged SATA cables or connectors. |
– Verify and secure all physical connections. – Replace faulty cables or try different SATA ports. – Connect the drive externally to test it on another system. |
|
– Outdated BIOS or driver conflicts. |
||
External Hard Drive Not Showing on Windows When Connected |
– Faulty or damaged USB cable or port. |
– Try different USB cables and ports. – Check if the drive appears in Disk Management. |
– Drive not initialized or missing a drive letter. |
– Open Disk Management to initialize the drive. – Assign a drive letter if necessary. |
|
– File system corruption making the drive unreadable. |
||
– Physical damage to the drive’s components. |
– Consult professional data recovery services if the drive is unresponsive. |
What to Check First When Your Hard Drive Won’t Boot
Let’s start with the basics—sometimes your hard drive won’t boot simply because it’s not connected properly, either physically or in your BIOS/UEFI settings. If that’s the issue, no app or tool will fix it until you sort out the connection. So, before we start with the recovery steps, let’s rule this out.
If you’ve already tried everything to make your drive bootable again, feel free to skip ahead to the Hard Drive Still Won’t Boot? Here’s How to Retrieve Your Files Off of It.
Check Hardware Connections
Internal hard drives connect to your computer through two key cables: the SATA cable and the power cable. The SATA cable handles data transfer between the drive and the motherboard, while the power cable from the power supply unit (PSU) keeps the drive running. Both connections need to be secure for the drive to work properly.

Open your computer case and locate the hard drive. Check the cables connected to it:
- The SATA cable plugs into the motherboard with a slim, L-shaped connector.
- The power cable comes from the PSU and attaches to a wider port on the drive. Make sure both cables are firmly attached to the drive and their respective ports. Even a slightly loose connection can stop the drive from working.
If the cables look fine but the drive isn’t working, swap out the SATA cable for a new one. These cables can wear out or fail over time. Also sometimes, the SATA port on the motherboard itself stops working. Disconnect the cable from the current port and try another one. Most motherboards have several ports, so you should have options.
Turn on your computer and listen to the hard drive. A working drive makes a low humming or a soft clicking sound. If you hear loud clicking, grinding, or nothing at all, the drive might be damaged.
Check/Reset BIOS/UEFI
The next stop is your system’s BIOS or UEFI settings. These are the system-level controls that manage how your computer interacts with its hardware. BIOS (Basic Input/Output System) and UEFI (Unified Extensible Firmware Interface) are essentially the “brains” of your system’s startup process, they determine which device to boot from first and whether your hard drive is recognized.
If the BIOS/UEFI doesn’t detect your hard drive, the system won’t boot, no matter how functional the drive might be. Here’s how to access BIOS/UEFI:
- Start your computer and press the key to access BIOS/UEFI during startup. This is usually F2, F10, Del, or something similar. You’ll see a message like “Press F2 to enter Setup” on the initial boot screen.
- Navigate to the “Storage” or “Boot” section within the BIOS/UEFI menu. Look for your hard drive in the list of connected devices. If it’s not listed, the system doesn’t detect the drive, which could mean a physical connection issue or drive failure.
- In the Boot section, check the order of boot devices. Make sure your hard drive is listed as the primary boot option. If it isn’t, adjust the boot priority so your system tries to load from your hard drive first. Save and exit the BIOS/UEFI settings.
Some systems support both UEFI and Legacy (CSM) boot modes. If your drive isn’t detected in one mode, try switching to the other. This is especially useful for older hard drives or OS.
If you suspect an incorrect configuration, use the “Restore Factory Defaults” or “Load Optimized Defaults” option in the BIOS/UEFI menu. This resets everything to the manufacturer’s default settings, which often resolves issues caused by changes to the configuration.
Make a Bootable USB Drive and Try to Fix Your Drive
If your hard drive is detected in BIOS/UEFI but still won’t boot, it means there’s likely an issue with the OS, bootloader, or file system. A bootable USB drive can help you bypass your non-bootable hard drive and use repair tools to fix the system or recover your files. This is one of the most effective ways to troubleshoot and resolve boot problems.
How to Make a Bootable USB Drive
A bootable USB drive is a portable device that contains the files and software needed to start a computer, even if its internal storage or OS isn’t working. In simple terms, it’s a USB drive with an image file (like an ISO) and a boot sector that allows the computer to load directly from it. This creates a temporary environment to troubleshoot, repair, or recover your hard drive.
When a computer starts, the BIOS/UEFI looks for a bootable device in a specific order. Usually, it prioritizes the internal hard drive. A bootable USB overrides that process, and lets you bypass the unbootable drive and load recovery tools or an OS directly from the USB.
What you need to start:
- A working computer to set up the USB drive.
- A USB flash drive with at least 8GB of free space.
- The Windows Media Creation Tool or another ISO creation tool like Rufus.
- A Windows 10 or Windows 11 ISO file (downloaded through the Media Creation Tool or directly from Microsoft).
We’ll walk you through the creation of a bootable USB drive using the Windows Media Creation Tool. Just follow our steps, and you’ll have a fully functional bootable USB ready in no time:
- Visit Microsoft’s official download page for Windows 10 or Windows 11.
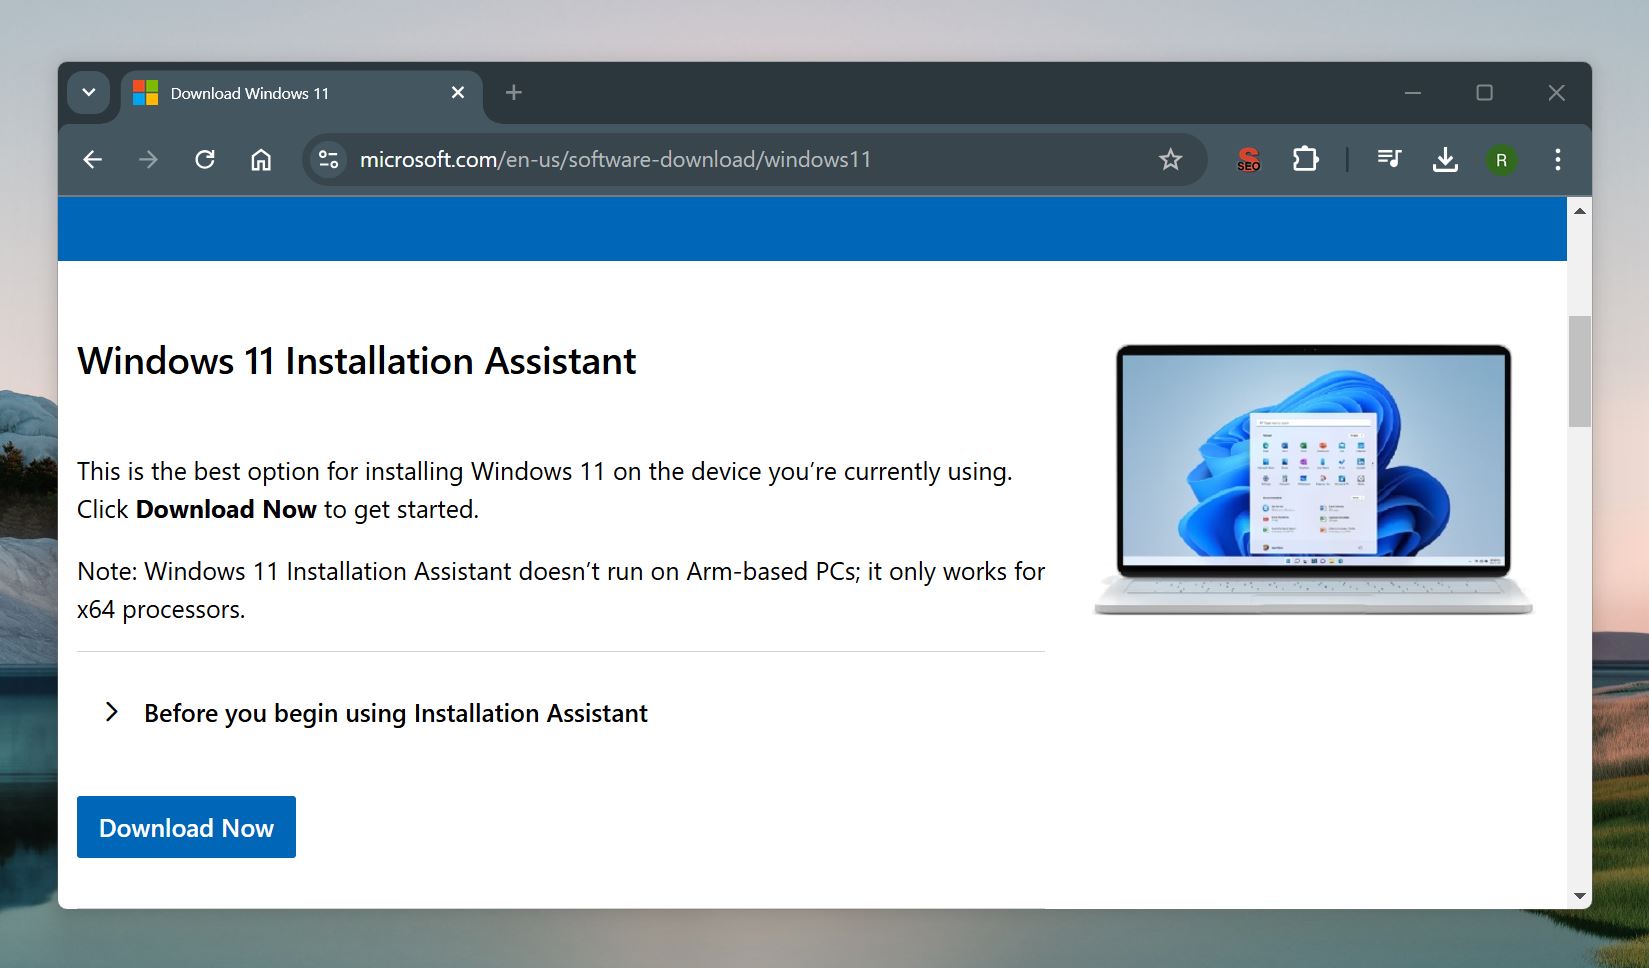
- Click Download now under the Media Creation Tool section.
- Save the file to your computer.
- Open the downloaded file (MediaCreationTool.exe) and allow it to run.
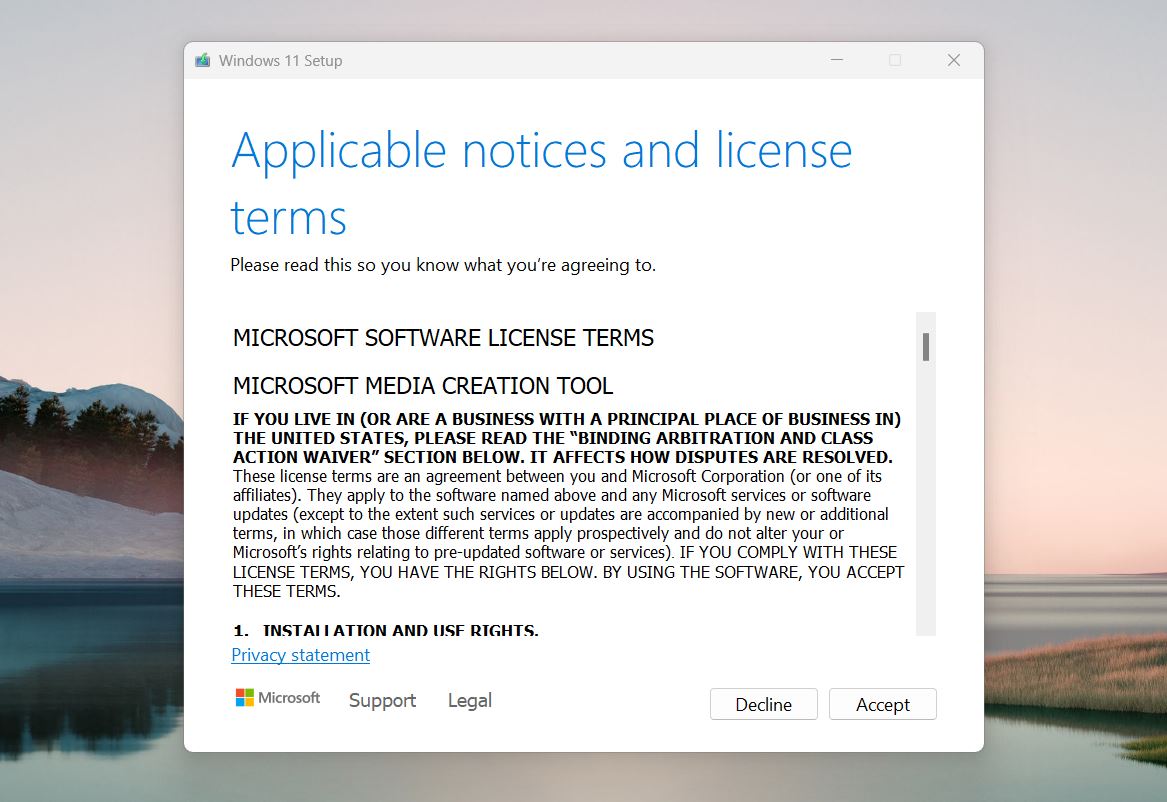
- Accept the license terms when prompted.
- On the “What do you want to do?” screen, select Create installation media (USB flash drive, DVD, or ISO file) for another PC and click Next.
- Choose the language, Windows edition (e.g., Windows Home or Pro), and architecture (64-bit, 32-bit, or both).
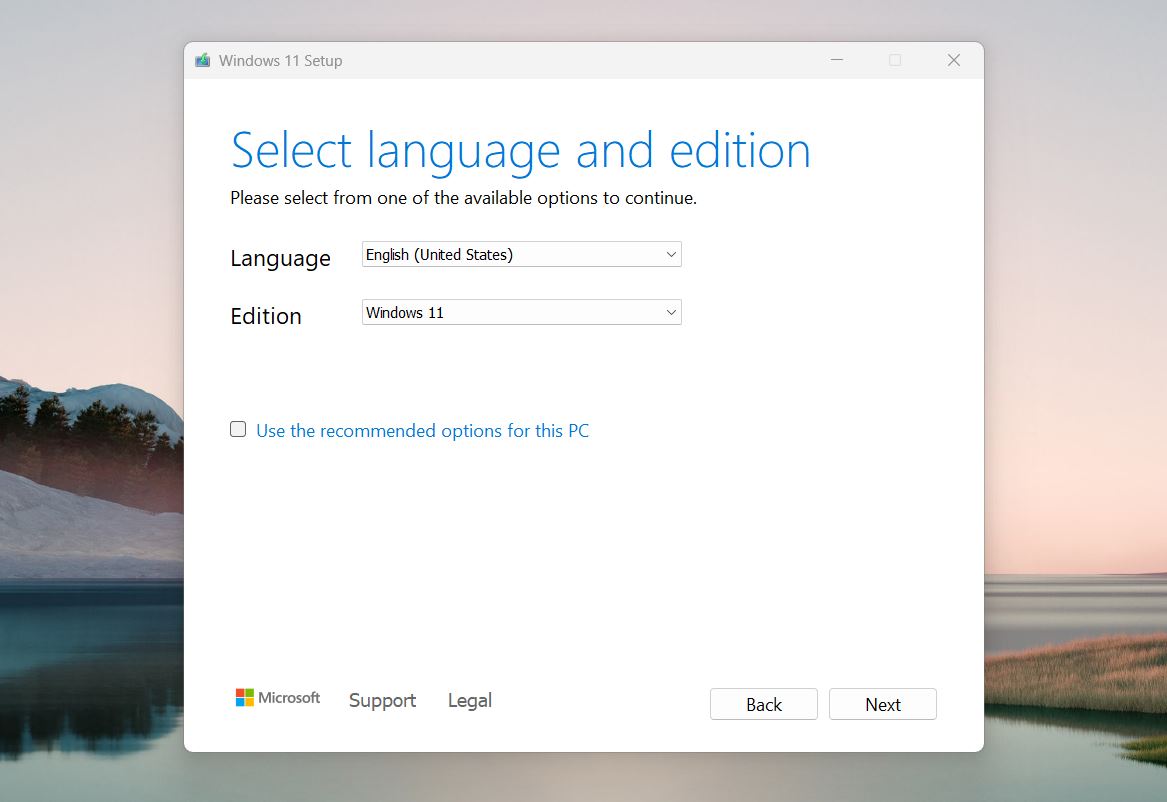
- If you’re unsure, leave the Use the recommended options for this PC checkbox selected and click Next.
- On the “Choose which media to use” screen, select USB flash drive.
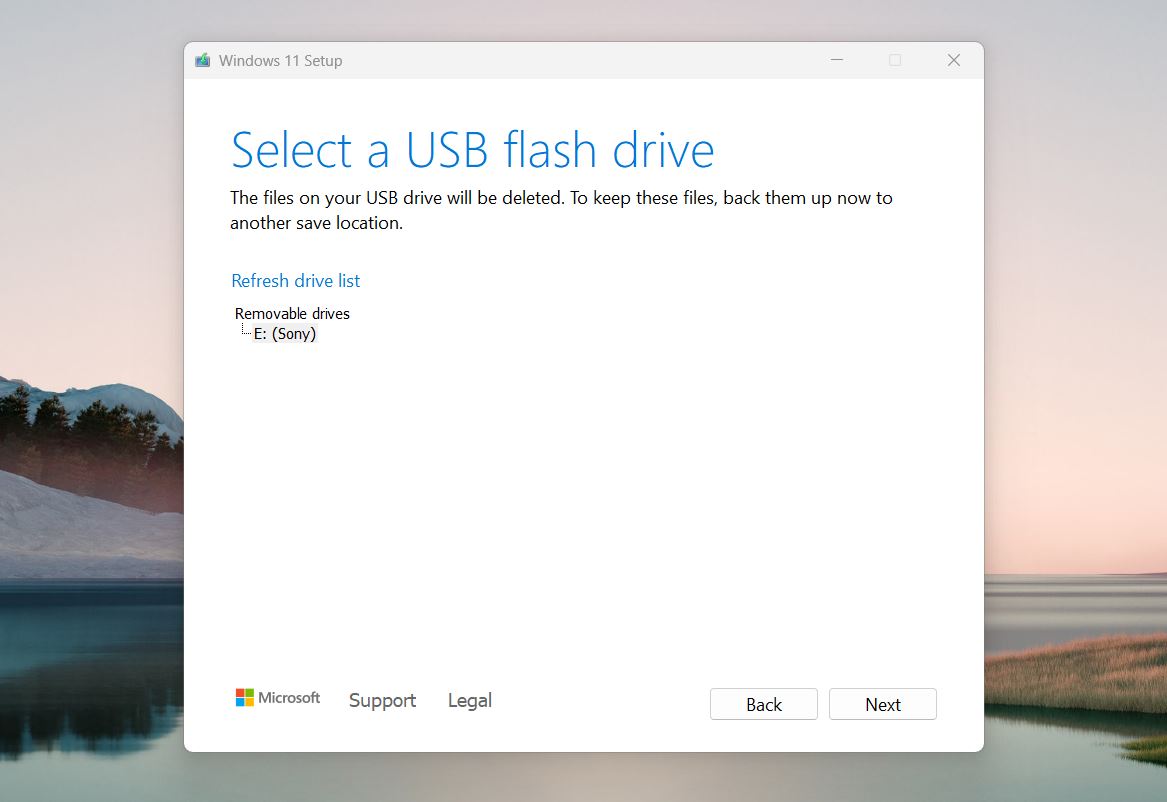
- Insert your USB flash drive into the computer. Select the USB drive from the list (make sure it’s the correct one, as the tool will erase all data on it). Click Next.
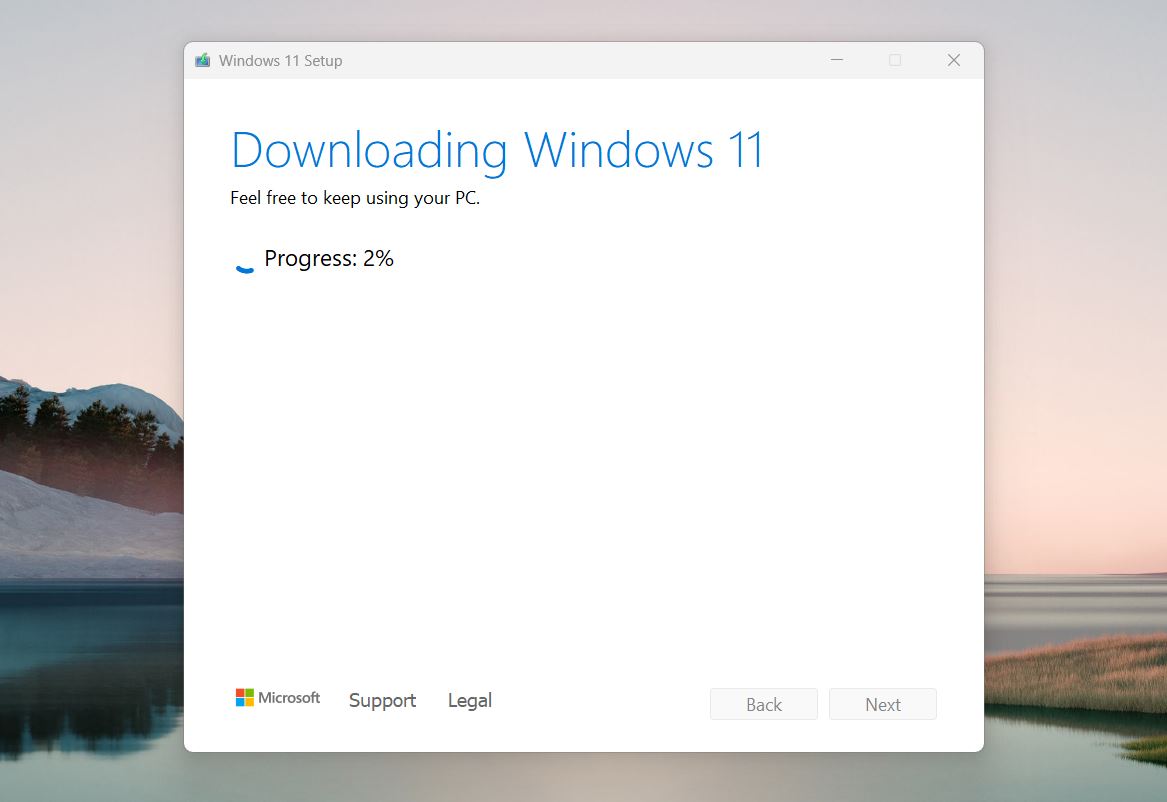
- The Media Creation Tool will download the necessary Windows files and create the bootable USB drive. This process can take 10–30 minutes or more, it depends on your internet speed and computer performance.
- Once the tool completes, you’ll see a message saying Your USB flash drive is ready.
- Click Finish to close the tool.
Now, to boot from the USB drive do this:
- Insert the bootable USB into the computer with the unbootable hard drive.
- Restart the computer and press the boot menu key (often F12, F11, or Esc) during startup.
- Select the USB drive from the list of boot devices and press Enter.
Method 1: Use the Windows Startup Repair Tool
Now that you have your bootable USB drive, you can use it to run the Windows Startup Repair tool. Startup Repair is an automated utility designed to fix common issues that prevent your OS from booting. It scans your system for problems like missing/corrupted boot files, invalid boot configurations, or issues with startup services, and attempts to repair them without any manual input.
How to use Startup Repair:
- Boot from your USB Drive.
- Once the USB boots, the Windows installation screen will appear.
- Choose your language, time, and keyboard preferences, then click Next.
- On the next screen, select Repair your computer in the bottom-left corner instead of Install now.
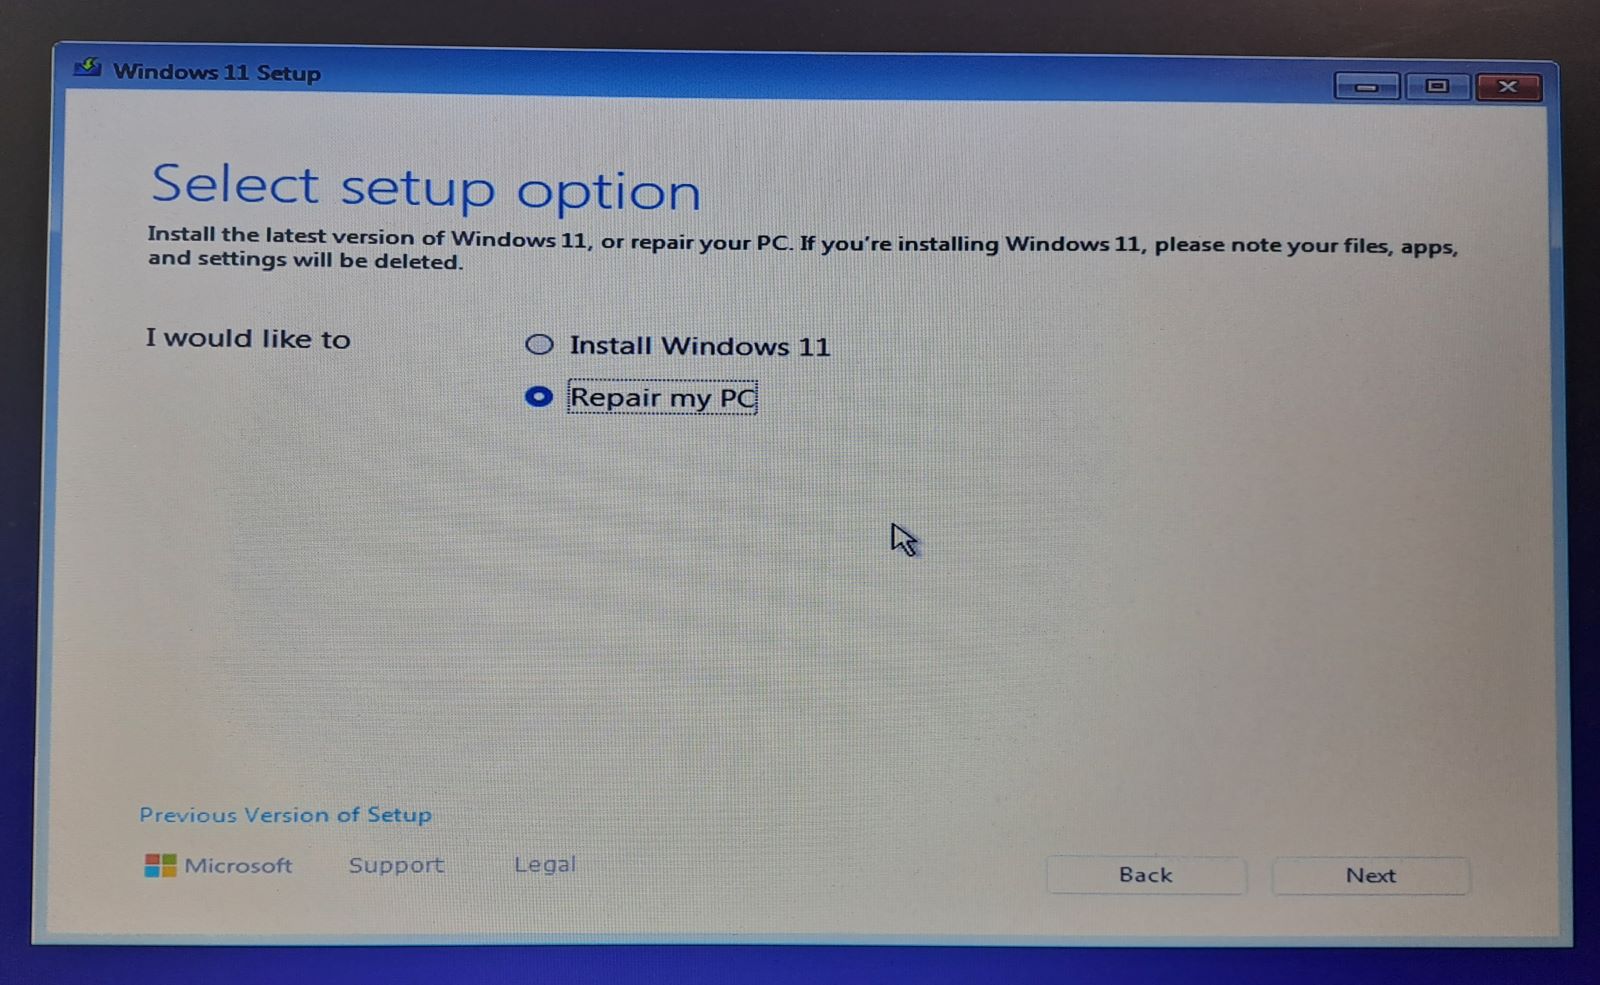
- In the recovery environment, click Troubleshoot to access advanced repair options.

- Select Advanced options, then choose Startup Repair from the list of recovery tools.
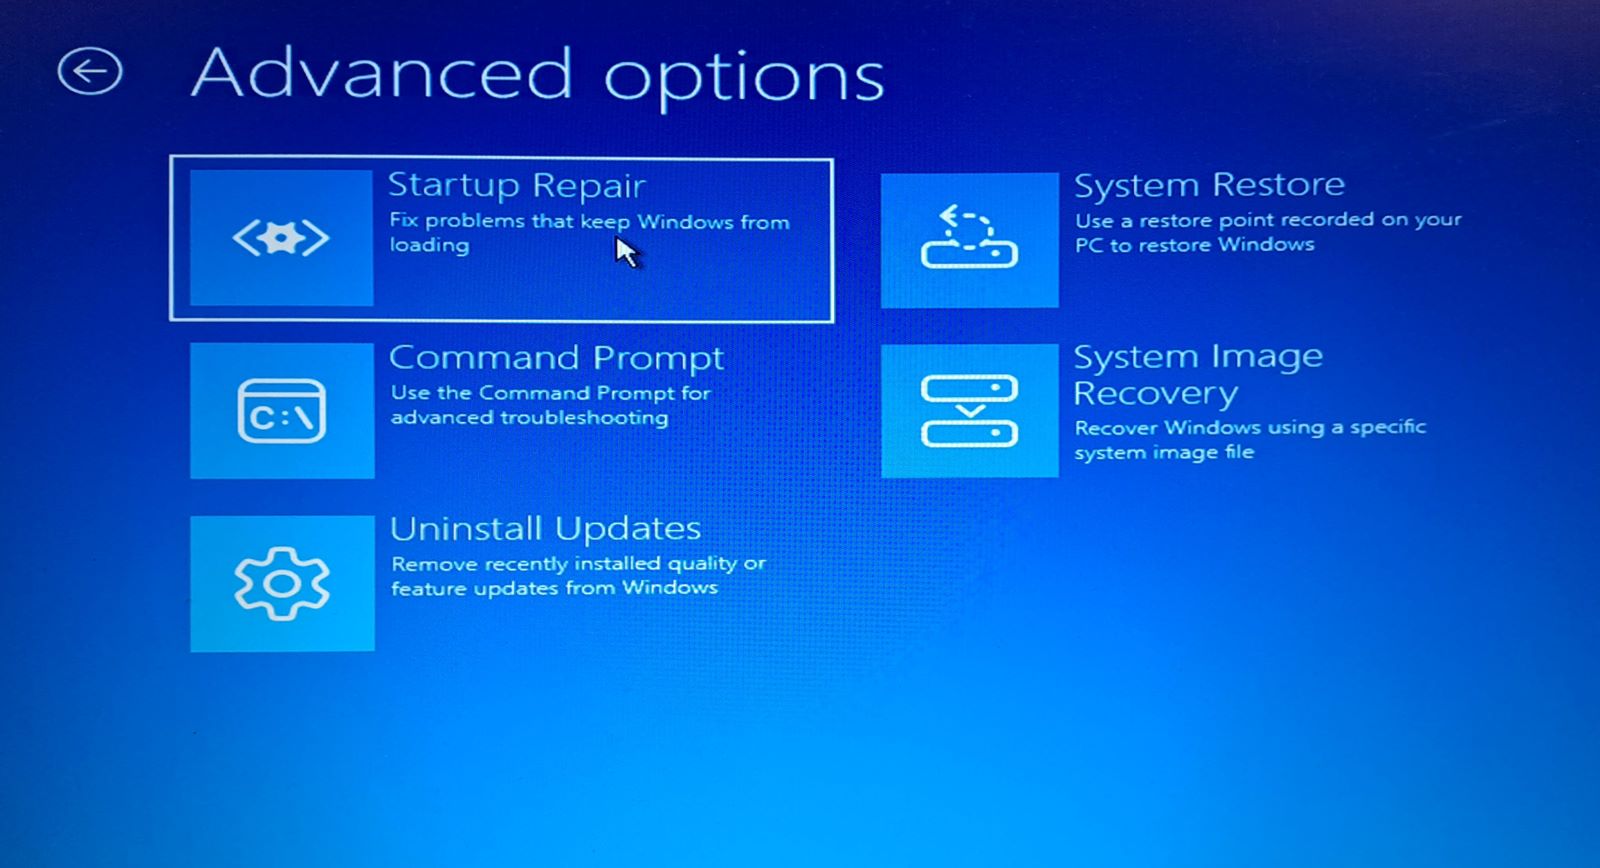
- Windows will scan your hard drive and OS for boot-related issues.
- If it finds problems, the tool will attempt to fix them automatically.
- If the repair is successful, you’ll see a message confirming the repairs.
- Remove the USB drive and restart the system.
- Check if your hard drive now boots properly.
If Startup Repair doesn’t resolve the problem—we have plenty more to try. The next step is to run the System File Checker (SFC).
Method 2: Run System File Checker (SFC)
If your hard drive still won’t boot after using Startup Repair, the problem might be caused by corrupted or missing system files. System File Checker (SFC) is a built-in Windows utility that scans and repairs critical system files.
The SFC utility compares the integrity of critical system files, like ntoskrnl.exe, hal.dll, or bootres.dll, against their cached copies stored in a secure directory (C:\Windows\System32\dllcache). If it finds discrepancies, it replaces the problematic files automatically. This process is especially effective for cases of file corruption caused by sudden shutdowns, malware, or failed updates.
How to use SFC:
- Boot from your USB drive (same as the previous method).
- Select Repair your computer at the bottom-left corner of the screen.
- Choose Troubleshoot, then go to Advanced Options and click Command Prompt.
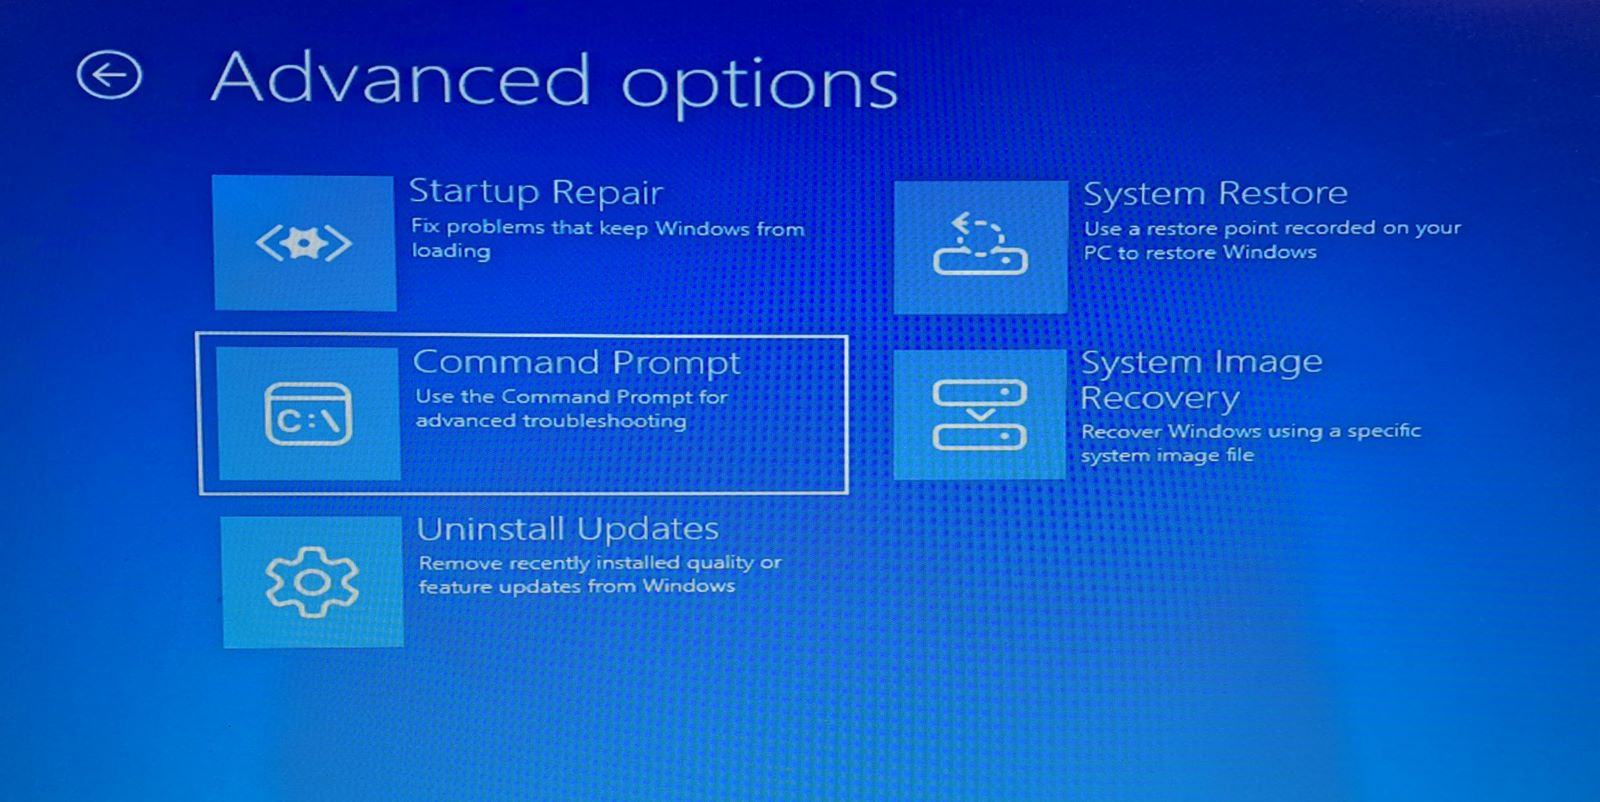
- Run the SFC command and press Enter:
sfc /scannow
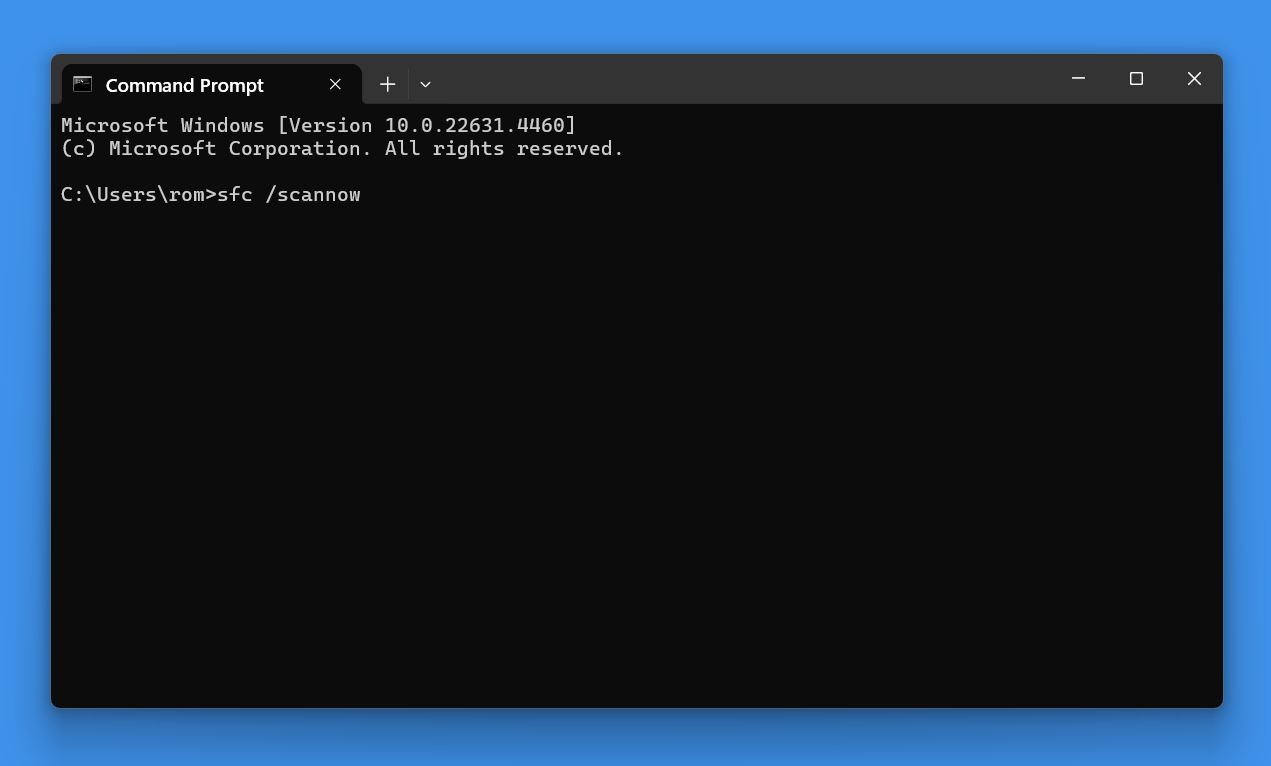
- If it detects any issues, it will attempt to repair or replace the files automatically.
When the scan completes, you’ll see one of these results:
- Windows Resource Protection did not find any integrity violations: No issues were found.
- Windows Resource Protection found corrupt files and successfully repaired them: Issues were found and fixed.
- Windows Resource Protection found corrupt files but was unable to fix some of them: Manual intervention may be required, or additional tools might be needed.
After the scan finishes, close Command Prompt and restart your computer to check if the issue is resolved. If this doesn’t do the trick, next, we’ll try to rebuild the bootloader.
Method 3: Rebuild the Bootloader with Bootrec
The bootloader is like a roadmap—it tells your computer where the OS is and how to start it. It’s a small program stored on your hard drive that gets activated right after the BIOS/UEFI initializes. It’s responsible for finding and loading your OS. If the bootloader is damaged—whether it’s the Master Boot Record (MBR), the Boot Configuration Data (BCD), or the boot sector—your computer won’t know where or how to boot Windows.
Here’s how to use Bootrec:
- Boot from your USB drive (same as before).
- Select Repair your computer in the bottom-left corner instead of “Install now.”
- Open Command Prompt.
- Type the following commands in Command Prompt, press Enter after each one:
bootrec /fixmbr
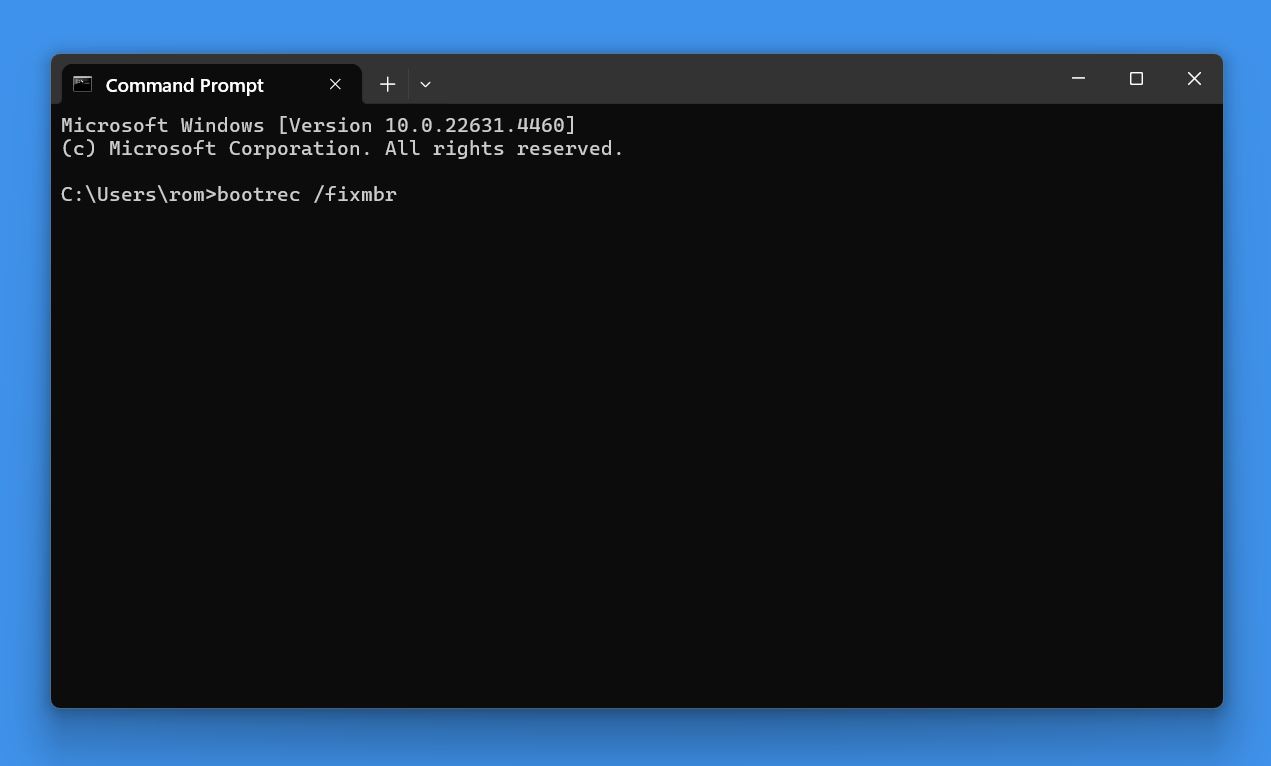 (it repairs repairs the MBR, which tells your computer how to locate and load the OS).
 - Next command: bootrec /fixboot (it repairs the boot sector, a small region on the hard drive responsible for initializing the startup process).
- If you get an “Access Denied” error, type: bootsect /nt60 sys (this will force the repair on the boot sector for Windows systems).
- Next scan for Windows installations: bootrec /scanos (it scans the hard drive for operating systems that are not currently listed in the bootloader).
- Next command: bootrec /rebuildbcd (this command rebuilds the BCD, a critical file containing all boot-related configurations).
Once you’ve run all the commands, type exit to close Command Prompt. Remove the USB drive and restart your computer to see if it boots normally.
Method 4: Turn Off Fast Startup
If your hard drive still isn’t booting after you tried Startup Repair, SFC, and Bootrec, Fast Startup might be the culprit. This Windows feature is designed to speed up boot times. It combines elements of a cold shutdown and hibernation. Instead of completely powering off, Windows saves the system kernel and loaded drivers to a file called hiberfil.sys on the hard drive. During startup, it reloads this saved state to reduce boot times. While convenient for everyday use, this feature can create problems.
How to disable Fast Startup:
- Boot from your USB drive (same process as before).
- Open Command Prompt.
- In Command Prompt, type this: powercfg -h off
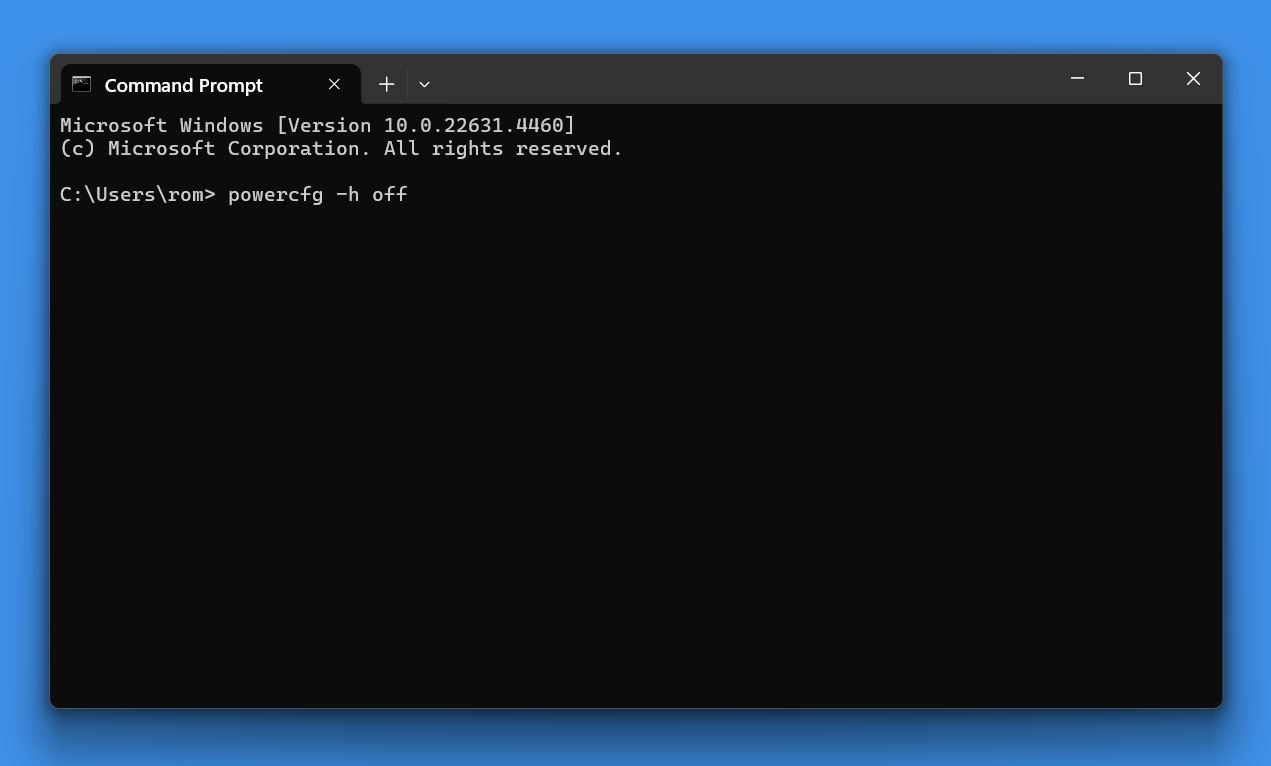
This command disables hibernation, which also turns off Fast Startup because the feature relies on the hibernation file (hiberfil.sys). If Windows saved a bad system state in the hiberfil.sys file, disabling Fast Startup prevents it from being reloaded. Close Command Prompt and remove the USB drive. Restart the computer and check if the system boots normally.
Method 5: Use TestDisk to Recover or Repair Partitions
If your hard drive still won’t boot, the issue could be with the partition table. TestDisk is a free, open-source tool that can recover lost partitions, repair corrupted partition tables, and fix boot sectors. While you can’t run TestDisk directly from the Windows Recovery Environment, you can use a separate bootable USB with TestDisk pre-installed or a Linux live USB.
You can find live USB options with TestDisk pre-installed on its official website. These are ready-to-use environments that include TestDisk. Once you create this live USB using a tool like Rufus, you can run it similarly to how we used the bootable USB earlier.
How to use TestDisk:
- Insert the TestDisk USB into your unbootable computer and restart it. Press the key to open the boot menu during startup (commonly F12, Esc, or F11). Select the USB drive as the boot device and press Enter.
- Once the live environment loads, navigate to TestDisk. If it is not already running, you can open it from a terminal with “testdisk” command or locate it through the file manager in the live environment.
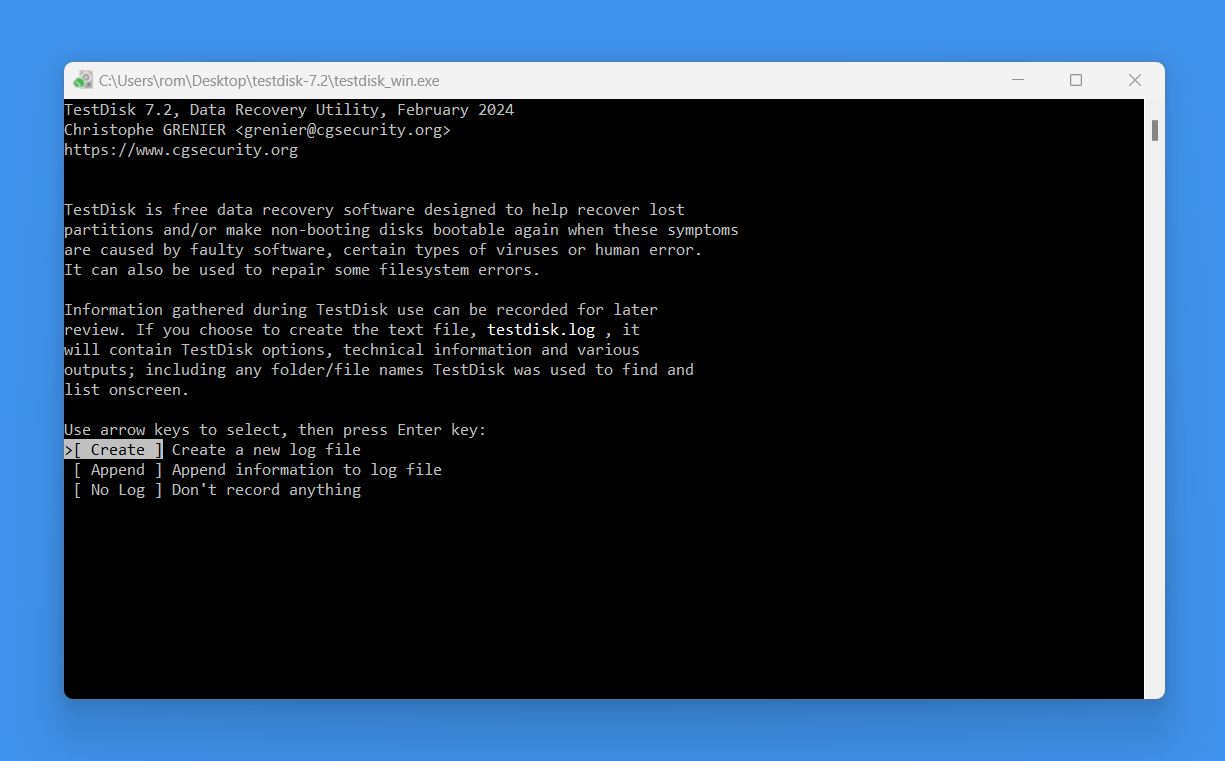
- Launch TestDisk and choose Create when prompted to start a new log file. This log file will document any changes made during the recovery process, which can be helpful for troubleshooting.
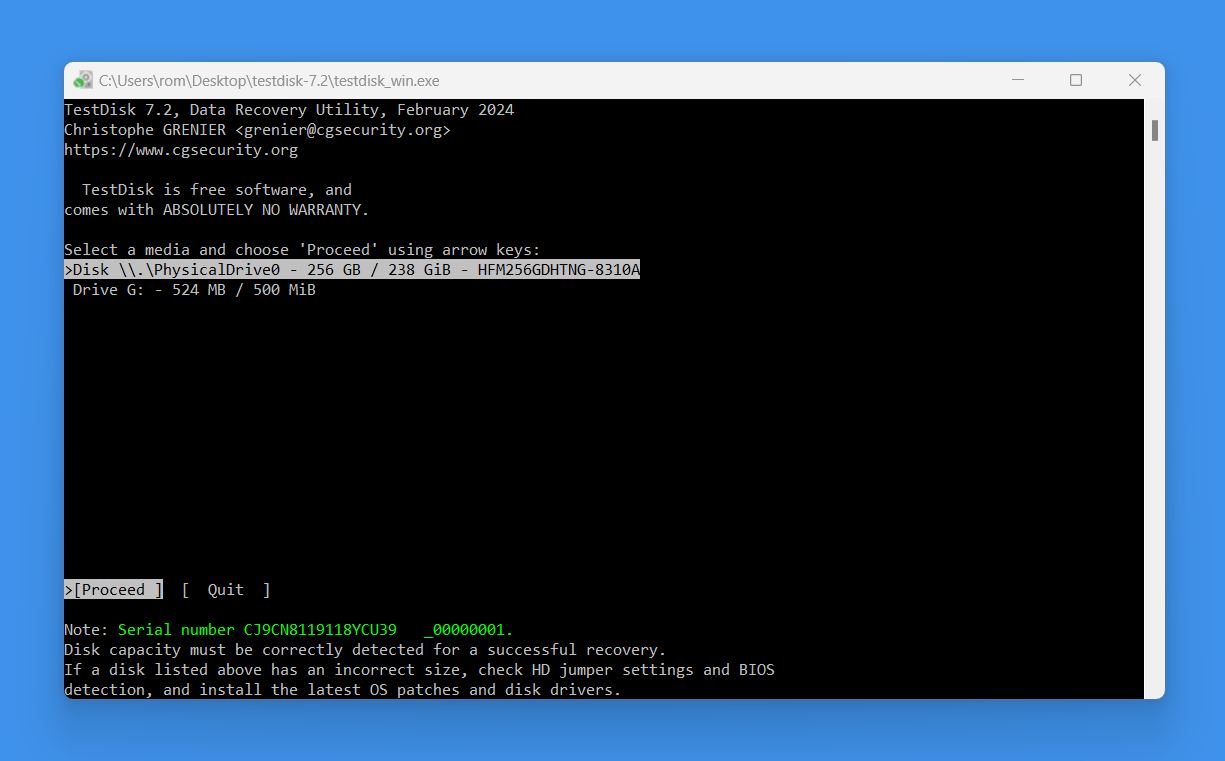
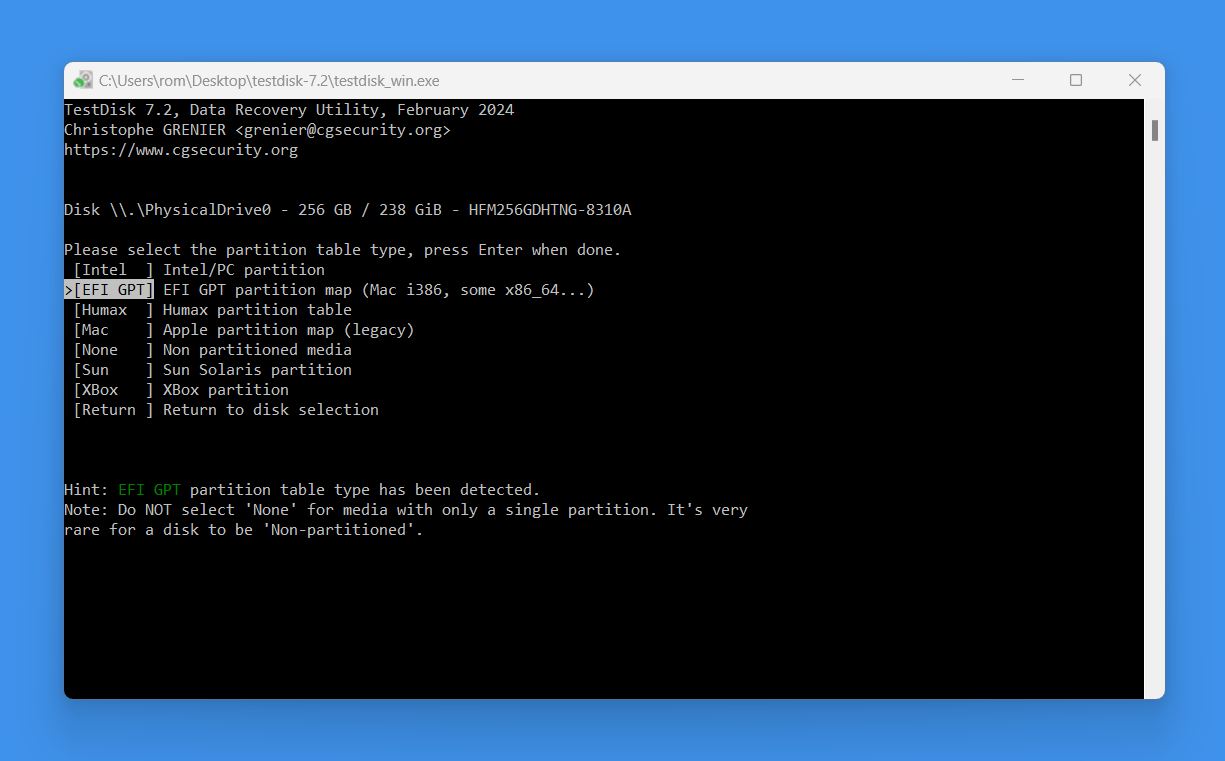
- Select the hard drive you want to analyze from the list of detected drives. Double-check that you’ve selected the correct drive. TestDisk will typically detect the partition table type automatically; confirm this when prompted.
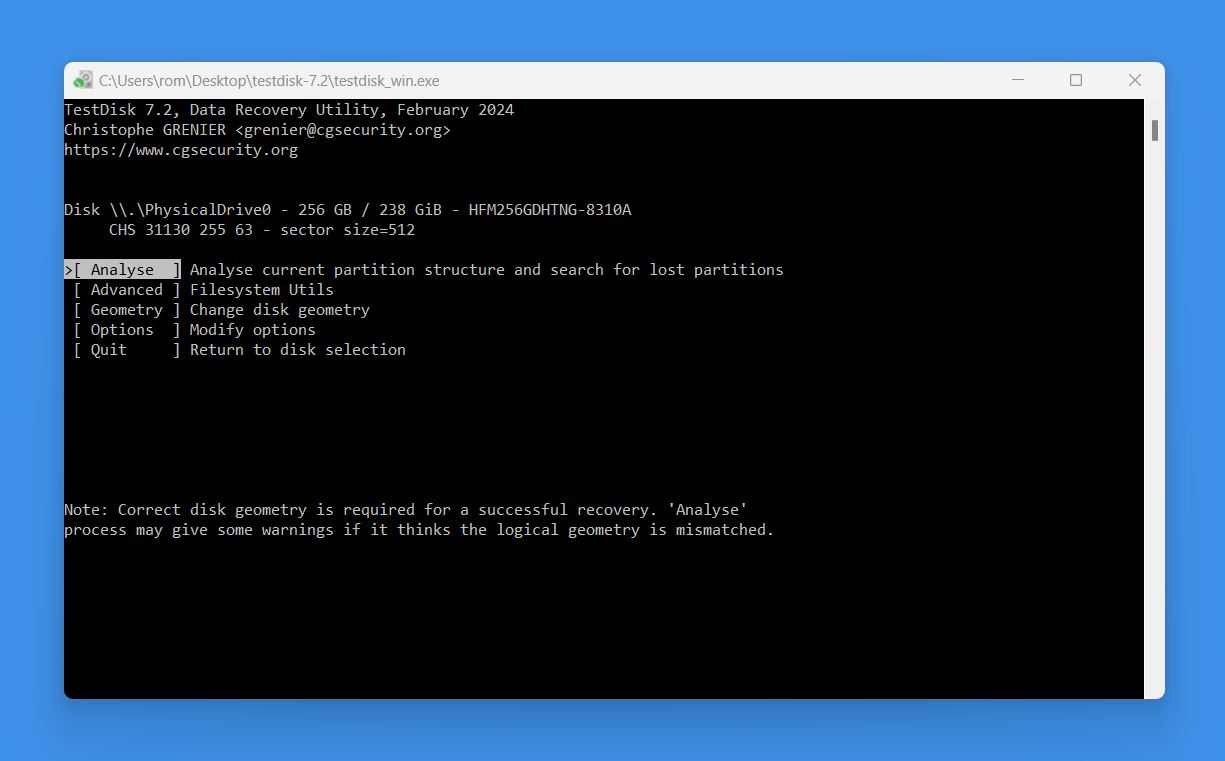
- Choose Analyze to scan for lost or existing partitions.
- Start with the Quick Search option to locate partitions quickly. If this doesn’t find what you’re looking for, proceed with the Deeper Search option, which performs a more thorough scan of the drive.
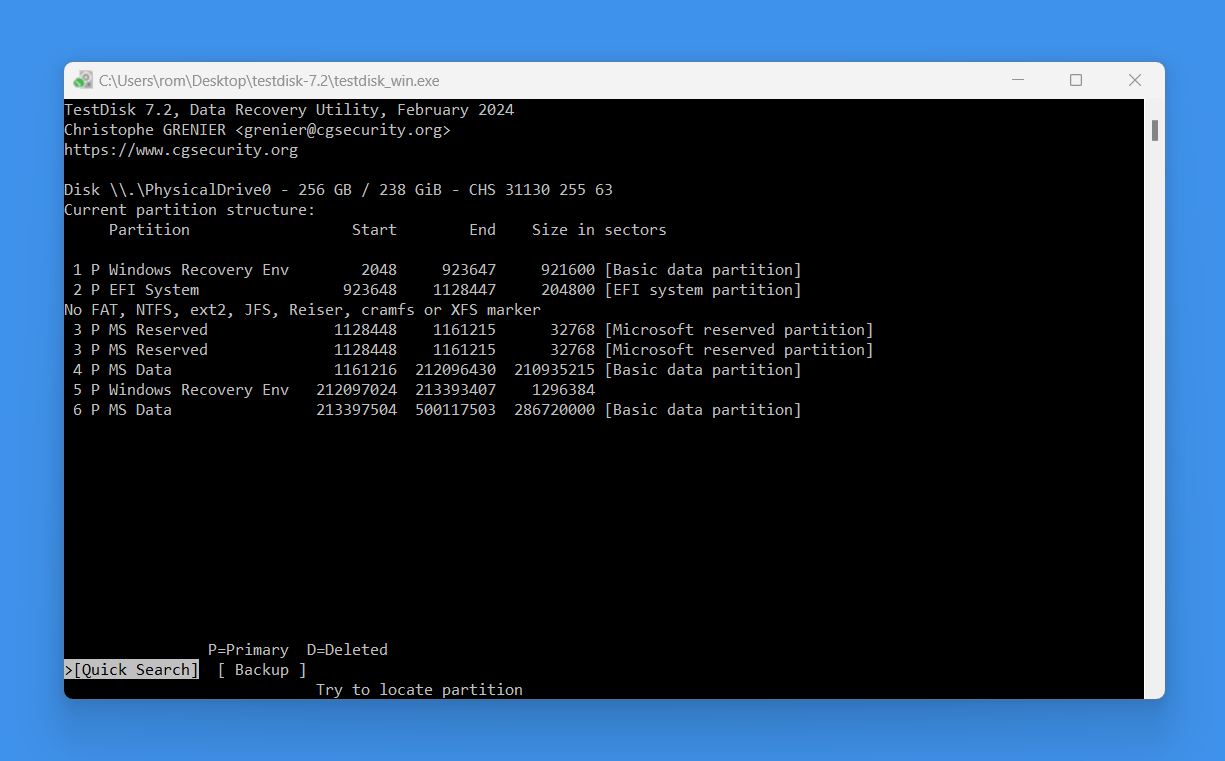
- Highlight the partition you want to repair or recover and select Write to save the changes to the partition table. If TestDisk reports a damaged boot sector, select Boot, then choose Rebuild BS to fix it.
- Exit TestDisk and shut down the live USB environment. Remove the USB drive and restart your computer to check if the hard drive now boots properly.
Hard Drive Still Won’t Boot? Here’s How to Retrieve Your Files Off of It
If all repair attempts fail and your hard drive still won’t boot, it doesn’t mean you can’t retrieve your files. As long as your hard drive isn’t completely dead, there are still ways to access your data.
In case you’ve managed to fix your unbootable drive but noticed that some files are missing—files you’re sure were there before—you can still try to recover them. Check out Step #2: Use Data Recovery Software The method described there, can scan your drive for lost/deleted files and often recover them.
Step #1: Connect the Drive to Another Computer
If your hard drive won’t boot, one of the easiest ways to access your data is to connect the drive to another working computer. This lets you bypass any boot issues and treat your drive like an external storage device. Here’s how to do it.

- Take the hard drive out of your computer. For desktops, open the case and carefully unplug the SATA and power cables. Unscrew the drive and slide it out of its bay. For laptops, check the manual or look up instructions online to locate the drive. Usually, you’ll need to remove the bottom panel and slide the drive out of its slot.
- Use a USB-to-SATA adapter, external enclosure, or docking station to connect the hard drive to another computer. These tools convert your internal hard drive into an external USB drive. USB-to-SATA adapters are simple cables, while enclosures and docks give the drive a more secure housing.
- Plug the adapter, enclosure, or dock into a working PC. If everything is working correctly, the drive should show up in File Explorer. You can then open the drive and copy your files to a safe location.
- If the drive doesn’t show up automatically, open Disk Management. On Windows, right-click the Start button and choose Disk Management. If the drive appears but doesn’t have a file system (it might say “unallocated”), you’ll need recovery software to access the files.
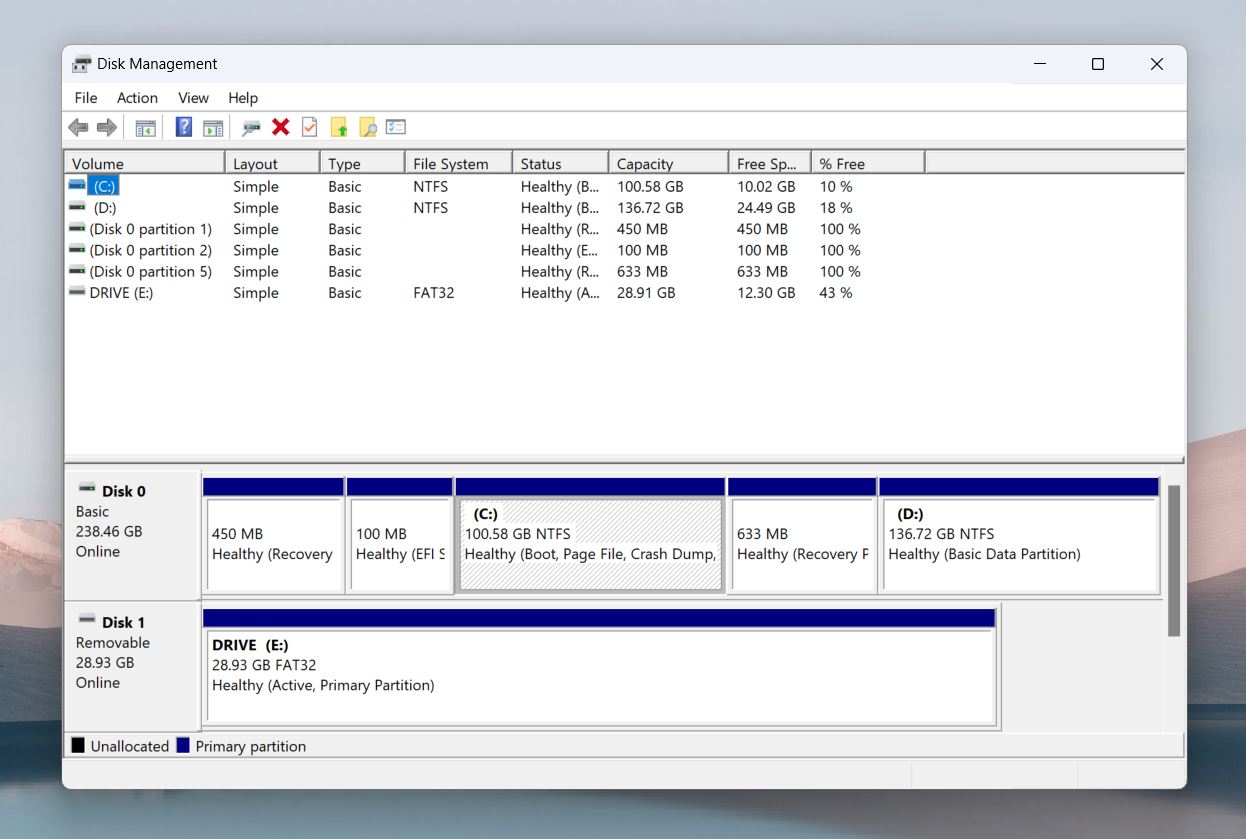
- If the drive is accessible, copy your important files to another location. You can transfer these to this PC or an external drive to keep them safe.
Step #2: Use Data Recovery Software
If your drive doesn’t show up in File Explorer but is visible in Disk Management, it’s most likely a file system problem. The good news? The PC still recognizes the drive, which means you can use data recovery software to access and retrieve your files. Here’s how to make it happen.
You can read our article on the best recovery software to take a look at all your options. All these tools can access files on drives visible in Disk Management, even if they don’t show up in File Explorer. We also have an interactive data recovery software picker that can help you choose the best solution based on your specific needs.
If you don’t have time to compare tools, we recommend Disk Drill. It’s fast, reliable, and super easy to use—unlike some other tools like PhotoRec or R-Studio, which require a lot of manual work.
Our materials provide in-depth insights into data recovery software, including Disk Drill. For example, we offer a comprehensive review of Disk Drill and an article that explores the safety of this product.
You can download Disk Drill for free from its official CleverFiles site. The free version lets you scan your drive and preview everything that’s recoverable: existing, deleted/lost, hidden files. It even allows you to recover up to 500 MB of data at no cost, so you can test its features before upgrading to the paid version. After you download Disk Drill, follow these steps:
- Install it on your computer.
- Launch Disk Drill. In the window that opens, you should see all recognized storage devices, including your internal hard drive, external devices, and any connected USB drives. If it’s visible in Disk Management, you’ll see it here.
- Since your drive might not boot due to serious issues, we recommend first checking its health with Disk Drill’s S.M.A.R.T. monitoring feature to determine the safest way to proceed.
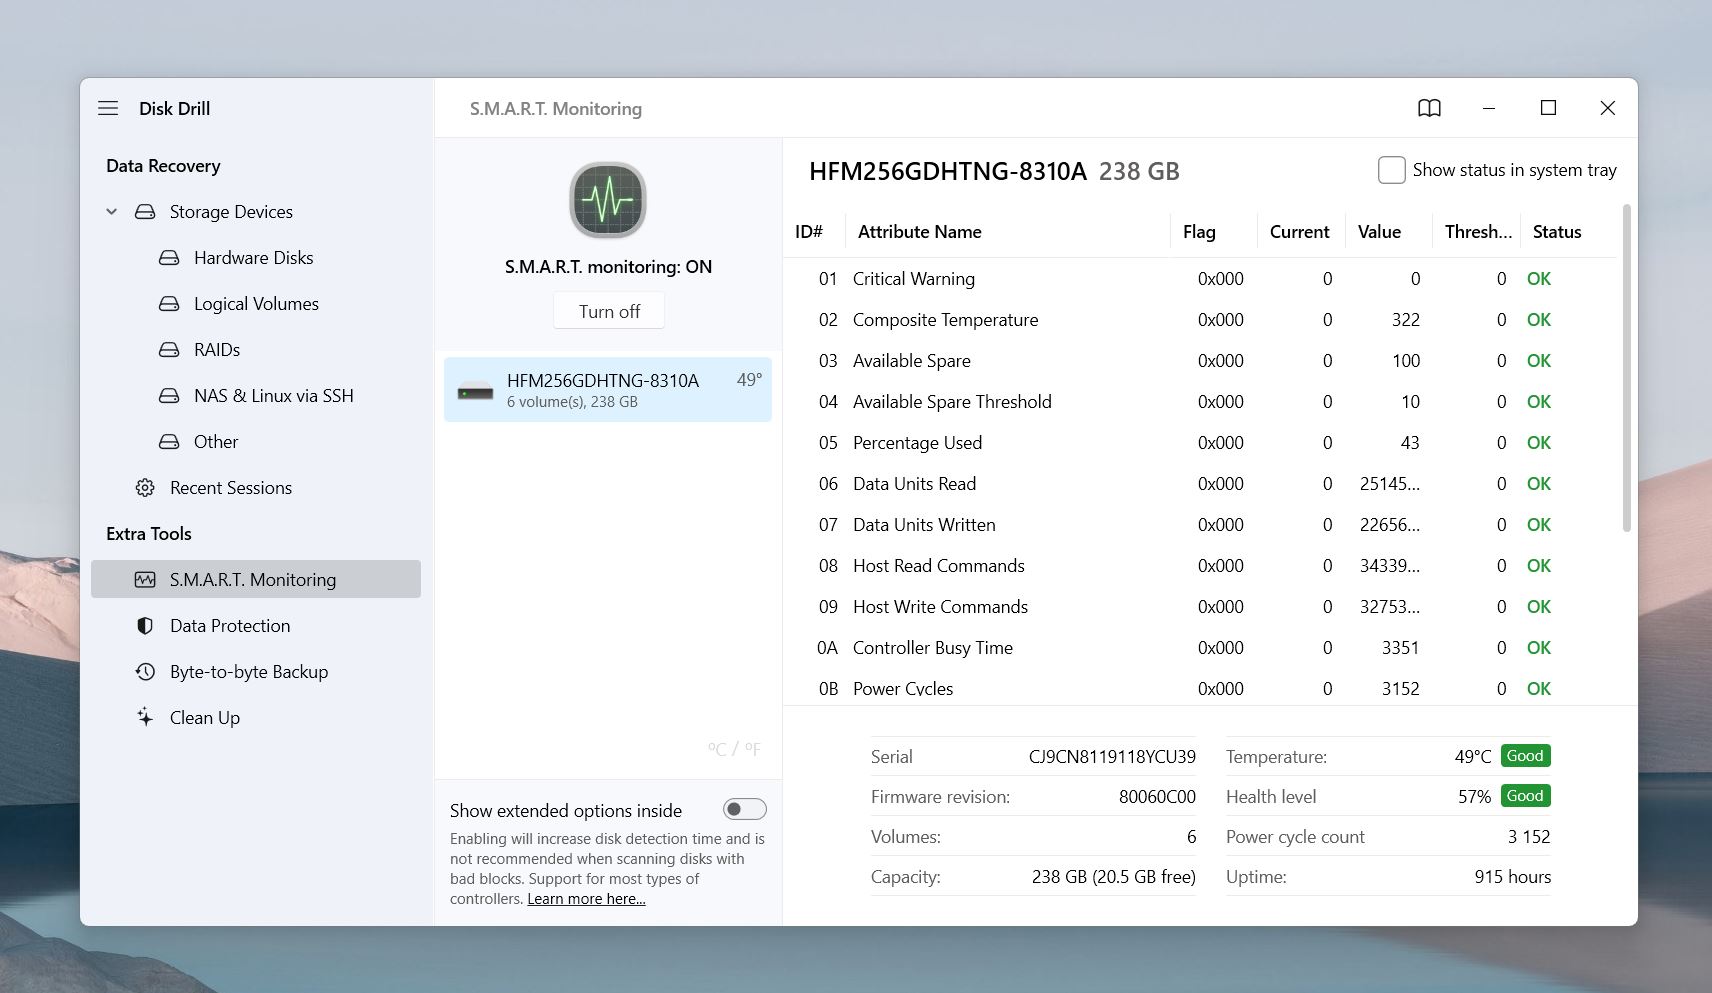
- Click the S.M.A.R.T. Monitoring tab in the program. If the report shows issues like high reallocated sectors or frequent read errors, it’s a sign the drive is struggling. In this case, use Disk Drill’s Byte-to-Byte Backup feature to create a full image of the drive. This puts less strain on the drive and allows you to scan the image instead, which is often a safer and more effective way to retrieve data from problematic drives. If S.M.A.R.T. monitoring shows no problems and everything is “OK” or “Good”, you can skip the next optional step.
- (optional) Go to the Extra Tools menu and select Byte-to-Byte Backup.
- Choose the unbootable drive as the source for the backup and select a destination where the backup will be saved.
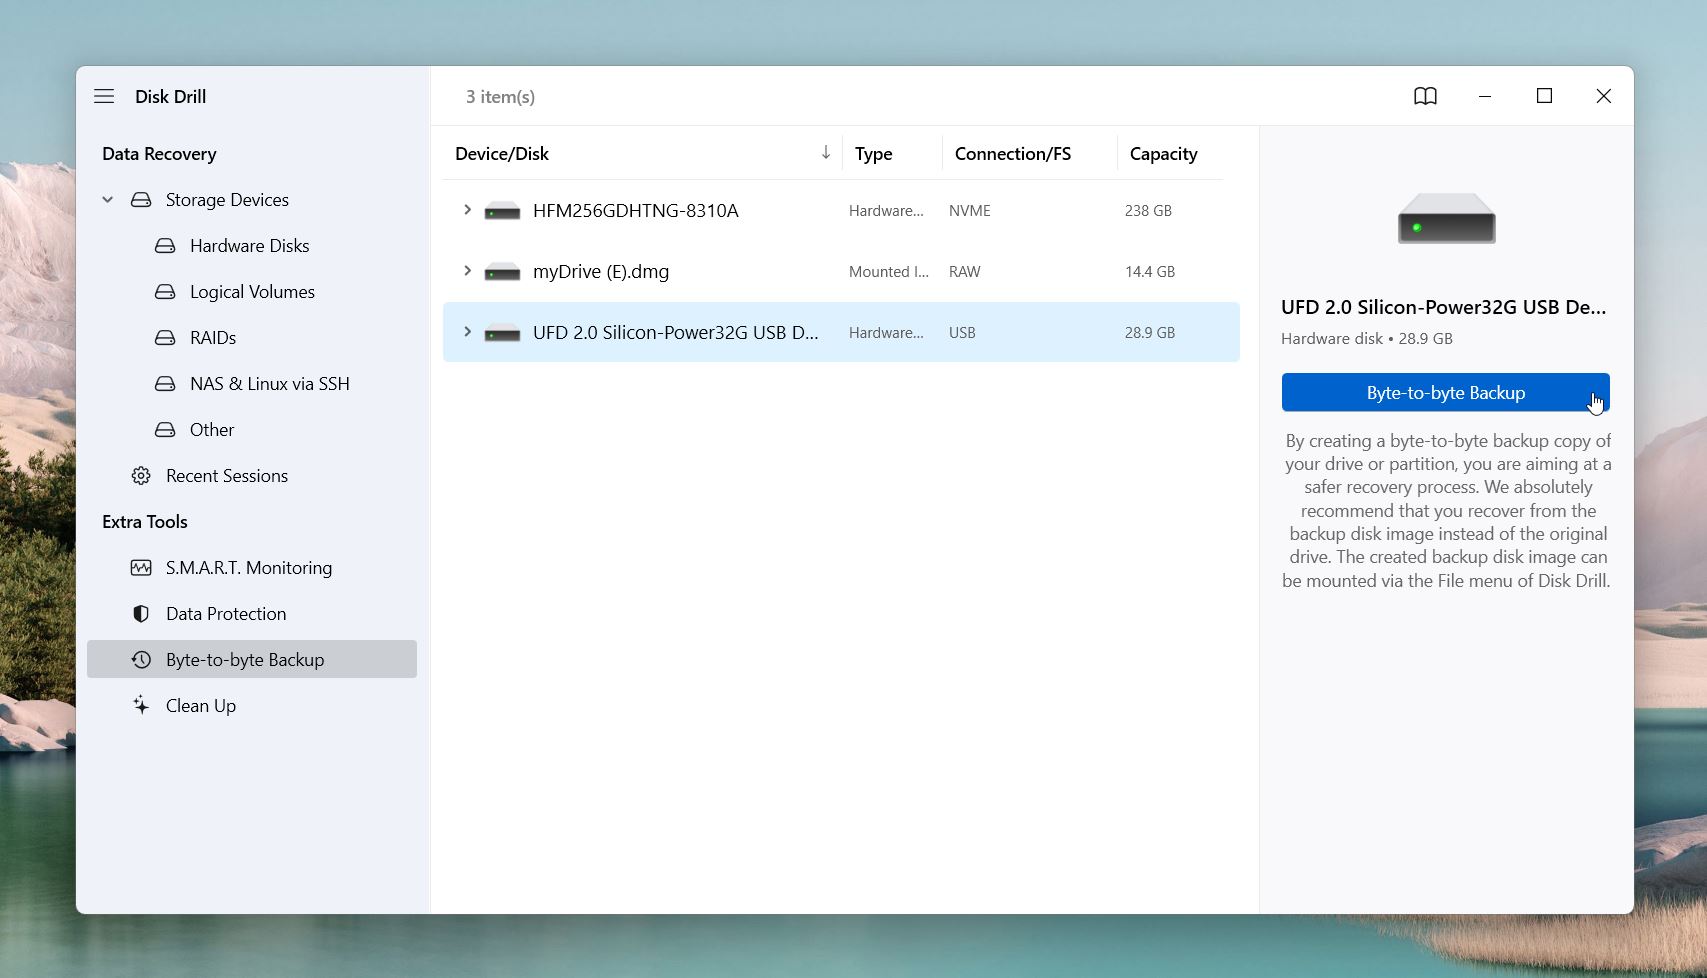
- Once the backup is complete, go back to the Data Recovery section, click Attach Disk Image, and select the backup file to scan for recoverable data.
- Select the hard drive you cannot boot (or its byte-to-byte backup) and then click on Search for lost data.
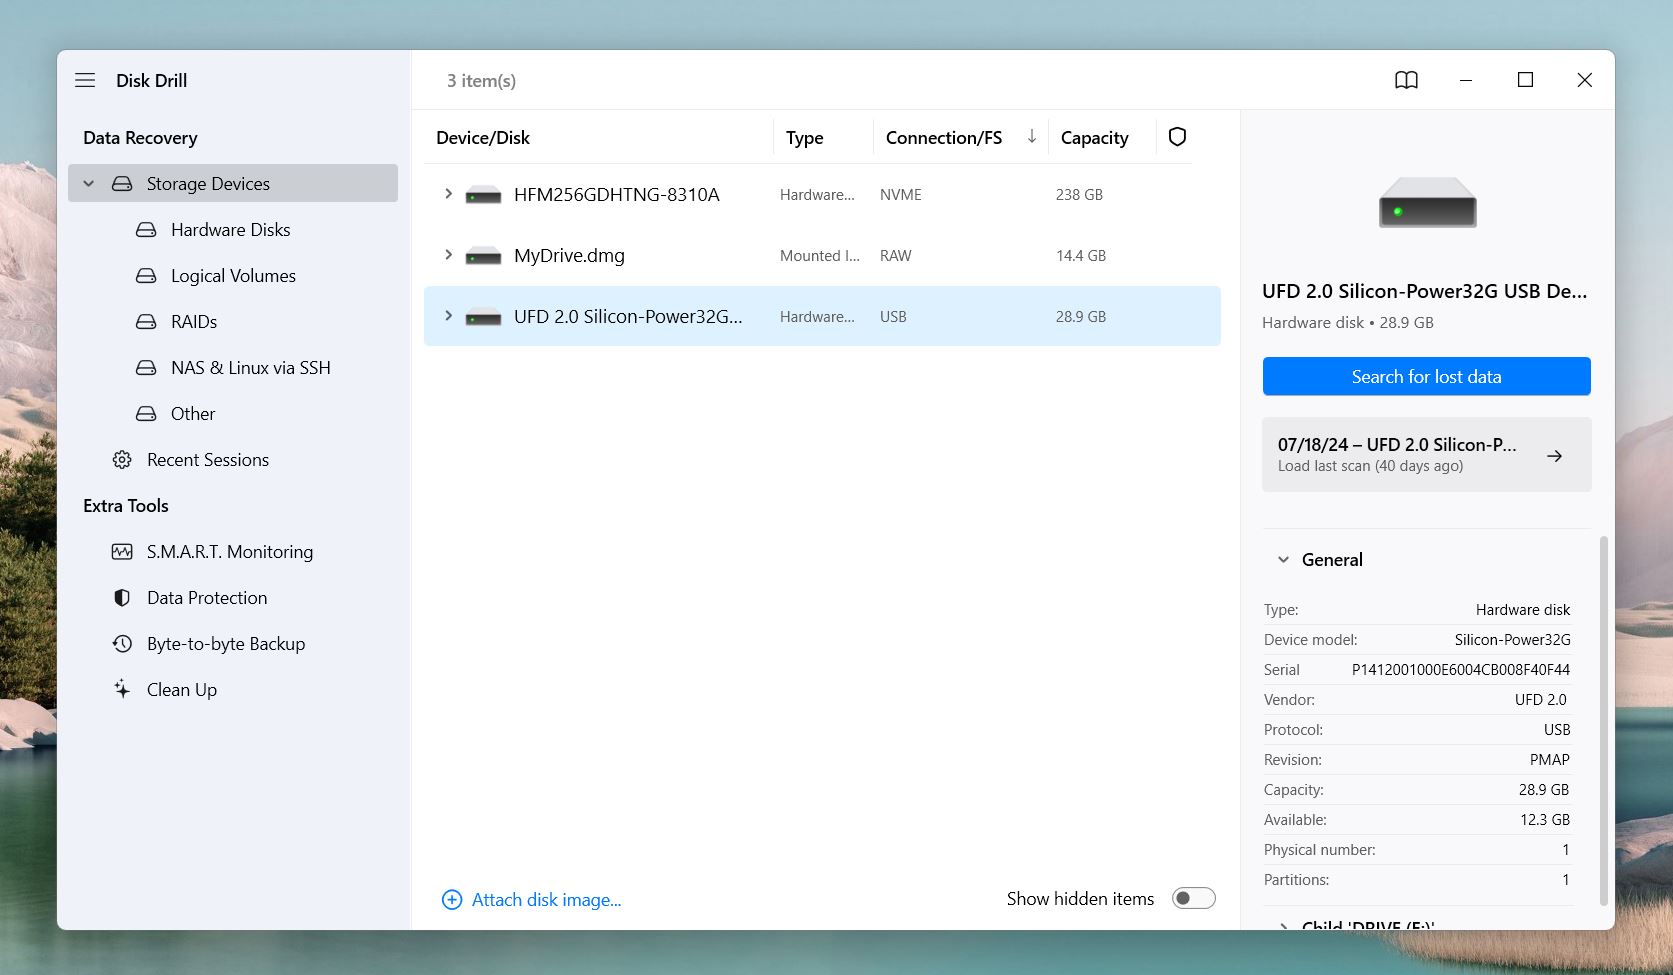
- Disk Drill will now start its scanning algorithms and map the files on your unbootable hard drive. While it scans your drive, it will show you a list of files that it has already found. If you’re in a hurry, you don’t need to wait for the scan to finish. As soon as Disk Drill shows files, you can browse and retrieve the ones you need.
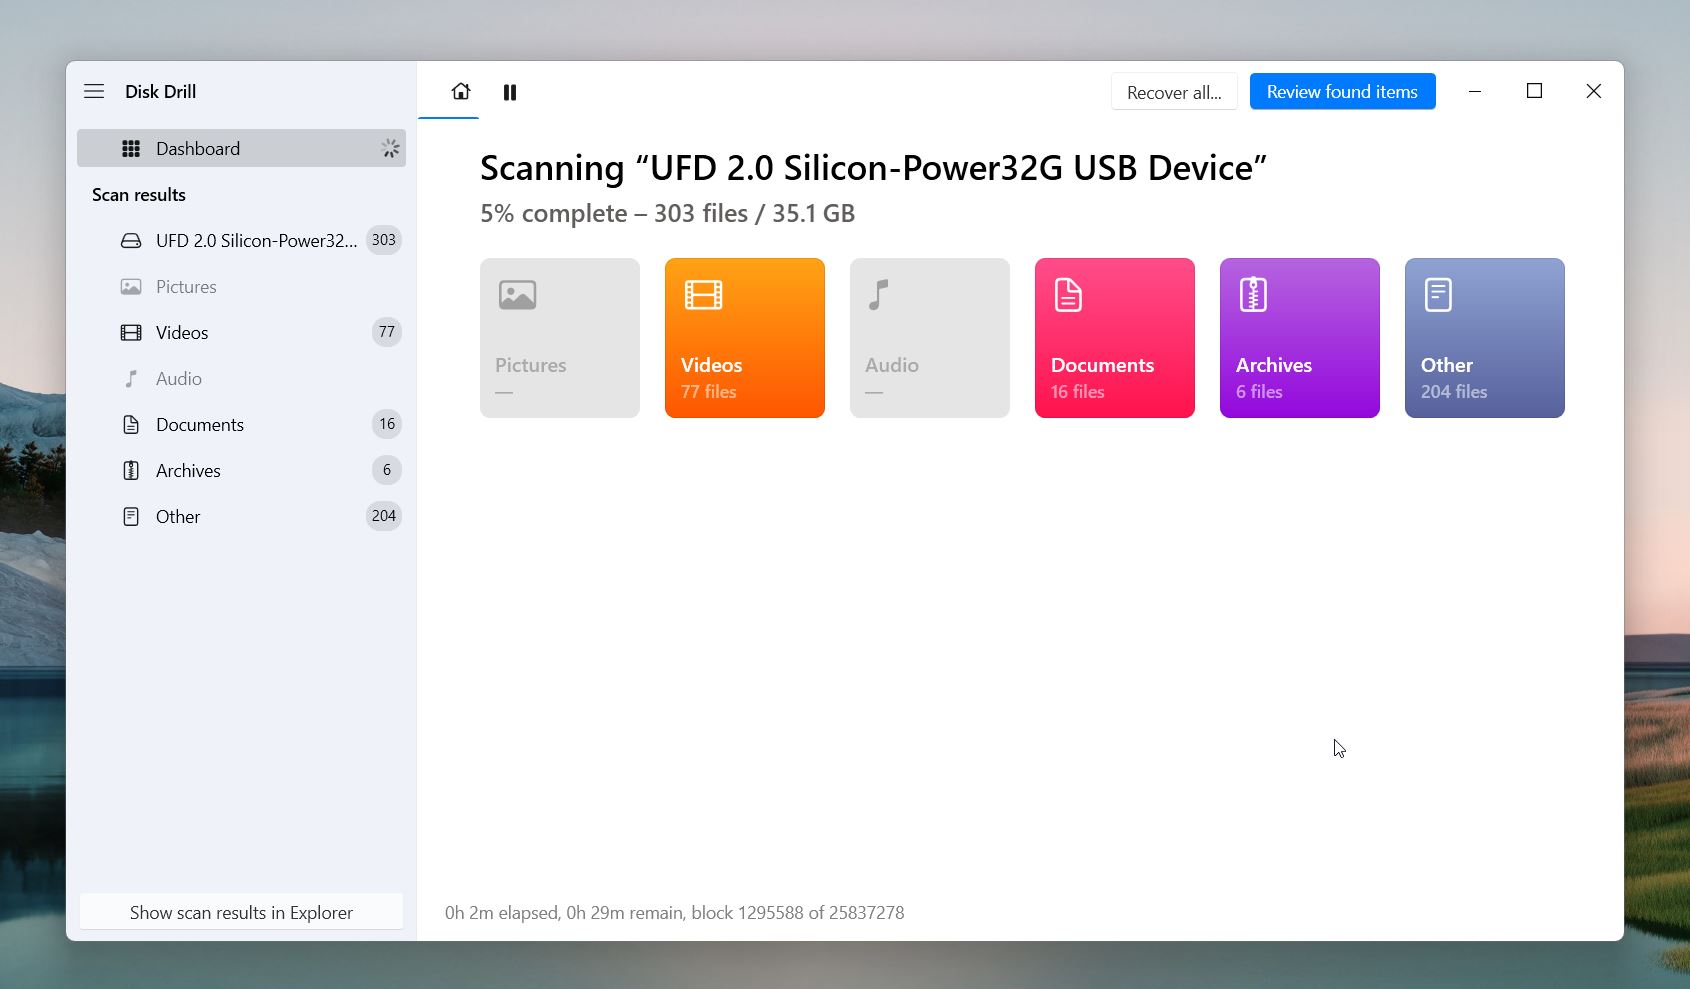
- If you wait for Disk Drill to analyze the drive completely, you will be shown a list of all of the files that Disk Drill has located. Use the filters in Disk Drill to narrow down the files you want to recover. On the left side, you’ll see categories like Pictures, Videos, Documents, and so on. You can also filter by file size or date modified to narrow down your results quickly.
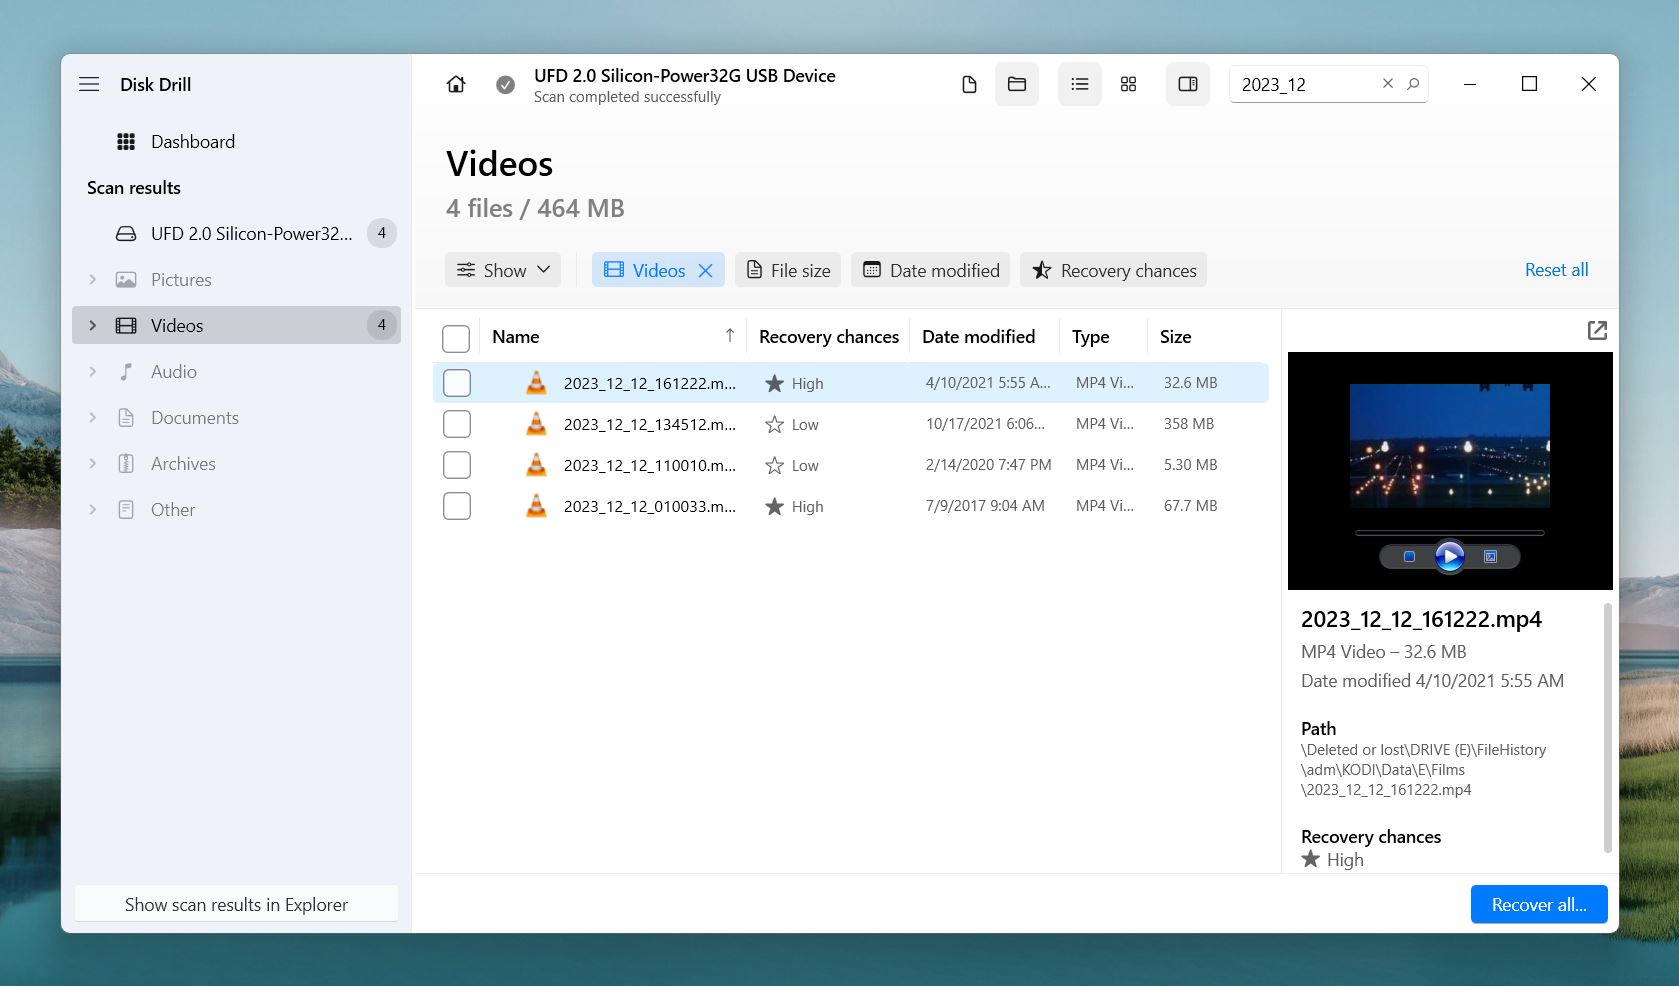
- You can choose specific files to recover or, if you want to save everything, simply click the Recover All button at the bottom to retrieve all the files at once.
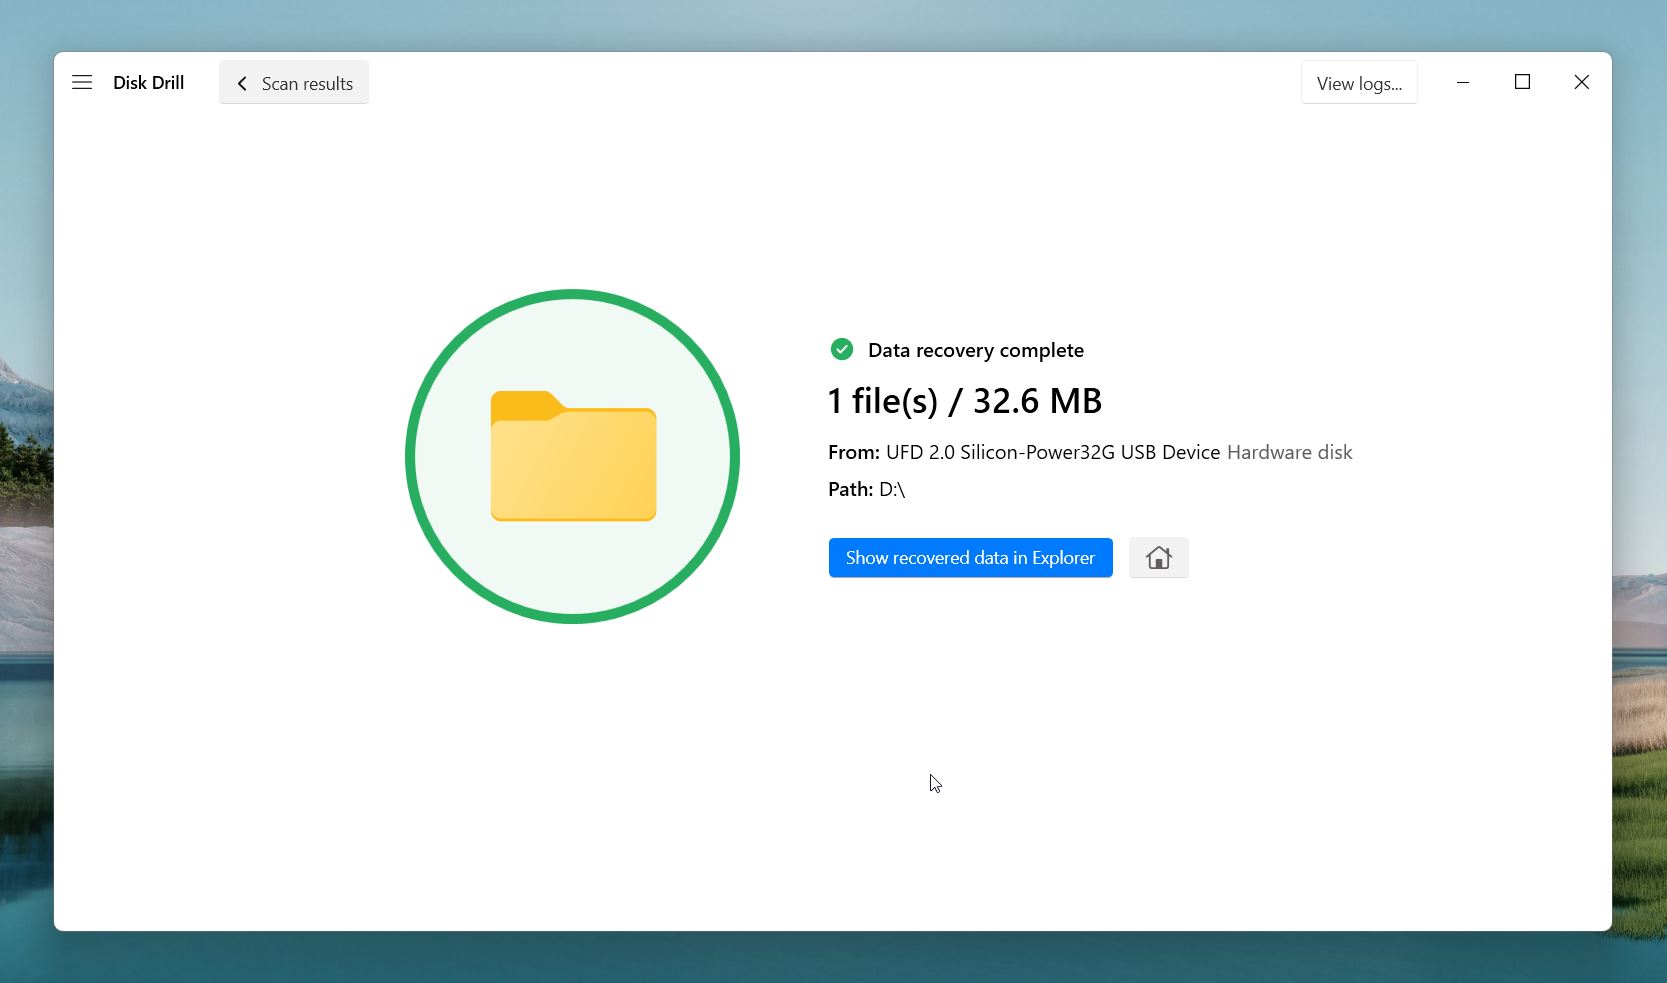
- Your recovery process is complete, and you should see your files in the new location you chose.
Step #3: Contact Professional Recovery Services
If you couldn’t connect your unbootable drive to a working computer or it didn’t show up in Disk Management, it might be time to consider professional data recovery services. These specialists use advanced tools and techniques to recover data from severely damaged drives, whether the problem is mechanical failure, corruption, or issues with the internal components of the drive itself.
Professional recovery services can recover data even from drives in the worst condition, but they don’t come cheap. The cost typically ranges from a few hundred to several thousand dollars, depending on the severity of the issue, the drive’s condition, and the amount of data. Because of this, professional recovery is often seen as a last resort.
Affordable alternatives. If professional services are too expensive or your drive’s condition doesn’t seem critical, there are more affordable ways to get help:
- Ask for help on Reddit. The r/datarecovery subreddit is a great resource. It’s an active community where experts and enthusiasts provide free advice. Describe your issue in detail, and you’ll often receive helpful suggestions.
- Post on our forum, The Handy Recovery Community is another option. It’s a supportive space where you can ask questions and get advice from recovery professionals and other users who’ve faced similar problems.
How to Recover Data From an External Hard Drive That Won’t Boot
In case it’s your external drive giving you problems, and it doesn’t show up when you connect it to your computer, here’s what you can try to get your files back.
Step #1: Check Cables and Ports
External hard drives typically connect to your computer using USB, Thunderbolt, or eSATA cables. These connections rely on cables, functional ports, and sometimes external power sources. If any of these elements are faulty, your drive might not show up. Take a few minutes to rule out connection issues with these simple steps.
Here’s what you can check and do:
- Look closely at the cable for visible damage like fraying, bent connectors, or loose fittings. Even if it looks fine, internal wear could still cause problems.
- Swap the cable with a new or known-working one. A faulty cable is one of the most common causes of connectivity problems.
- Plug the drive into a different port on your computer. Ports can wear out, collect dust, or become damaged over time, so try another one.
- For drives that require external power, make sure the adapter is securely plugged in and working. If possible, test it with a different outlet or a replacement adapter.
- Connect the drive directly to the computer instead of a USB hub. Hubs, especially older or unpowered ones, can sometimes cause data transfer or power issues.
Step #2: Check Disk Management
If that didn’t solve the issue, the next step is to see if your computer recognizes the drive at a system level. You can do this through Disk Management, a built-in Windows tool that provides detailed information about all connected storage devices. Here’s what you can сheck in Disk Management:
- Right-click the Start button and select Disk Management. This will open a window showing all storage devices connected to your computer.
- Locate your external drive in the list. If it’s there, check its status:

- Healthy (Primary Partition). The drive is functioning but may not have a drive letter assigned.
- Unallocated. The partition is missing or corrupted, which makes the drive unusable.
- No drive letter. The drive is okay but isn’t assigned a letter, so it won’t appear in File Explorer.
- RAW. The file system is damaged and the drive is unreadable.
If the drive doesn’t have a letter, right-click it, select Change Drive Letter and Paths, then click Add to assign a new one. This can make the drive appear in File Explorer.
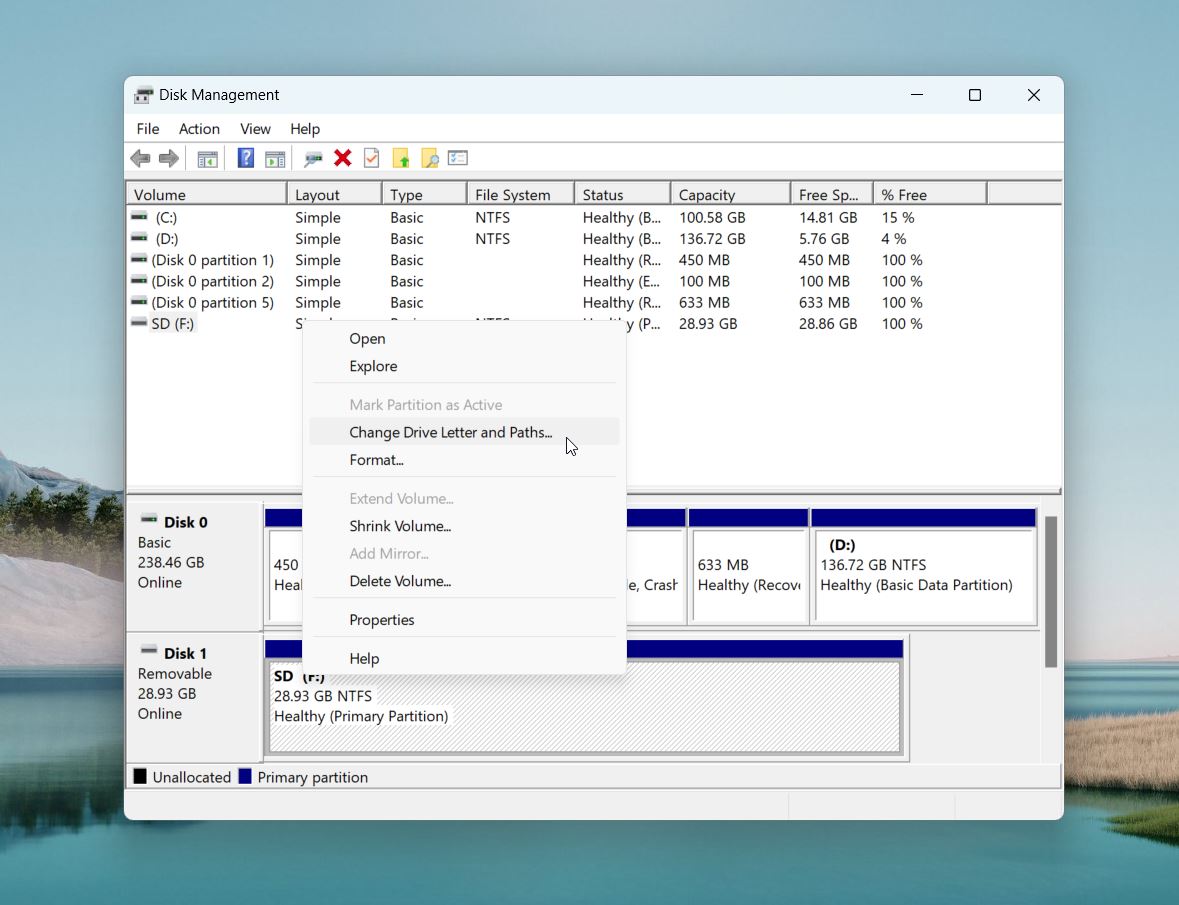
But, no matter what the status of your drive is in Disk Management, as long as it shows up there, you can use data recovery software to retrieve your files. Even if the drive is labeled as “Unallocated” or has a RAW file system, recovery tools can scan the drive for lost data.
Step #3: Use Data Recovery Software
When it comes to data recovery, there’s no real difference between an internal hard drive and an external one. The main difference is how they connect to your computer—internal drives use direct connections like SATA, while external drives rely on USB or Thunderbolt connections through an enclosure. Despite this, the recovery process for both is essentially the same.
The steps for recovery from an external drive are identical to those we covered earlier for internal drives. Simply go to this step and follow the steps outlined there—you’ll be able to recover your files in no time!
Closing Remarks
As you can see, data recovery from a hard drive that won’t boot isn’t the easiest problem, but it’s certainly doable if you follow the guide closely. Every step, from physical connections to recovery software, brings you closer to your files.
If you hit a snag, like trouble connecting a non-booting drive to another computer, don’t hesitate to reach out for help. Visit our Advisor Community, where experts and experienced users can guide you through any challenges. And you might find solutions from others who’ve dealt with similar problems.
FAQ
How can I recover data from a laptop hard drive that won't boot?
Here are three possible ways to recover data from a laptop hard drive that won’t boot:
- Create a bootable USB drive and use tools like Startup Repair, System File Checker, or Bootrec to try fixing the booting problems. If successful, you can access your data normally.
- Check online for instructions on how to safely remove the hard drive from your laptop. Use a USB-to-SATA adapter or external enclosure to connect it to another computer and copy your files. If the drive shows up in Disk Management but not in File Explorer, use recovery software like Disk Drill to scan and recover your files. Save the recovered data to a separate drive.
- If the drive is physically damaged or not recognized at all, professional recovery services can help retrieve your data. Keep in mind this option can be costly.
What can be the reason why an external hard drive won't boot?
There are several reasons an external hard drive might fail to boot or show up on your computer. Here are the most common ones:
- Faulty connections are a common reason why an external hard drive won’t boot. A damaged or worn-out USB cable can prevent the drive from connecting to your computer, and damaged USB ports on the computer can also disrupt the connection.
- Power issues can prevent the drive from functioning properly. If the external hard drive relies on an external power adapter, it may not work if the adapter is faulty or not plugged in securely. Insufficient power from a USB port can also cause the drive to fail, particularly with older USB ports or unpowered hubs.
- File system corruption is another common issue. When a drive’s file system becomes corrupted, your computer may detect the hardware but fail to access the data on the drive.
- Physical damage to the external hard drive is a serious issue, especially since these drives are more prone to damage from drops or impacts. Problems with internal components, such as the platters or read/write heads, can make the drive unbootable.
- A failed USB controller or enclosure is another potential cause. The USB-to-SATA converter inside the external drive’s enclosure might fail.
- Corrupted drivers on your computer, or corrupted firmware on the drive itself, can disrupt the connection.
How can I tell if my HDD is failing?
The clearest sign of HDD failure is clicking or whirring sounds from the drive. The drive can also overheat and start crashing often. The moment you notice that files and folders on your drive go missing that should be the last straw. Immediately stop using your drive and test it with S.M.A.R.T. monitoring features that are built-in for recovery tools such as Disk Drill.
This article was written by Joshua Solomon, a Contributing Writer at Handy Recovery Advisor. It was recently updated by Roman Demian. It was also verified for technical accuracy by Andrey Vasilyev, our editorial advisor.
Curious about our content creation process? Take a look at our Editor Guidelines.
