Have you accidentally deleted a Word document—whether it’s a DOC or DOCX file—that took hours to create? You’re not alone. We’ve helped people in the same situation, and know for sure it’s not necessarily a dead end. You don’t always have to start from scratch. We’ll demonstrate several options (four to be precise) that you can use to recover a deleted Word document. It won’t require any super technical skills—just follow our lead, and you’re good to go.
This guide is for Windows users. If you’re a Mac person, we’ve got you covered with a separate guide on how to recover deleted Word documents on a Mac.
Is it Possible to Recover Deleted Word Documents?
The first place to check for deleted files is, of course, the Recycle Bin. Since you’ve probably already tried that, we won’t stop here for a Recycle Bin guide.
If you need a refresher, you can check our guide on How to Recover Deleted Files from the Recycle Bin.
But what if your DOC or DOCX file isn’t there? You might ask, “What now?” Well, you still have two options:
- Data recovery software – These tools can scan your storage device for remnants of deleted Word files and attempt to restore them, even if they no longer appear in File Explorer.
- Backups – If you regularly back up your files (locally or to the cloud), you can use those to restore your Word documents.
We’ll start with data recovery tools since our experience shows that this is what readers are most interested in. Those who have backups often know what to do, but if you don’t—that’s okay. We’ll cover that too, so you have all the solutions you need to recover your deleted DOC and DOCX files.
How to Recover Deleted Word Files without Backups
Data recovery software takes advantage of the way the Windows OS handles data deletion. When Windows deletes a file from your machine, it removes the logical links that make the file accessible and marks the space it occupied as available for use. As long as the original data has not been overwritten, data recovery software can, so to speak, undelete the Word document.
Keep in mind that file recovery is not a 100% guarantee. Several factors affect your chances:
- ⏱️ How long ago was the document deleted? Time matters. Deleted files stick around on a drive until new data overwrites them. The more you use the drive, the lower your chances of recovery.
- 💾 Have you used the drive since deletion? Any activity—like saving new files or editing existing ones—can overwrite deleted data. For example, saving a 5 MB file might overwrite the same amount of space where your Word document was stored. The less you’ve used the drive, the better your odds.
- 🛠️ What type of storage is it? HDDs (hard drives) are more forgiving since they don’t erase data right away. SSDs (solid-state drives) are tougher because of TRIM, a feature that wipes deleted files almost instantly. However, external SSDs connected through USB might not run TRIM, which leaves files recoverable. Internal SSDs, on the other hand, usually run TRIM and make recovery impossible.
If you stop using the drive and act fast, your chances go way up.
We will demonstrate deleted Word document recovery using two programs: Disk Drill and Recuva. We chose these so you can see how the recovery process works with two popular data recovery options, both are capable and perfect for first-time users.
Option A: Disk Drill
We evaluate Disk Drill very highly (as seen in our full review). In our opinion, it offers one of the best ratios of recovery performance and features to usability.
Recovery usually takes just a few clicks, and its navigation feels intuitive. Unlike some other tools, it doesn’t overwhelm you with unnecessary information or intrusive pop-up windows.
Disk Drill is safe to install, but here’s a key tip: Make sure to install it on a drive/partition different from where you lost the files. This prevents overwriting your deleted Word file with the recovery app itself—something we definitely want to avoid.
Let’s take a look at how to retrieve a deleted Word document with Disk Drill:
- Head to the official Disk Drill website, download and install it.
- Select the storage device that contained the deleted Word document.
- Click the Scan for lost data button to start the process.
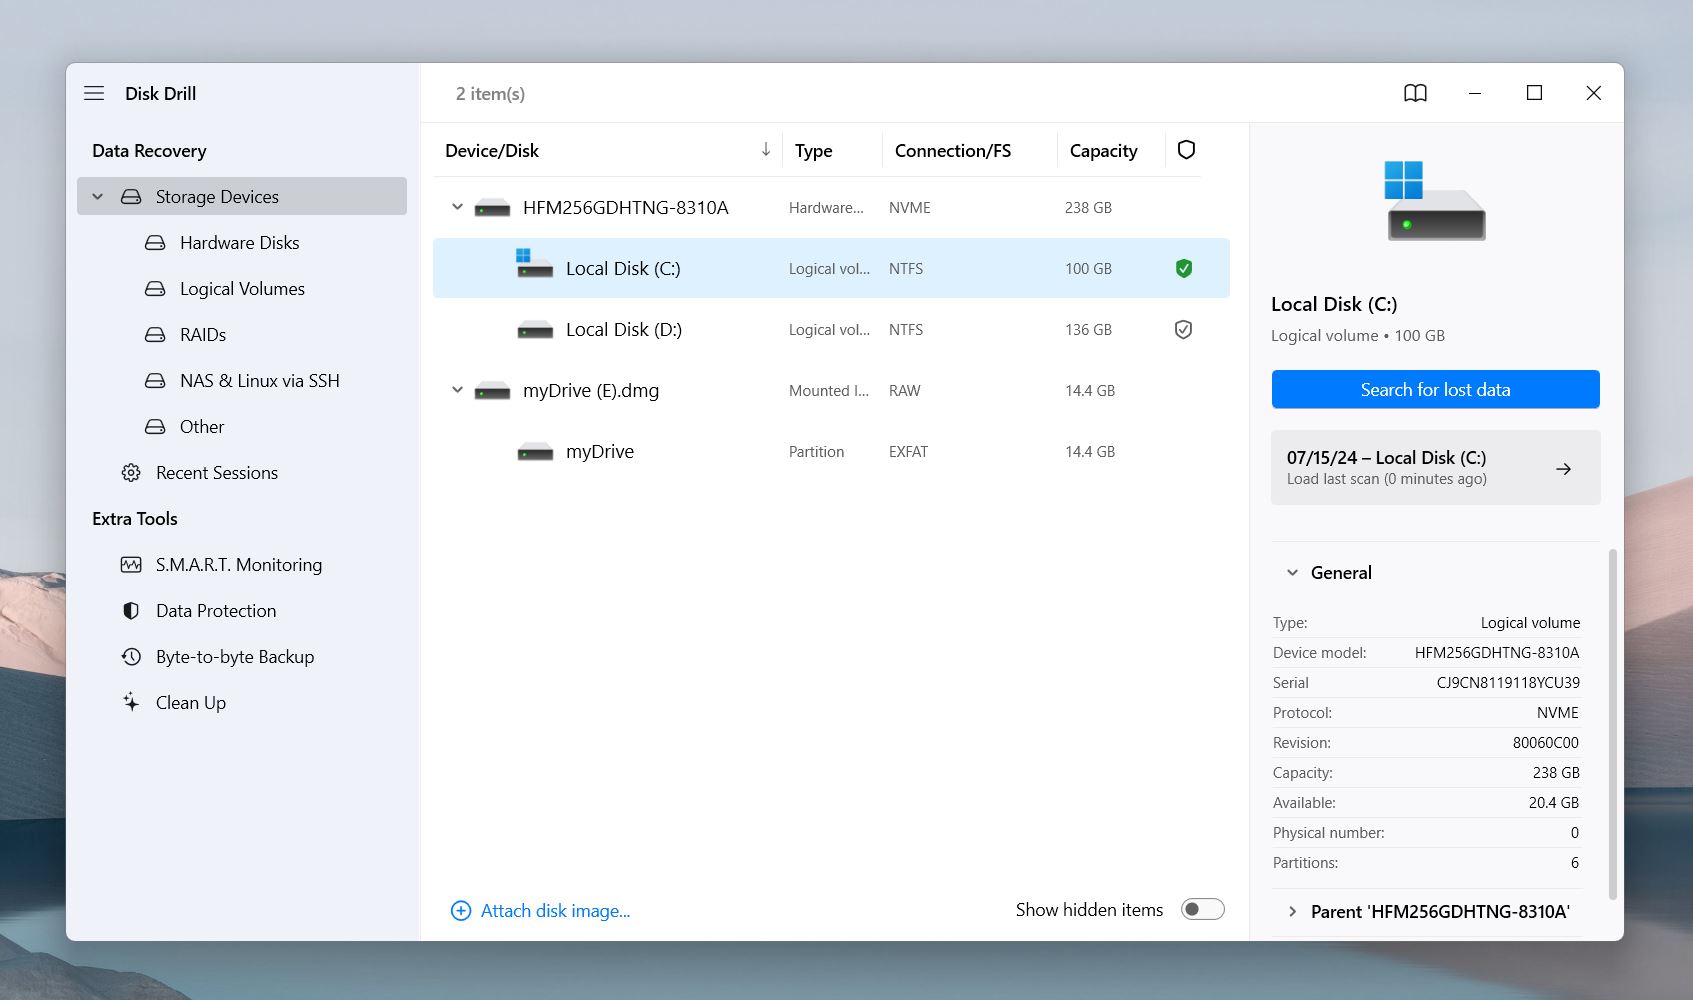
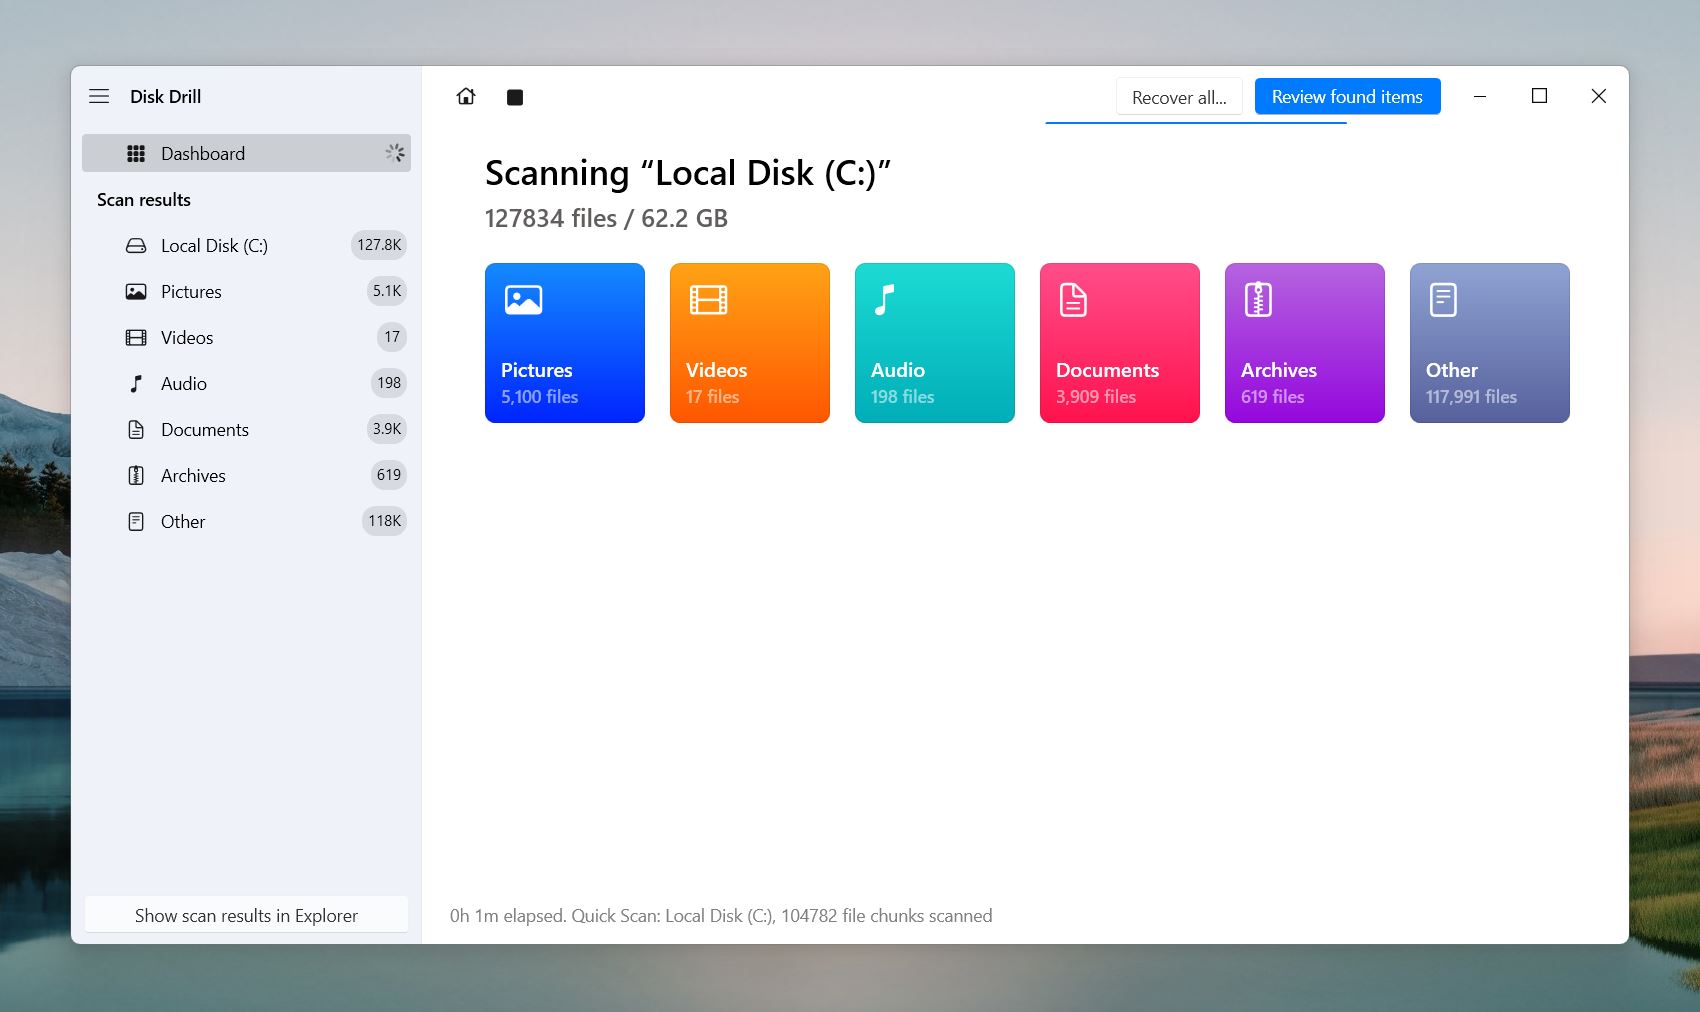
- As the scan begins, you’ll see pictograms of categories like Pictures, Video, Audio, and Documents. To make things easier, choose Documents. This filters the results to show only found documents, including your DOC or DOCX files, so you don’t have to dig through unrelated data.
- To narrow your search further, use the search bar at the top. If you remember the file name or even part of it, type it in to filter the results. Alternatively, you can type .doc or .docx to display only Word documents.
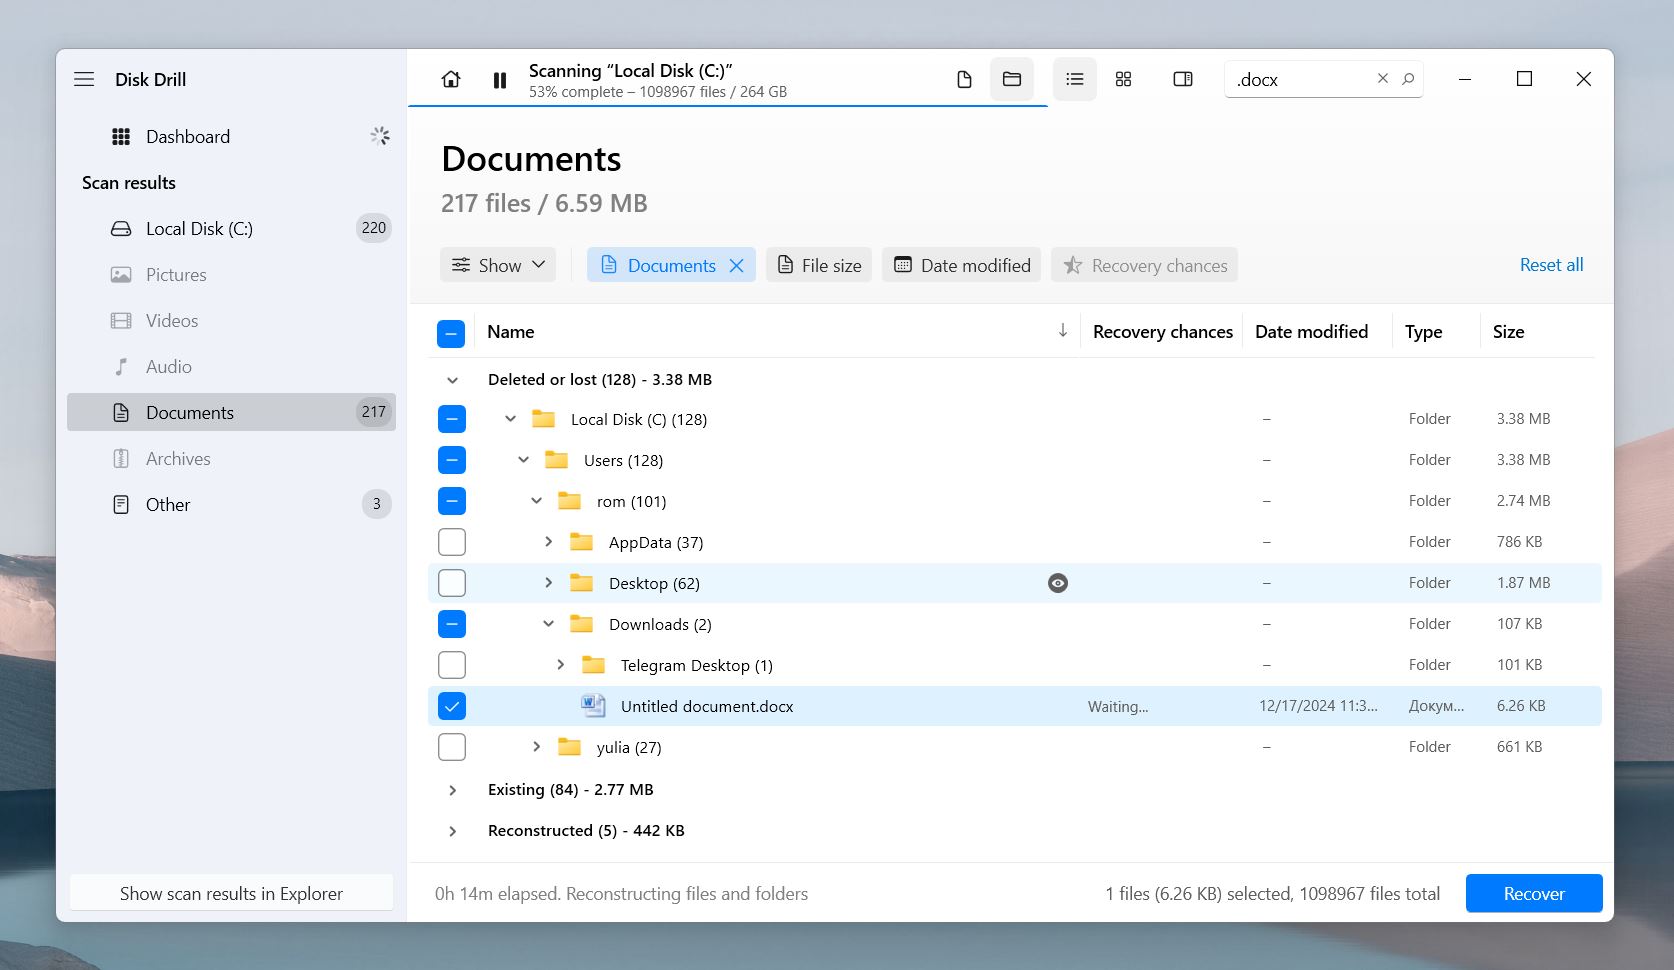
- You can also preview each file before recovery. As you hover over a file, you’ll see an 👁️🗨️ eye icon appear. Click on it to open a preview. Sometimes, files can’t be recovered with their original names, so the preview feature can be super useful. 🗨️
The Recovery Chances column shows High, Average, or Low for each file. This rating reflects the file’s condition and the likelihood of successful recovery. And here’s a tip: if you can preview the file, it’s 100% recoverable.
- Click the Restore button to get your lost files back.
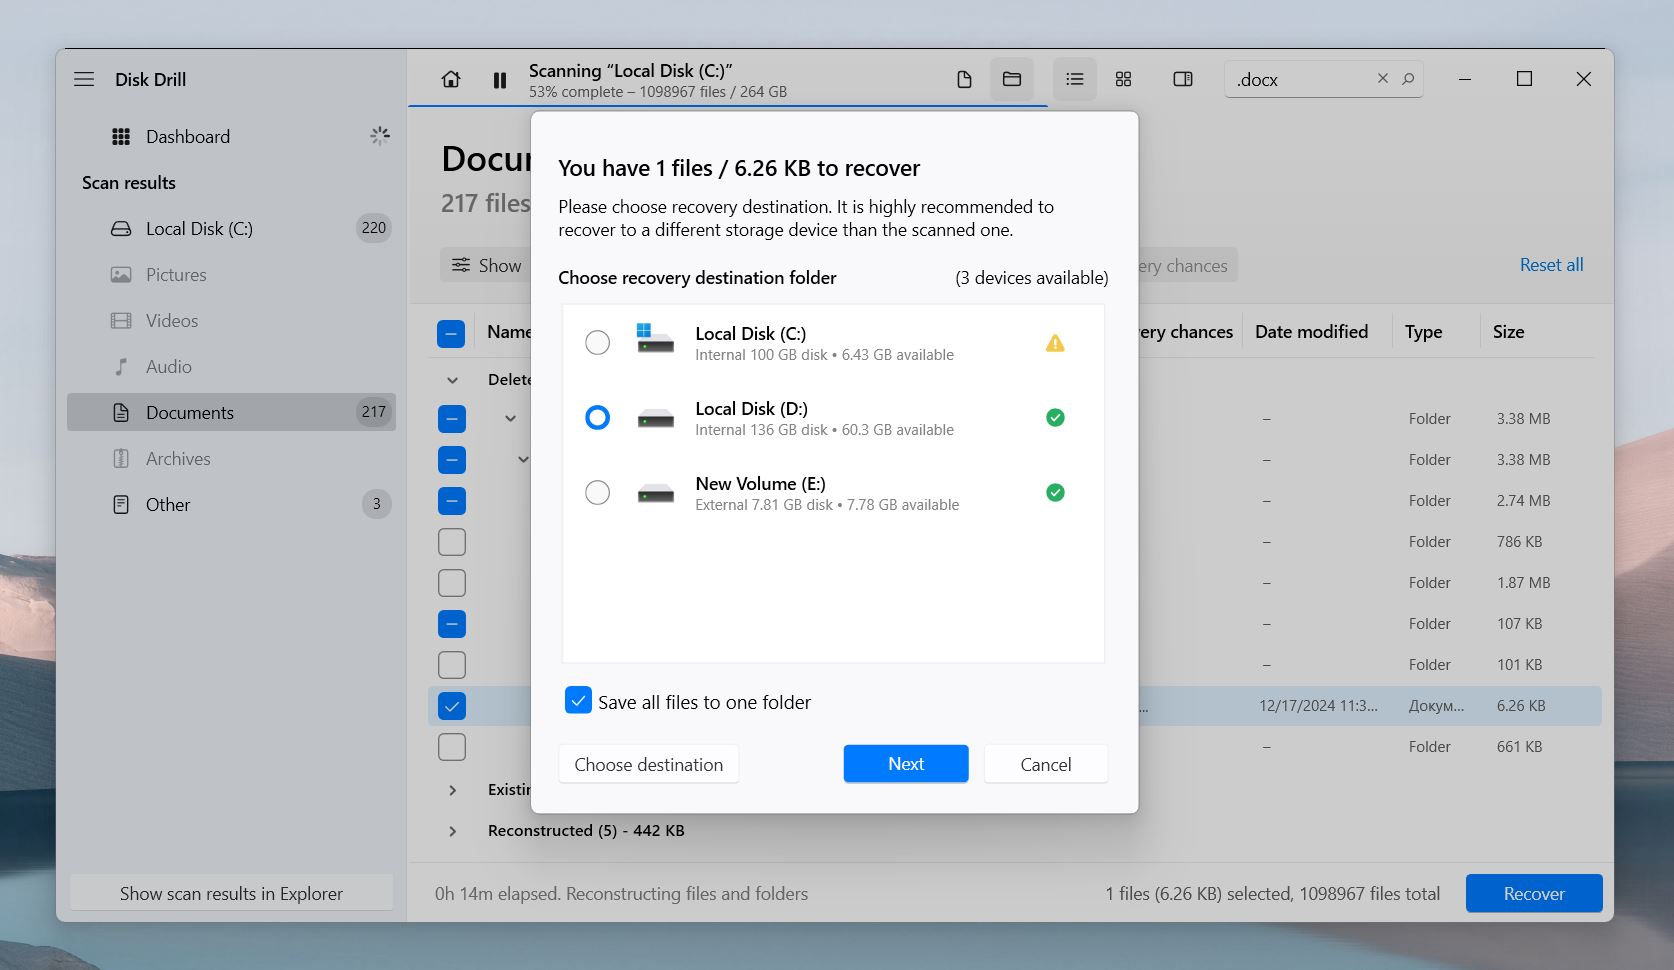
- Select the files you want to retrieve and choose a safe location to save them. Just like when installing Disk Drill, pick a different drive or partition from the one where your documents were originally located. This prevents overwriting any remaining recoverable data.
We’ve used Disk Drill in many different situations, and it’s one of the most reliable tools for deleted Word document recovery. It supports NTFS drives exceptionally well, which matters since most Word files are lost on Windows computers using NTFS as the default file system. Our tests also showed that Disk Drill handles DOC and DOCX file types very well. This is especially important if your file system is damaged or the device storing your Word documents was formatted. It’s a very capable instrument but, like anything in life, it has its pros and cons:
Pros:
- High success rate.
- Can recover Word documents even in complex data loss cases.
- Clean and user-friendly interface.
- Quick filtering to locate files.
- Offers both Quick and Deep Scans.
- Works with most storage devices (HDDs, SSDs, USBs, memory cards, etc.).
- Great preview feature.
- Preview and recover files before the scan finishes.
- Option to pause scans and resume later.
- Includes useful additional features like Byte-to-byte backups, S.M.A.R.T. monitoring, and Data protection tools.
- Dark mode.
Cons:
- Free version limits recovery to 500 MB.
Option B: Recuva
Recuva is another solid option for Word document recovery. It may not have the same level of polish or advanced features as Disk Drill, but it gets the job done well for simple recovery tasks. Recuva works well with DOC and DOCX files, and its lightweight design makes it easy to install and use, even on older systems.
If you want more details on how Recuva compares to Disk Drill, we’ve got you covered.
Here’s how to get your deleted Word documents back using Recuva:
- Head to the official website and download Recuva. Like with any recovery tool, install it on a different drive than the one where you lost your Word files to avoid overwriting data.
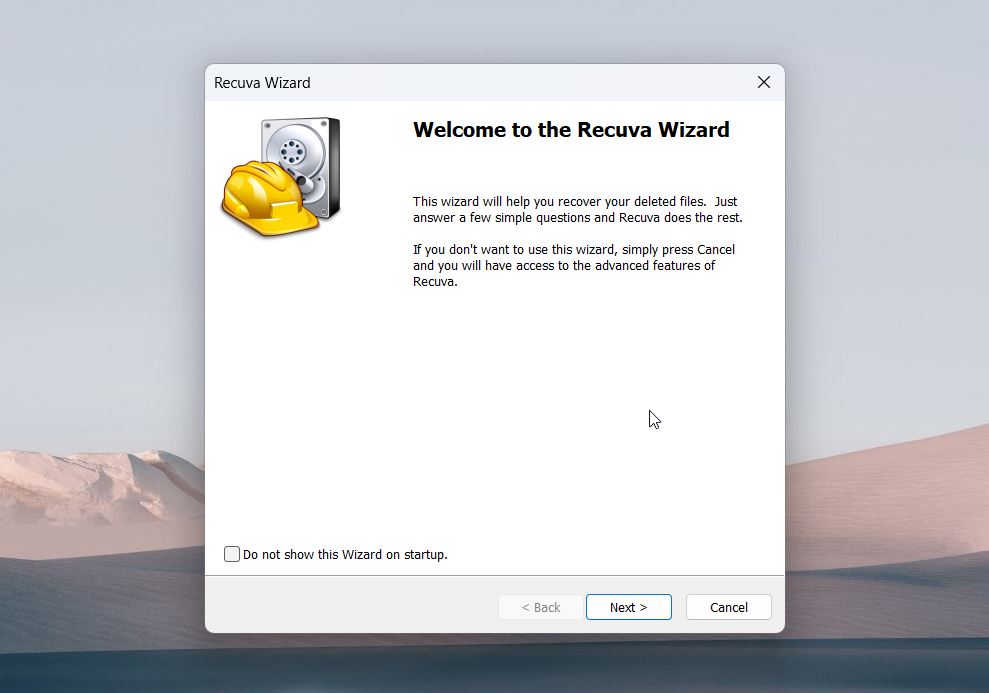
- Open Recuva, and its recovery wizard will guide you.
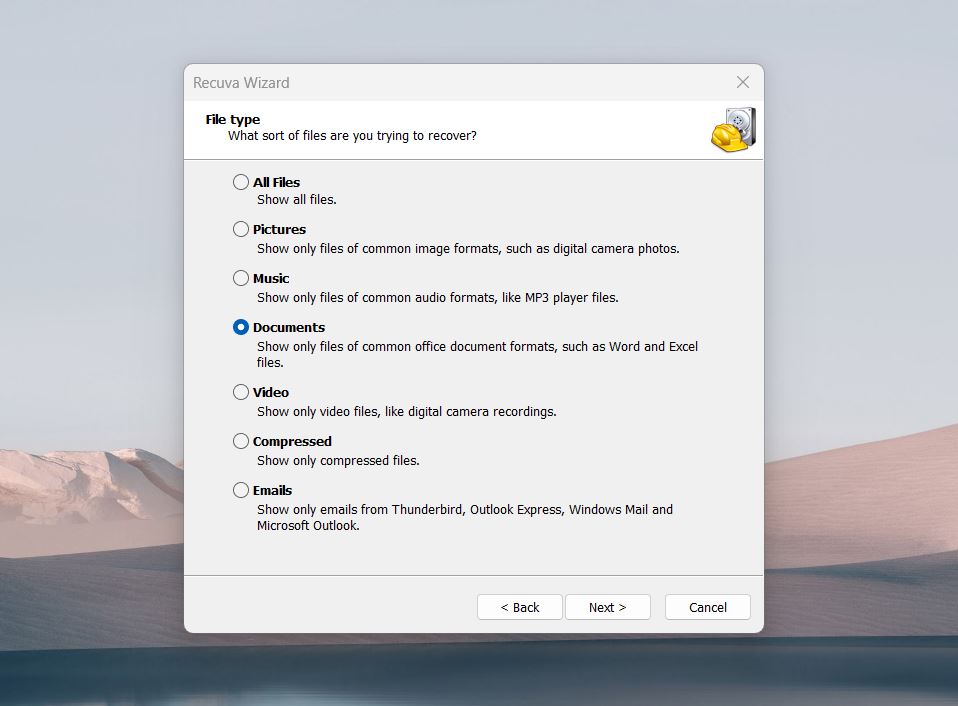
- Choose Documents when asked what type of files you want to recover.
- Recuva will ask where to search for the deleted files.
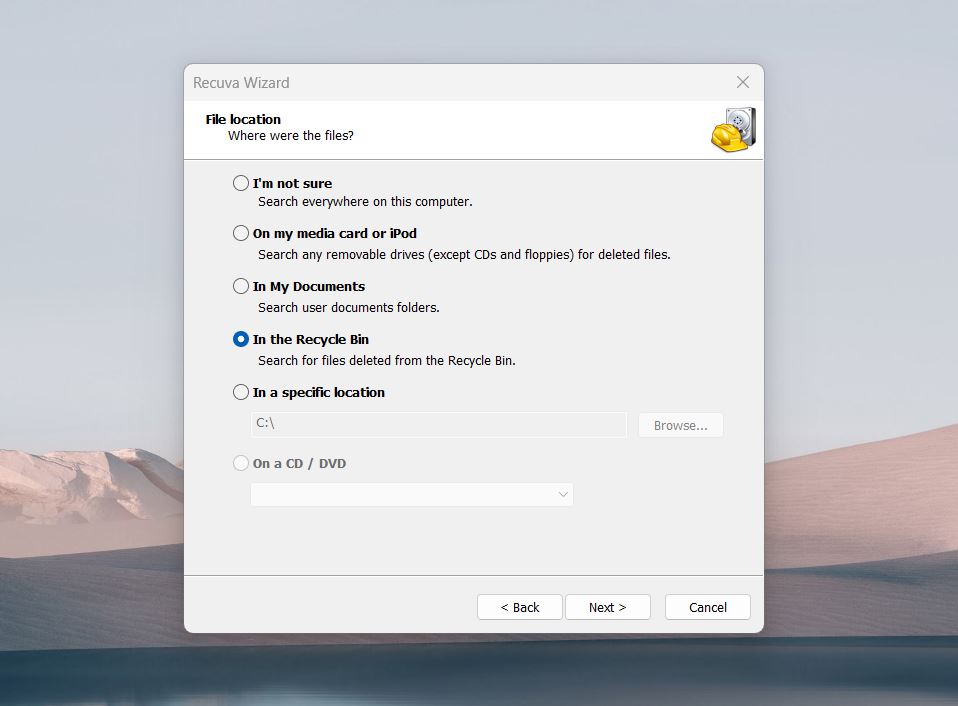
- You can select the exact folder where you saved the Word file or choose “I’m not sure” to scan the entire drive.
- Start with the Quick Scan to search for recently deleted files.
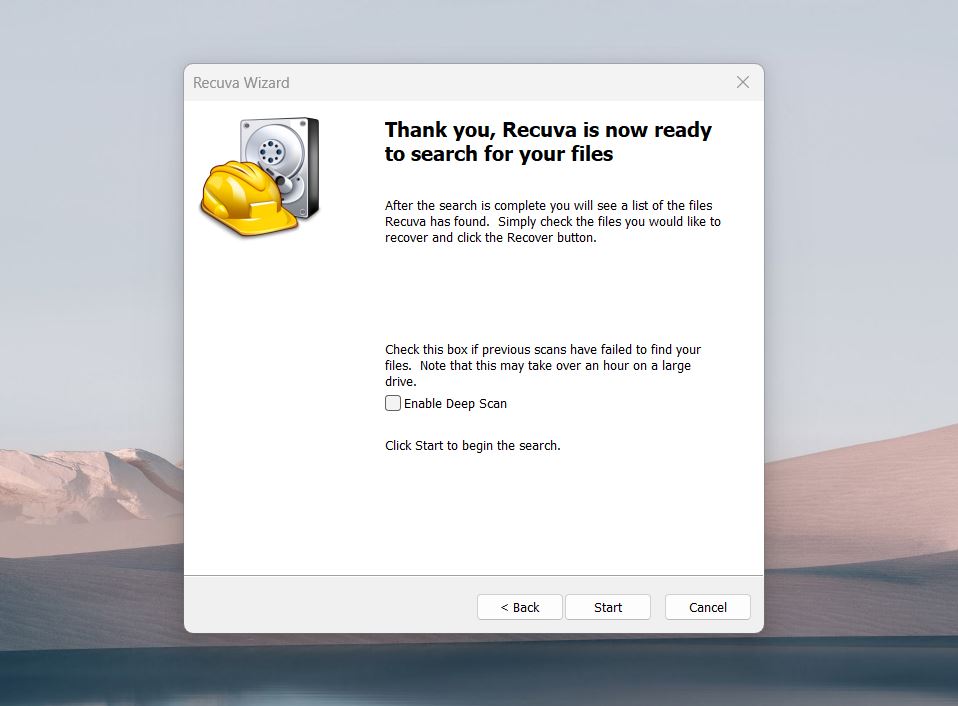 🗨️
🗨️If the Quick Scan doesn’t find your DOC or DOCX files, run a Deep Scan for a more thorough search. Keep in mind that this takes longer.
- Once the scan finishes, Recuva lists the recoverable files. Use the file type filter to narrow results to DOC and DOCX files.
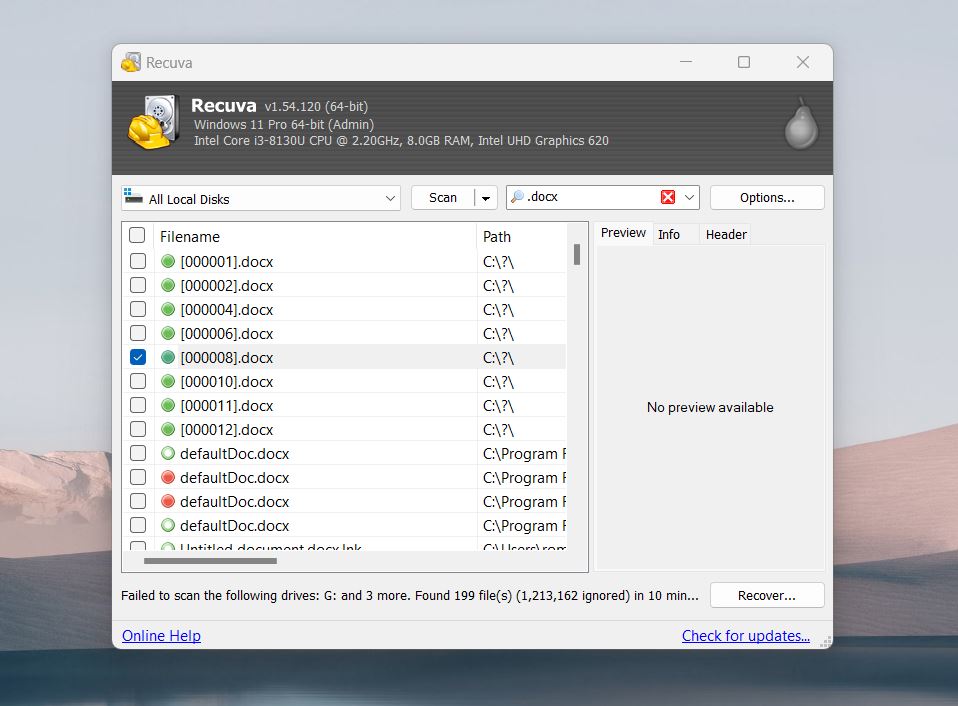
- You can use the “Switch to advanced mode” option, which will reveal Recuva’s color-coded system for a health assessment (green, yellow, and red) to indicate how likely the file is recoverable.
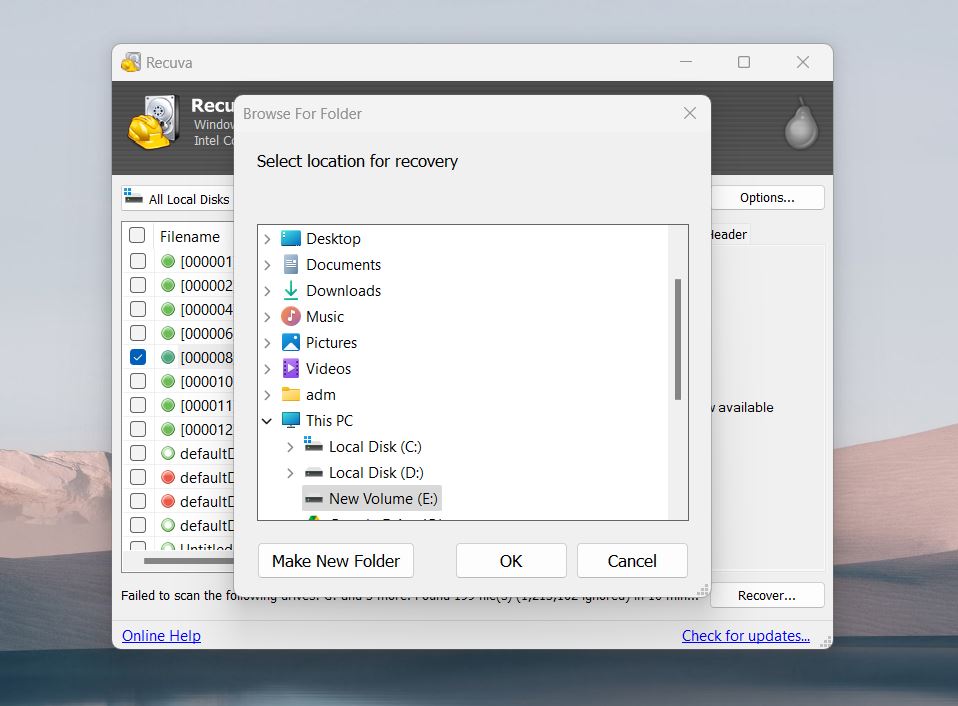
- Select the files you want to recover click Recover and save them to a different drive/partition.
Although Recuva is not as capable a recovery tool as Disk Drill and may struggle with more complex data loss cases, it remains popular for a reason. Its affordability, and ability to handle basic recovery tasks make it a solid option for many users. Let’s take a look at its pros and cons:
Pros:
- Completely free for basic recovery.
- Lightweight.
- Quick and easy setup with a guided wizard.
- Offers both Quick and Deep Scans.
- Filters results by file type (e.g., DOC, DOCX).
- Color-coded recovery status.
Cons:
- Often fails to restore folder structure and file names.
- Fails to update drive list without restarting.
- Can’t scan entire disks, only partitions.
- Useless for complex cases like RAW drives/partitions.
- Outdated interface.
- File previews limited to a few formats.
- Scans cannot resume after removable drive disconnects.
- Lacks additional features.
How to Recover Deleted Word Files with Backups
Now, as promised—backups. If you set up either local or cloud backups on your machine before the deletion occurred—great. Recovery is usually quick and easy.
There are many third-party backup & recovery tools. For this example, we will show you how to use backups made with two options that are available out of the box on Windows 10 and 11: File History for local backups and OneDrive for cloud backups.
Local Backups: File History
File History was introduced in Windows 8 and has remained an incredibly useful feature of Windows ever since. By default, it backs up files and folders in your Libraries, Desktop, and Favorites (everything you add to Favorites will be backed up). If you enabled File History beforehand, here’s how you can use File History to find deleted Word documents and restore them:
- Open the Start menu and type File History in the search bar.
- Select File History from the results to open the control panel.
- In the File History control panel, click on Restore personal files in the left-hand pane.
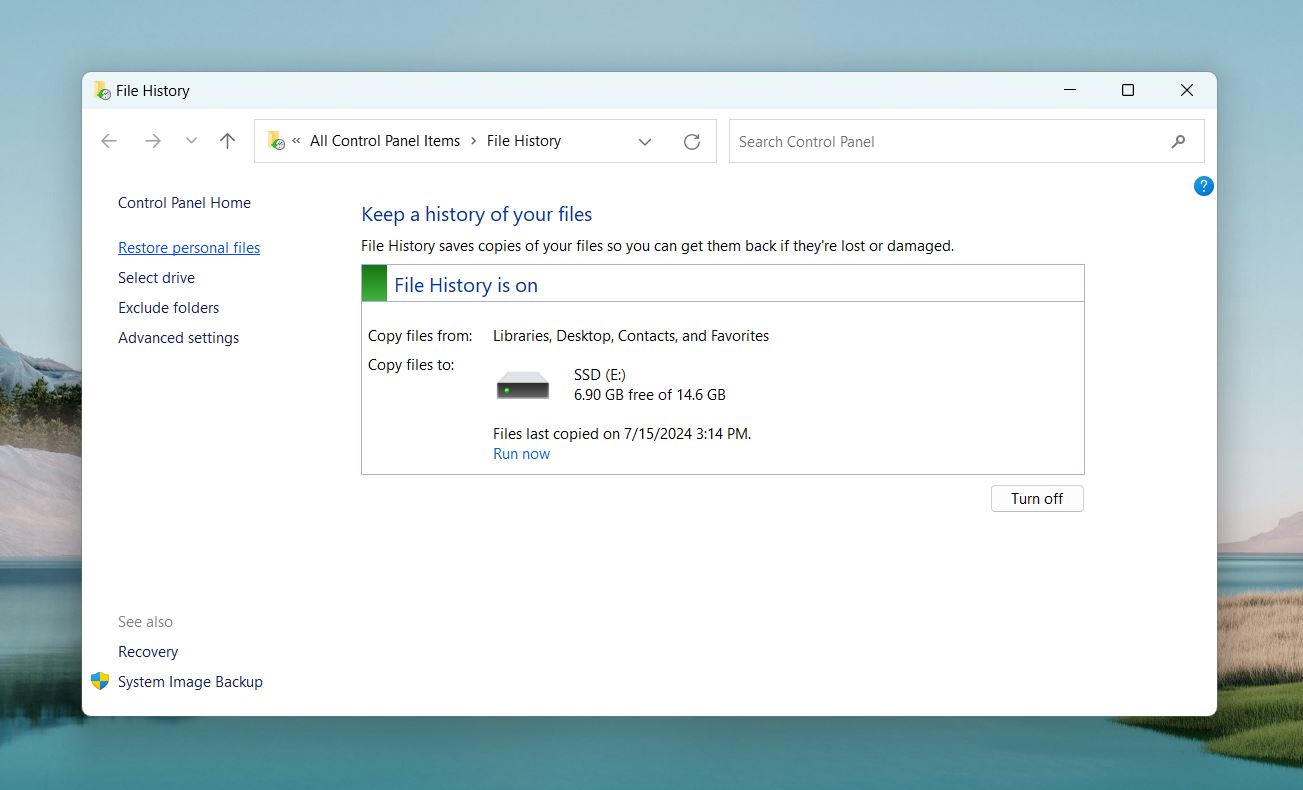
- Navigate through the available backups to locate the folder or files you want to restore. You can use the search bar to type part of the file name or extension (e.g., .doc or .docx).
- Click the round Restore button to return the files to their original location.
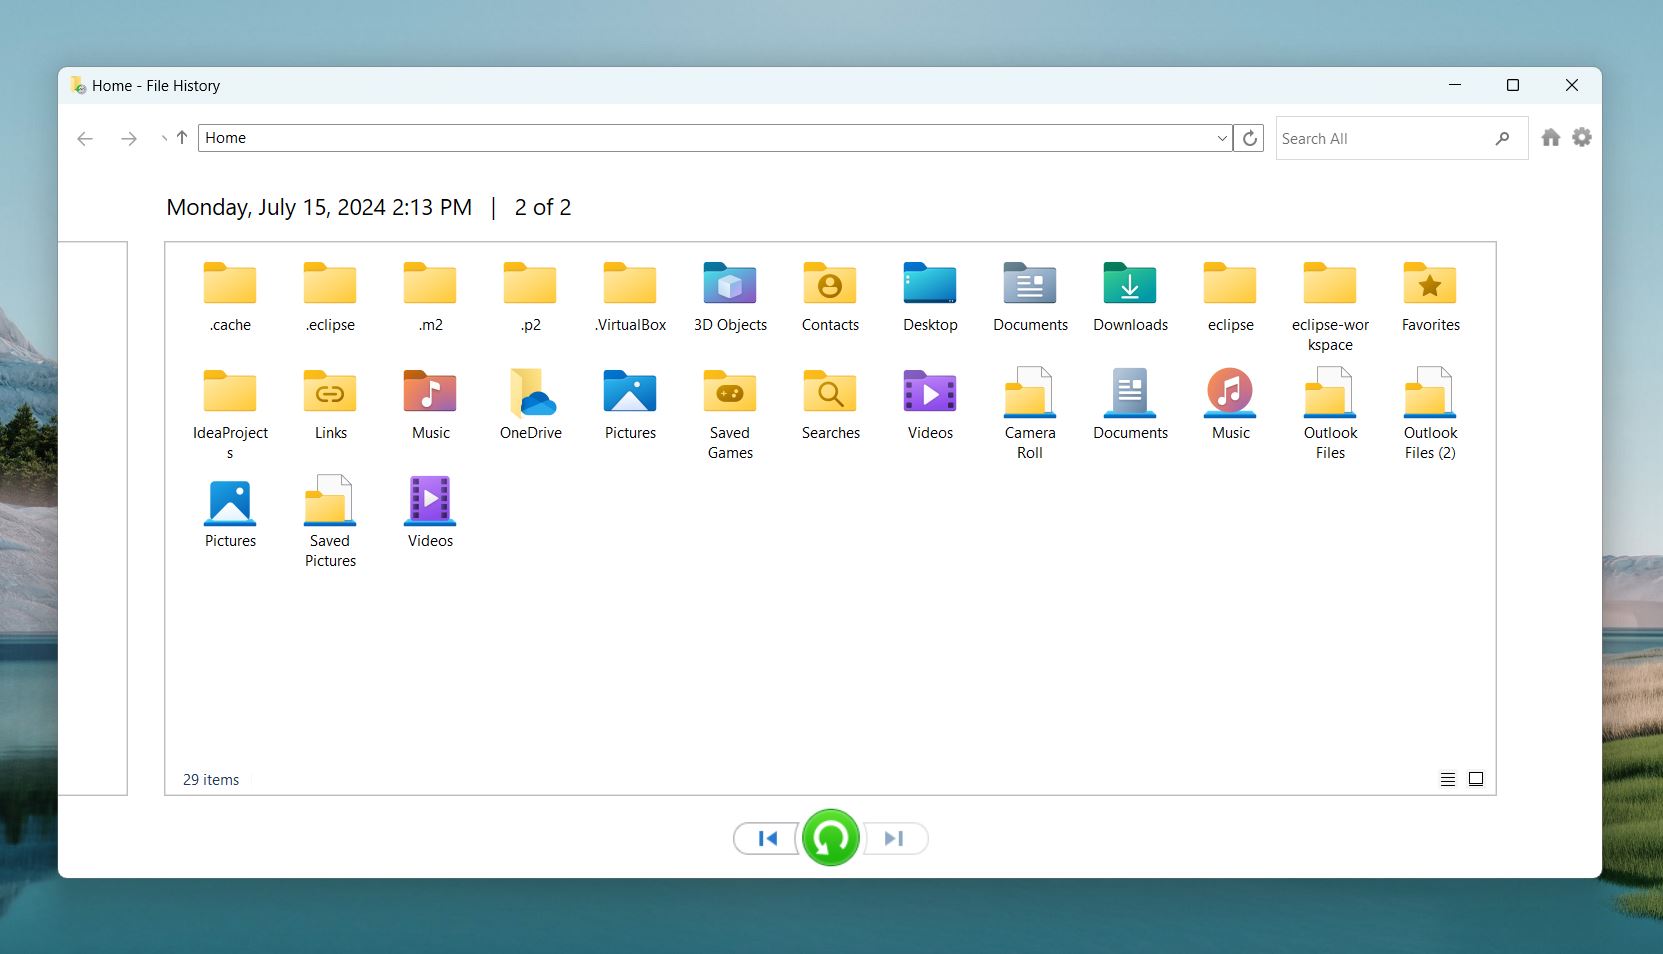
- If you prefer a different restore location, right-click the files and choose Restore to, then select a destination folder.
Changes made to the document since the last backup was taken will not be recoverable, but you will get the original file back which is better than the alternative of losing it completely.
Now that we’ve covered its basics, let’s list the pros and cons of File History:
Pros:
- Built into Windows—no need for additional software.
- Automatically backs up files at regular intervals.
- Can restore previous versions of files.
- Backs up locations where documents like Word files are usually stored.
- Straightforward recovery process.
Cons:
- Needs to be enabled before data loss occurs.
- Only backs up selected folders.
- Requires an external storage for backups.
- Backups can take up significant space over time.
Cloud Backups: OneDrive
OneDrive is a Microsoft storage service that allows users to store data in the cloud. It comes as part of Windows 10/11 and enables you to save disk space by storing files in the cloud and provides the ability to access them from any device.
We often include OneDrive in our guides because many people don’t realize they had it turned on. Their lost files might already be safely stored in the cloud, so it’s always worth a reminder to check.
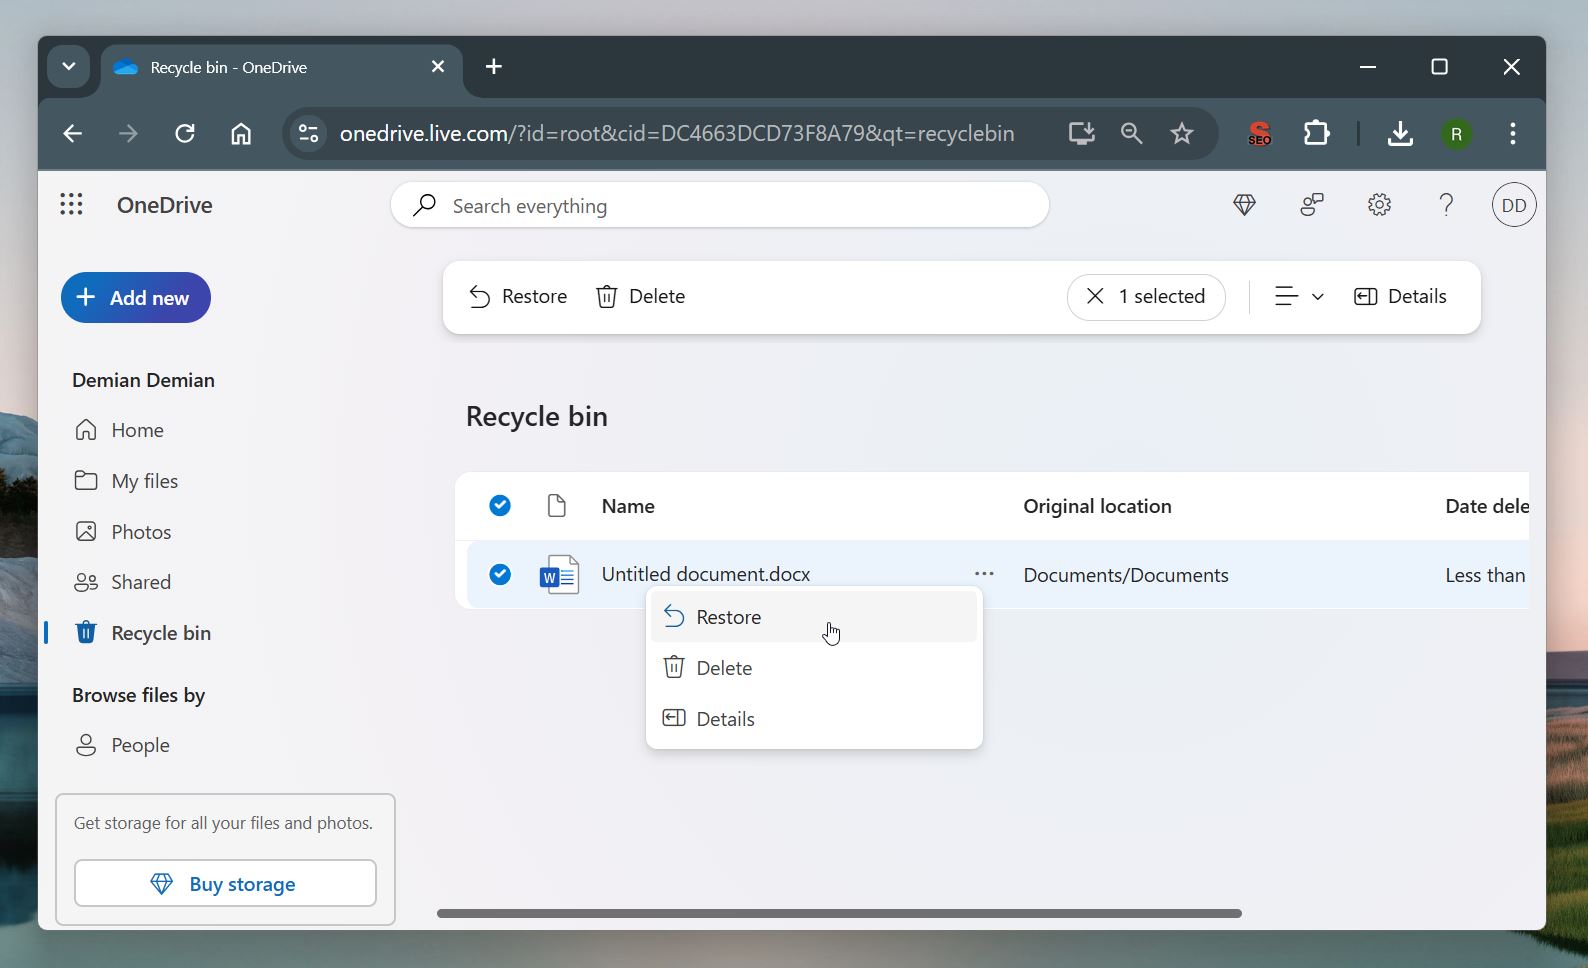
OneDrive synchronization works like this: if you delete a synchronized file and then empty the Recycle Bin on your computer, the file becomes desynchronized. This means it may no longer appear in your computer’s trash, but you can still find it in the OneDrive Recycle Bin for up to 30 days (for work or school accounts, retention lasts 93 days unless changed by an administrator).
Use these steps to undelete a Word document saved to OneDrive:
- Go to the OneDrive website and log in with your Microsoft account.
- Select the Recycle Bin.
- Choose the Word files you want to recover.
- Click the Restore button.
If you use other cloud services like Google Drive or Dropbox, it’s definitely worth checking their trash. Similar to OneDrive, deleted files often remain recoverable for a limited time.
Pros:
- Built into Windows 10/11.
- Automatically syncs files to the cloud in real-time.
- Deleted files stay in the OneDrive Recycle Bin for up to 30 days.
- Accessible from any device with an internet connection.
Cons:
- Requires an internet connection to sync files.
- Free storage is limited to 5 GB.
FAQ
How can I recover a deleted Word document for free?
You have a few reliable options to recover a deleted Word document without spending a dime:
- If you haven’t emptied the Recycle Bin, your deleted DOC or DOCX file might still be there. Right-click on the file and select Restore to return it to its original location.
- If File History was enabled before deletion, you can recover the file from the backup.
- If you sync files with OneDrive, Google Drive, or Dropbox, check their respective Recycle Bin or Trash. Cloud services often keep deleted files for 30 days.
- Tools like Disk Drill (Basic version) and Recuva allow you to recover deleted Word files for free. Install it on a different drive, scan the location where the file was deleted, and restore the DOC or DOCX file.
Can I recover a Word file permanently deleted from the Recycle Bin?
Yes, it’s possible to recover a Word file permanently deleted from the Recycle Bin, but it depends on how much the drive has been used since deletion. You can use data recovery software. Tools like Disk Drill and Recuva can scan your drive for deleted/lost files, including DOC and DOCX formats, even after the Recycle Bin has been emptied. Don’t forget to Install the software on a different drive to avoid overwriting recoverable data.
What are the best tools to recover deleted Word documents?
Some of the best recovery tools for deleted Word documents include Disk Drill, Recuva, PhotoRec, and R-Studio.
Disk Drill stands out for its high success rates and easy-to-use interface, a strong choice for both simple and complex recoveries. Recuva works well for basic tasks. PhotoRec is completely free and handles older DOC files effectively but has trouble with newer DOCX files. R-Studio offers powerful tools to recover Word documents, but it might feel too complex for the average home user. That’s why we chose Disk Drill and Recuva to demonstrate in our guide and reserved PhotoRec and R-Studio for mention only.
How do I recover a deleted Word document without software?
You can recover a deleted Word document without software by using built-in features in Windows or cloud backups such as:
- Recycle Bin – Open the Recycle Bin, find your DOC or DOCX file, right-click it, and select Restore.
- File History (must be activated before deletion) – Open Restore your files with File History from the Start menu, navigate to the folder, use the arrows to find the version you need, and click Restore to recover the file.
- Cloud Backups (must be activated before deletion) – If you use OneDrive, Google Drive, or Dropbox, check their Recycle Bin for deleted files.
This article was written by Robert Agar, a Staff Writer at Handy Recovery Advisor. It was recently updated by Roman Demian. It was also verified for technical accuracy by Andrey Vasilyev, our editorial advisor.
Curious about our content creation process? Take a look at our Editor Guidelines.
