So, you just got back from a trip or finished a photo shoot and decided to transfer your photos to your PC, only to find that all your pictures have disappeared from your SD card without a trace.
Well, this can happen for a number of reasons—your SD card might have become corrupted due to improper ejection, a virus infection, or file system errors. You might have also accidentally clicked the wrong button on your camera and erased all your photos. No matter the cause, we’re happy to tell you that in most cases, your photos can still be saved since they are usually still present on the SD card despite being invisible.
Continue reading as we explain in detail how you can restore the photos that disappeared from your SD card.
Originally, we had a section detailing possible reasons for missing photos at the beginning of the article. However, to help you find a solution to your problem more quickly, we decided to move that section to the second half of the article. If you’re interested in reading about those reasons, you can find them at this link.
How to Recover Photos Missing From Memory Card
For as long as your SD card’s missing photos haven’t been overwritten by new files, you can still extract them using special tools called data recovery software. These utilities can pull data from the file system, and some can even rebuild files that got corrupted. If you’ve never used one before, we’ll demonstrate the process below.
Option A: Disk Drill
Disk Drill is one of the most powerful and well-loved tools of its kind, and its easy-to-use GUI (graphical user interface) makes it perfect for users attempting DIY recovery for the first time.
Disk Drill is especially useful for recovering photos that disappeared from your memory card because you can preview files along the way (even RAW images, as long as your operating system can view a particular file type, or you have any third-party viewer that supports it).

If you want to know more about Disk Drill’s features, read our full Disk Drill review. Additionally, we also have a dedicated safety analysis of the tool for those interested in its security aspects.
Here is how you can recover pictures that have disappeared from an SD card using Disk Drill:
- Make sure your SD card is securely connected to your computer.
- Download and install Disk Drill. Then, launch it.
- Select your SD card from the drive list. It may appear as a “Generic USB” if you’re using a USB-type card reader. Then, click “Search for lost data”.

- Disk Drill will now scan your SD card. Wait until the app notifies you that the scan is complete, then click “Review found items”.

- You’ll now be able to review the files Disk Drill found. On the top-right corner of the screen, you can use the search bar to filter results to show only the files you want. For example, type “.cr2” to display only Canon RAW image version 2 files. You can also use the left sidebar to filter scan results by ‘Image’ type or use the “Show” dropdown to filter results to display only deleted or lost pictures.

- Our favorite Disk Drill feature is the ability to preview files in the app. This is also useful since data recovery software might not always be able to retrieve exact file names. Hover your mouse pointer to the right of the file and click the eye button that appears.

- Use the checkbox column to select the files you want to restore. Then, click “Recover”.

- After clicking “Recover”, a window will appear displaying a list of suggested disks and folders for recovery. Alternatively, you can select ‘”Choose Destination” to pick a location yourself. The program will warn about the importance of not restoring data to the same device from which it is being recovered. After selecting the destination, click “Next” to complete the recovery process.

Disk Drill Basic for Windows offers only 500 MB of free recovery. However, you can preview as many files as you want without paying a cent – this can help you figure out which files you can recover using software. We actually cover SD card recovery software in the next section, which is available for free, but note the limitations that are standard across all such tools.
Option B: PhotoRec
If you want to recover files above 500 MB and you don’t really have the budget to invest in Disk Drill (although we do recommend it as it offers a lifetime license), you can try recovering your data with PhotoRec.
Like Disk Drill, PhotoRec is a comprehensive data recovery software, and it can restore pictures from an SD card that have disappeared. However, it does have some limitations since it’s free. Most notably, it doesn’t offer an option to preview photos that are recoverable, nor does it allow you to select specific files for recovery.

Due to its nature, PhotoRec recovers data in bulk, without preserving the original file names and folder structure. It also doesn’t have a graphical user interface – you’ll be recovering your data primarily through the Command Prompt.
Pro tip: At some point, qphotorec_win.exe (included in the archive file) was added to the TestDisk/PhotoRec build, enabling the use of PhotoRec with a graphical user interface.
Here is how you can retrieve lost pictures from an SD card using PhotoRec:
- Make sure your SD card is securely connected to your computer.
- Download and install PhotoRec (it comes downloaded with TestDisk, its sister software).
- Launch PhotoRec.
- Use your arrow keys to select your SD card from the list, then highlight “Proceed” and hit enter.

- Use arrow keys up and down to highlight the partition you want to scan, then use your right arrow key to highlight “File Opt” and hit enter.

- Browse the list to make sure the file type you want to recover is selected. Make sure to select JPEG and PNG files, as well as manufacturer-specfic RAW files (for ex. CRW for Canon cameras). Hit enter to return to the last screen.

- This time, highlight “Search” and hit enter.

- Use your arrow keys to highlight “Other” and hit enter.

- If you only want to recover files you deleted, go ahead with the “Free” option. Otherwise, use your down arrow key to highlight “Whole” and hit enter (this works better if you want to recover files from a corrupted SD card).

- Use the arrow keys (up and down to select a folder, left and right to enter and exit highlighted folders) to select a destination for your recovered files. Then, hit C. Please remember to select a location on your computer and not on your SD card to avoid overwriting files.

- After the previous step, the scan will begin and display the number of files found as it progresses. Once it is finished, the program will alert you, and you will find all the recovered files in the folder you specified earlier.

Pro tip: PhotoRec version 7.3 was released in October 2024, but it is still in beta. If you want to learn more about its features and our (recent) experiences with this software, read our full PhotoRec review.
If you want to restore your SD card from Android directly on your mobile device, there are similar apps on the Google Play. We wrote an article to help you choose the right one: Top 5 Best Apps to Recover Data from SD Card on Android.
Option C: Professional Data Recovery Service
If you can’t preview your files and/or you suspect that your SD card has been physically damaged, it’s time to call the pros (or risk further damage and data loss). If you’ve never used a professional SD card recovery service before, try to find one that offers at least most of the following:
- Free remote estimate: The most reputable centers have worked with thousands of cases… So they’re able to guesstimate a project based on similar cases without even diagnosing your SD card in person.
- No data-no charge guarantee: In my experience, not many services offer this guarantee. If you find one that does, it’s a good sign that they’re confident in their ability to restore their customers’ data.
- Class 100 Clean Room: This is an ultra-sterile lab where tiny dust and debris are highly controlled to avoid scratching or contaminating storage disks. This is non-negotiable. Anything less than a Class 100 Clean Room only increases the likelihood of permanent data loss and further damage to your SD card’s disk.
- Case-by-case pricing: Beware of data recovery centers that offer a fixed amount per GB recovered. Data recovery is too complex to follow this pricing structure.
Is it Possible to Recover Photos That Disappeared or Keep Disappearing From SD Card?
Most of the time, yes! SD cards follow the same behavior as most storage devices do – whenever you delete a file, the storage disk just marks its data block as “unallocated.” In other words, it gets treated as free space. So when you save a new file, the old data gets overwritten. Before that happens, you can still extract that data from the file system using special tools. However, cameras, mobile phones, and other multimedia devices all rely on the SD card and its variations… So things get a little more complicated. Since different devices interact with SD cards in their own ways, it’s important to properly diagnose the problem before attempting repair so you can avoid further data loss. Use the table below to figure out your next step and use the links to jump to the most relevant section.
Interesting to Note: Some SD cards, when formatted in a camera, support the SD_ERASE command. This command functions similarly to TRIM on SSDs, potentially making data recovery difficult or impossible.
Scenario |
Commonly happens to… |
Solution |
😮 Accidental deletion |
Digital cameras with LCD displays like Canon DSLR and Nikon DSLR cameras (it’s easy to hit “delete all” instead of “delete all in folder,” and cameras do not create recycle bin folders in their SD cards). |
If you deleted your photos on your computer, check your recycle bin. If you deleted them using your camera, stop using it immediately. Then, refer to: How to Recover Photos Missing From Memory Card |
❌ Fake card |
Popular branded memory cards like Kingston SD cards, Sony SD cards, and SanDisk SD cards. The read/write speeds and/or indicated storage capacity are usually false. Continuing to take footage when your storage runs out can cause overwriting. |
Only buy from authorized stores and check the manufacturer’s website for anti-counterfeit designs on their products. (Kingston, Sony) |
⛔ Corruption due to virus attack, read/write interruption, etc. |
All memory cards and devices |
|
🧹 Formatting issues |
DSLRs like Nikon and Canon cameras – if you insert an SD card with the wrong format, you’ll be prompted to format it directly on your device (which wipes your data) |
Special tools can restore data from a formatted SD card, even if it uses a different file system before formatting. Refer to: How to Recover Photos Missing From Memory Card |
🔒 Inaccessible/locked |
Most mainstream SD/SDHC/SDXC card brands, such as Kingston, Transcend, SanDisk, and Sony have physical locks. microSD cards may have physical locks themselves or can be locked via an adaptor. |
Check your SD card’s corners for a lock switch. You can’t access or recover photos from a SanDisk SD card if it’s locked. If it’s unlocked but still inaccessible, refer to: Additional Methods of Recovering Disappearing SD Card Photos |
💥 Physical damage |
All memory cards and devices |
Additional Methods of Recovering Disappearing SD Card Photos
Sometimes, photos can vanish from your SD card due to human error or minor corruption issues. Apart from data recovery software, there are a few simple fixes you can try. These methods address common situations where photos become hidden or inaccessible because of system glitches or errors on the SD card. If you follow the steps below, you might be able to make your missing photos reappear without the need for specialized recovery software.
Method 1: Check If the Photos Are Hidden
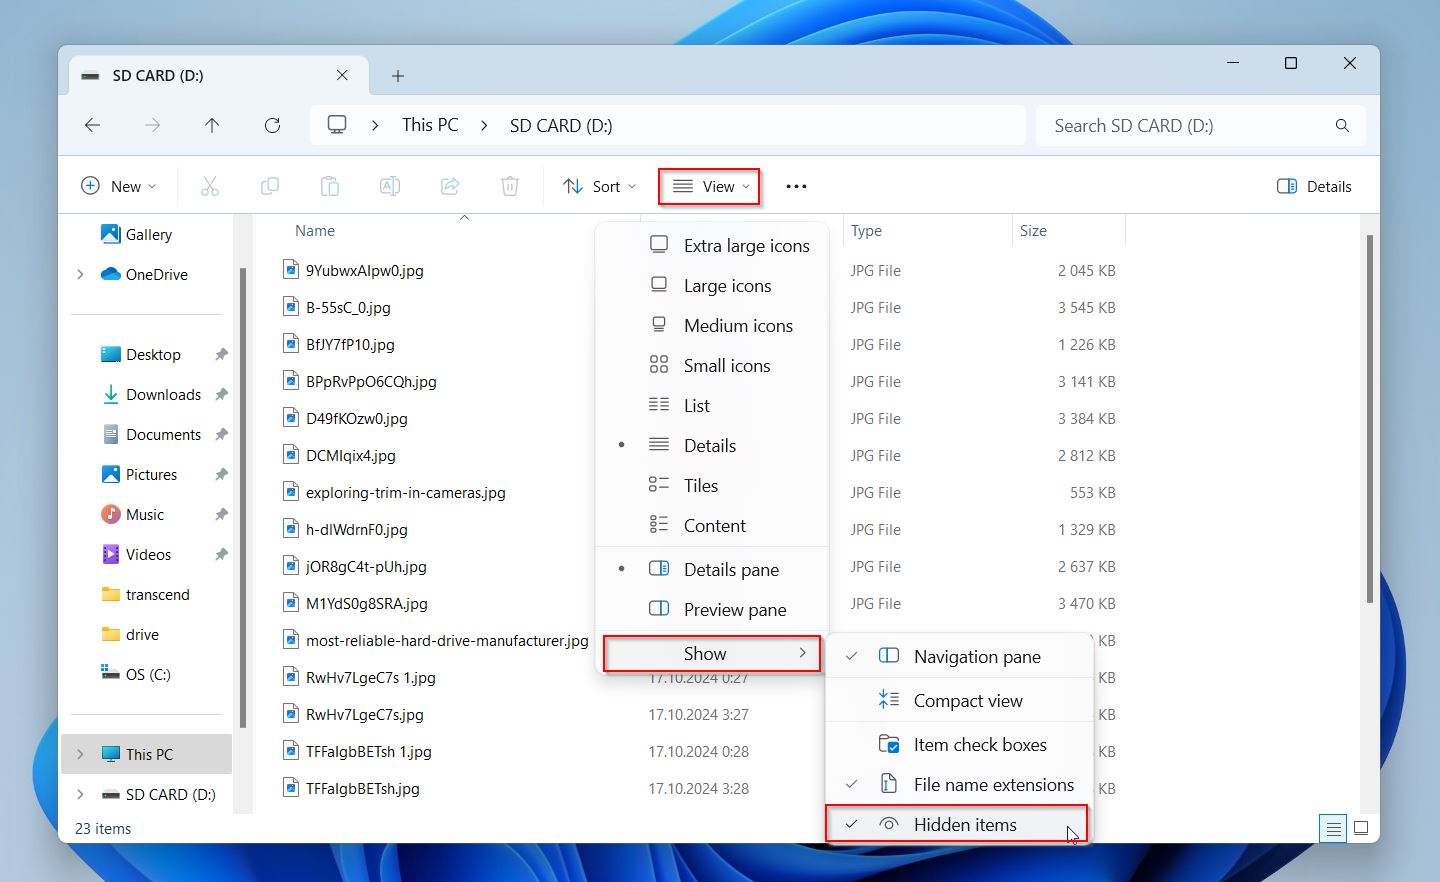
Sometimes, your photos might not be visible because they are hidden by the system. This can happen due to various reasons, such as system errors or incorrect settings selected by accident. You can try to adjust your folder options, and possibly reveal hidden photos on SD card. Follow the steps below to check if your photos are hidden.
- Open File Explorer by clicking the folder icon in the taskbar.
- Navigate to your SD card under “This PC” or “Computer.”
- Click the “View” tab at the top of the window.
- From the dropdown menu, select “Show”, then make sure “Hidden items” option is checked.

- See if any photos show up.
Method 2: Try to Fix SD Card Errors
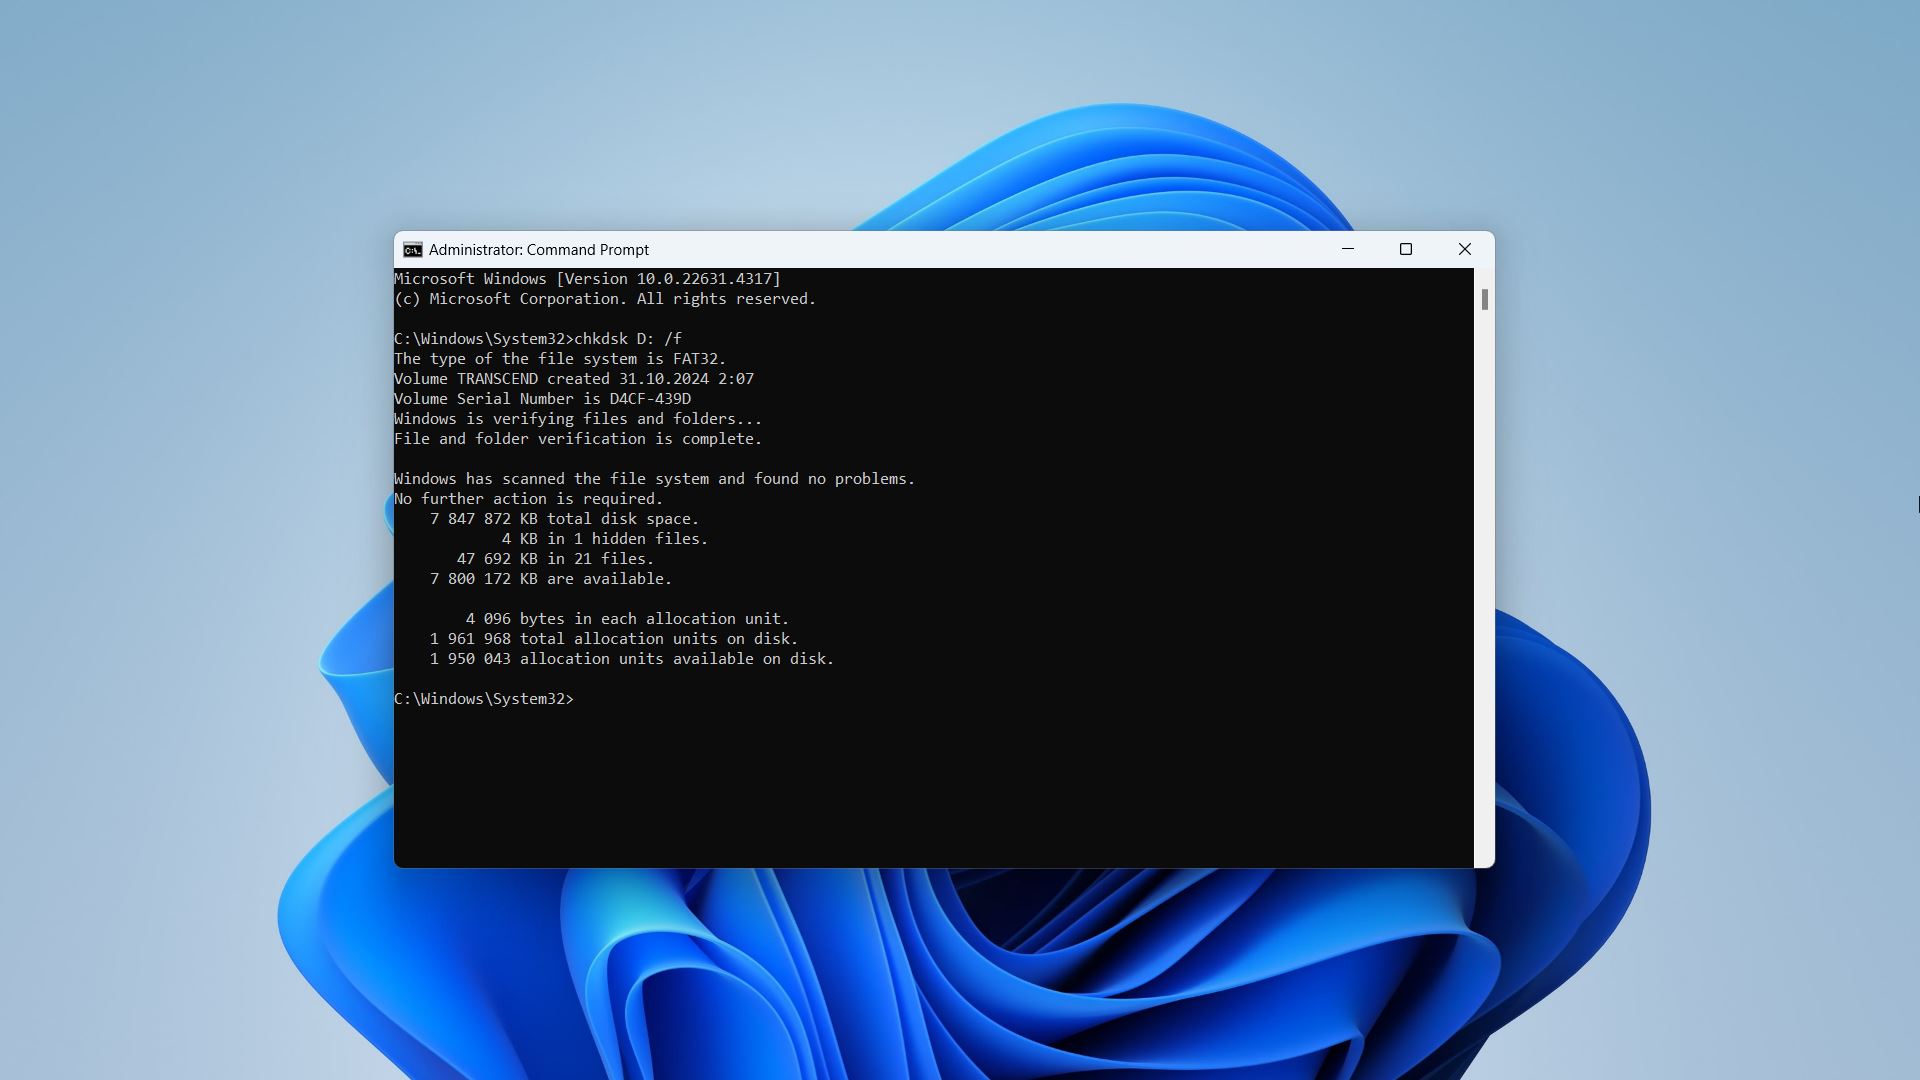
Errors on your SD card may cause photos to become inaccessible or disappear. To restore your missing files, you should check and repair these errors. You can use the built-in Windows utility called CHKDSK to scan and fix your SD card. While the method itself can be hit or miss, if it resolves the issue, it means your card is indeed corrupted, and we advise you to back up your data and avoid storing any important data on it. Therefore, it is better to use data recovery software before this method.
- Insert your SD card into the computer’s card reader.
- Press Windows Key + R, type cmd, and press Enter.
- In the Command Prompt window, type chkdsk E: /f /r, replacing E: with the drive letter assigned to your SD card.

- Press Enter. Allow the scanning process to complete.
- The utility will check the SD card for errors and attempt to fix them. This may take some time, depending on the size of your SD card.
Method 3: Add or Change Your SD Card’s Disk Letter
It’s also possible that your computer failed to assign a drive letter to your SD card (or there are conflicting drive letters due to another problem), preventing it from properly recognizing the drive. Changing its disk letter manually may cause your photos to reappear.
- Launch Disk Management (use the search function in the Windows Start menu).
- Identify your SD card’s disk, then hit right-click > “Change Drive Letter and Paths…”

- If your SD card already has a drive letter, click “Change…” Otherwise, click “Add…”

- Make sure “Assign the following drive letter:” is selected, then use the dropdown button to choose a letter. Then, click “OK.”

FAQ
How to recover missing photos from SD card?
Here are common steps to recover missing photos from an SD card:
- Download and install the data recovery software of your choice.
- Launch the app and select the SD card that contains the missing photos.
- Start the scan procedure and wait until it finishes.
- Review the found items (if your software allows it) once the scan is complete.
- Select the images you want to restore and complete the recovery process.
Why did my photos disappear from my SD card?
The following reasons can cause your photos to disappear from your SD card:
- Accidental deletion or formatting
- Corruption due to virus infection, read/write interruption, data degradation
- Outdated drivers (*)
- Malfunctioning card reader (*)
(*) This may affect the SD card’s connection but not the actual presence of files (photos) on it.
Is it possible to recover photos from an SD card for free?
Yes! It’s possible to recover photos from an SD card for free using PhotoRec – a 100% free and open-source data recovery software. However, all free tools have massive limitations.
PhotoRec, for example, doesn’t have a GUI (graphical user interface)… So you’ll be restoring files entirely through Command Prompt. Other free software only provides limited data recovery, no previews, and more.
How to recover photos from an SD card directly on an Android phone?
To recover photos from an SD card directly on an Android phone, you can use a mobile data recovery app. We tested dozens of them and came up with 5 of our favorites:
- DiskDigger
- Tenorshare UltData
- EaseUS MobiSaver
- Wondershare Dr. Fone
- iMobie PhoneRescue
We wrote an article reviewing all of these apps in more detail.
Conclusion
If you need to recover files that disappeared from your SD card, you need the right tools to do it. Otherwise, your SD card can suffer more damage and even permanent data loss. We also suggest that you create a regular backup routine if your files matter to you. No matter how you try to baby your memory card, something will happen down the line – it’s just the nature of technology.
This article was written by Alejandro Santos, a Staff Writer at Handy Recovery Advisor. It was also verified for technical accuracy by Andrey Vasilyev, our editorial advisor.
Curious about our content creation process? Take a look at our Editor Guidelines.
