Have you accidentally deleted important files from your Maxtor hard drive, noticed files disappearing on their own, or found that your external Maxtor drive isn’t showing up in Windows? We’ll cover the most common problems and guide you through practical fixes step by step. By the end of this article, you’ll know everything you need about Maxtor data recovery. Just keep reading.
The Maxtor Corporation was launched in 1982 and quickly grew into a reputable hard drive manufacturer. At one point, Maxtor was the world’s third-largest hard disk manufacturer. Eventually, the company was acquired by hard drive giant Seagate in 2006. Since then, no new hard drives have been sold under the Maxtor brand.
Maxtor Hard Drive Data Recovery Guide
Here’s a quick guide to nudge you in the right direction. We’ve pulled together the most common issues people face with Maxtor hard drives and what you can do to fix them. Under What You Can Do, you’ll find possible solutions with links to detailed guides to help you take action.
Scenario |
What You Can Do |
I accidentally deleted a few files from my Maxtor drive. |
Use data recovery tools to scan the drive. |
I formatted the drive and realized later I had important data. |
Choose a data recovery tool with deep scan capabilities and use it to scan for traces of formatted data. (If the drive underwent a full format, the data is permanently erased and cannot be recovered) |
I noticed some files were missing, but I didn’t delete anything. |
Use a data recovery tool to locate the missing files. |
My Maxtor drive won’t boot, and I need to recover my files. |
1. (If the drive is a system drive) remove the drive from the system and connect it as an external drive to another computer using a SATA-to-USB adapter or docking station. 2. Copy files manually if accessible through File Explorer. 3. If files are inaccessible, use recovery software to scan the drive for data. Save recovered data to the host computer or an external storage device. |
I need data from my Maxtor external drive, but it isn’t showing up in Windows. |
1. Check cables, USB ports, and try to connect it to a different computer. 2. If visible in Disk Management but not File Explorer, use recovery tools to scan the drive and recover data. 3. Try to assign or change the drive letter. 4. Alternatively create a byte-to-byte image of the drive if you suspect the drive is on its last legs. |
The drive behaves oddly/shows errors when I try to open/copy files. |
1. (Optional) Create an image (backup) of your drive. 2. Repair the drive with built-in tools like CHKDSK. 3. If errors persist, use advanced tools to repair file systems or recover inaccessible data. 4. If you suspect physical damage, create a backup image and recover data from the image instead of the drive. |
The drive seems slower than usual or has random freezes. |
1. Create an image (backup) of your drive. 2. Use VictoriaHDD. If errors are found, repair them using the tool’s repair feature. If bad sectors are detected, use the Remap option to relocate data from the damaged sectors to healthy areas. 3. If it shows serious problems, create a backup image and recover data from the image instead of the drive. |
I suspect physical damage to my Maxtor drive. |
1. If the drive is still detected in Disk Management, you can try creating a full image of the drive to preserve your data. 2. If the drive is too damaged to do this, it’s best to send it to professionals. |
I deleted/lost partition(s) on my drive. |
Create an image of your drive first, then use TestDisk to fix the issue. If TestDisk fails, you can still recover your data from image backup. |
How to Recover Data from Maxtor Hard Drives
We’ll cover “How to Recover Data from Maxtor Hard Drives” first, as some of the fixes may lead to data loss (and we wouldn’t want that). Also, our statistics show that in most cases when people search for Maxtor hard drive recovery, it’s about deleted data or inaccessible files on problematic Maxtor drives. Since those are the most common issues, we’ll tackle them head-on right out of the gate.
To recover data from a Maxtor drive—whether you accidentally deleted a few files, formatted the entire drive, or can’t access it in File Explorer—you’ll need data recovery software. These tools can scan your drive and retrieve all kinds of files: deleted files, hidden files, and existing files that aren’t showing up.
If you can’t find certain files on your Maxtor drive, it’s a good idea to check if they’re hidden. A lot of people overlook this, but it only takes a second to check. Open File Explorer, go to the View tab at the top and check the box for Hidden Items. 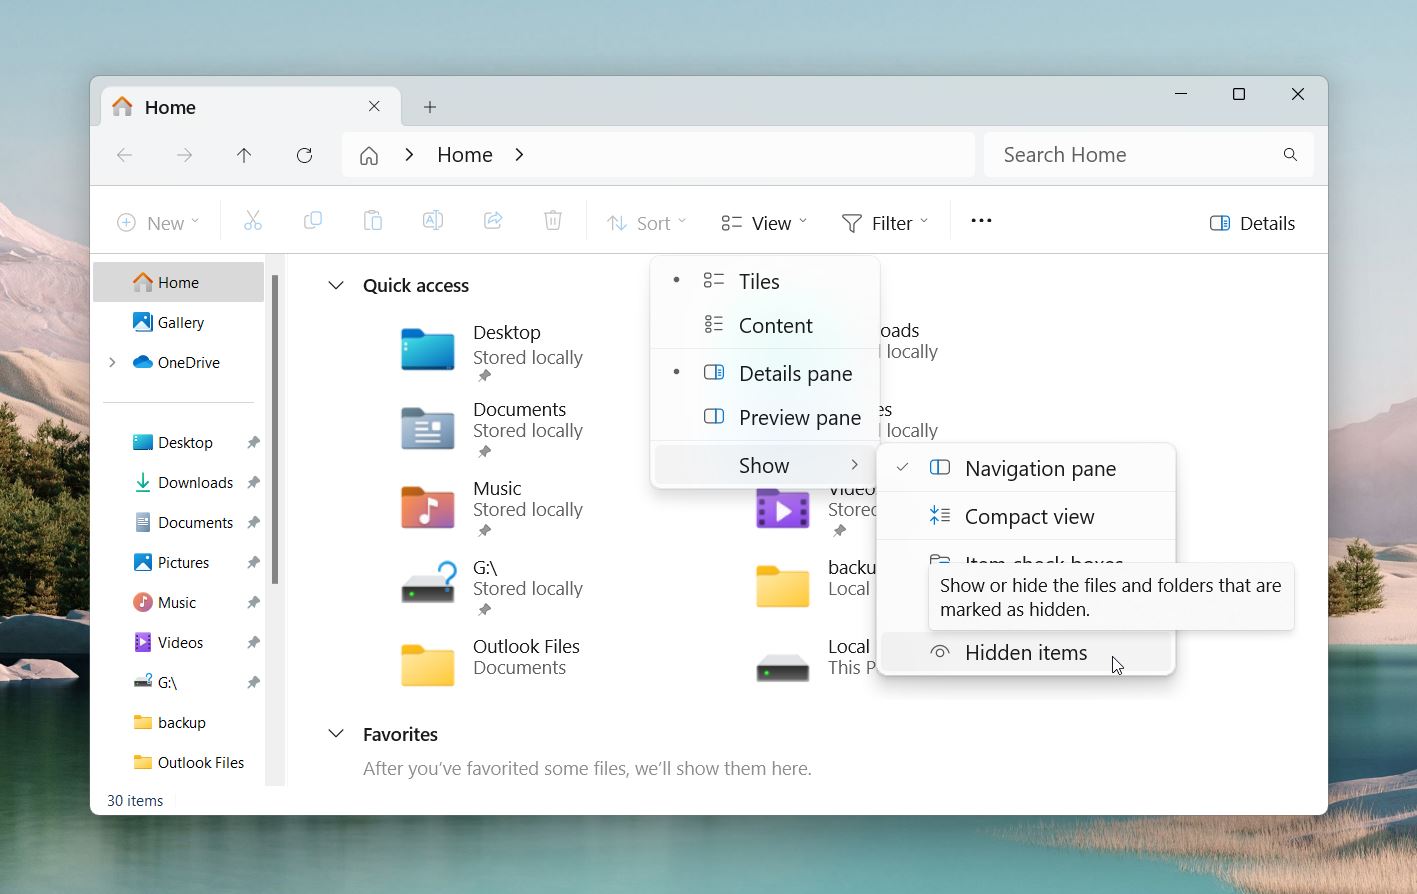 Sometimes files get marked as hidden after system glitches or drive errors, so it’s definitely worth a quick look.
Here are a few recommendations to help with the process:
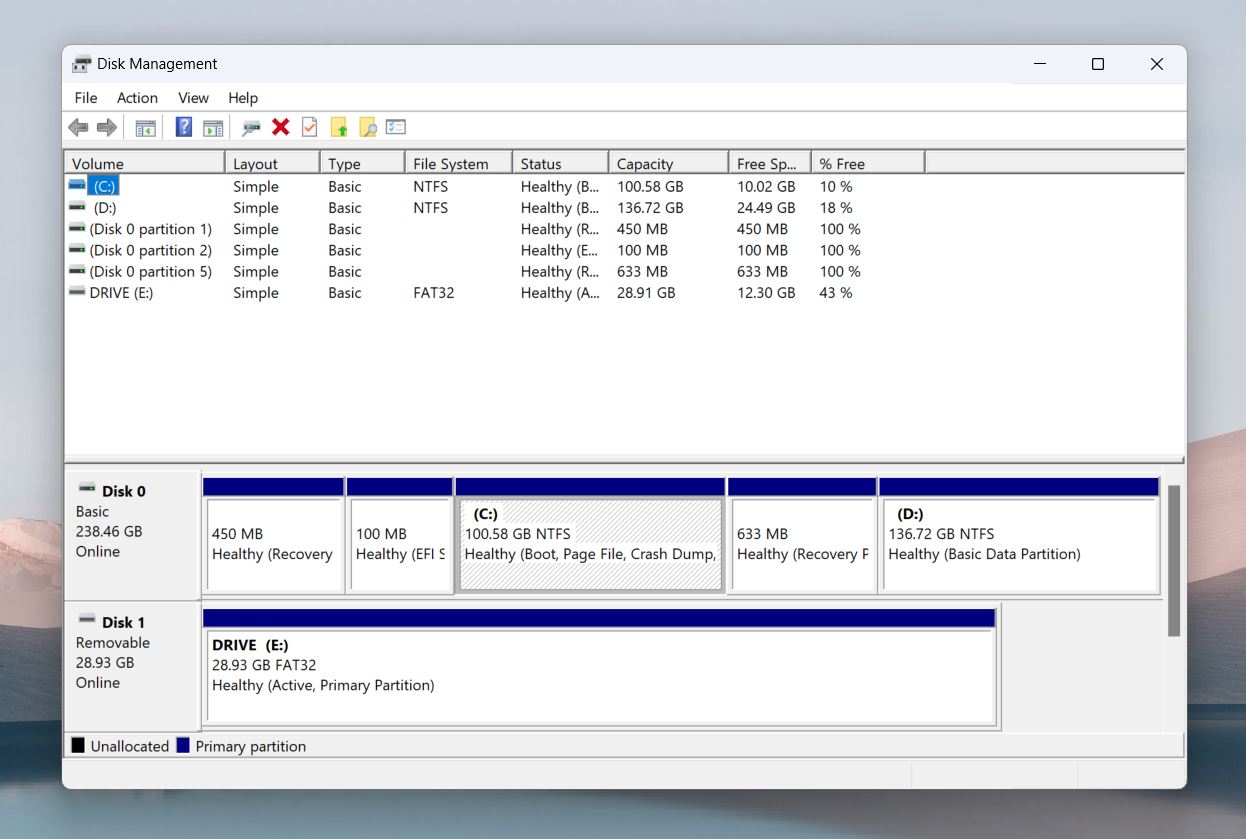
- If your Maxtor drive isn’t visible in File Explorer, check Disk Management. As long as the drive appears there, data recovery tools can still access and scan it. 👀
To check Disk Management, press Win + X and select Disk Management from the menu. Look for your Maxtor drive in the list of connected drives to confirm if it’s recognized by the system.
- If you want to recover deleted or lost files, avoid downloading, copying, or installing anything to the drive. This reduces the risk of overwriting old data with new data, which will make recovery impossible.
- If the drive freezes, shows errors, or seems damaged, create a byte-for-byte image of it. This allows you to scan the image instead of the actual drive to protect the drive from further harm.
- If it’s an external drive make sure you’re using a reliable cable and USB port. A bad connection can cause the drive to disconnect during the recovery process.
For this job, we’d recommend Disk Drill. In our tests, it delivered impressive recovery results and proved to be a reliable tool for hard drives (but not only). It also includes a disk imaging feature, known as a byte-for-byte backup, which you might need if your Maxtor drive is acting up.
The best part? It has a free version that lets you scan and preview files, so you can check if your data is even retrievable. Plus, you can recover up to 500MB without spending a dime.
Go to Disk Drill’s official website to download the software. Use the official page to avoid unsafe or modified versions from third-party sites. If possible, do not put Disk Drill on your Maxtor drive. As we mentioned earlier, new data could overwrite the files you’re trying to recover. Install it on a different drive or partition to protect your chances of recovery.
Next, we’ll walk you through a backup process. If your Maxtor drive is glitchy, freezing, or throwing errors, this step is a must. If your drive is working fine, you can skip this step and move on to the next one.
Step #1: Create Byte-for-byte Backup (For Problematic Maxtor Hard Drives)
Here’s a guide on how to create a byte-for-byte backup of your Maxtor drive. Be prepared—you’ll need enough free storage space on a different drive to store the backup. For example, if your Maxtor drive has a 1TB capacity, you’ll need at least 1TB of free space on another drive, plus a little extra room just to be safe.
Here’s how to do it:
- Open Disk Drill and navigate to the Byte-to-Byte Backup option in the left-hand menu.
- Pick your Maxtor drive from the list of connected devices and click on the Byte-to-Byte Backup button.
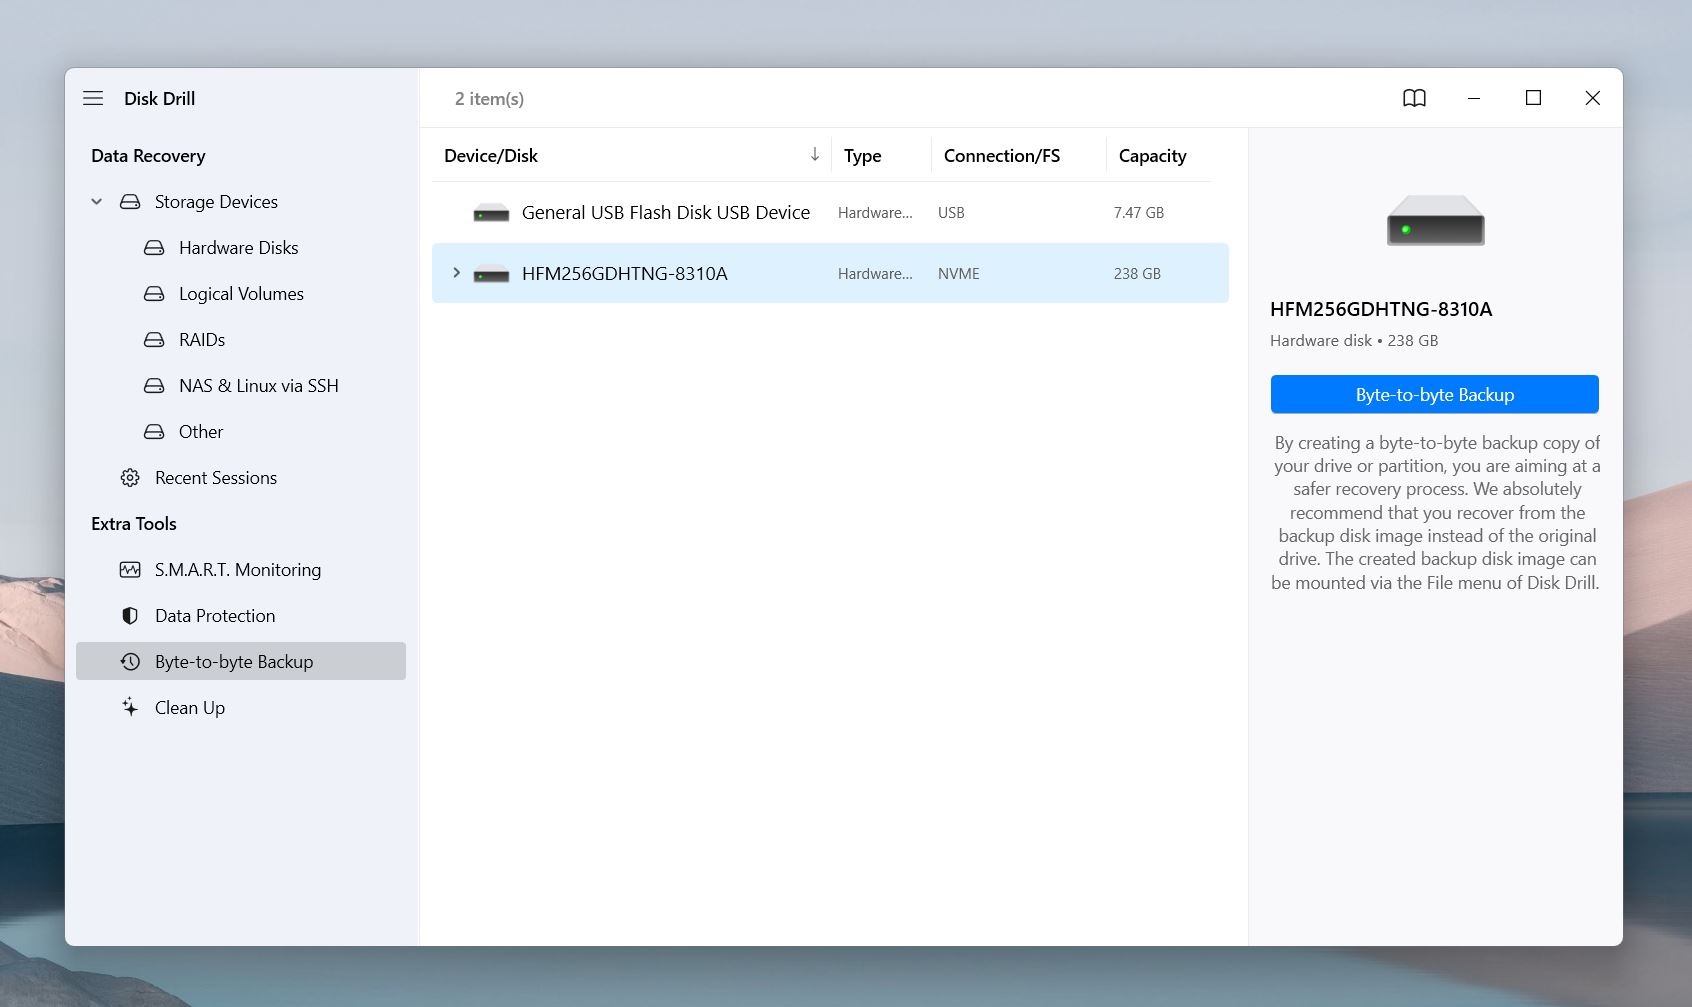
- Pick a storage device with enough space for the backup.
- Start the backup process. Disk Drill will create an image file of your Maxtor drive. This image includes everything—visible files, hidden files, deleted data, and even empty space. It’s a full byte-for-byte copy of your drive.
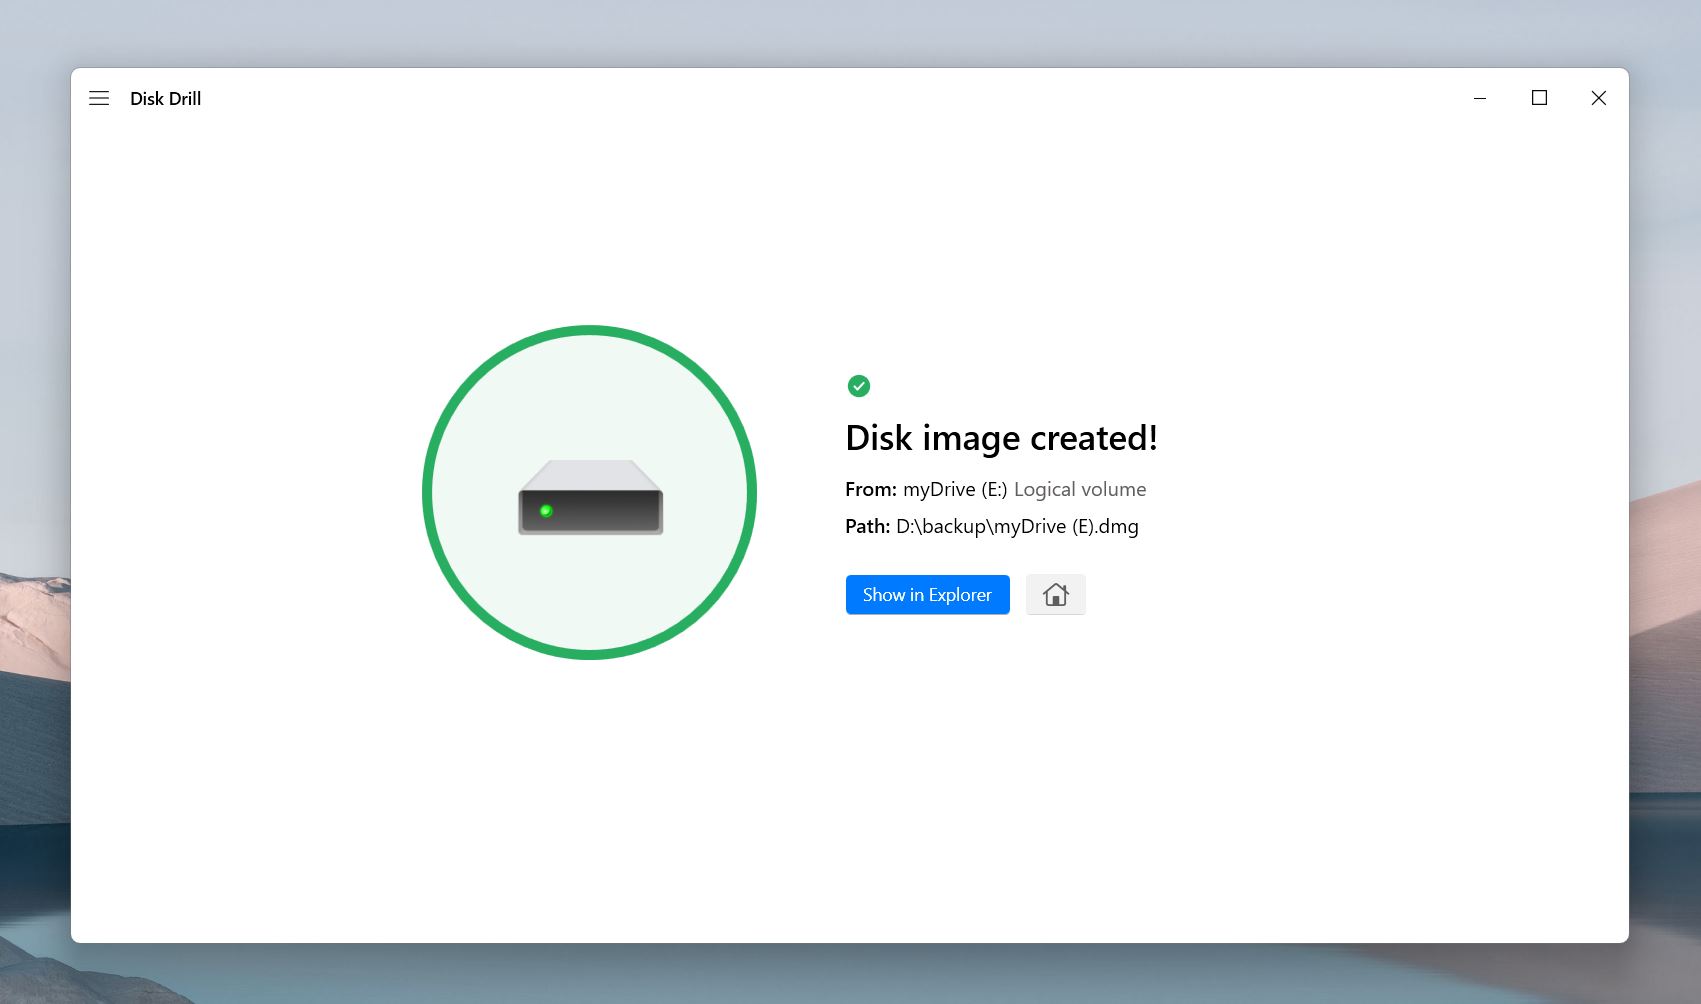
- Once the backup is complete, go back to the Data Recovery section in Disk Drill. To do this, click the Home 🏠 button next to Show in Explorer.
To scan the backup image, you’ll need to mount it first. At the bottom, you’ll see the option labeled Attach Disk Image. Click it and select the DMG backup file you just created.
Step #2: Scan Your Drive (or Its Image) for Recoverable Data
The reason Disk Drill is so effective lies in its sophisticated algorithms, which handle a variety of data loss scenarios with precision. It uses three powerful scanning modes—Quick Scan, Deep Scan, and Signature Scan—to handle all kinds of data recovery scenarios. Here’s a breakdown of what each mode does:
- Quick scan recovers files that were “recently deleted,” like those removed with Shift+Delete or emptied from the Recycle Bin. In these cases, the file system is still intact, and Quick Scan uses file table records to find and restore your files. File names and folder structures are usually preserved. It doesn’t matter what file types you’re recovering—it works for all of them.
- Deep scan is perfect for tougher cases like formatted drives or missing file systems. Deep Scan works when the file system has been replaced, turned into RAW, or corrupted.
- Signature scan works independently of the file system and looks for unique patterns (or “signatures”) to locate files. It’s especially useful for drives with severe corruption.
It’s very easy to recover deleted or inaccessible files from the Maxtor hard drive with Disk Drill. The process only takes a few clicks, and there’s no need to manually select scan modes or deal with anything complicated.
Just follow these steps, and you’ll have your files back in no time:
- Open Disk Drill and select your Maxtor drive (or its mounted image) from the list of connected devices.
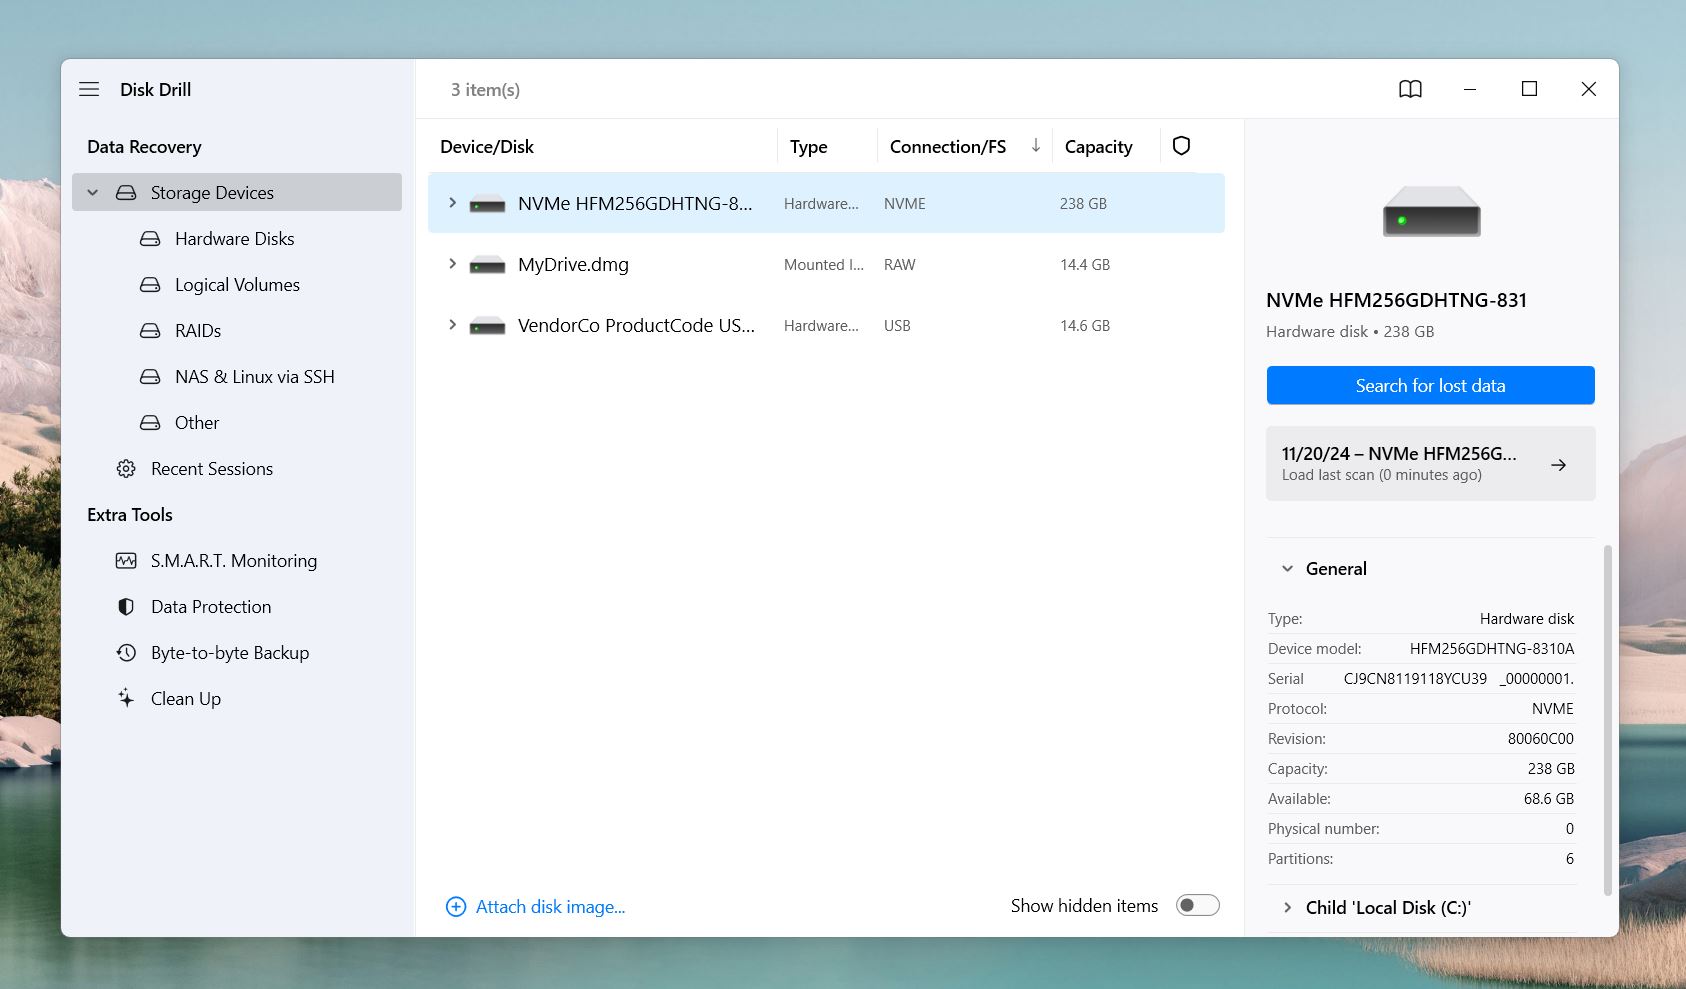
- Click Search for lost data to begin the recovery process.
- Disk Drill will automatically scan your drive, and you don’t have to wait for the scan to finish. Click Review found items at any point during the scan to browse the files that have already been detected.
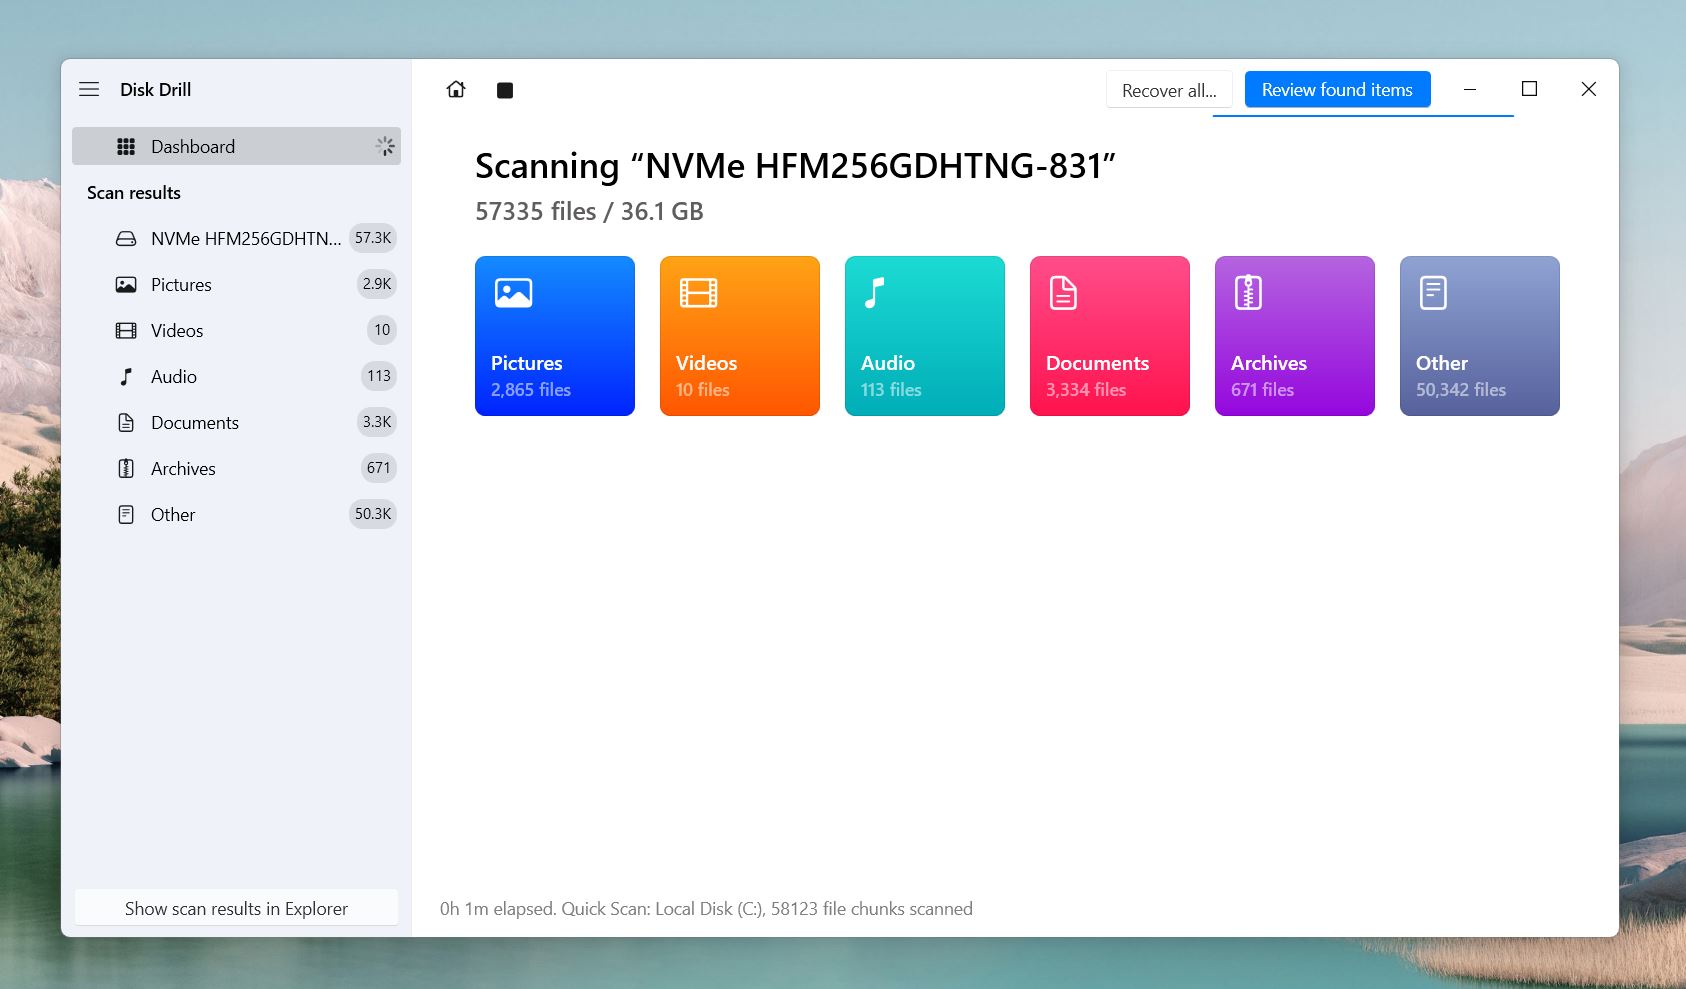
- Browse through the list of files to check for the ones you need. If you find your files early in the scan, you can start the recovery process immediately without waiting for the scan to complete.
- Use the search bar in the top-right corner to filter files by name or type. For example, typing “.pdf” will help you find PDF documents, while “.zip” will show ZIP archives. You can also use the sidebar to navigate files by type, such as documents, videos, images, and so on.
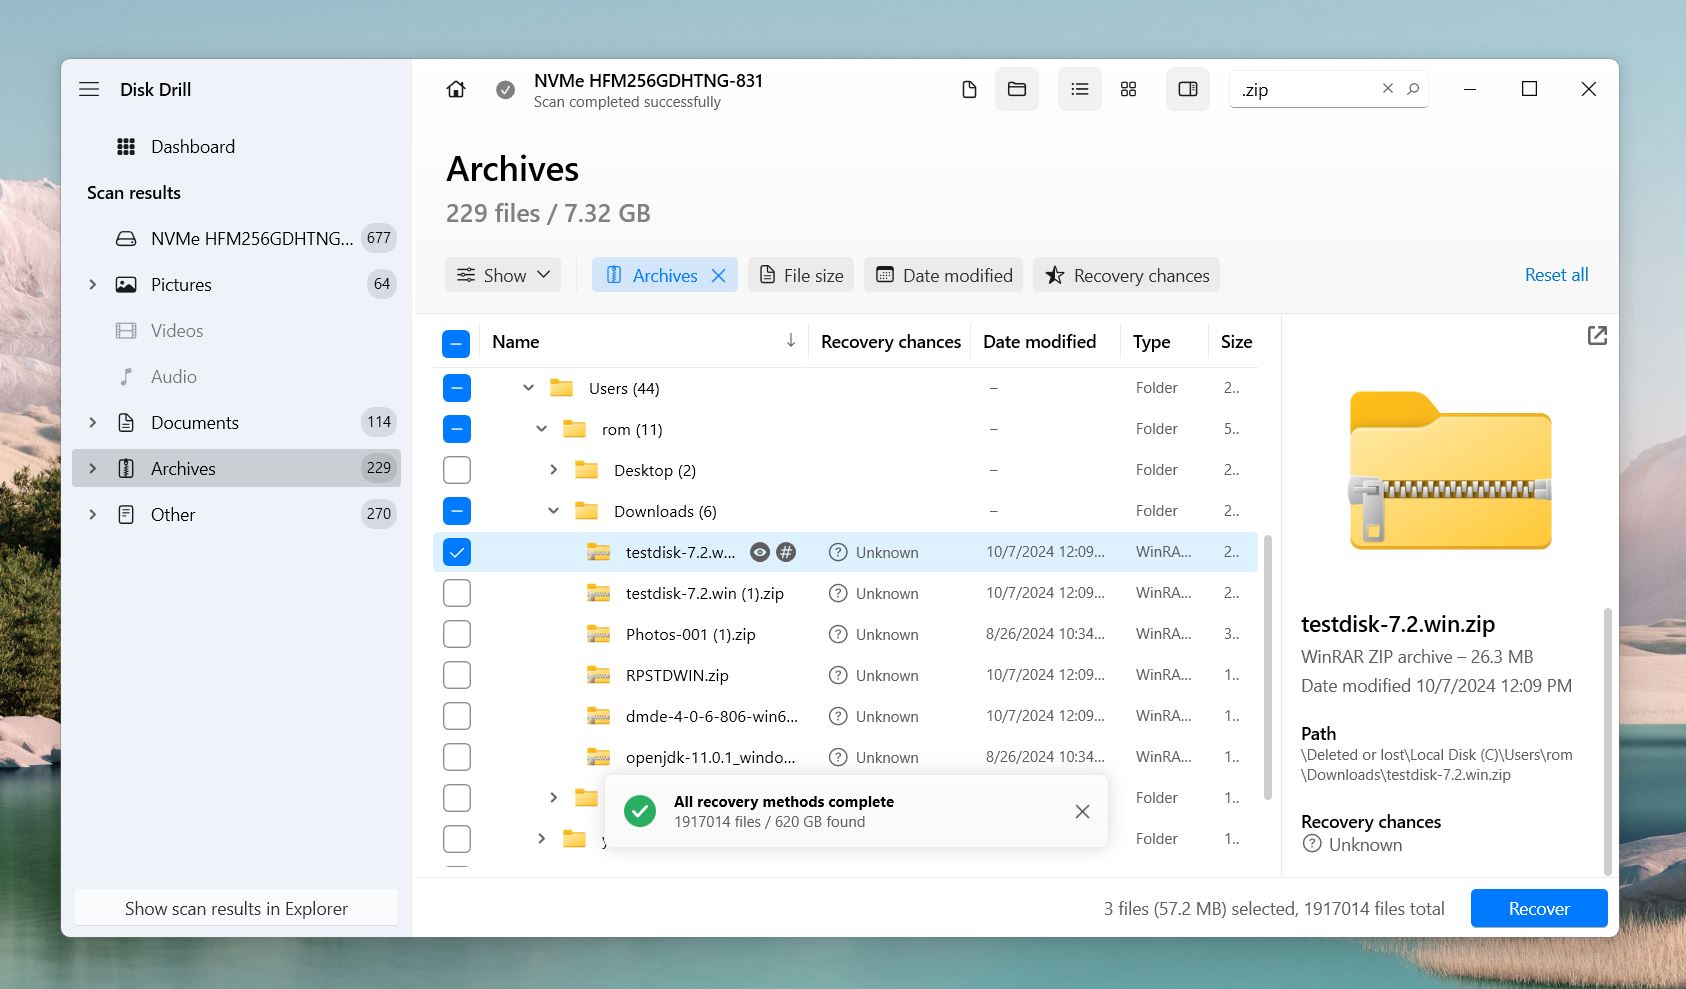
- Hover over a file name and click the eye icon to preview it. Disk Drill supports previews for all file types that your Windows system can open.
- Use the checkboxes next to the files you want to recover to mark them for retrieval.
- Click the Recover button and choose a destination where Disk Drill should save the recovered files. Always save these files to a different volume or drive to avoid overwriting any remaining data on your Maxtor drive.
Disk Drill is a pretty nifty tool to have on your PC. It offers a range of additional features like data protection, disk cleanup, and S.M.A.R.T. monitoring to keep an eye on your drive’s health. If, for any reason, Disk Drill doesn’t suit your needs, you can check its alternatives. However, in our opinion, Disk Drill strikes the best balance between ease of use and functionality. Also, it is totally safe.
How to Perform Maxtor Hard Drive Recovery
In this section, we’ll cover different methods for Maxtor hard drive recovery. The best approach depends on the specific issue. To make it easier, we’ll highlight which problems each method works for, so you can quickly find the solution you need.
Method #1: Check the Cables and Connectors
When it helps: If your Maxtor drive isn’t showing up in Disk Management.
Sometimes, the issue isn’t with the drive itself but with the connection. Here’s what you can try.
For external Maxtor drives:
- Inspect the USB cable for any visible issues, such as frayed wires or bent connectors. Even minor damage can disrupt the connection and prevent your computer from recognizing the drive.
- Swap the USB cable with a new one or one you’ve tested with another device. A faulty cable is a common cause of external drives not showing up.
- Plug the drive into a different USB port on your computer. If you’re using a desktop, try a port on the back of the PC, as these often provide more stable power.
- Connect the drive to another computer to see if it works there. If the drive is recognized on a different system, the issue might lie with the original computer’s configuration or ports.
For internal Maxtor drives:
- Open your computer case and inspect the SATA and power cables connected to the Maxtor drive. Make sure both ends of the cables are firmly plugged in and show no visible damage.
- Replace the SATA and power cables with new ones if they appear worn out or damaged.
- Disconnect the drive’s cables, clean the connectors, and plug them back in securely.
- Move the SATA cable to a different port on the motherboard. Faulty or unreliable SATA ports can cause the drive to remain undetected.
- Test the drive in another system or use a SATA-to-USB adapter to connect it externally. This can help determine if the issue is with the drive itself or your current system.
Method #2: Rescan Your Drive in Disk Management
When it helps: If your Maxtor drive doesn’t show up in File Explorer but appears in Disk Management.
It’s possible that your computer might have gotten interrupted before establishing a connection to your hard drive.
To fix this issue, try rescanning your drive in Disk Management. Here’s how:
- Press Win + X and click Disk Management.
- Click Action in the top menu of Disk Management, then select Rescan Disks from the dropdown. This forces the system to detect all connected drives again.
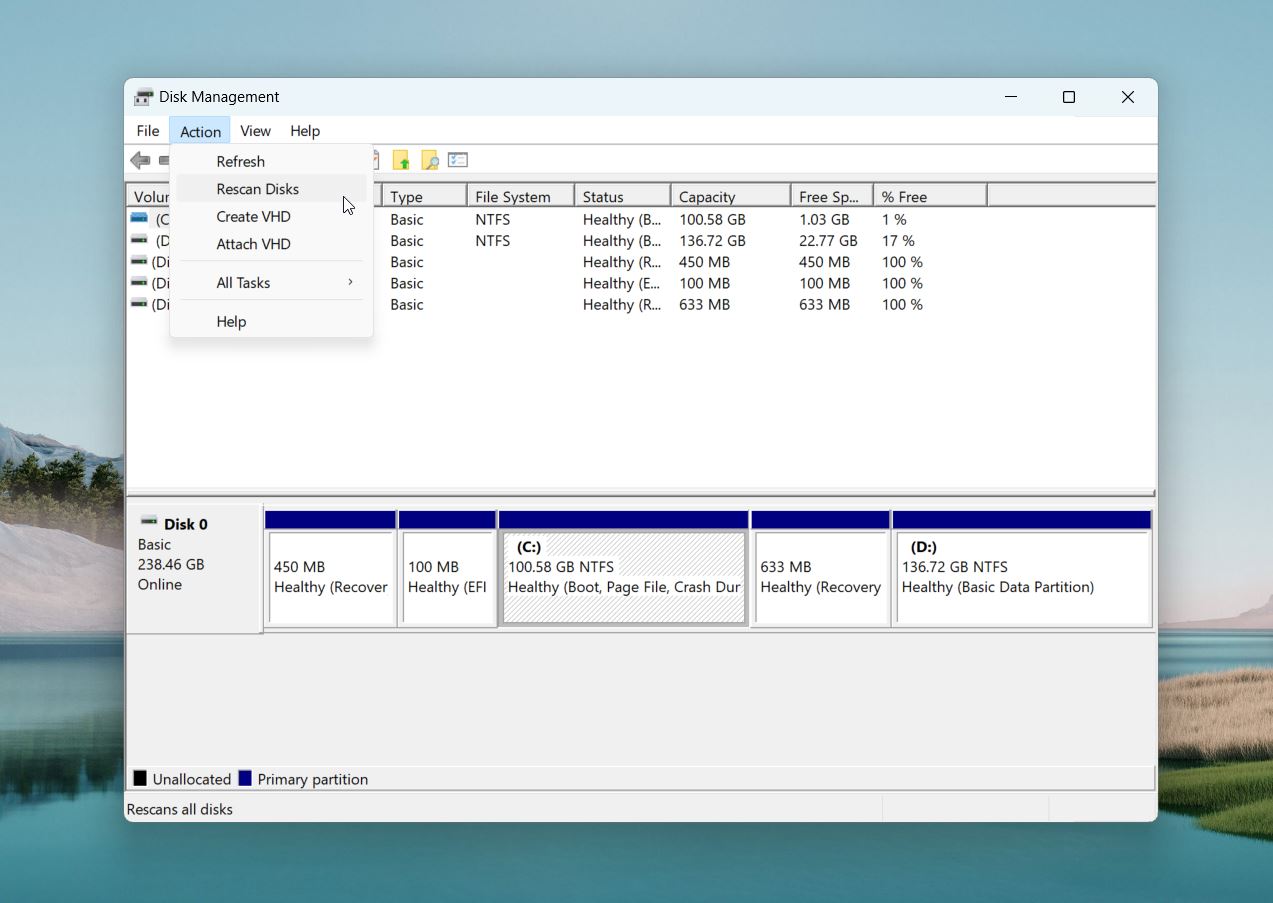
- Wait for the rescan process to complete. This might take a minute or two
Method #3: Assign or Change the Drive Letter
When it helps: If your Maxtor drive doesn’t show up in File Explorer but appears in Disk Management.
Drives without a letter assigned won’t show up in File Explorer, even though the system detects them. Additionally, drive letter conflicts can sometimes prevent the drive from being accessible. You can fix this issue quickly in Disk Management. Here’s how:
- Open Disk Management.
- Right-click your Maxtor drive and choose Change Drive Letter and Paths.
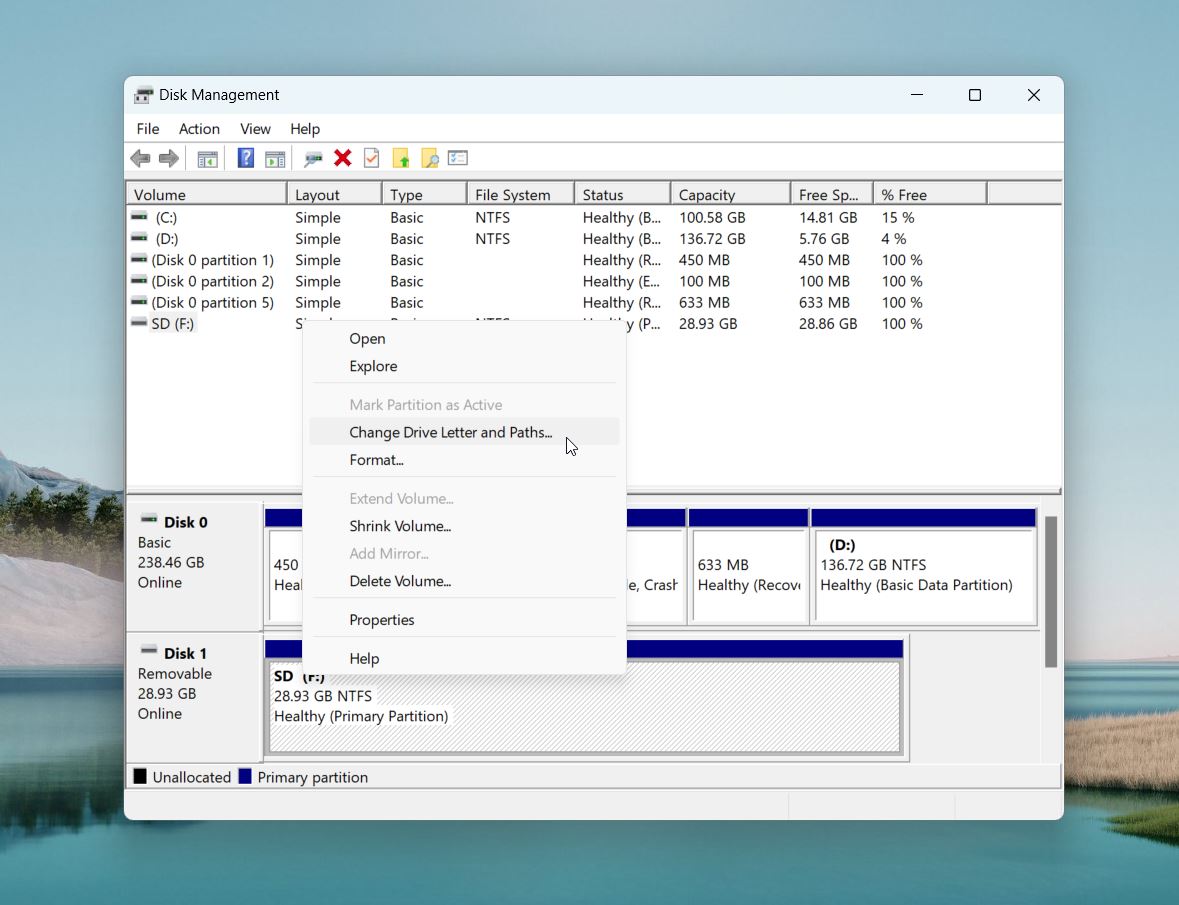
- In the pop-up box, click Add if the drive doesn’t have a letter yet. If it already has one, click Change to assign a new letter and avoid potential conflicts.
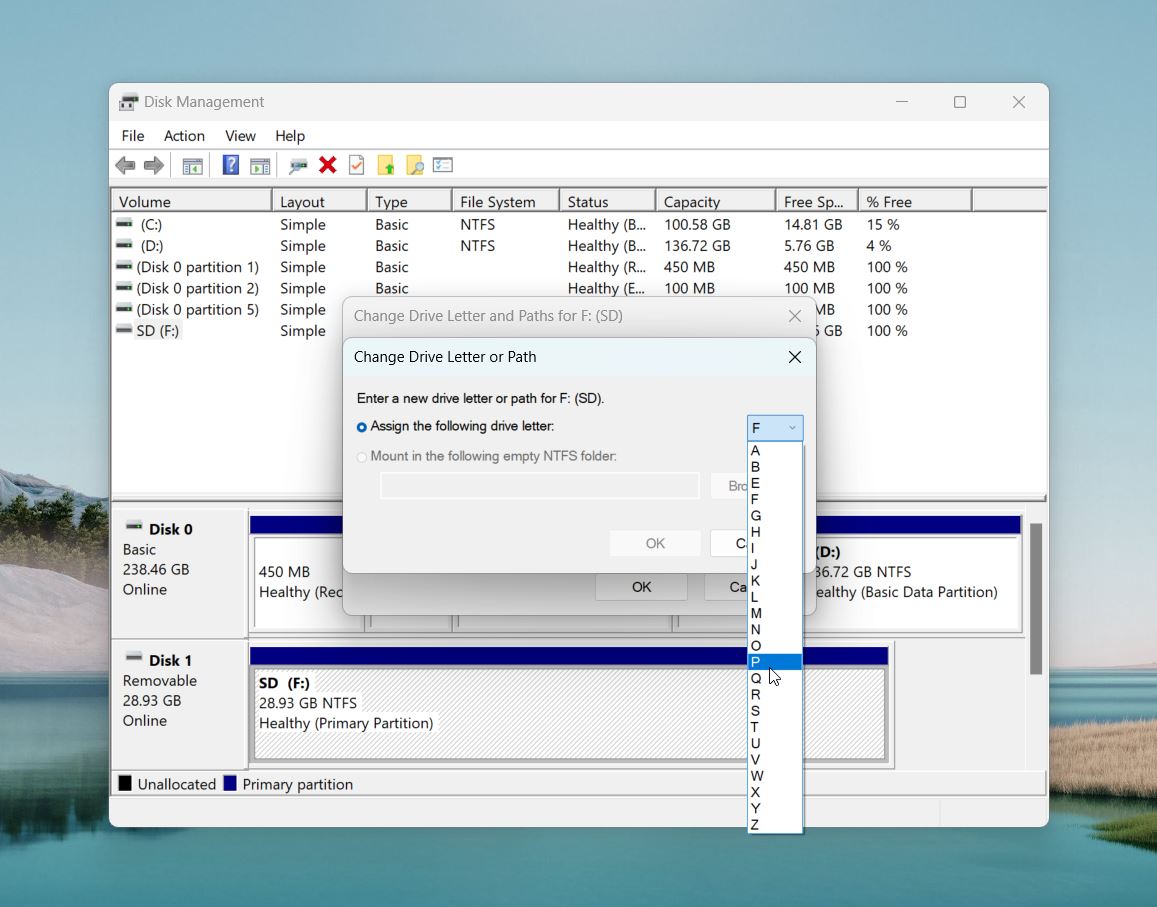
- Pick a new letter from the dropdown menu. Go for something not in use, like “E” or “F,” to keep things simple.
- Hit OK to save your changes. Windows will update the configuration and apply the new letter to your drive.
- Open File Explorer to check if the drive is now visible. The new or assigned letter should fix the issue and make the drive accessible.
Method #4: Run CHKDSK
When it helps: If your Maxtor drive has file system errors, bad sectors, or problems that make files inaccessible.
CHKDSK is a built-in Windows tool that scans your drive for issues and fixes many common non-physical problems. Here’s what it can do:
- It checks your drive for soft bad sectors, which are caused by things like power outages or improper shutdowns. CHKDSK fixes these by relocating data to undamaged areas of the drive.
- It identifies hard bad sectors, which are caused by physical damage. While it can’t repair these, it marks them as unusable so no new data gets written to those spots.
- It cleans up file system errors, such as broken file references, lost clusters, and directory problems.
- It fixes metadata mismatches, like incorrect file names, sizes, or other file details, so information on your drive is accurate and aligned.
That said, back up any important files before you run CHKDSK— there’s a small chance it might overwrite some data during the repair process.
How to run CHKDSK:
- Press Win + S, type Command Prompt, and right-click it. Select Run as Administrator to open it with the permissions needed to run CHKDSK.

- Type this command and press Enter:
chkdsk E: /r
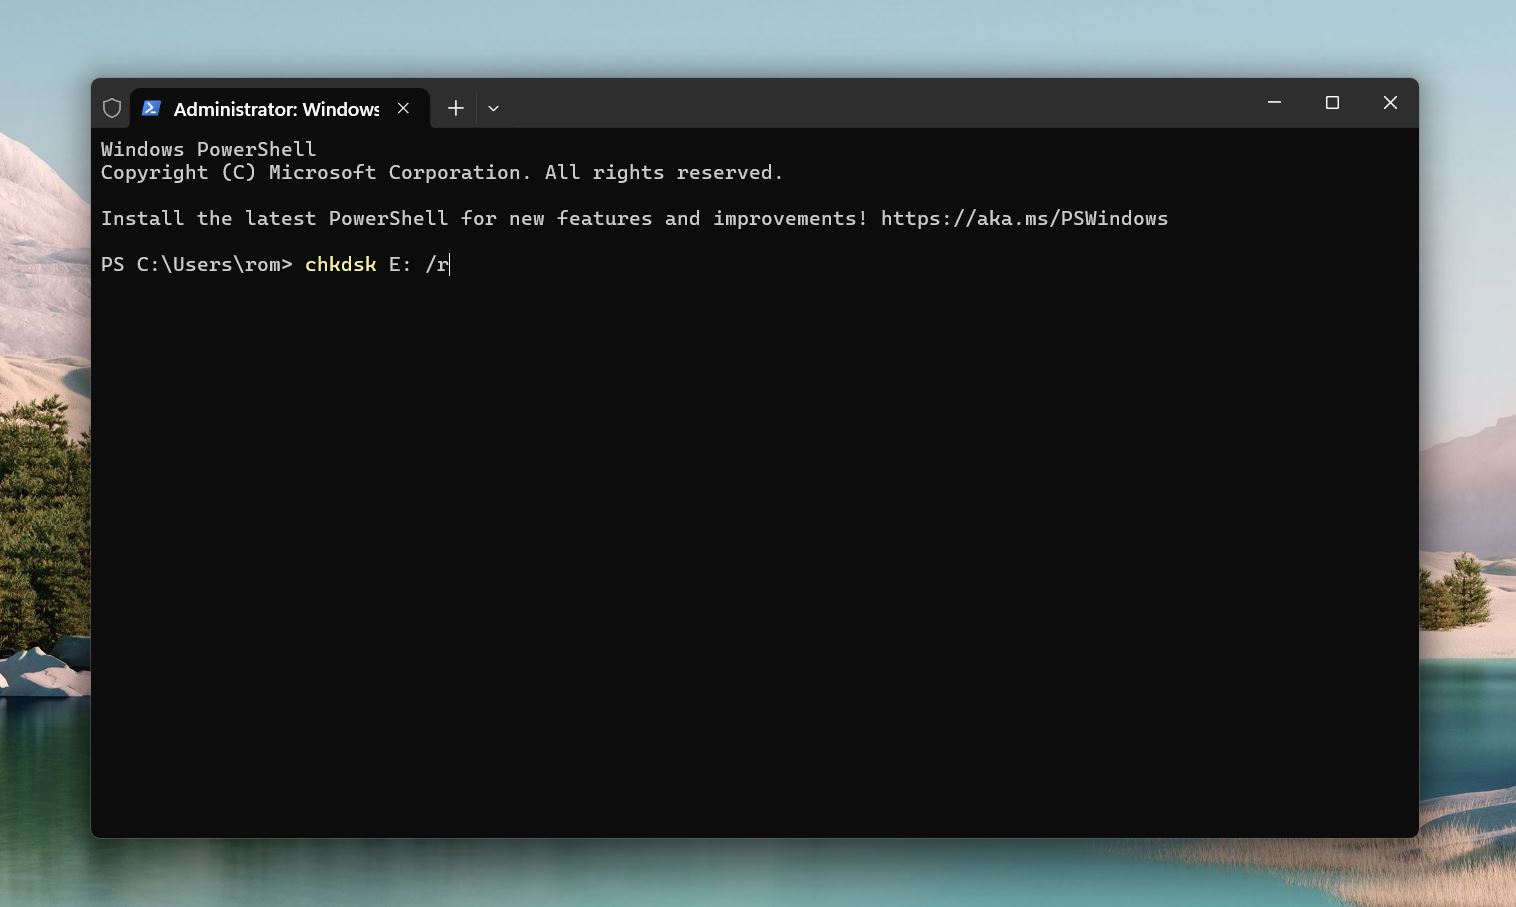 (Replace E with the letter assigned to your Maxtor drive in File Explorer)
 - If the drive is in use, Windows will ask if you want to schedule CHKDSK for the next restart. Type Y and hit Enter.
- Restart your PC. CHKDSK will scan the drive and repair any errors it finds.
- Once CHKDSK finishes, it will show a summary of the fixes. Check File Explorer to see if your Maxtor drive is back to normal.
Method #5: Run VictoriaHDD
When it helps: If your Maxtor drive freezes, runs slowly, or shows errors that suggest bad sectors.
VictoriaHDD is a powerful diagnostic and repair tool for hard drives. Here’s what it can do:
- It scans the surface of your drive to locate bad sectors, identifying areas that are slow or completely unreadable.
- VictoriaHDD tries to recover or move data from bad sectors to healthy parts of the drive and marks damaged sectors to prevent new data from being written there.
- It provides detailed info about your drive’s condition, including S.M.A.R.T. data and performance stats, so you know what’s going on under the hood.
A few tips:
- Always back up important files before running VictoriaHDD. Repairs can sometimes result in data loss.
- If your drive has a lot of bad sectors or continues to show problems after repairs, it might be time to replace it.
How to use VictoriaHDD:
- Go to the official VictoriaHDD website and download the latest version. Once downloaded, extract the files to a folder. VictoriaHDD doesn’t need installation—you can run it straight from the executable file.
- Right-click the executable file and choose Run as Administrator to give it full access to your drive.
- From the list of connected drives, select your Maxtor hard drive.
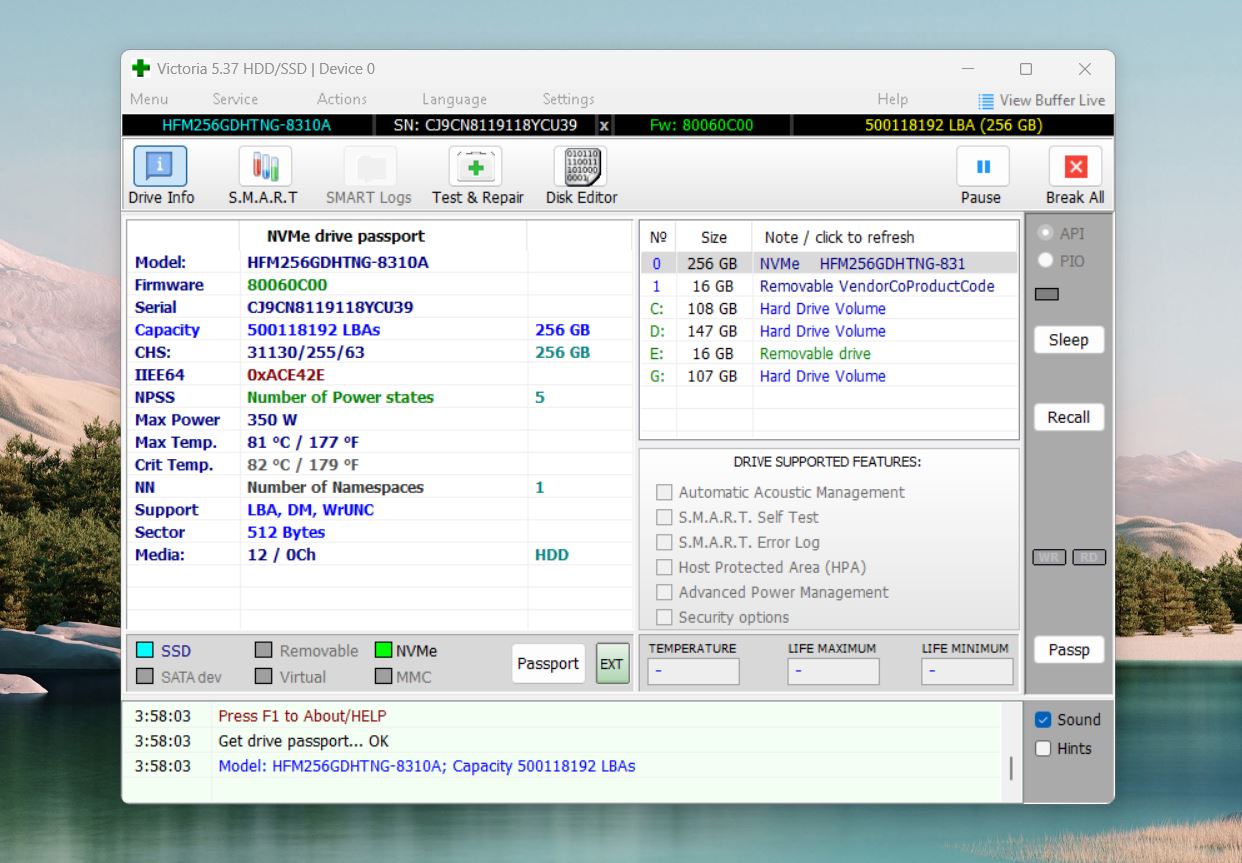
- Go to the Tests tab and hit Scan to begin analyzing the drive’s sectors. As the scan progresses, VictoriaHDD will display a map of your drive’s health (it marks sectors as good, slow, or bad).
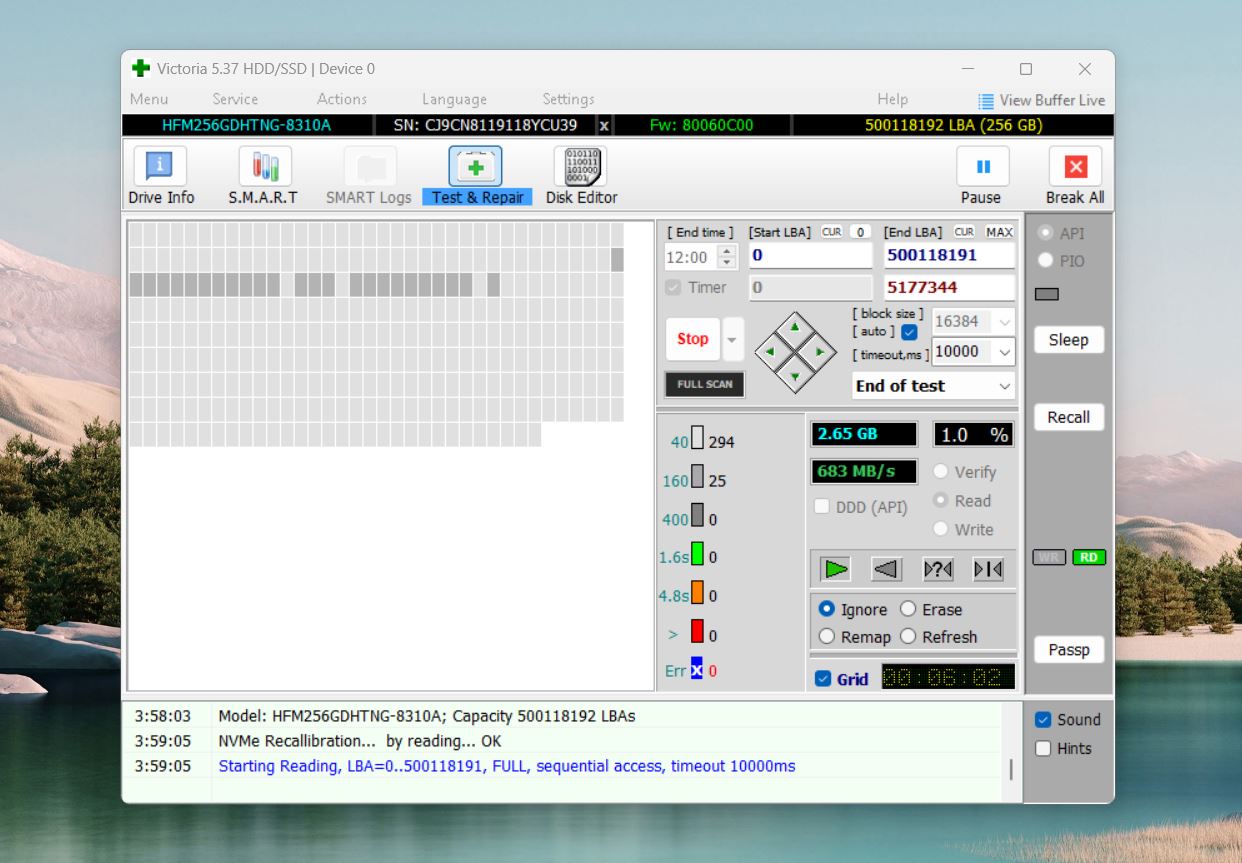
- If bad sectors are found, use the Remap option to reallocate them. This tells the system to avoid writing data to those damaged areas.
If you’re after more recovery options, disk repair tools like DiskGenius and HDD Regenerator offer similar features to VictoriaHDD.
Method #6: Use TestDisk to Fix Partition Problems
When it helps: If your Maxtor drive’s partitions are missing, corrupted, or show up as unallocated in Disk Management.
TestDisk is a free, open-source tool that can:
- Recover lost or deleted partitions.
- Rebuild damaged partition tables.
- Repair FAT, NTFS, and ext2/ext3 file systems.
- Fix boot sectors on FAT and NTFS volumes.
It’s a solid choice if your Maxtor drive has partition issues. That said, like with most methods in this article, it’s smart to back up any important data first. TestDisk is reliable, but things can go sideways during recovery, so a backup will keep your data safe.
Be ready—TestDisk only runs in a command-line interface, so it’s not as user-friendly as some other tools, so follow our guide closely:
- Head to the official TestDisk website and download the latest version. Extract the files to a folder on your computer. TestDisk doesn’t require installation, so you’ll run it directly from the extracted files.
- Open the folder with the extracted files and double-click testdisk_win.exe. Right-click the file and select Run as Administrator to make sure TestDisk has full access to your drive.
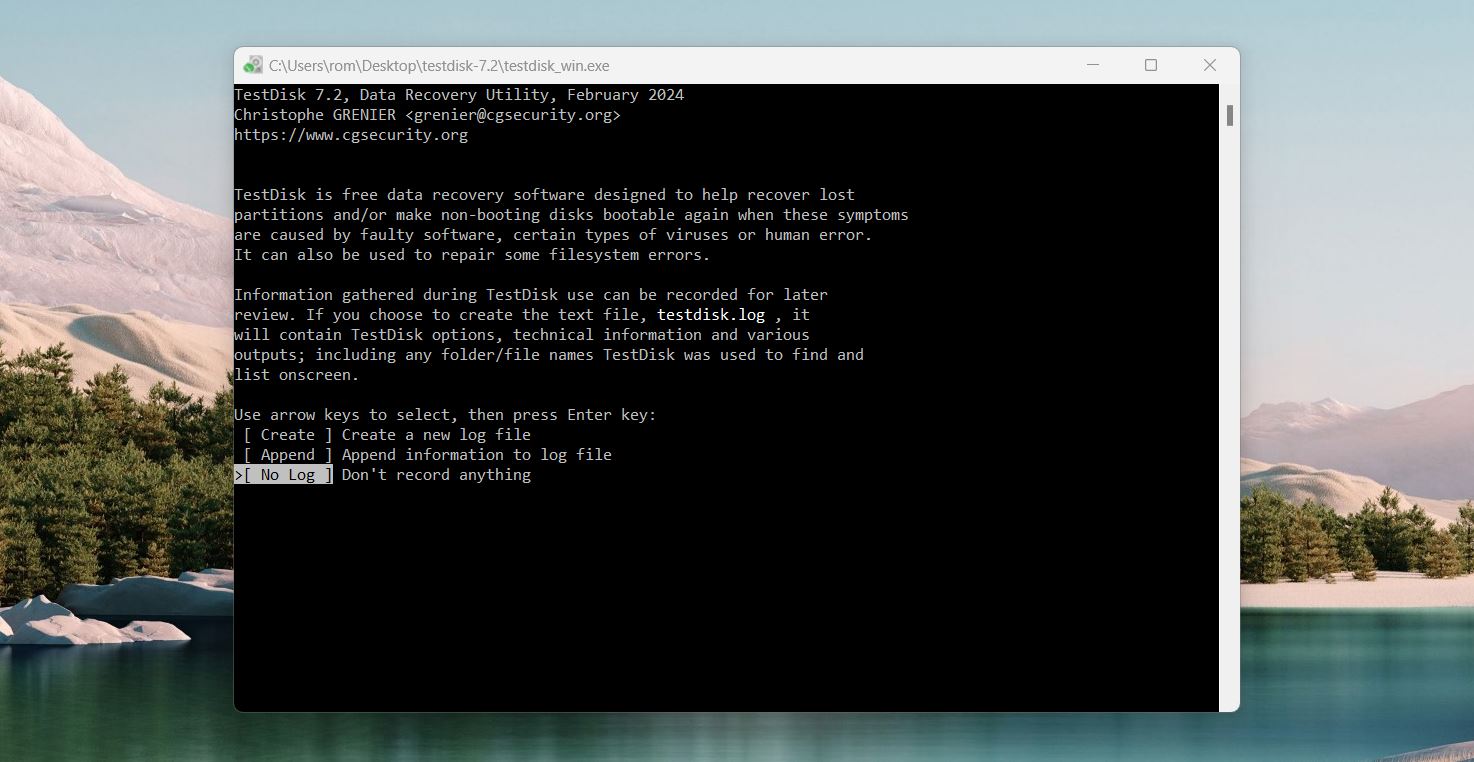
- Select the Create/No Long option and hit Enter.
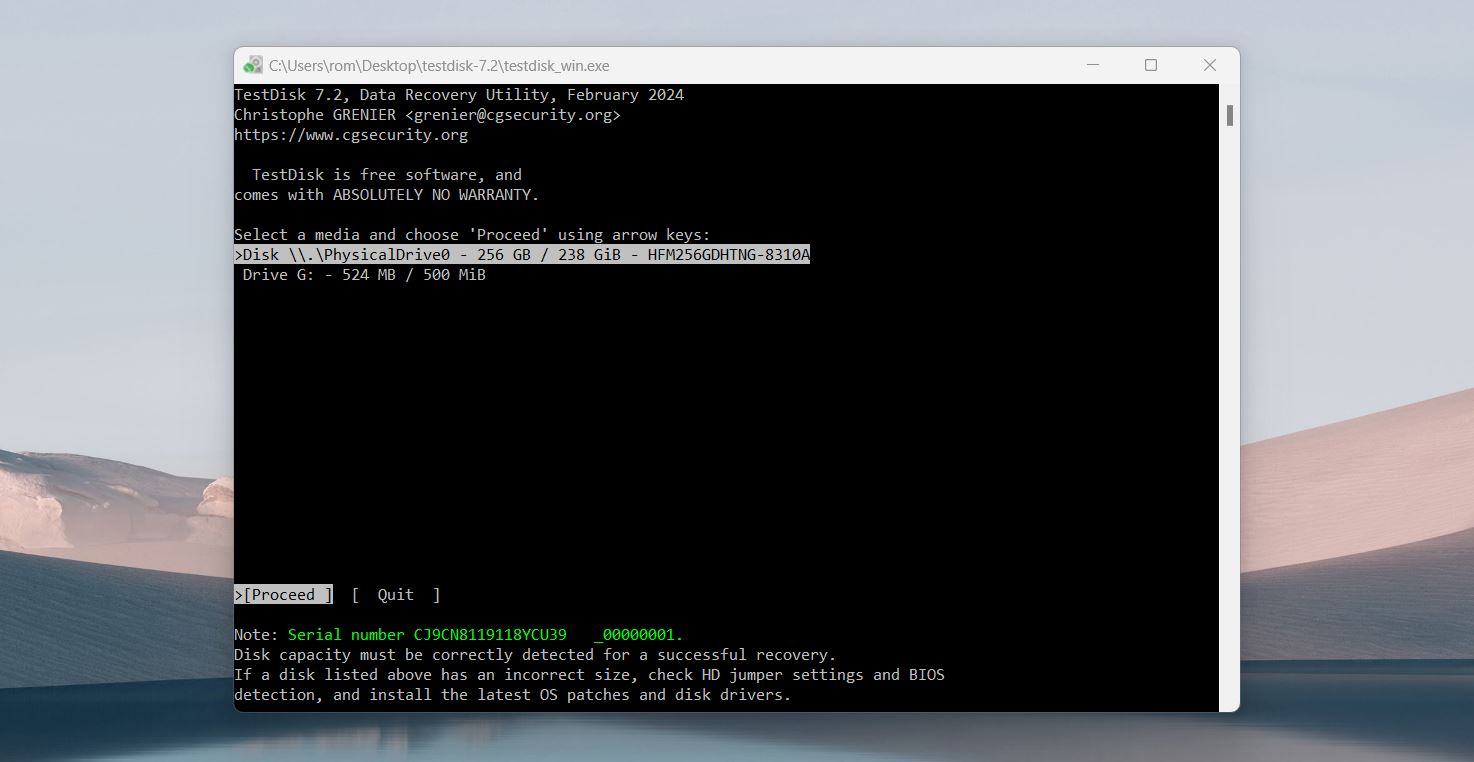
- Once TestDisk starts, it will display a list of connected drives. Use the arrow keys to highlight your Maxtor drive and press Enter. Double-check your selection to be sure you’ve picked the right drive.
- TestDisk will attempt to detect your drive’s partition table type automatically (e.g., Intel, EFI GPT). In most cases, stick with the default option and press Enter to proceed.
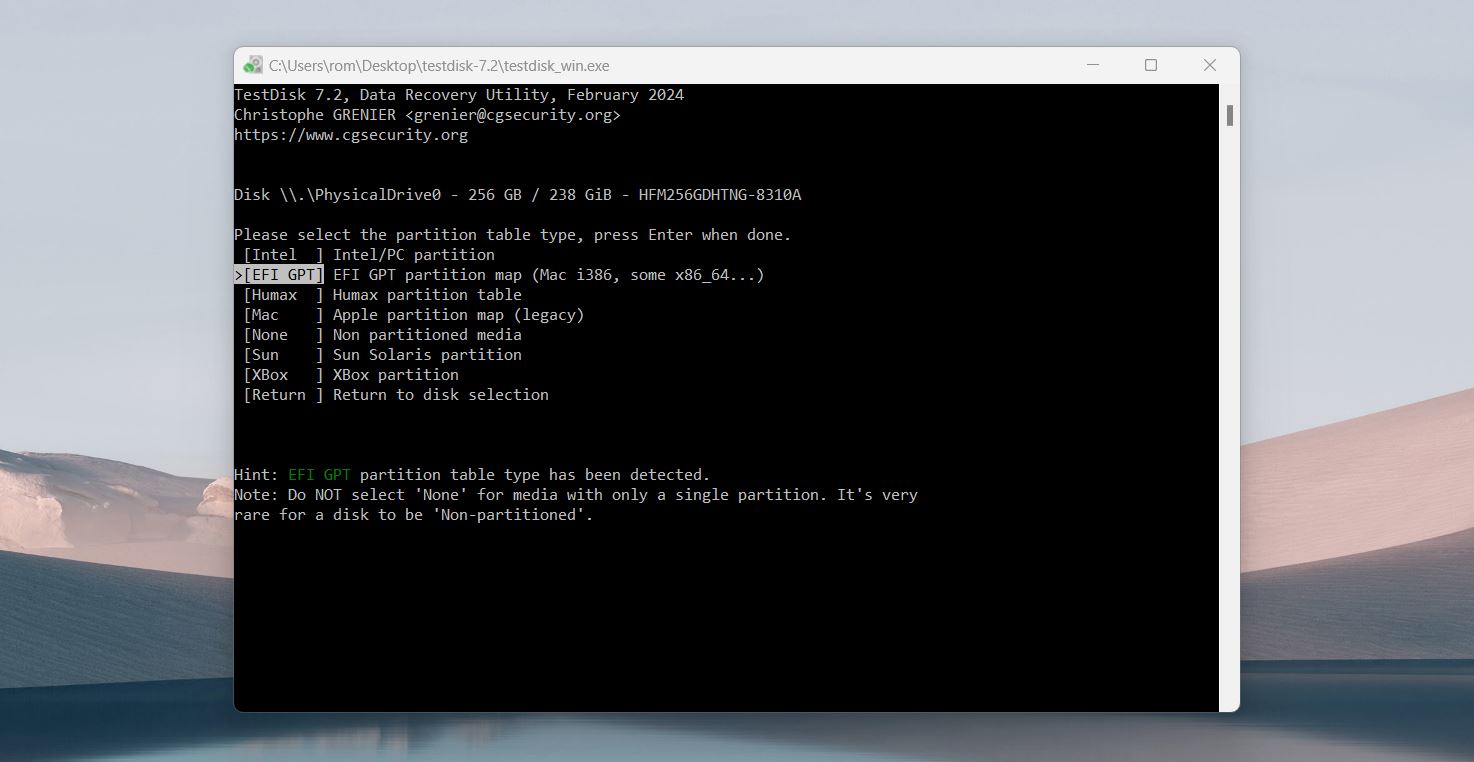
- Select Analyze from the menu to scan your Maxtor drive for existing and lost partitions.
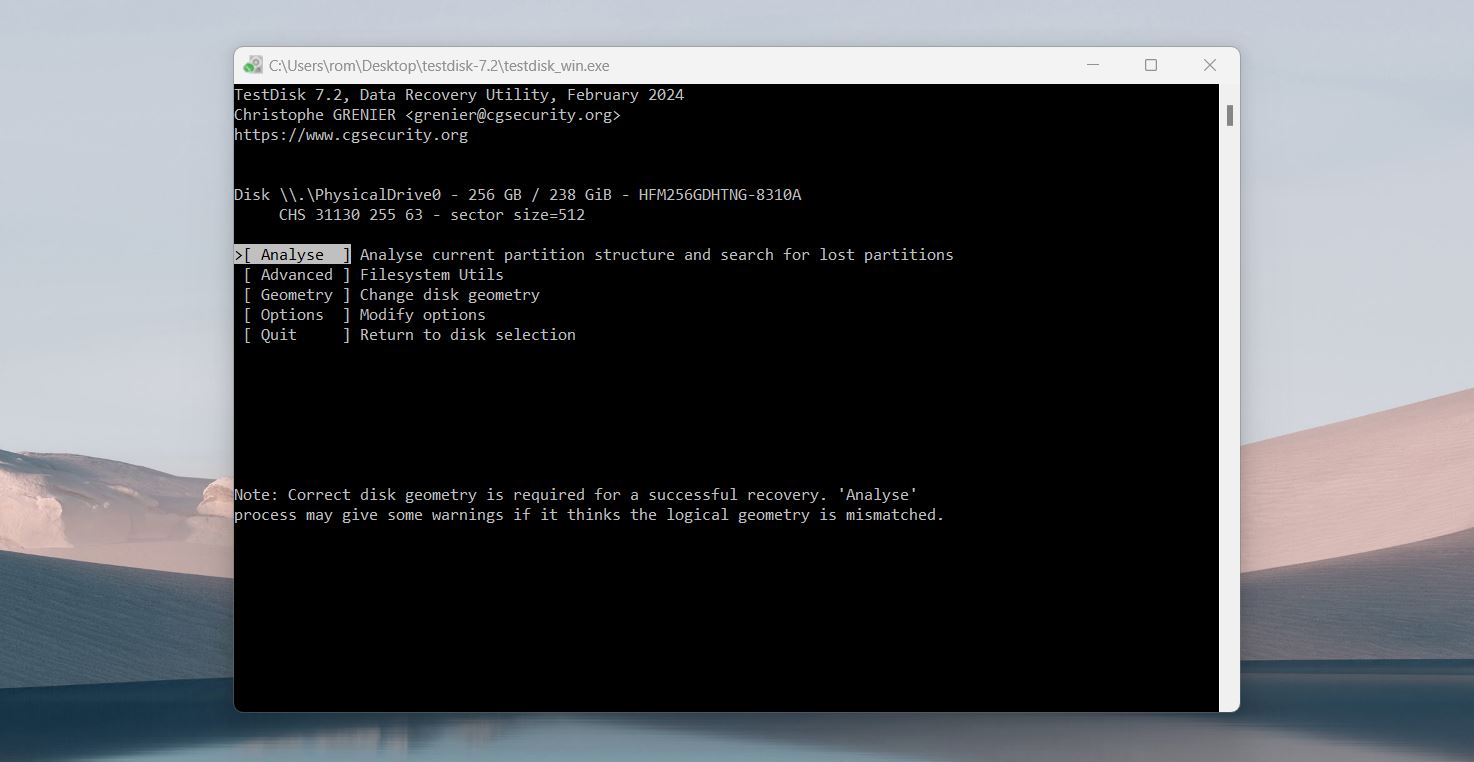
- When the scan completes, TestDisk will display a list of detected partitions. Look for the one you’re trying to recover or repair. Highlight it and press Enter to select it.
- If the partition appears correct, choose the option to Write the new partition structure back to the drive. TestDisk will prompt you to confirm before any changes.
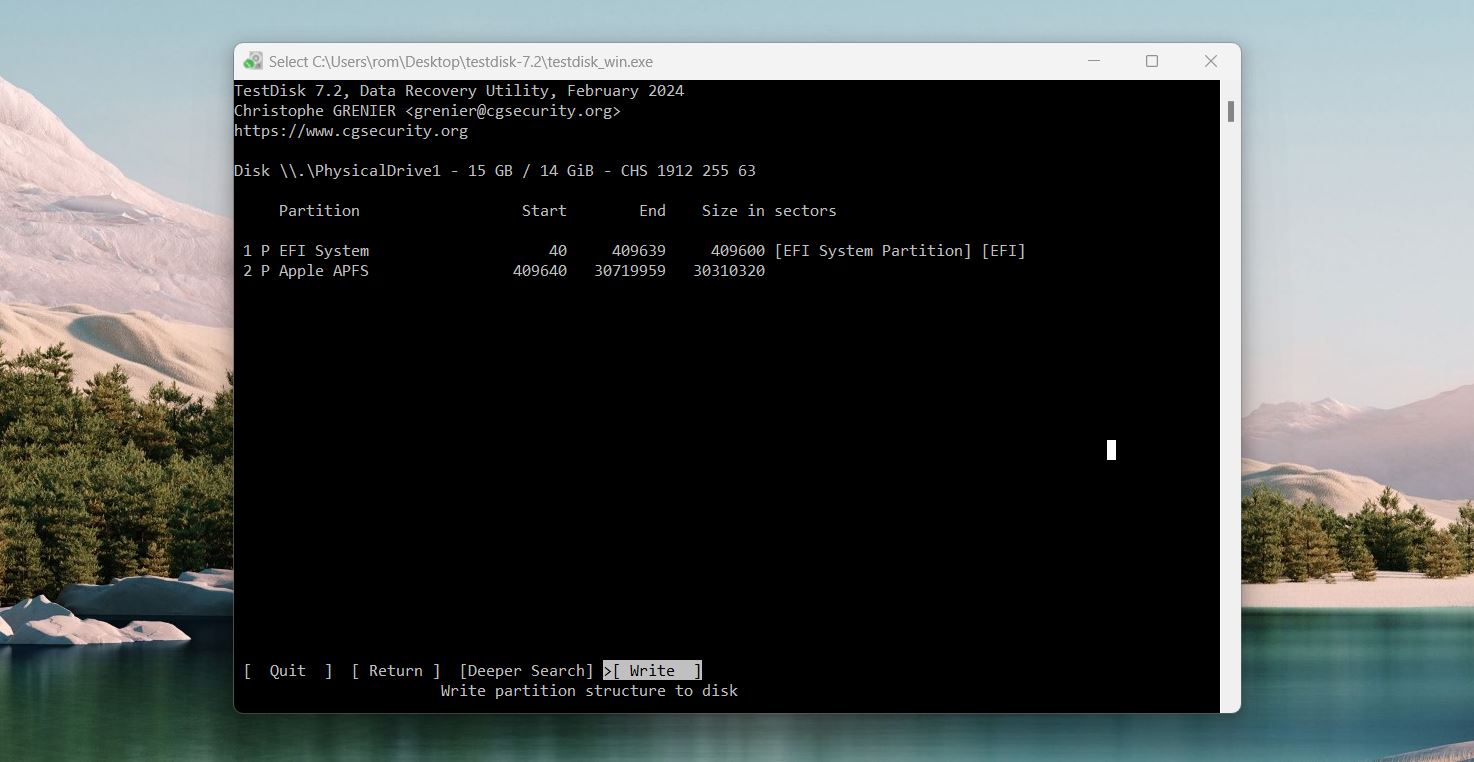
- After writing the partition, restart your computer to finalize the changes.
- Open File Explorer to see if your Maxtor drive is now accessible and your files are intact.
We have a full review of TestDisk, where you can learn more about its capabilities and features. For example, you’ll learn that many live CDs include TestDisk, which can come in handy when you need to fix unbootable drives. You can also check out our list of TestDisk alternatives to discover more similar tools.
Method #7: Format Your Maxtor Drive
When it helps: The file system is corrupted; the drive shows as RAW or unallocated in Disk Management.
Formatting is usually the last resort for HDDs, but it’s a highly effective way to fix all logical (non-physical) problems with a drive. Here’s what it does:
- It replaces the damaged file system with a fresh one, so the drive can store and organize data correctly again.
- It clears out old storage data and resets the drive for new use.
- It identifies bad sectors (with full format) and blocks them off so they can’t be used again.
As you can see, formatting your Maxtor drive wipes everything, so make sure to back up any important files before you start. If you happened to forget, it’s still not too late. If you did a quick format (which is usually the case), there’s still a good chance you can recover your files with data recovery software. There is also an option to format a drive without losing data, but this still requires backing up your files beforehand.
How to format your Maxtor drive:
- Open Disk Management.
- Find your drive in the list.
- Right-click the drive and select Format from the context menu.
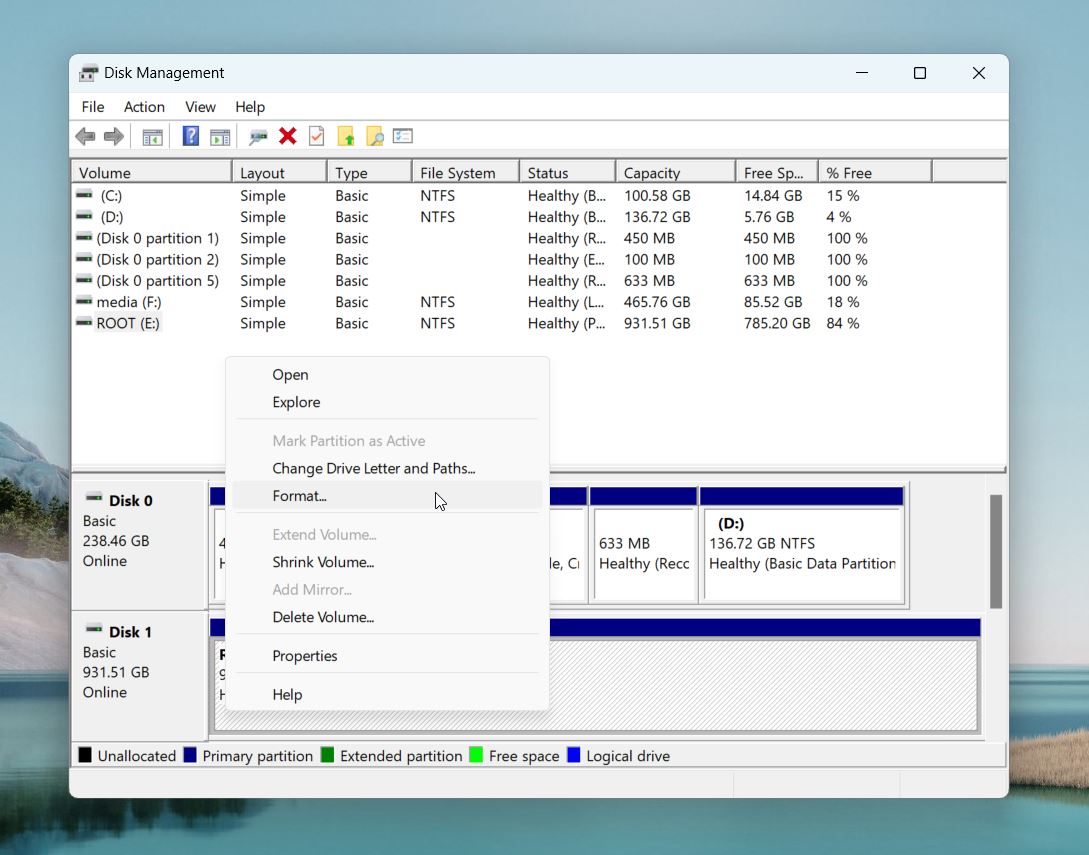
- In the options window, select a file system: NTFS is best for Windows-based systems, and exFAT is compatible with many systems like Windows, macOS, and Linux.
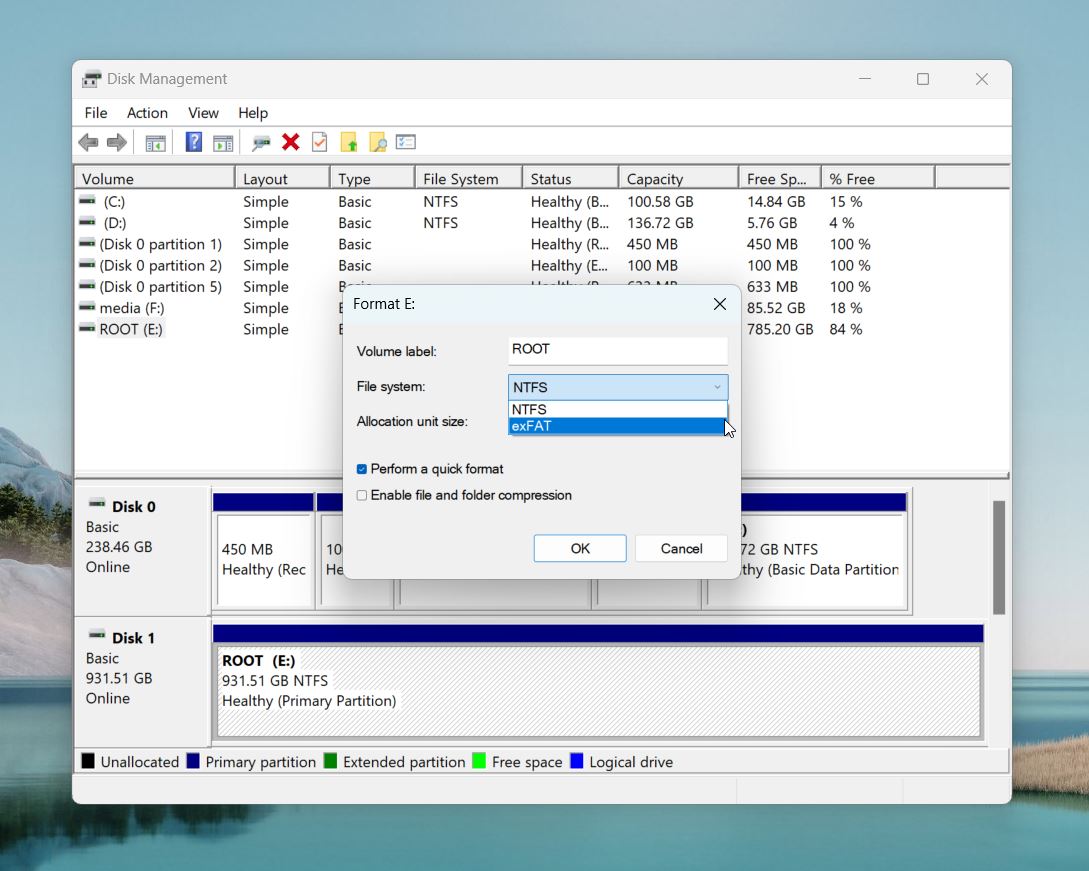
- In the Volume Label field, enter a name for your Maxtor drive (optional).
- You have the option to Quick Format or perform a Full Format. Here’s the difference between the two: Quick format skips the bad sector scan—it just clears the file system, so the drive looks empty, but the data’s still recoverable. Full format takes longer since it erases and overwrites everything and checks for bad sectors.
- Hit OK, and Windows will format the drive.
Method #8: Contact Your Local Service Center
When it helps: If your Maxtor drive has physical damage, is making unusual noises (like clicking or grinding), or none of the previous methods have worked.
If you’re unable to repair the Maxtor hard drive using disk repair software or tools mentioned above, you can reach out to a local data service center.
Hard drives typically last around 3 to 5 years on average, and since Maxtor stopped manufacturing drives in 2006, there’s a chance your drive might be beyond recovery, especially if it’s suffered physical damage. Keep in mind, though, that professional data recovery services aren’t cheap—they can sometimes cost more than a brand-new hard drive. If your data is truly irreplaceable, it might be worth the investment, but ultimately, the decision is yours.
Many recovery services offer a “no data, no charge” policy, which means you only pay if they’re able to recover your data. Be sure to check the service provider’s website for the full details.
Recently, we published a research article on the feasibility of finding an affordable offline data recovery center.
FAQ
What are the most common reasons for Maxtor hard drive data loss?
Data loss can happen for various reasons, here are most common ones:
- 🗑️Accidental deletion – Sometimes, you can accidentally delete files on your hard drive. In such situations, you can use data recovery software for Maxtor disk recovery.
- 💿Formatting – If you directly format a Maxtor hard drive without any backups, this action will erase all the precious data on your hard drive. It can also be complicated to recover data from a formatted hard drive. Thus, it’s necessary to be very careful while formatting a disk/drive.
- 📂Unsupported file system – It’s possible that your hard drive is incompatible with your OS, thus generating the “Unsupported File System” error. This happens because external hard drives don’t support all file systems, for instance, NTFS, exFAT, EXT3, etc. If your Maxtor external hard drive is not showing up, you will likely have to format it to resolve the issue.
- 🦠Virus or malware infection – Virus attacks or malware infections are notorious for causing hard drive failures and data loss.
- ⏏️Incorrect unplugging of the hard disk – If your external hard drive is not working, it could be due to improper connection or incorrect unplugging. An external storage device is mostly connected via a 2.0 or 3.0 USB connection, and the drive cables can be quite sensitive. If unplugged improperly, you could experience data loss.
- 🔌Power failure – Sudden power failures can cause significant damage to your computer and connected hard drives. It can impede the functioning of the external HDD and even cause data loss. Thus, one must always have a Power Supply Unit (PSU) attached to the computer or PC to prevent such an occurrence.
- 🔋Insufficient power – Sudden power surges or outages can cause irreparable damage to electric devices. The continuous flow of insufficient power can crash or corrupt your drive.
- 🔨Physical Damage – Sudden damage to the drive’s processor can result in the hard drive not working. You may need to contact a professional recovery service in such a scenario.
Can external hard disk data be recovered?
Yes, here’s how you can retrieve data using professional software:
- Download and install the data recovery software of your choice.
- Connect the Maxtor external hard drive to the computer.
- Select the Maxtor HDD and choose the option to scan for lost/deleted data.
- Preview the files you want to recover (if possible).
- Click Recover (or the equivalent button) to restore data from the external HDD.
Why is my Maxtor external hard drive not showing up?
If your Maxtor external drive isn’t showing up, the following reasons might be why:
- The USB port or cable is faulty or incompatible.
- Your system drivers are corrupt or outdated.
- The files or drive is hidden.
- The power supply is unstable or insufficient.
- The Maxtor hard drive is not formatted to your system and is incompatible.
- Your drive could be infected with malware or viruses.
How do I recover data from an unresponsive Maxtor external hard drive?
If your Maxtor hard drive is unresponsive, it might show signs of physical failure like:
- File corruption or missing files.
- Undetected drives.
- Poor drive performance
- Unusual noises
- Drive shows bad sectors.
If your Maxtor external drive shows these symptoms, it’s best to contact a reliable service center.
How do I access my Maxtor hard drive?
You can access your Maxtor hard drive using the following steps:
- Plug your Maxtor HDD into the PC.
- Go to File Explorer and click This PC.
- Click the Maxtor hard drive to access your files.
How do I get files off a broken external hard drive?
You can get files off a broken or corrupted Maxtor external hard drive using data recovery software. Just follow these steps:
- Download and install the data recovery software of your choice.
- Connect the Maxtor external hard drive.
- Select the Maxtor HDD and choose the option to scan for data.
- Preview the files you want to retrieve.
- Click Recover (or the equivalent) to restore data from the external HDD.
This article was written by Joshua Solomon, a Contributing Writer at Handy Recovery Advisor. It was recently updated by Roman Demian. It was also verified for technical accuracy by Andrey Vasilyev, our editorial advisor.
Curious about our content creation process? Take a look at our Editor Guidelines.
