Cloud data recovery is a hot topic online nowadays, as proven by countless articles discussing its feasibility on various devices and platforms.
So, is it possible to recover lost data from the cloud, especially if you have permanently deleted it from your Trash folder?
We tested different data loss scenarios for this comprehensive guide, focusing more on your chances to recover permanently deleted files from the cloud. We’ll also leave you with other tips and recovery methods you can follow.
What We’ll Cover
Our research and tests focused on the free versions of Cloud Storage Services dominating the market today: Google Drive, Google Photos, iCloud, OneDrive, and Dropbox. We’ll delve into each service across different platforms and provide detailed insights in the following sections.
Causes of Data Loss in the Cloud vs. Possible Solutions
Before we jump into the different methods for data recovery, here’s a quick view of possible data loss scenarios and their possible solutions.
Data Loss Scenarios |
Possible Solutions |
Accidental overwriting |
|
Accidental deletion from the drive folder |
|
User inactivity |
|
Permanent deletion from the Trash folder |
|
Software/Hardware errors (synchronization errors, server defects, etc.) |
|
However, it’s a different story if you have permanently deleted files from the cloud (deleting from the Trash/Bin folder). Recoverability in this case would be trickier, but we have gathered workarounds that might increase your chances.
Recovering Permanently Deleted Files from the Cloud
Recovering permanently deleted files from the cloud used to be a dead end years ago. However, cloud recovery has changed a lot these days. Here’s what different user experiences from forums and our own experiences tell us.
Calling Technical Support
Calling technical support is the usual last resort for most cases of permanent data deletion. Different users have both good and unhelpful experiences with asking for technical assistance. Based on the collective user experiences we gathered, here’s how the big 4 cloud providers perform against each other:
Cloud storage service |
Recoverability |
Google Drive |
|
iCloud |
|
OneDrive |
|
Dropbox |
|
User Experiences on Different Cloud Tech Support
We’ve seen special cases when Apple support successfully recovered a user’s files. In other cases, the customer is left hanging, without any conclusion. But there is nothing to conclude here, except that you should take the chance to talk to tech support, especially if the files are really important.
Here are some notable experiences in different communities from customers resorting to tech support:
- In this iCloud community question, the user called for Apple tech support. But as commonly experienced in these sessions, the support only referenced the user towards established how-tos. Tech support waiting time takes around an hour or more, so make sure you have exhausted all possible questions you may have. If possible, list them down before calling.
- One user reported losing files from the iCloud they had offloaded from their device. Since iCloud is more about syncing than an actual backup, it’s always a good idea to store your important files in multiple locations.
- Google Drive Help forums can only show you the possible way. The support personnel in the forum are volunteers who have no access to your cloud data, as stated in this forum question. However, we learned that Google can assist you in recovering a permanently deleted Google Drive file using their official file recovery contact form.
- One trick this iCloud user tried in their Reddit post on r/iCloud is to ask for a Senior Advisor during the call. However, note that this method is not an officially accepted process and isn’t guaranteed to work every time.
- Dropbox users from the official Dropbox forum also had no luck when trying to ask for community support in recovering their lost data.
- Try not to put all your files in one cloud storage service, especially if you have a huge amount of data. Another Reddit user’s experience had them paying for iCloud but still losing their files without deletion.
These user experiences are not a guarantee that the same will be the case for you. Customer support from these cloud services will depend on your location, how long ago was the data lost, and if you purchased a support package.
That said, it’s still worth trying your luck with your tech support, especially if you have no other option to try. For your benefit, we have compiled all possible ways you can contact the Apple, Google, Microsoft, and Dropbox support:
Contacting Google Support
You can go to the Google Drive Help Center and navigate to the bottom of the page. Then, follow these steps:
- Click Contact us under Need more help?

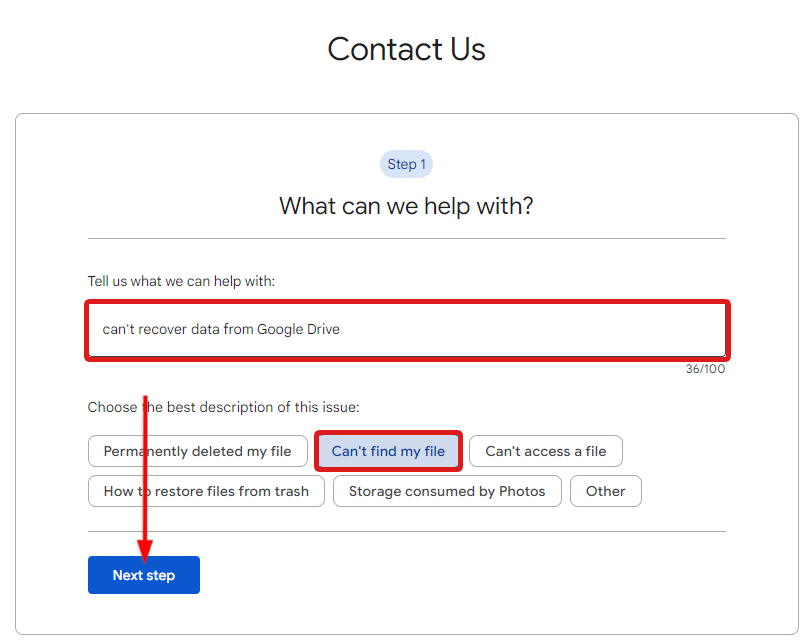
- Write down the details of your data loss scenario and select the most applicable description. Then, click Next Step.
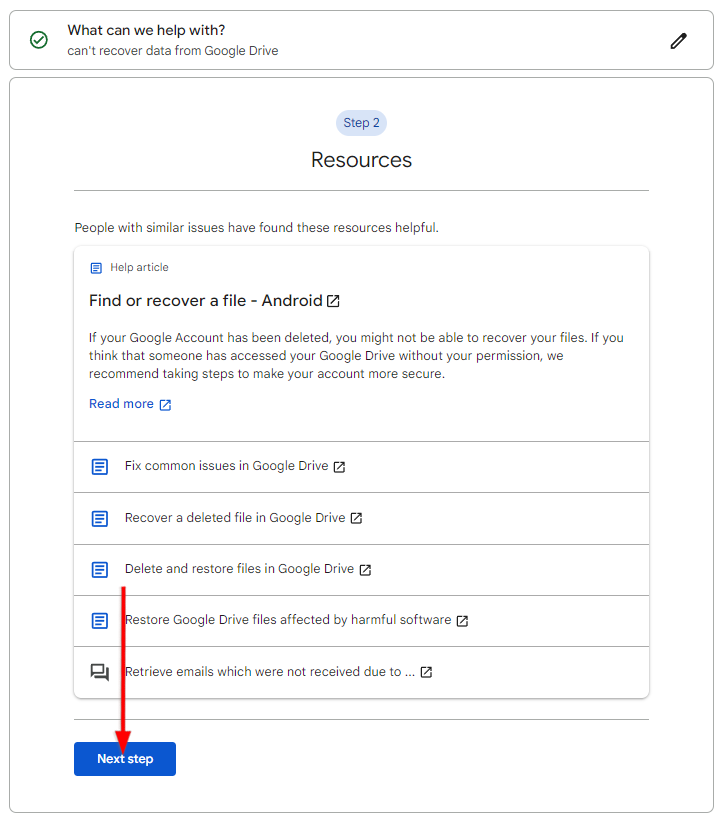
- If you wish to contact Google Support, click Next Step to skip Step 2.
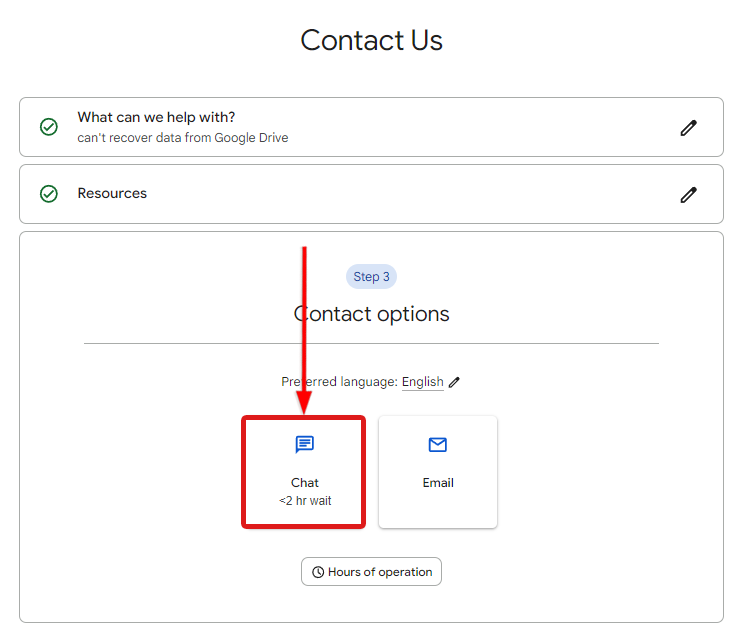
- In Step 3, choose whether you want to chat with a support representative or email them.
Note that currently, Google reiterates that if your files from Google Photos are deleted from the Trash folder, they are permanently removed and cannot be recovered anymore. Several community posts about permanently deleting their photos remained unsolved even today.
If you wish to escalate your issue, you can also try to contact Google through the information provided on their page. We only recommend this for highly crucial data loss scenarios.
Contacting Apple Support
If the above methods do not solve your data loss problem, you can resort to contacting Apple support. To seek for technical assistance from an Apple Support representative, do the following:
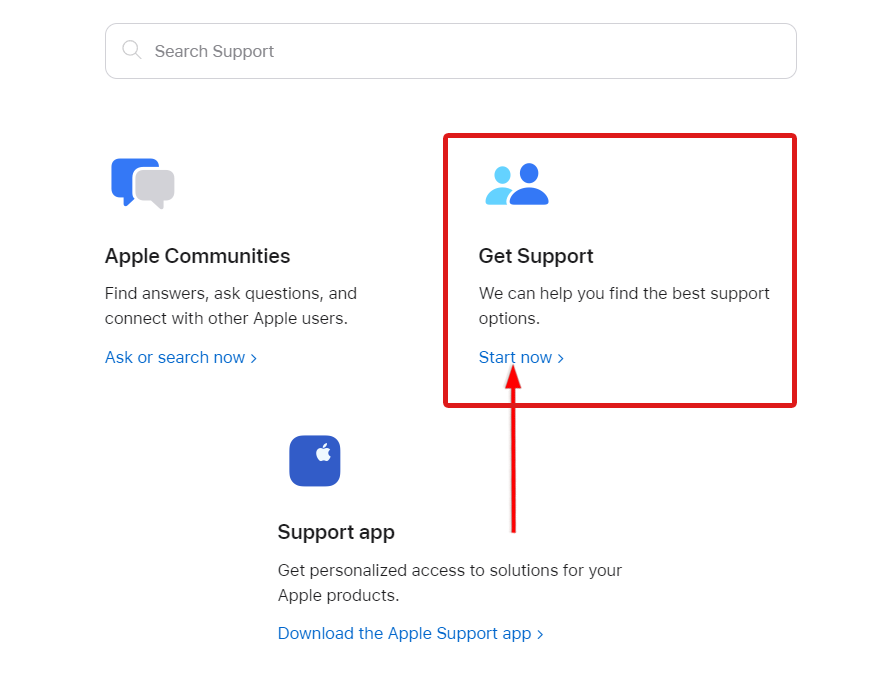
- On the bottom part of the Apple Support page,click on Start now under Get Support.
- Choose Backup & Restore from the options provided.
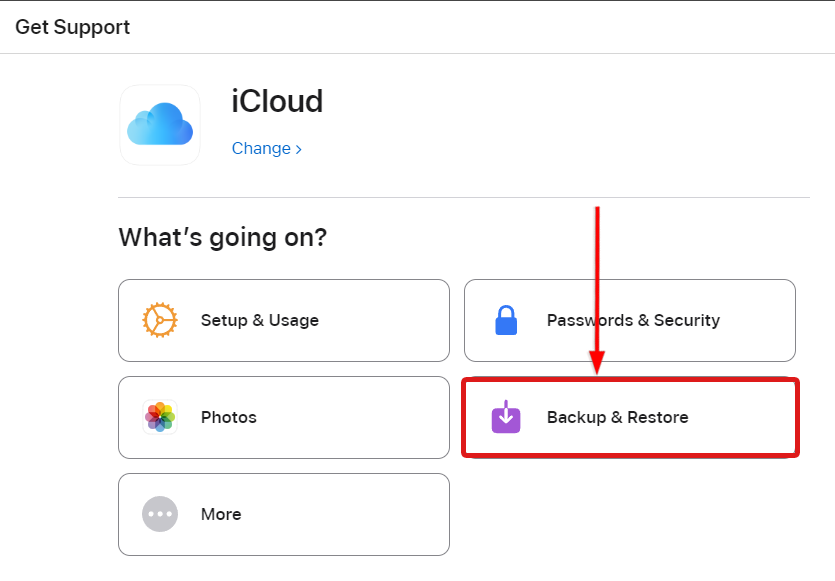
- Click Continue and proceed to the bottom of the page.
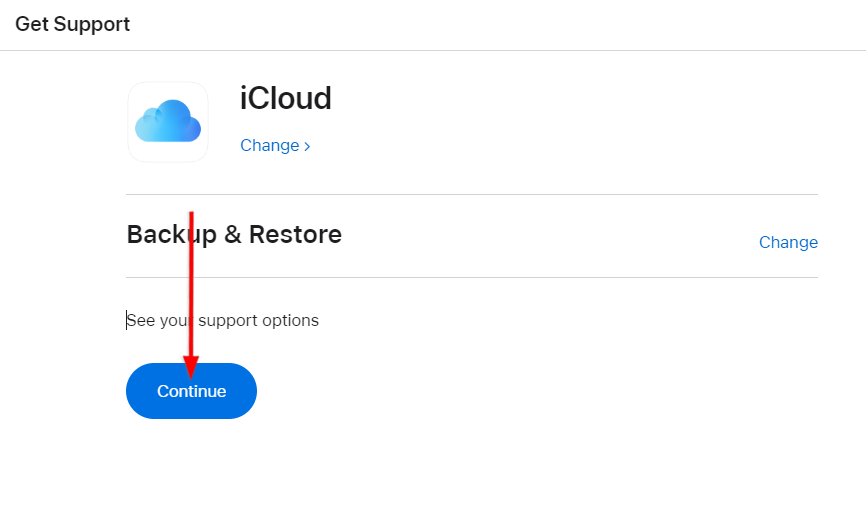
- Select Call or Chat under Contact.

- Enter your details and click Continue to connect with a support representative.
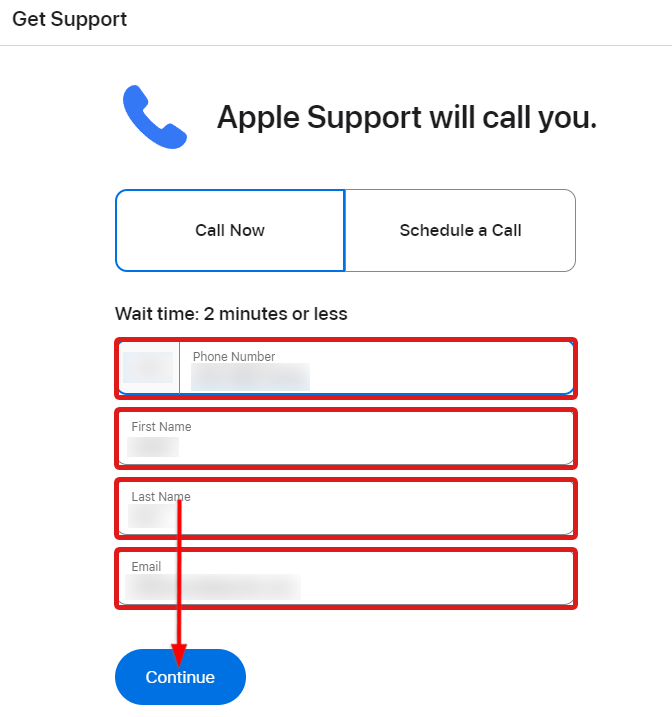
Please note that some users also reported only being able to recover a part of their lost files. Even if this method is not guaranteed to work, it’s still worth trying to contact Apple for assistance. You can also post in their iCloud Support communities.
Contacting Microsoft Support
Since the methods to recover lost data are limited for OneDrive, contacting Microsoft support can be your best bet after losing data from the cloud:
- Visit the Microsoft Support page and select Show expanded list of products, then click on OneDrive
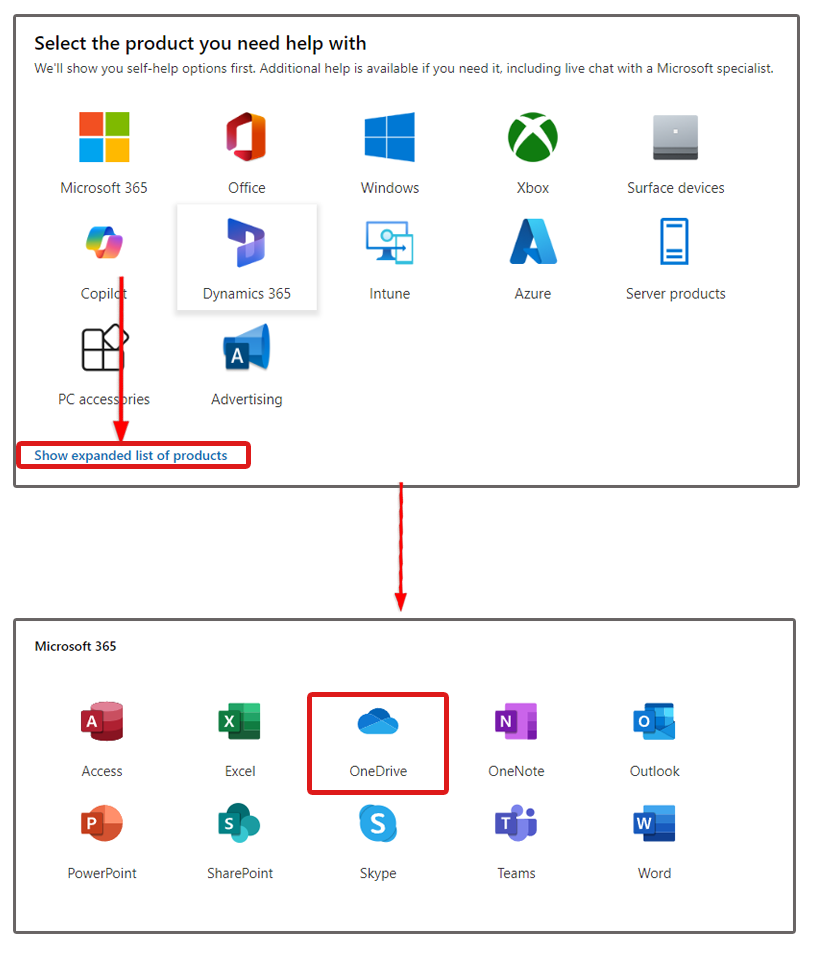
- On the pop-up window, select Get Home support.
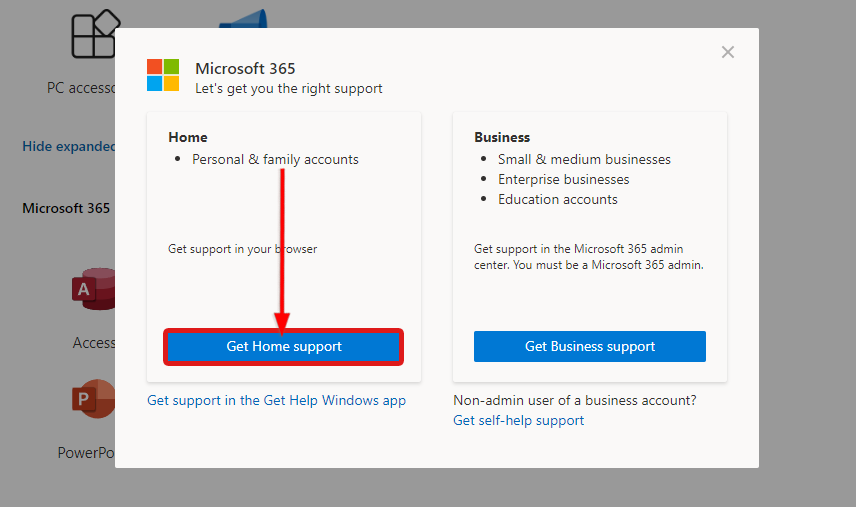
- Describe your problem in the search box. Note that this is where your suggested support options will be based. Then, click Get Help.
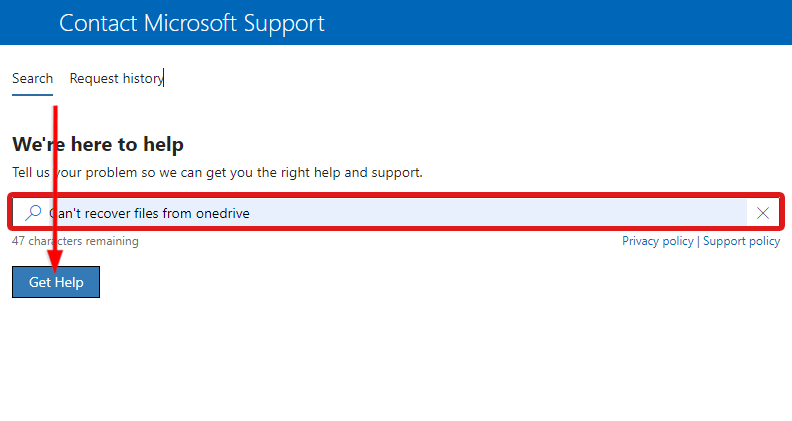
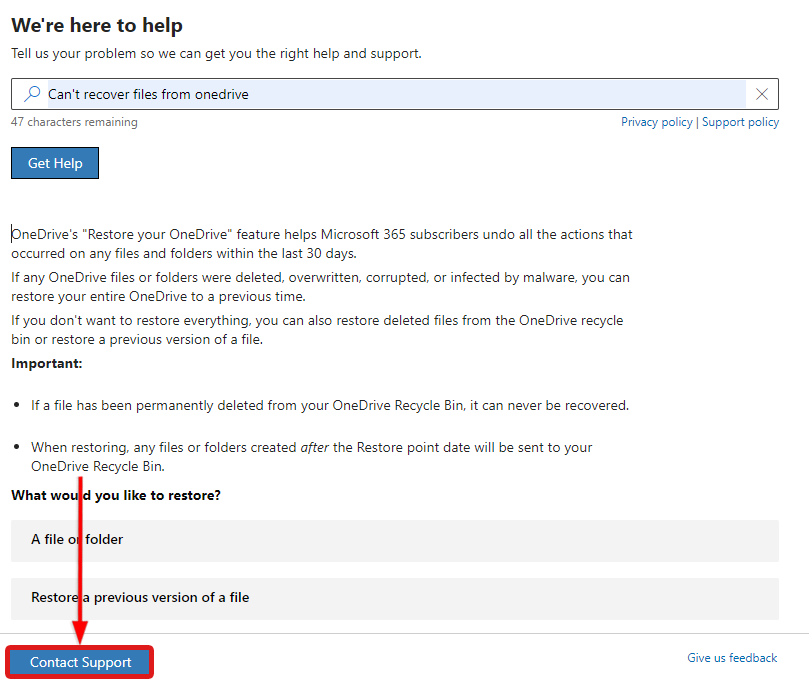
- Scroll down and find the Contact Support button.
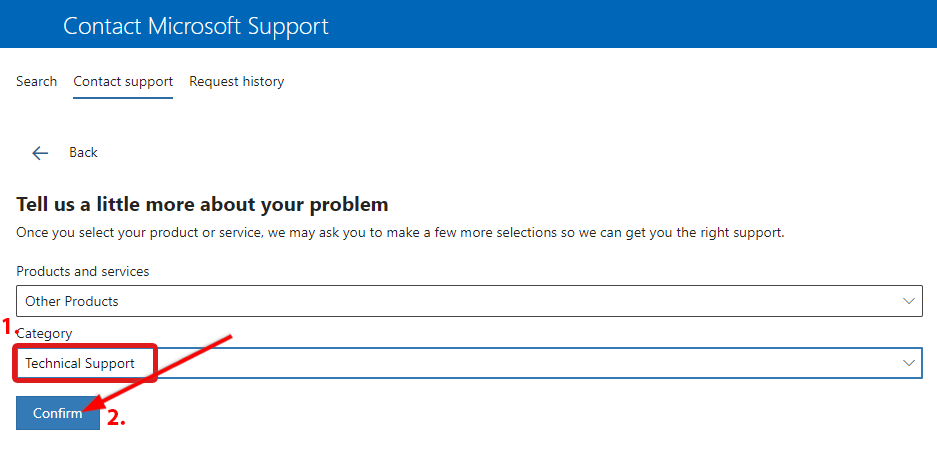
- On the Products and services dropdown, select Other Products.
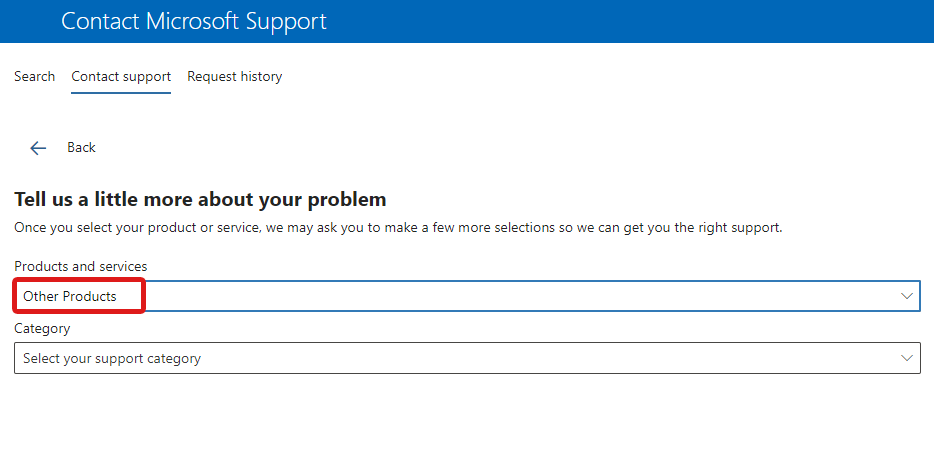
- Under Category, select Technical Support. Then, click Confirm.
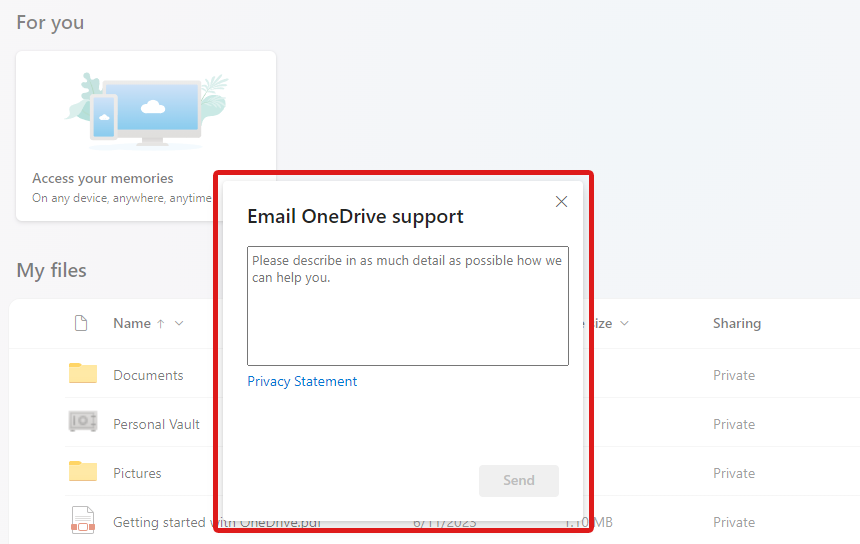
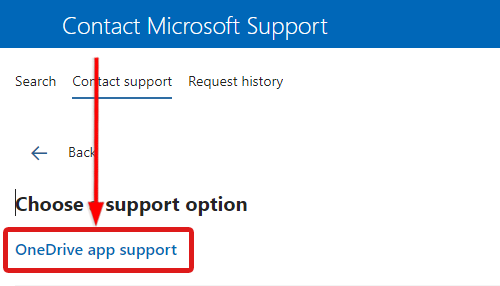
- The option OneDrive app support should be in the support option. Click on it to get redirected to OneDrive with the option to send an email to their support team.
Pro tip: If you’re missing important photos and are not sure how to get them back, stop messing with your iPhone and familiarize yourself with the recovery solutions and If you wish to chat with a support agent, you can modify your support query. However, this might mean your agent would not be informed about your specific problem.[/sc]
In this example, we changed our query to “Can’t recover files.” This way, we get the Chat with a support agent support option.
Contacting Dropbox Support
For more comprehensive assistance, you can refer to Dropbox’s different support options. However, this varies depending on your account subscription.
For Basic users, you only have access to Dropbox support via their help center, community forums, and English-only chatbots. Read more on Dropbox’s support options if you have paid subscriptions.
Other Methods to Recover Lost Data from the Cloud
If you want to try every trick in the data recovery book, we also laid down some of the standard cloud data recovery methods you can try.
Recover Lost Data from Google Drive
When you delete files from a Google Drive folder, they are redirected to the Trash folder. Items in the Trash folder will be permanently deleted after 30 days. Depending on your data loss scenario, the following methods may be useful for data recovery.
Recover files from the Trash folder
Checking the Trash folder is the first step you should take if you accidentally deleted your files from a Drive folder. Follow these steps to proceed:
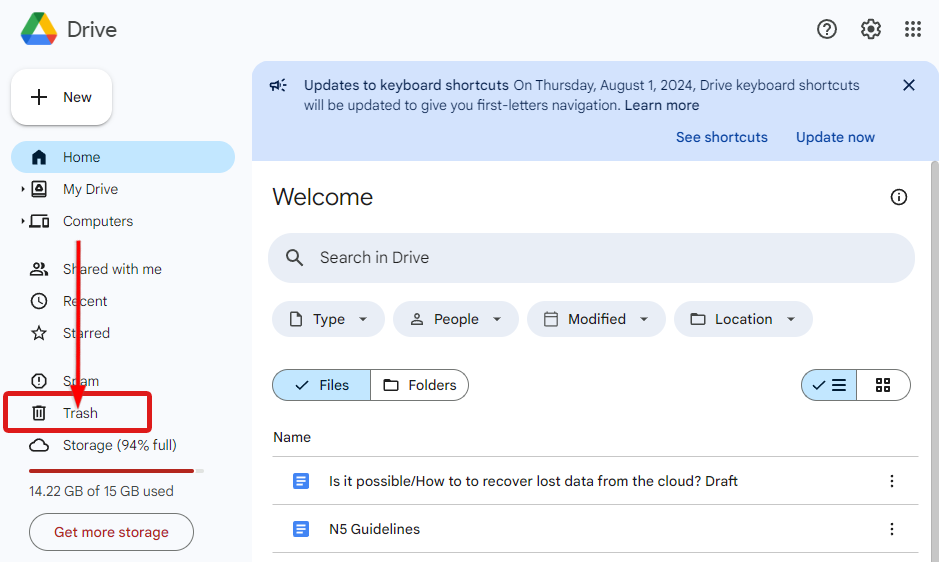
- From the Google Drive website, click the Trash folder on the left-side pane.
a. On mobile, tap the hamburger menu (the triple line icon) on the left side of the search menu and select Trash.
- Verify that your deleted file is in the Trash.
- Right-click on the file/s and select Restore to get back your files. They should return to their original location.
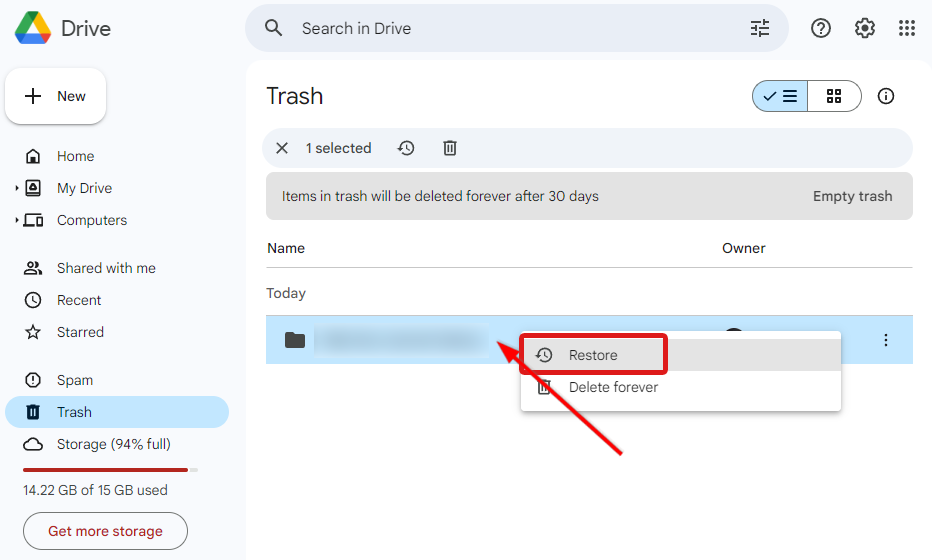 a. On mobile, tap the Meatballs menu (horizontal triple dot menu) located at the top-right corner of the screen. Then, choose Restore from the menu.
Cloud Data Recovery Using Google Takeout
Google Takeout is a backup feature for users signed up to any Google product. If you used Google Takeout to back up your data every 2 months for 1 year, there’s a chance that you have a backup of your lost files. This method is applicable for both Google Drive and Google Photos.
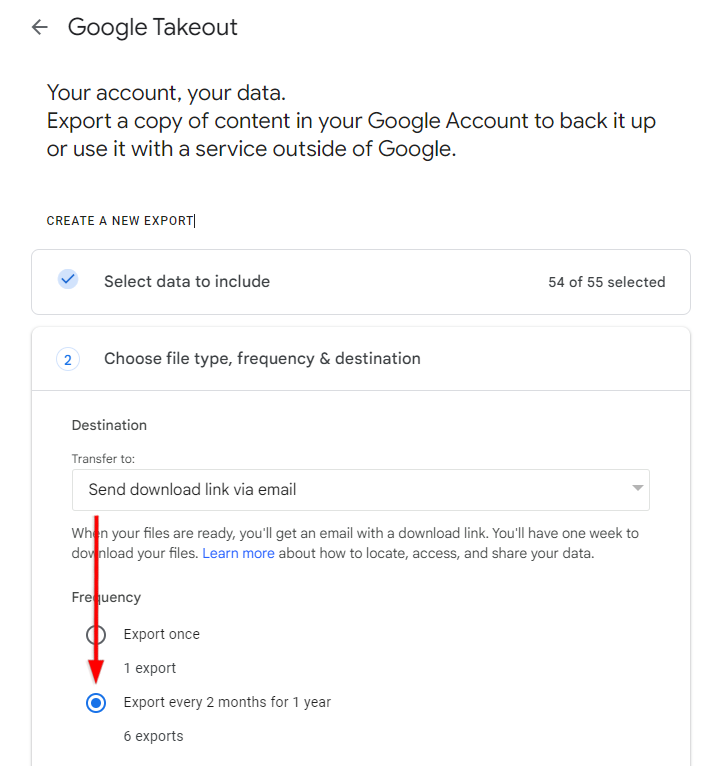
To check if you have an existing backup before data loss, search your Gmail account for the email containing the download link to the backup from your Google account.
Using Version History
Using Google’s Version History feature is effective for preventing data loss due to accidental overwriting. In this case, your file is still on your Drive, but with unsynced, incorrect modifications.
Use Version History to return your file to a previous version of your file by doing the following:
- Open drive.google.com in your web browser.
- Launch your overwritten file (Google Docs, Sheets, or Slides) in Google Drive.
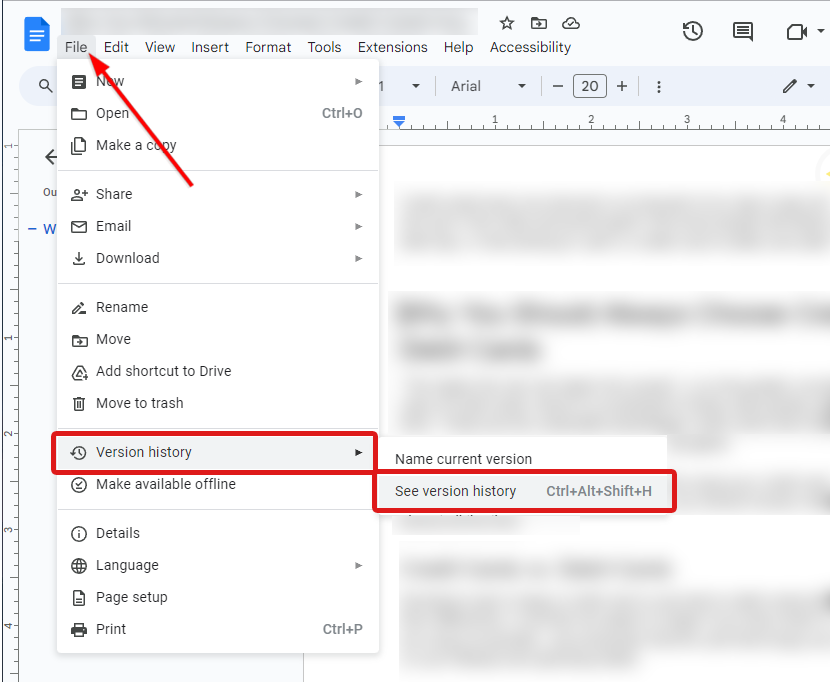
- On your Google Docs, click on the File menu > Version History > See version history. Alternatively, you can press CTRL + ALT + SHIFT + H or tap the Previous Version icon on the right side of the main menu.
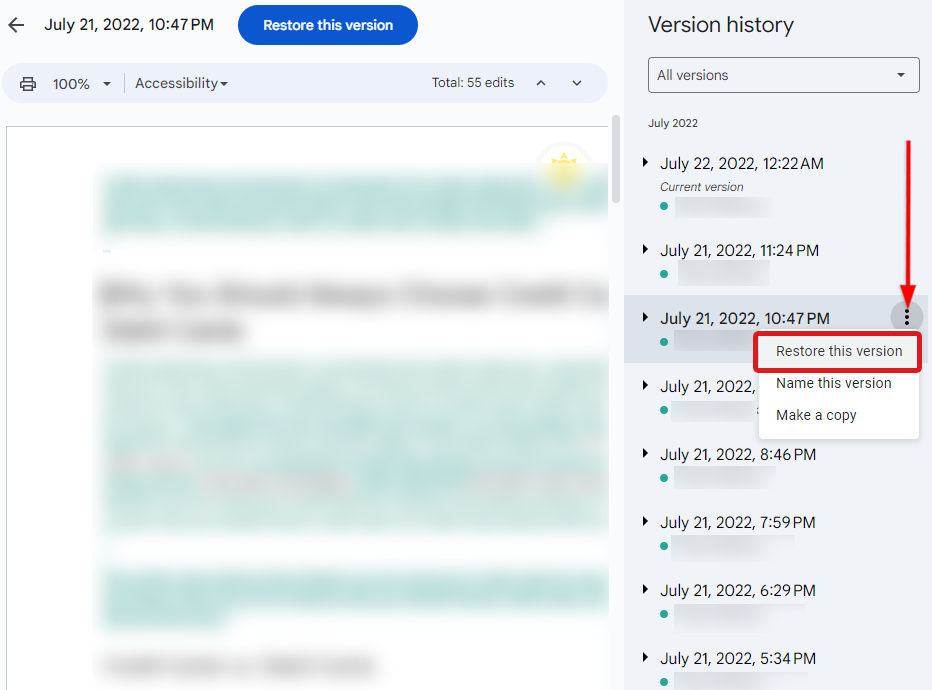
- From the version history, select which version you want to restore and select Restore this version.
For other non-Google native files, you can download their previous versions by doing the following:
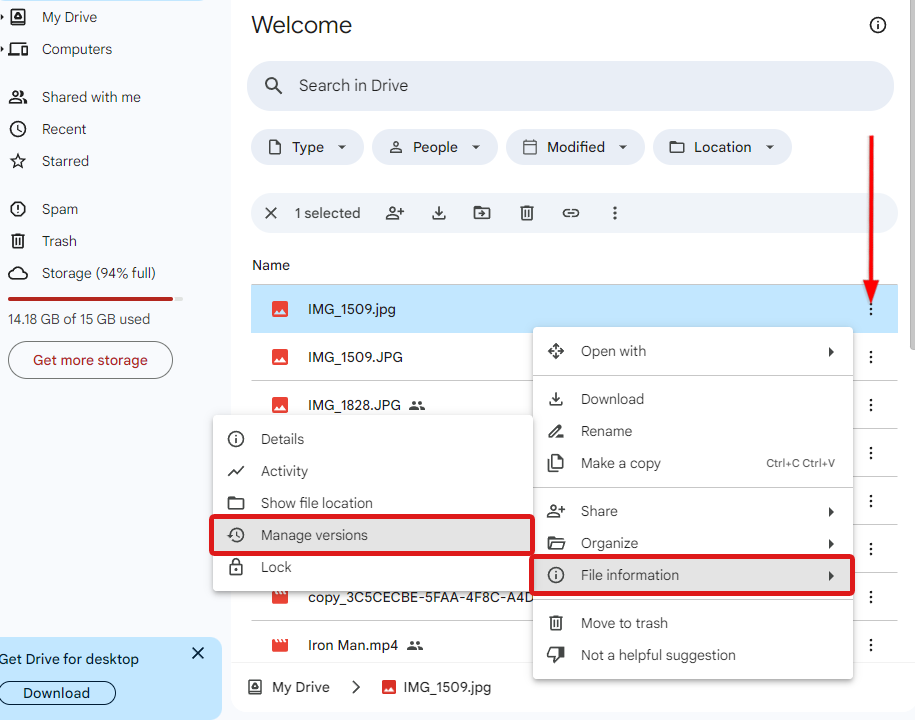
- In Google Drive, locate the file you want to restore. Then, select the Kebab menu (three vertical dots) > File Information > Manage versions.
- Select the previous version you want to restore by selecting the Kebab menu on the right side of it. Then, choose Download.
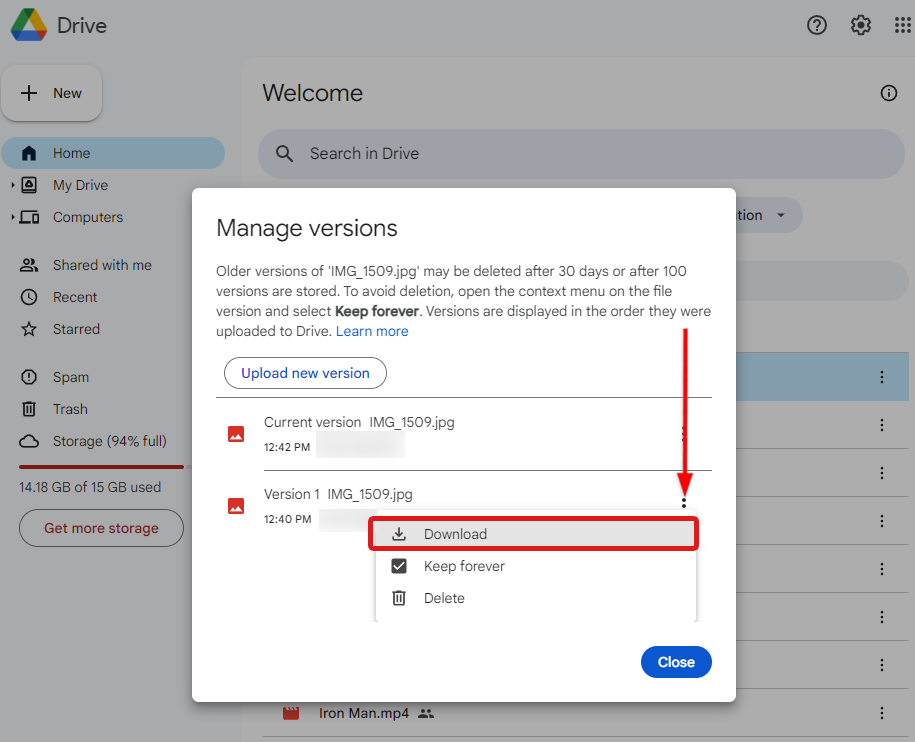
By default, Google Drive only keeps the previous versions of your file for 30 days or after 100 versions are stored. Learn more on Check activity & file version from Google’s official support website.
Using Google Drive for Desktop
Google Drive for Desktop (previously Google Backup and Sync app) downloads and syncs a copy of your Drive to your desktop. It also allows you to upload and sync folders from your desktop to the Drive.
You can attempt to recover your files using Google Drive for Desktop with the following steps.
However, note that these methods are not guaranteed to work every time.
On Windows: Previous Versions
If your files are synced in Google Drive for Desktop, you can try to check if Previous Versions on Windows have stored a copy of your files. Here’s how you can do this:
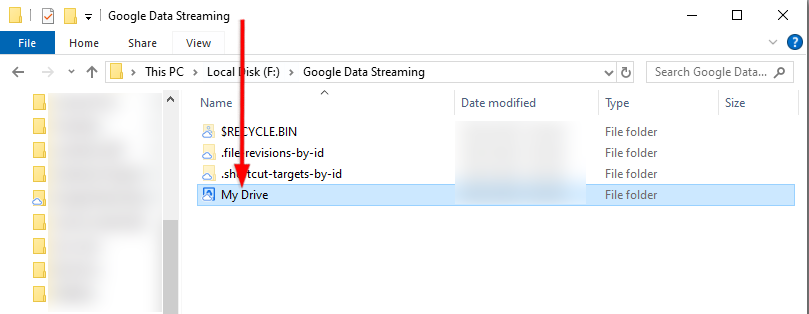
- Navigate to the virtual drive Google Drive created on your computer. Then, go to My Drive.
- Right-click on the white space and select Properties from the menu.
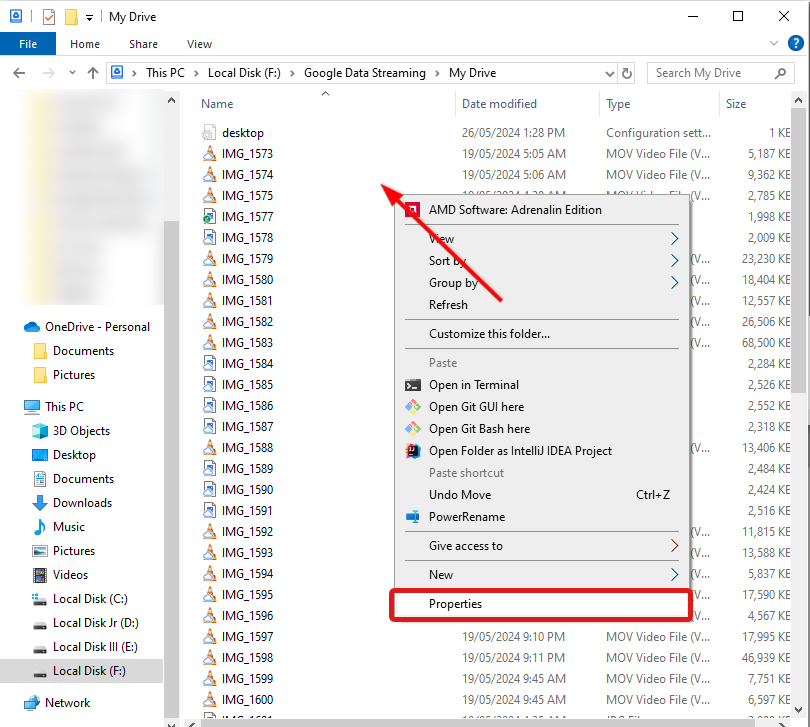
- Navigate to the Previous Versions tab of the properties.
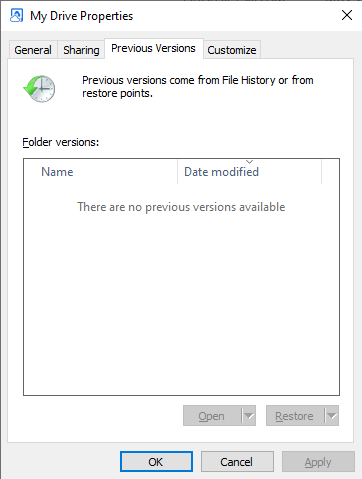
As we have mentioned previously, this method may not always work, as seen in our screenshots. However, it’s still worth trying to check this option, especially if other methods have not worked for your data loss scenario.
On Windows: Google Photos Backup
Google Drive for Desktop also enables you to back up photos and videos through Google Photos. When backed up, the files on your computer will not be deleted, even if you delete the copies from your Drive. If this is the case, you can simply browse through your local backup to get back your lost files.
On Windows: Use Third-Party Data Recovery Software
If you’ve opted to sync your Drive via the Mirror Files option on a Windows computer, consider using a third-party data recovery app like Disk Drill to attempt to recover your lost files. Simply scan the hard drive where your Drive folder is located and see if it detects your files.
For Google Workspace users, you can also restore deleted files in Google Drive using the Admin console. Learn more by referring to Google’s official guide.
Recover Files from the Google Photos Trash Folder
Google Photos stores your deleted photos or videos in the Trash folder. These files remain for 60 days before being permanently deleted.
To recover your files from the Trash folder, simply follow the steps outlined below:
- Open Google Photos in your web browser and navigate to the Trash folder by clicking the Trash icon on the left side menu.
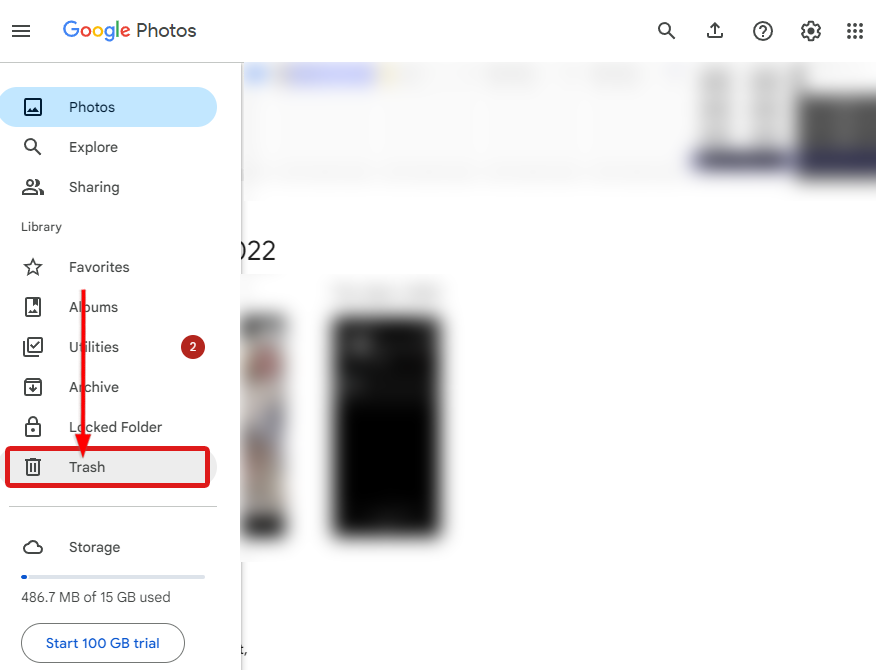
- You should see all the items currently in your Trash folder. Select the photo or video you wish to recover.

- Click on the Recover option from the menu in the top right corner.
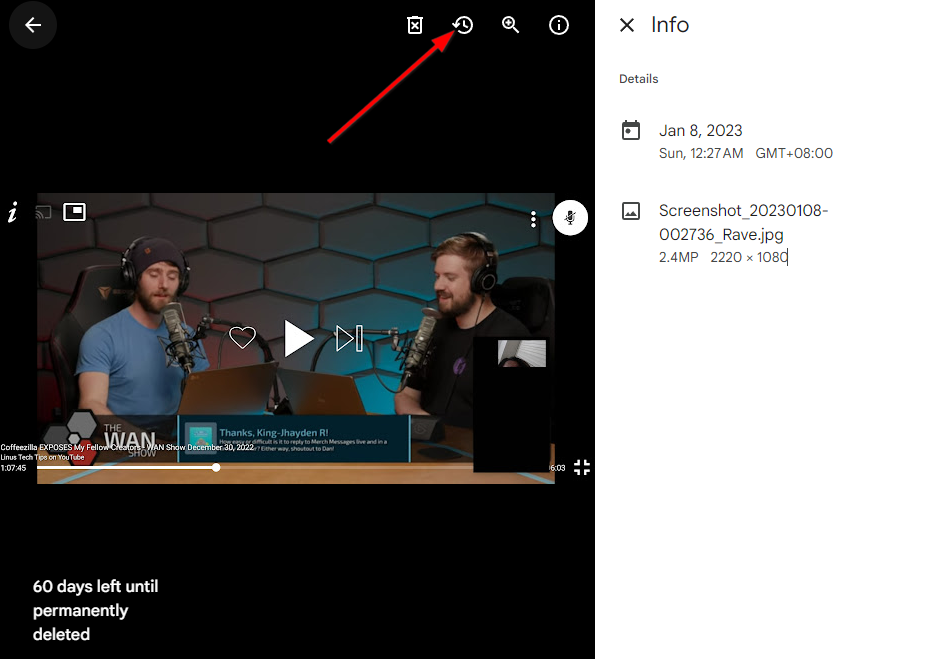
Note: If you lost your data due to inactivity, you may find it in the Trash folder for up to 60 days after the 2-year mark.
Recover Lost Data from iCloud
iCloud Drive stores all deleted files for 30 days. You can also restore a previous version of your Calendar, Contacts, and Safari bookmarks. Follow these steps to proceed:
- Sign in to your iCloud account via iCloud.com.
- Scroll down to the bottom of the website and choose Data Recovery.
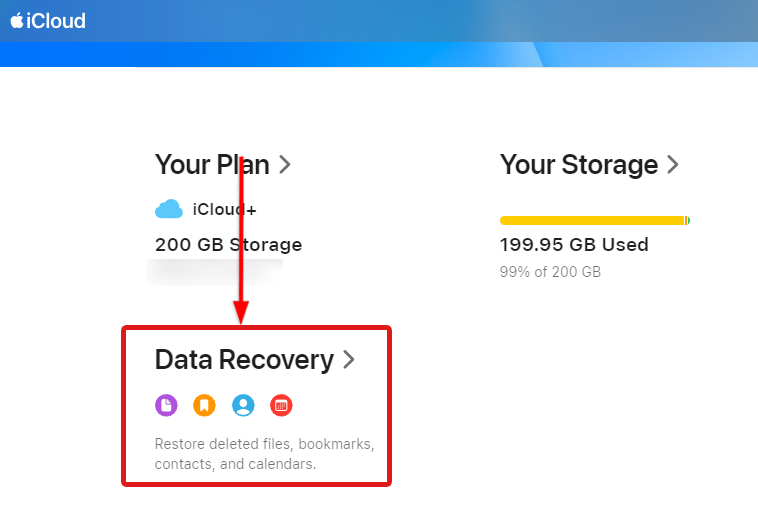
- Select which files you want to restore and click Restore.
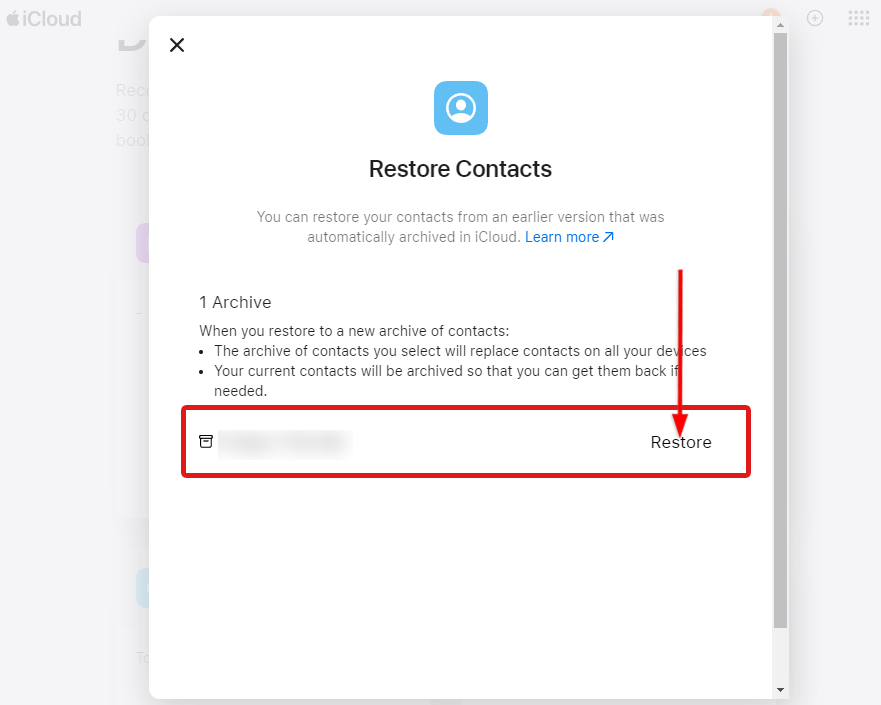
You can also access the Recently Deleted folders of your Drive, Photos, and Notes from iCloud.com to check if your missing files are still recoverable:
On Drive:
- Go to the Recently Deleted Folder.
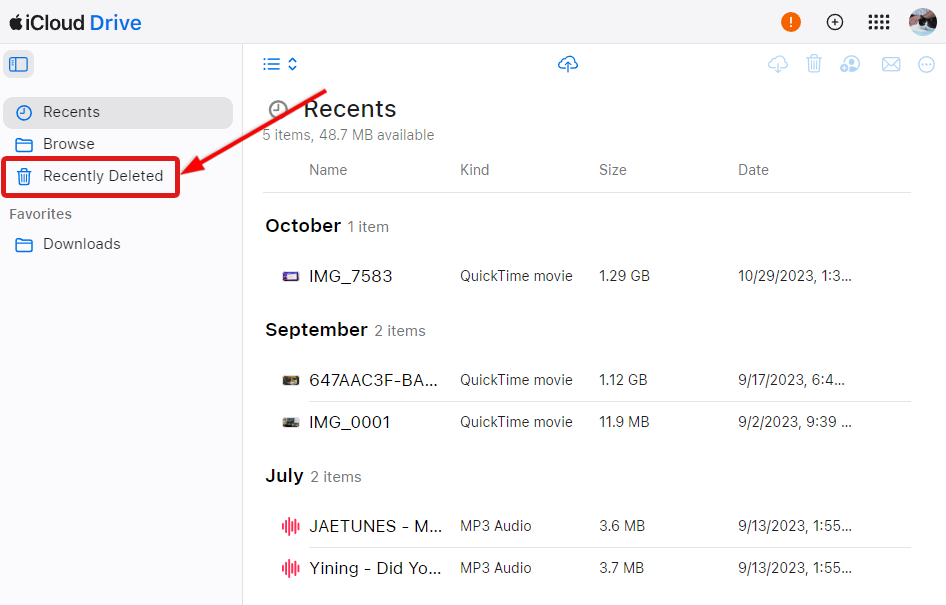
- Then, select the file/s you want to recover.
- Choose the Kebab menu and select Recover.
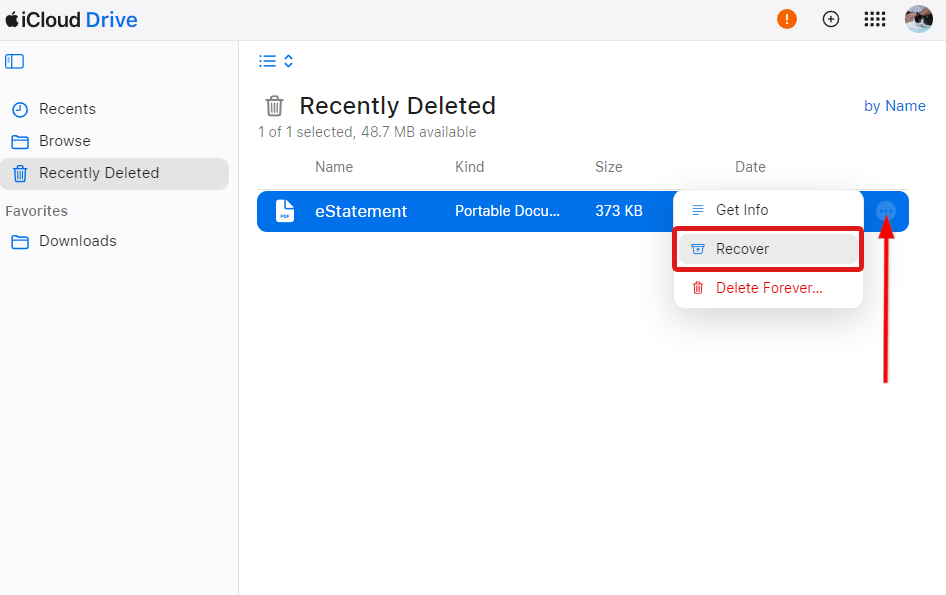
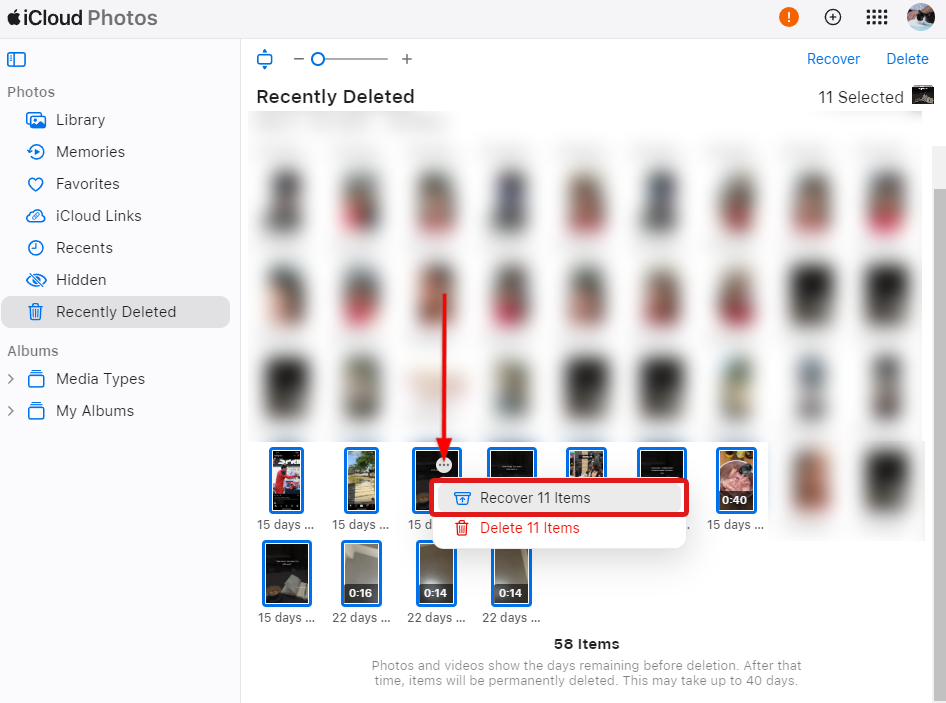
On Photos:
- Go to the Recently Deleted Folder.
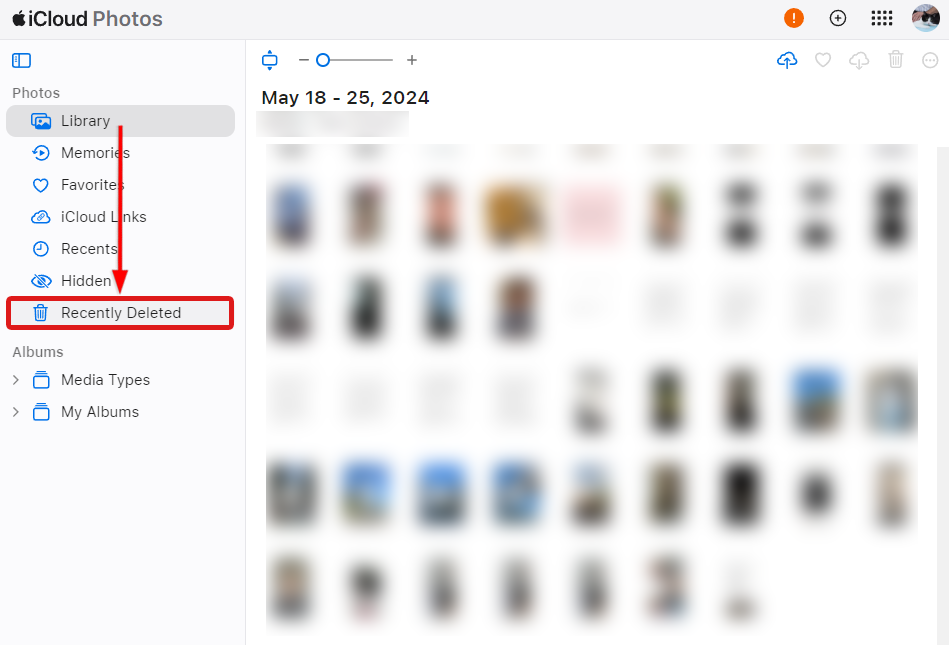
- Select the file/s you want to recover.
- Click the Meatballs menu and select Recover.
On Notes:
- Go to the Recently Deleted Folder.
- Then, select the note you want to recover and choose Recover.
Note that your deleted files will also remain in the Recently Deleted folder for 30 days before the system permanently deletes them.
Recover Lost Data from OneDrive
Microsoft OneDrive offers similar data recovery options to Google Drive, including checking the Recycle Bin folder, restoring previous versions, and contacting support.
Using OneDrive’s Recycle Bin
The retention period for deleted files in OneDrive’s Recycle Bin is 30 days for personal accounts and up to 93 days for work or school accounts. Before trying other methods, ensure that your files are no longer in the Recycle Bin by doing the following:
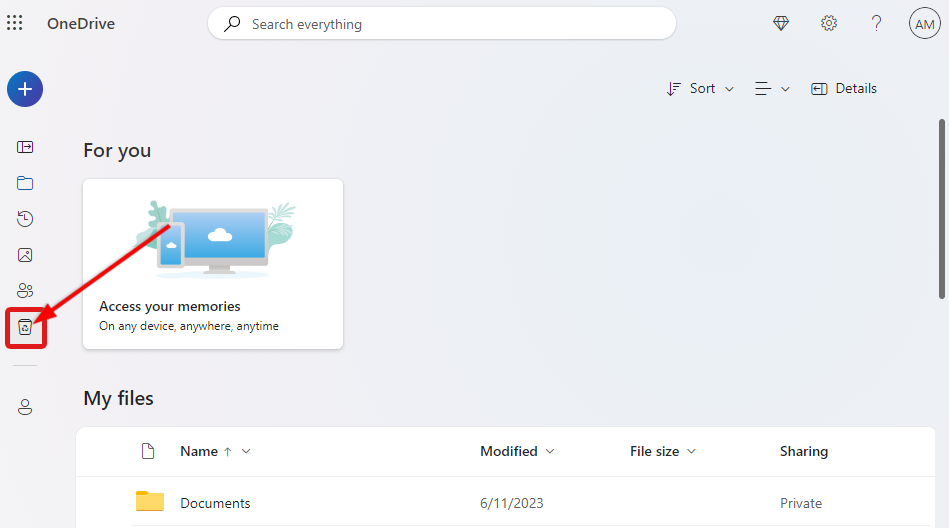
- Open OneDrive using the OneDrive web or desktop app. We’ll use OneDrive in the web browser in this example.
- In the left-hand navigation pane, click on the Recycle Bin.
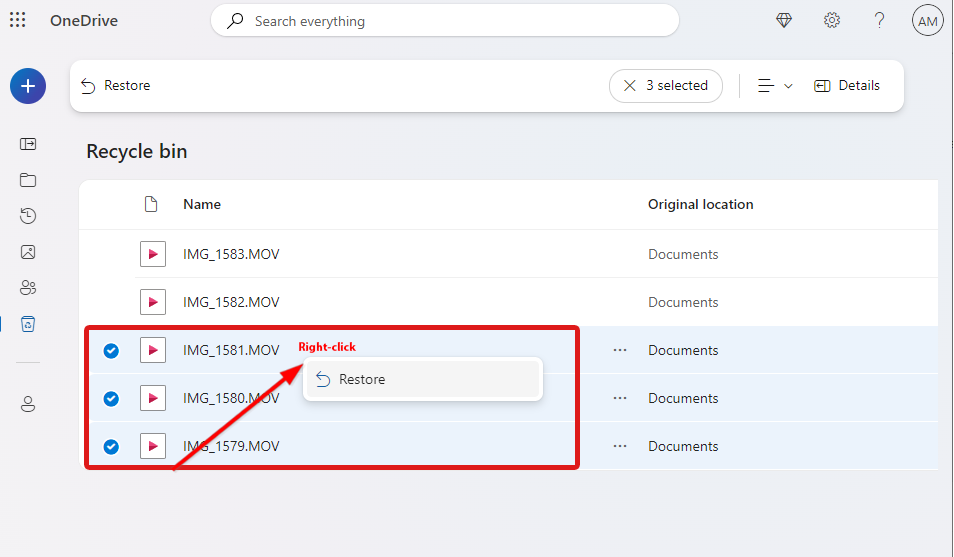
- Browse for the files you want to recover and select them. Then, right-click and choose Restore. Alternatively, you can select Restore from the pop-up menu at the top.
Restoring Previous Versions
Microsoft OneDrive also keeps a version history for your files. Try recovering a previous version if your file was overwritten instead of deleted. Here’s how you can do this:
- Go to OneDrive’s website or navigate to the OneDrive folder on your computer.
- Right-click on the file you want to restore and select Version History.
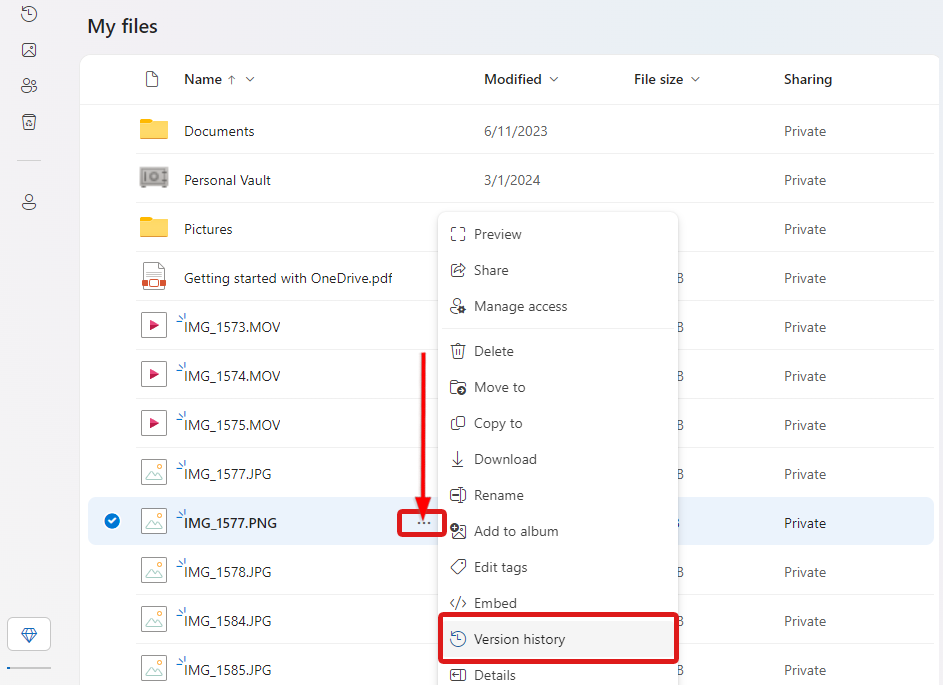
- Choose the version you want to get and click Restore.
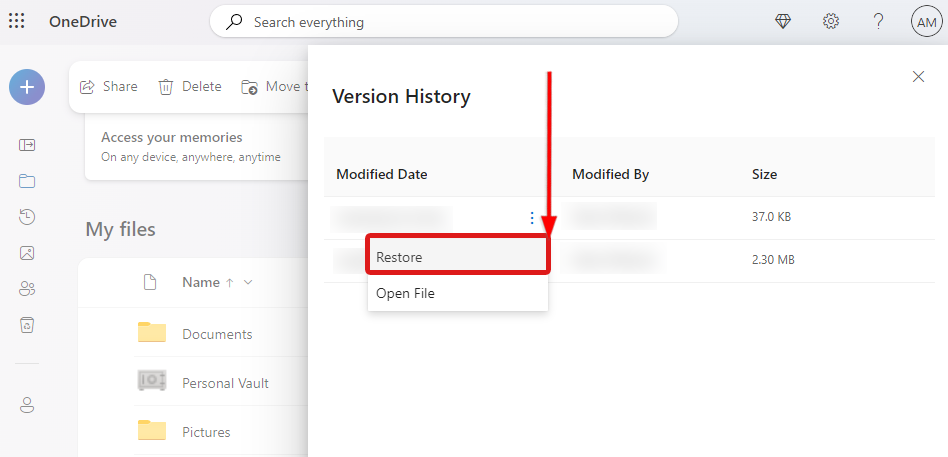
In addition to file-specific previous versions, you can restore a OneDrive previous version of your entire OneDrive if you have a Microsoft 365 subscription.
Recover Lost Data from Dropbox
Dropbox has been in the game for a while now, developing some features to restore accidentally deleted files. However, the support options available for Dropbox Basic users are limited. Here’s what we tried:
Restoring from the Deleted Files Folder
Restoring from Dropbox’s Deleted Files folder is the first step for users who suffered data loss in Dropbox. Follow the steps below to proceed.
- Log into your Dropbox account from your browser or using the Dropbox app.
- Head to the Deleted files menu on the left-hand sidebar.
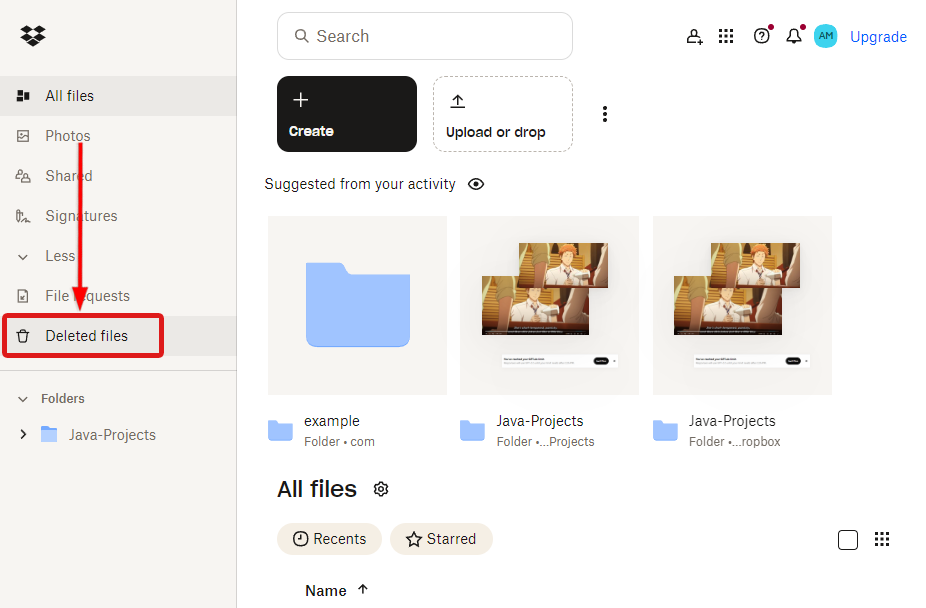
- Look for your deleted files.
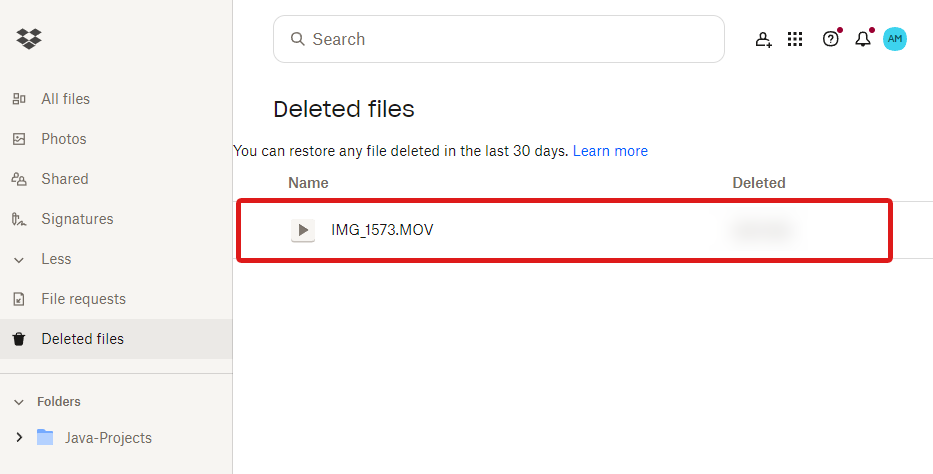
- If your deleted files are there, select them and click Restore.
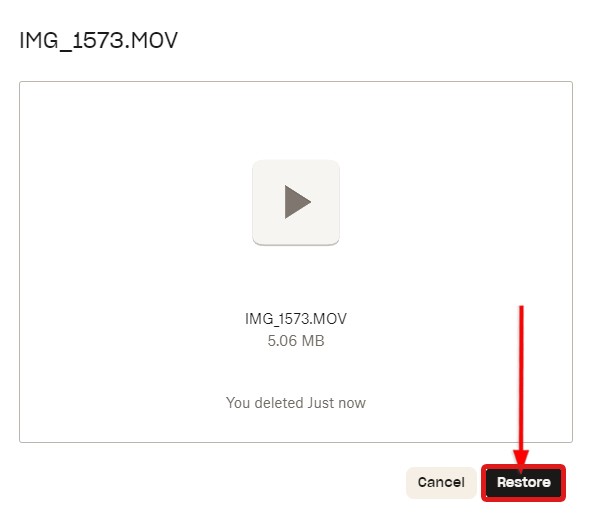
Note: For Free and Plus accounts, Dropbox retains deleted files for 30 days before permanently deleting them. For Professional, Standard, Essential, and Dropbox team accounts, it can be stored for up to 180 days. For Dropbox Advanced, Enterprise, Education, and Dropbox team Plus, deleted file retention is up to 365 days.
Using Version History
Dropbox maintains a version history for your files, allowing you to restore previous versions if necessary. This feature is useful for recovering files before accidental changes.
- Log into your Dropbox account via the web or desktop app.
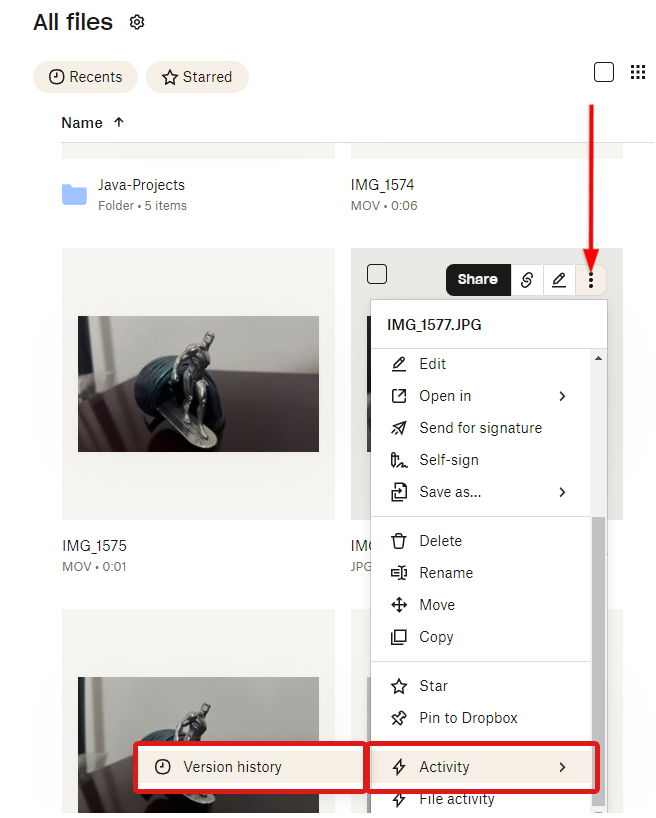
- Click the Kebab menu on the file you want to restore. Then, select Activity > Version History.
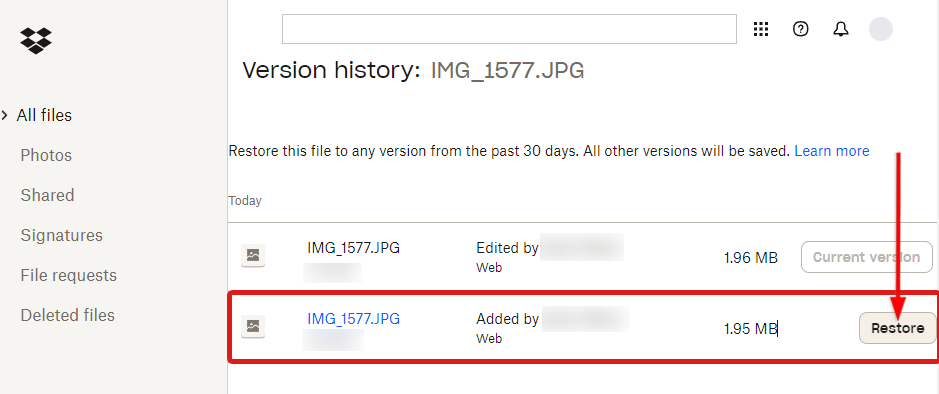
- Select the version you want to recover and select Recover.
For Dropbox Backup plan, Dropbox Plus, Family, Professional, Essentials, Standard, Advanced, Business, Business Plus, or Enterprise users, you can also follow the official guide on using Dropbox Rewind.
Conclusion
Recovery options for cloud storage services have broadened throughout the years. However, retrieving deleted data from cloud storage services is still difficult, if not impossible.
If your files are no longer in your Recently Deleted folder, you may have to contact support for assistance. Sometimes, they won’t be able to help, either. Still, it’s worth trying every method we laid down in this guide if you’re desperate to get your files back.
The best strategy is not to rely on only one cloud storage service and to regularly back up your files.
This article was written by Princess Lescan, a Staff Writer at Handy Recovery Advisor. It was also verified for technical accuracy by Andrey Vasilyev, our editorial advisor.
Curious about our content creation process? Take a look at our Editor Guidelines.
