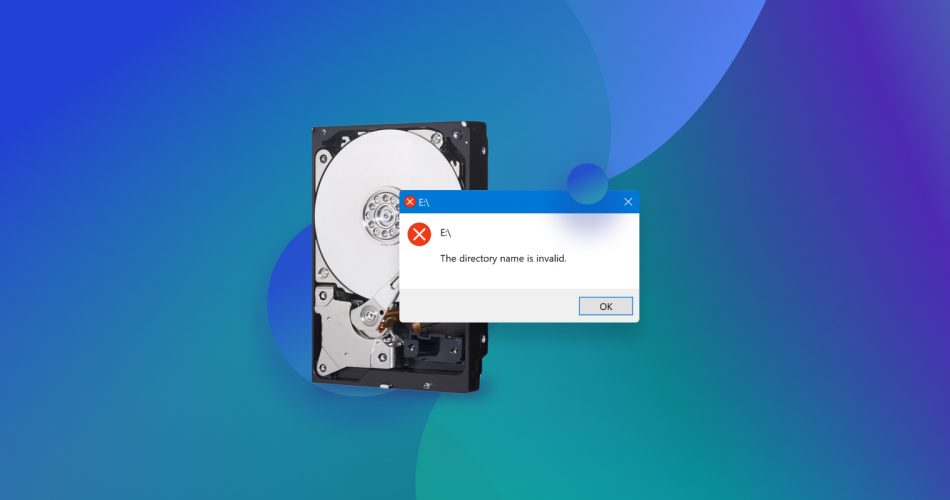
This article discusses multiple methods that can be used to fix a corrupted hard drive on Windows 10 and Windows 11 systems.
If you suspect your hard drive is corrupted or it already gives you major problems, this text is for you. Our team has put together all the methods that have proven effective for DIY hard drive repair in this guide. Here, you’ll find practical steps and tools you can use yourself to fix a corrupted hard drive at home.
In addition to corrupt HDD repair, we will also cover data recovery from problematic drives, as the data stored on them is often far more valuable than the drive itself. If you don’t care about the data, feel free to skip ahead to the fixes.
Common Solutions for Hard Drive Repair
There are multiple signs and symptoms of a corrupted hard drive, such as error messages, files failing to open, or the drive not showing up in File Explorer. Fortunately, there are also multiple solutions to address these problems. For your convenience, we’ve gathered the most common problems and their fixes in this table:
Problem |
Possible Cause |
Solution |
Drive is not detected by the computer |
Faulty connection or port issue |
|
Drive doesn’t show up in File Explorer (but appears in Disk Management) |
File system corruption or missing drive letter |
Use file recovery software to retrieve your files. Assign or change the drive letter in Disk Management, or repair the file system using CHKDSK. |
Files are inaccessible |
File system errors or bad sectors |
Use file recovery software to retrieve your files first, then run CHKDSK to repair the drive. |
Drive slows down significantly |
Fragmentation, bad sectors, or malware |
Use Victoria to scan and remap bad sectors, or defragment the drive. Scan for viruses to rule out malware. |
Files disappear unexpectedly |
Corrupted file system or malware |
Use file recovery software to recover lost files, scan for malware, or use Victoria for diagnostics. |
OS prompts to format the drive |
File system corruption or damaged partitions |
Use file recovery software to restore your data first. Then repair the partition with TestDisk or reformat the drive. |
Drive shows “RAW” file system |
Corrupted partition table |
Recover files using file recovery software, then use TestDisk or reformat the drive. |
Windows fails to boot with this drive |
Corrupted MBR or system files |
Recover critical files with recovery software, then run SFC tool or repair the MBR using AOMEI Partition Assistant. |
Our statistics show that most people searching for this article are dealing with corrupted external drives or internal non-system drives. However, the methods provided here can also apply to system drives. But the thing is, when a system drive is corrupted, your computer often won’t boot properly. If that’s the case, you’ll need to either connect the drive to a different computer with a working OS and use the methods there, or use these methods in a bootable USB environment. We’ve got a detailed separate guide on hard drives that won’t boot to help you handle the issue.
How to Recover Data From a Corrupted Hard Drive
Before we look at ways to repair your logically damaged hard drive, we’re going to cover what you can do to recover your data beforehand. Some methods used to fix a corrupted hard drive may involve the deletion of your data, so recovering what data you can now prevent some loss.
To recover your data, you need a data recovery tool. The one we’re using is Disk Drill Data Recovery. Not only does it have an impressive track record of successful recoveries, it’s also packed with useful features that can be used to monitor your hard drive’s health and preemptively warn you of potential problems (we’ll look at those later). It also has a disk imaging feature, which is super useful for compromised drives—and that’s what we’ll cover right now.
Disk Drill’s disk imaging feature is called Byte-to-Byte Backup. It creates an exact copy of your drive that includes all the data on it—healthy, damaged, or unreadable sectors— everything exactly as it is.
This feature is especially useful for corrupted drives because it lets you work on the backup image instead of the drive itself. It minimizes the risk of further damage and protects your original data during recovery or repair. However, you’ll need enough free space on another drive to save the image. Keep in mind that the image will take up the same amount of space as the entire drive, not just the free space on it. If you don’t have enough free space, you can skip this step and scan the drive directly instead.
Follow these steps to create the image of your corrupted hard drive:
- Download and install Disk Drill. Make sure you install it on a healthy drive, not the corrupted one, to avoid overwriting data.
- Open Disk Drill and go to the Extras menu. Select Byte-to-Byte Backup.
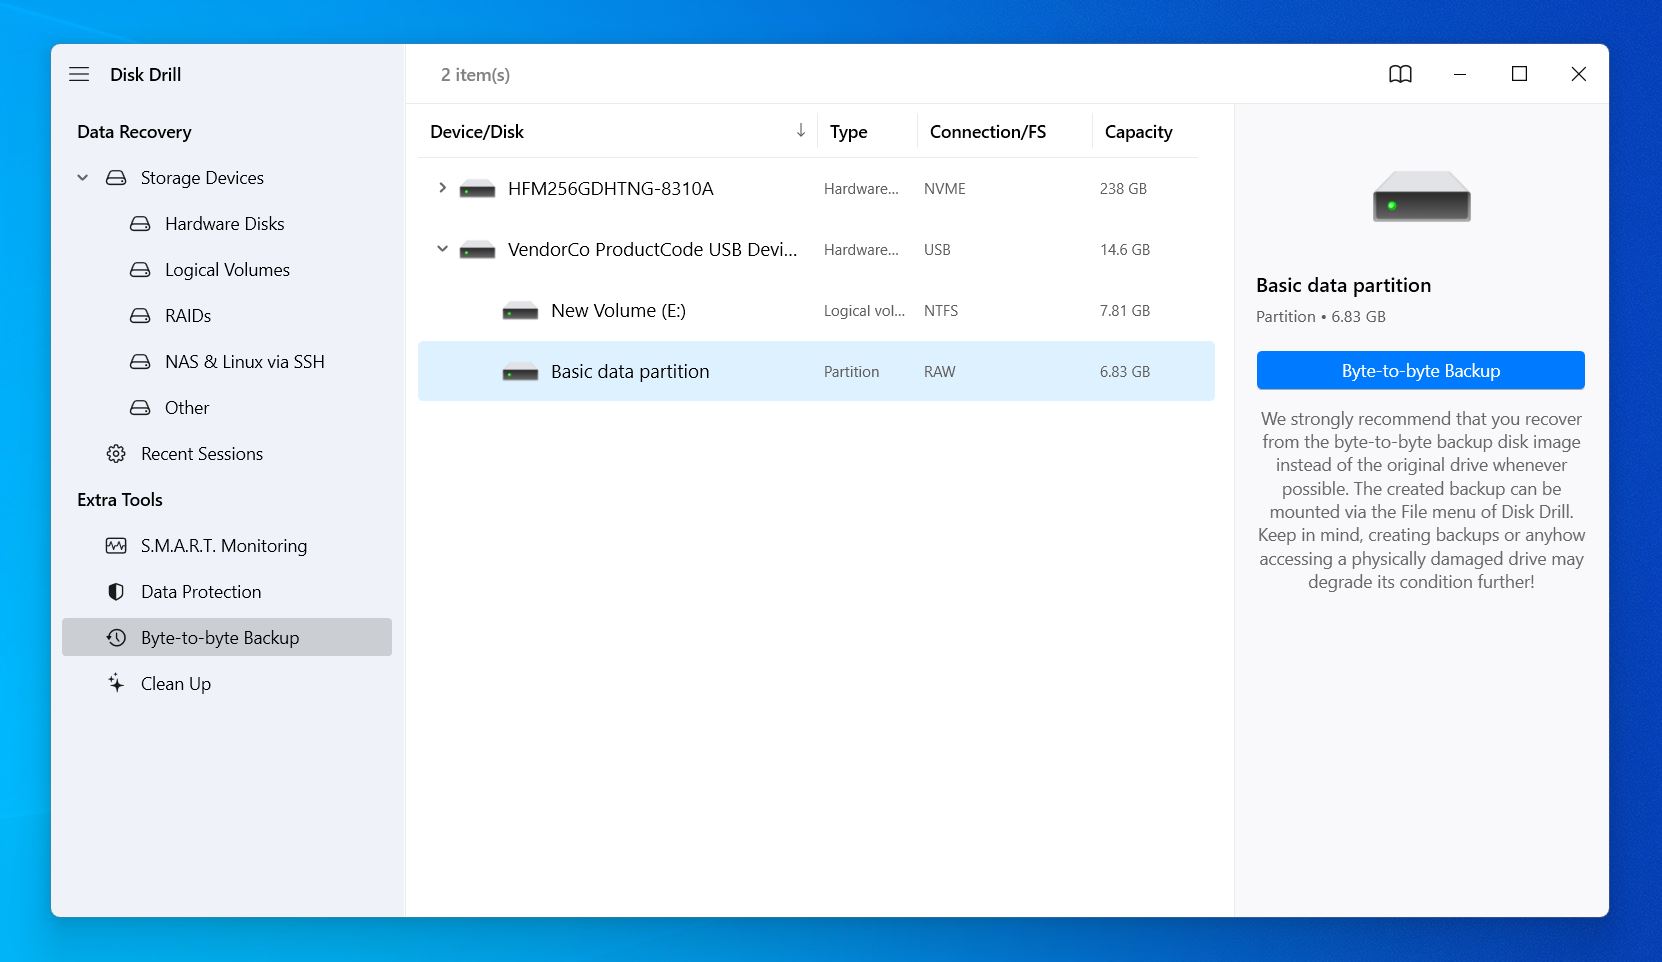
- From the list of drives, select the corrupted drive you want to back up.
- Choose a location on a healthy drive with enough free space to store the image.
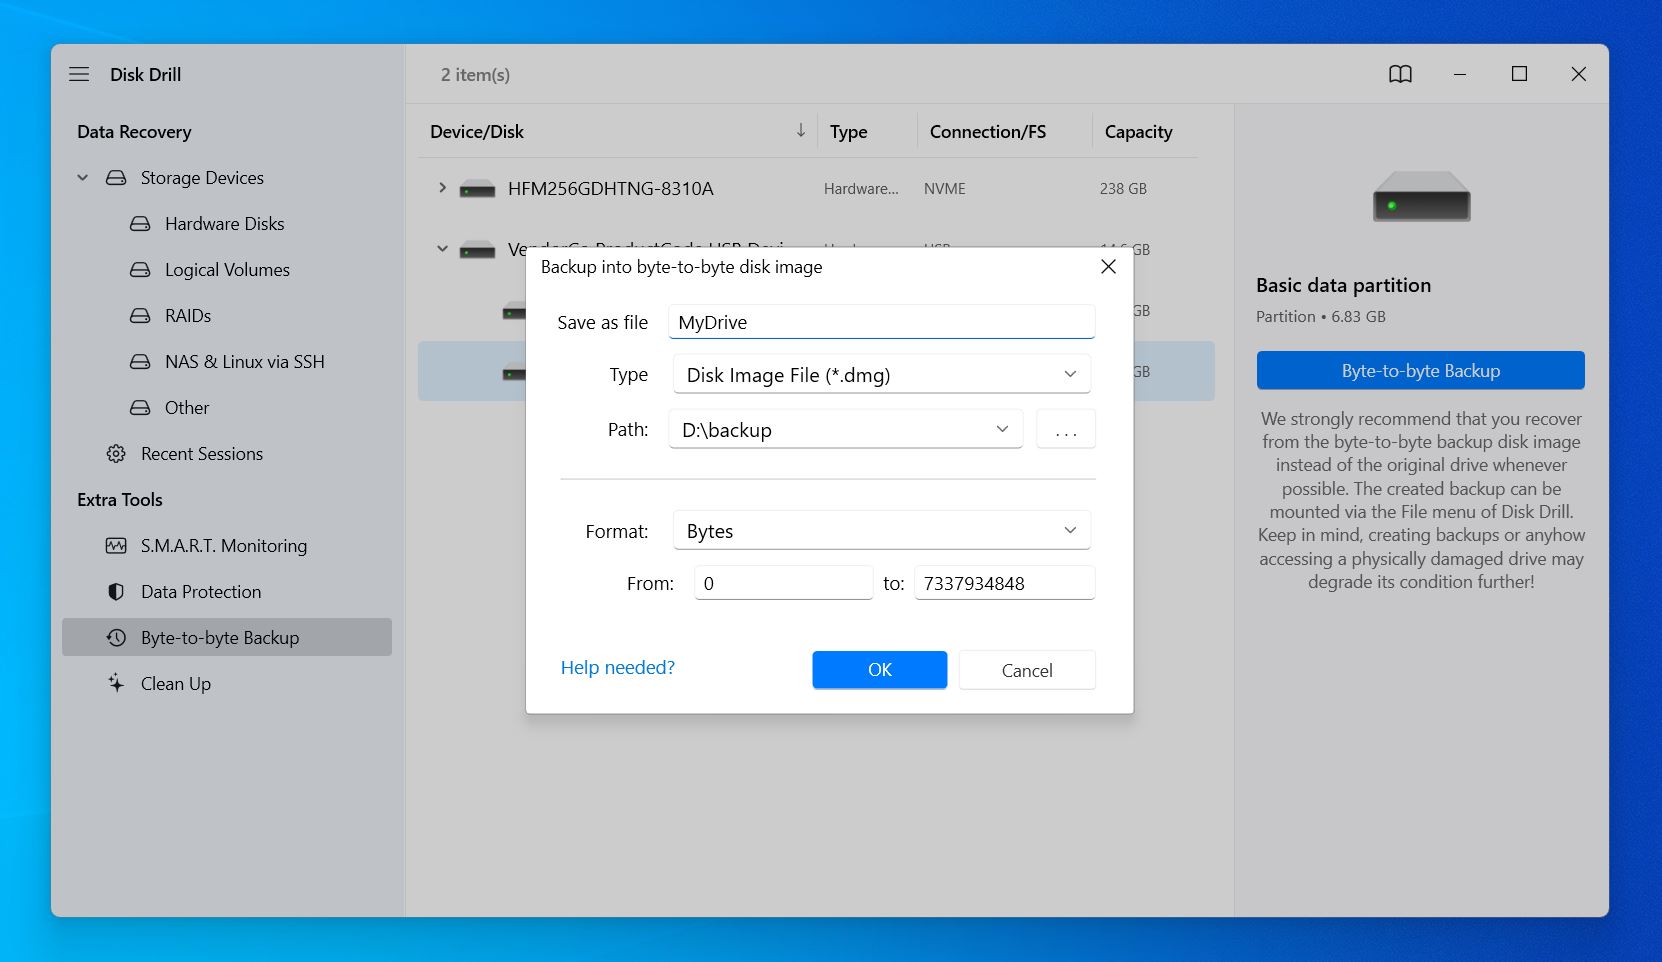 Start the backup process. Disk Drill will create an exact byte-for-byte copy of the drive. This process may take some time.
 - After the backup completes, verify that the image file has been created in the destination folder.
Disk Drill’s Byte-to-Byte Backup feature is available even in the Basic (free) version. However, data recovery in the Basic version is limited to 500 MB. If you need to recover more data, you’ll need to upgrade to the Pro version.
Now that you have an image, here’s how to recover data from it:
- First, you need to mount the image. In Disk Drill’s main menu, look for the Attach Disk Image option at the bottom. Click on it and select the image file you created earlier. Once mounted, the image will appear as a virtual drive in Disk Drill.
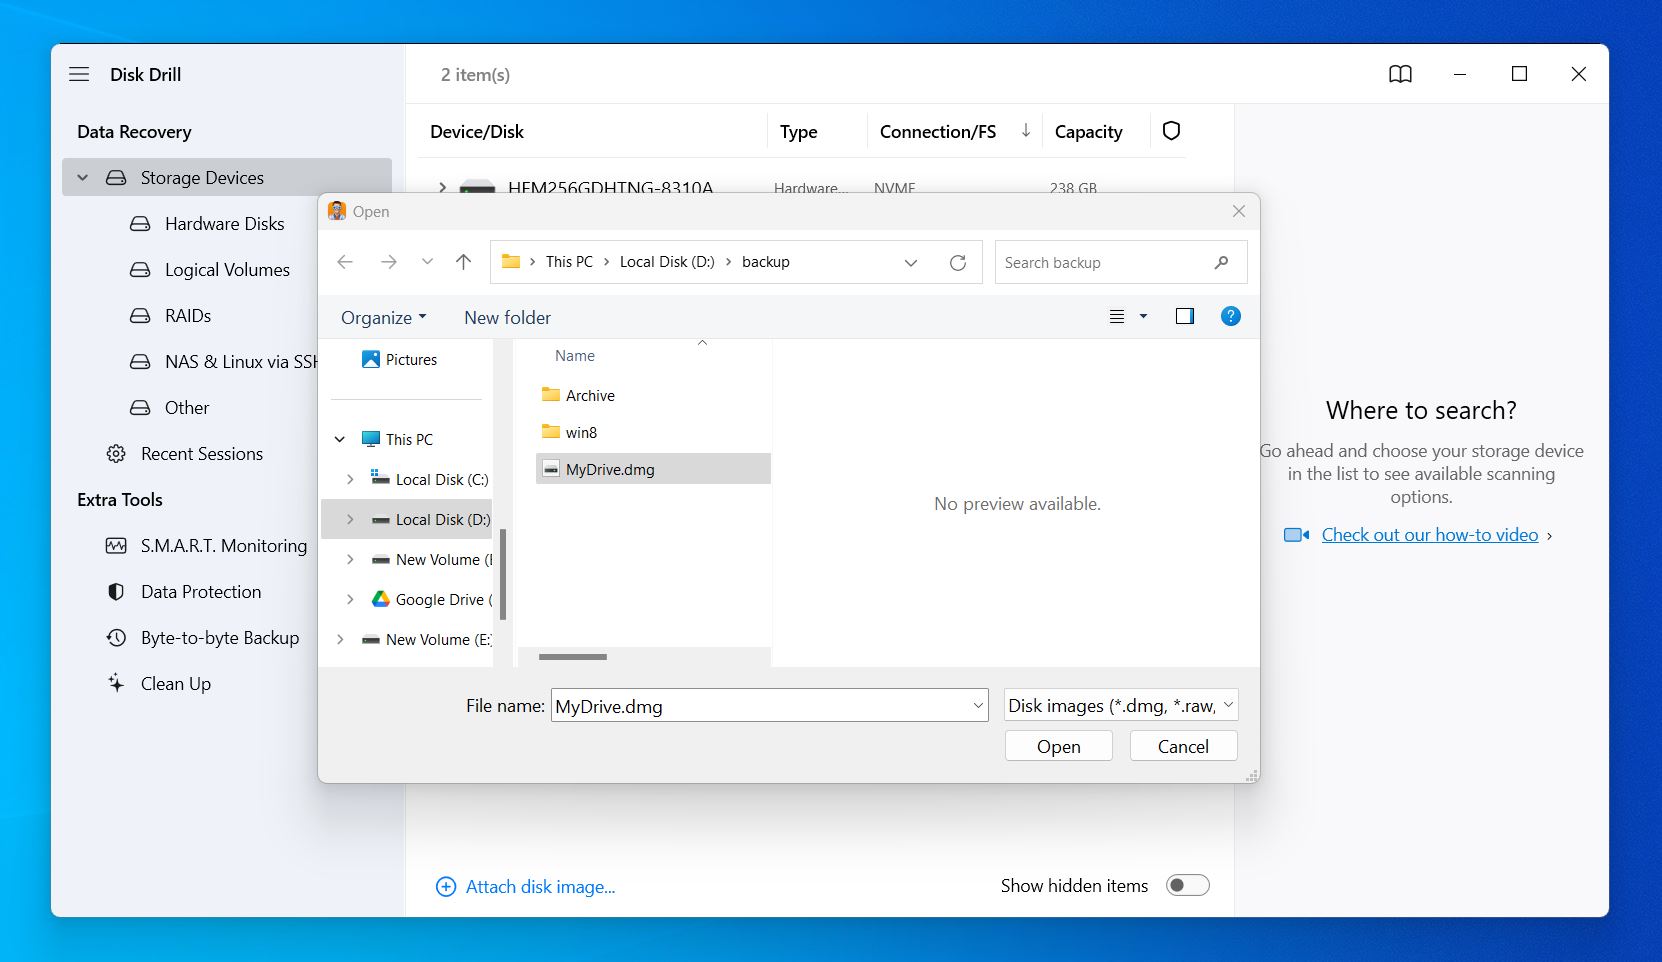
- Now, select the image and click Search for Lost Data. Disk Drill will treat the image as a physical drive and perform a thorough scan to identify recoverable files.
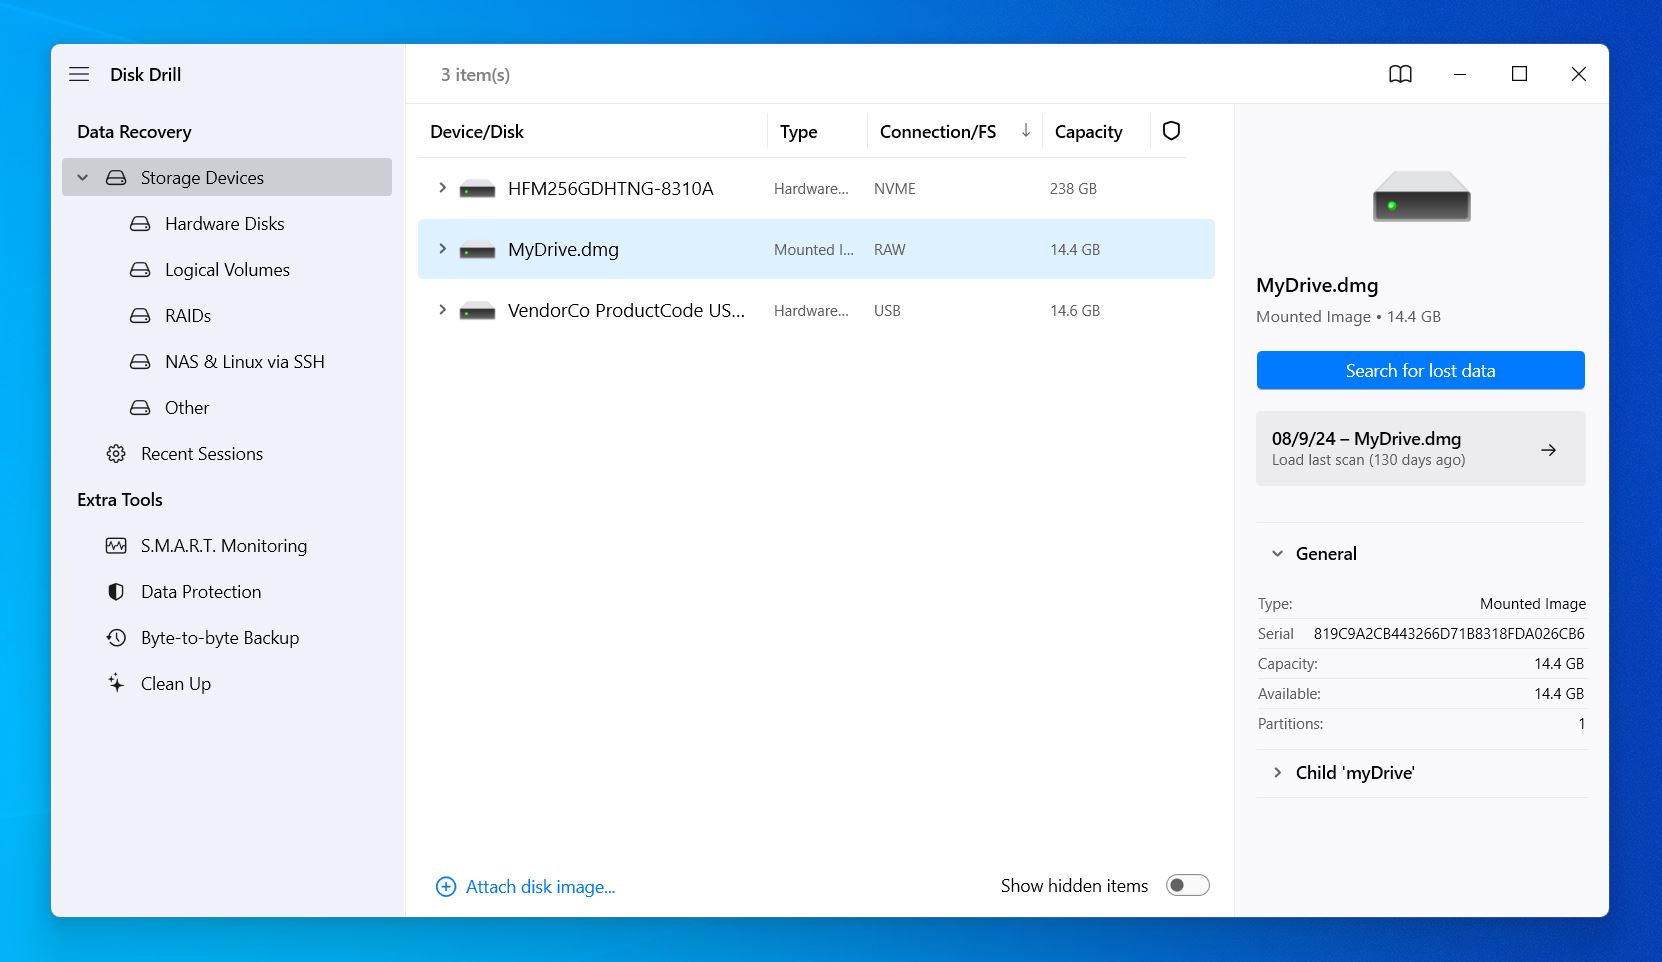
- When the scan finishes—or even during it—you can begin reviewing the results. Disk Drill lets you filter the results by categories like Pictures, Videos, or Audio to quickly locate specific file types. If you want to see everything, select Review Found Items for a detailed list. Or click Recover All to save everything Disk Drill finds to a specific location.
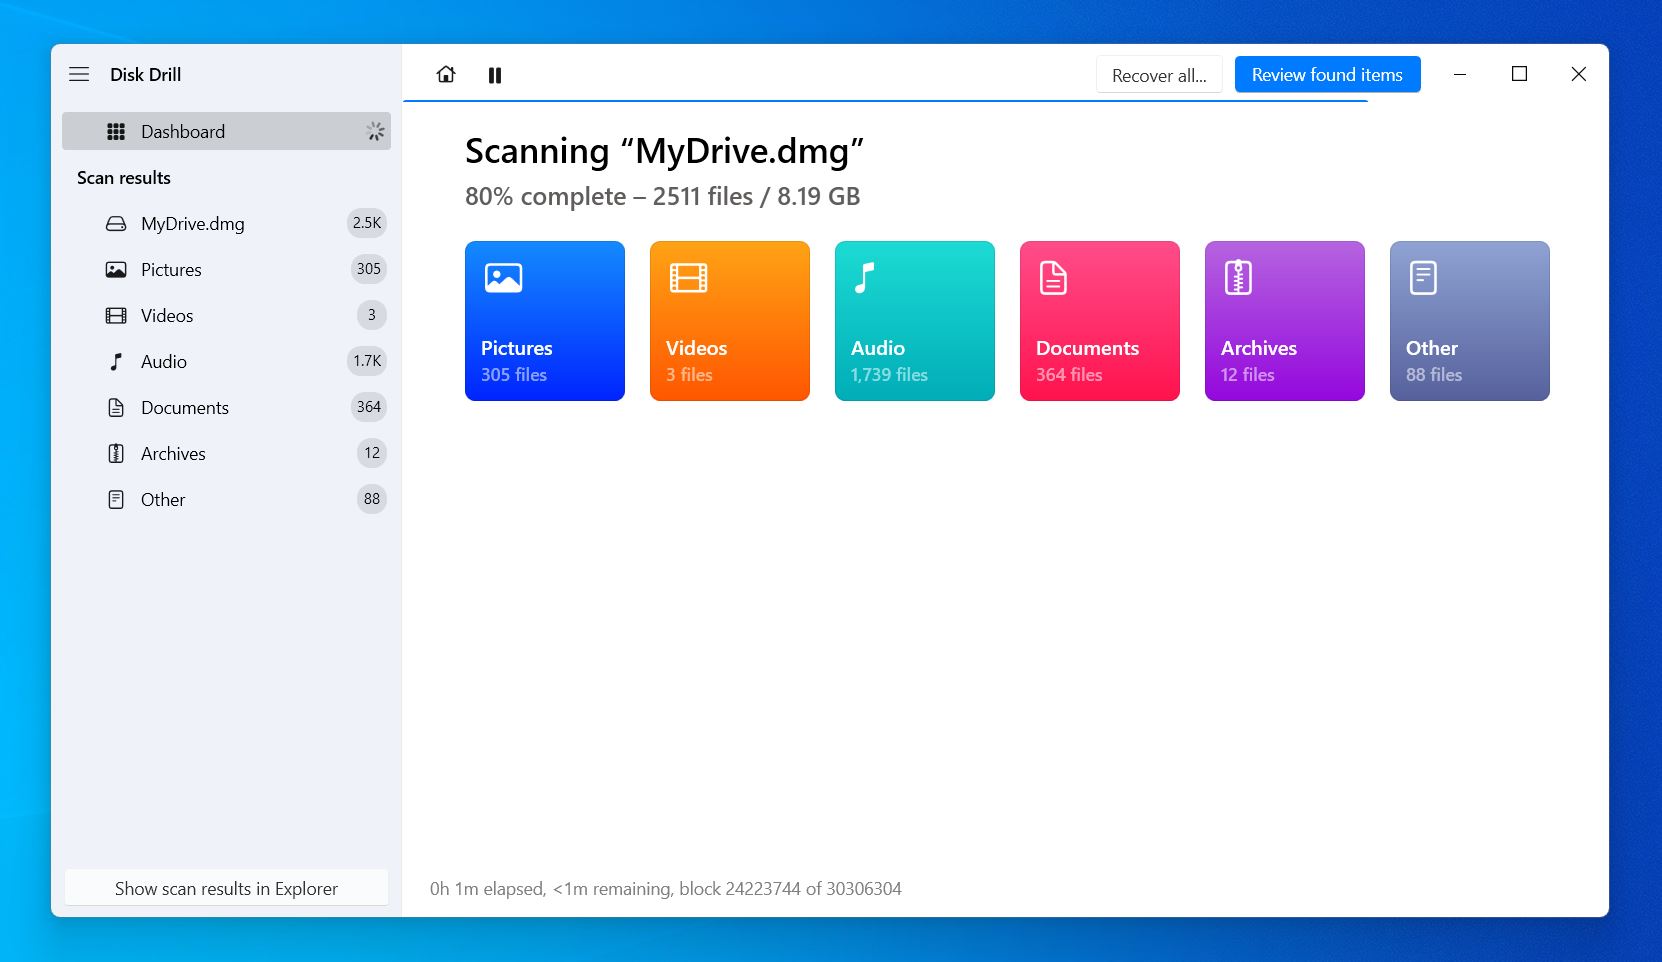
If you choose Review Found Items, Disk Drill will categorize the results into:
- Deleted or Lost: Files that were deleted or are no longer accessible through the file system.
- Reconstructed: Files that Disk Drill recovered by piecing together fragmented data.
- Existing: Files that are intact and accessible on the image.
As you browse through the results, a preview window will appear on the right side of Disk Drill’s interface. This preview supports all file types that your OS can view, either through native tools or third-party apps installed on your computer. To get a closer look at a file, click the eye icon to open a full preview.
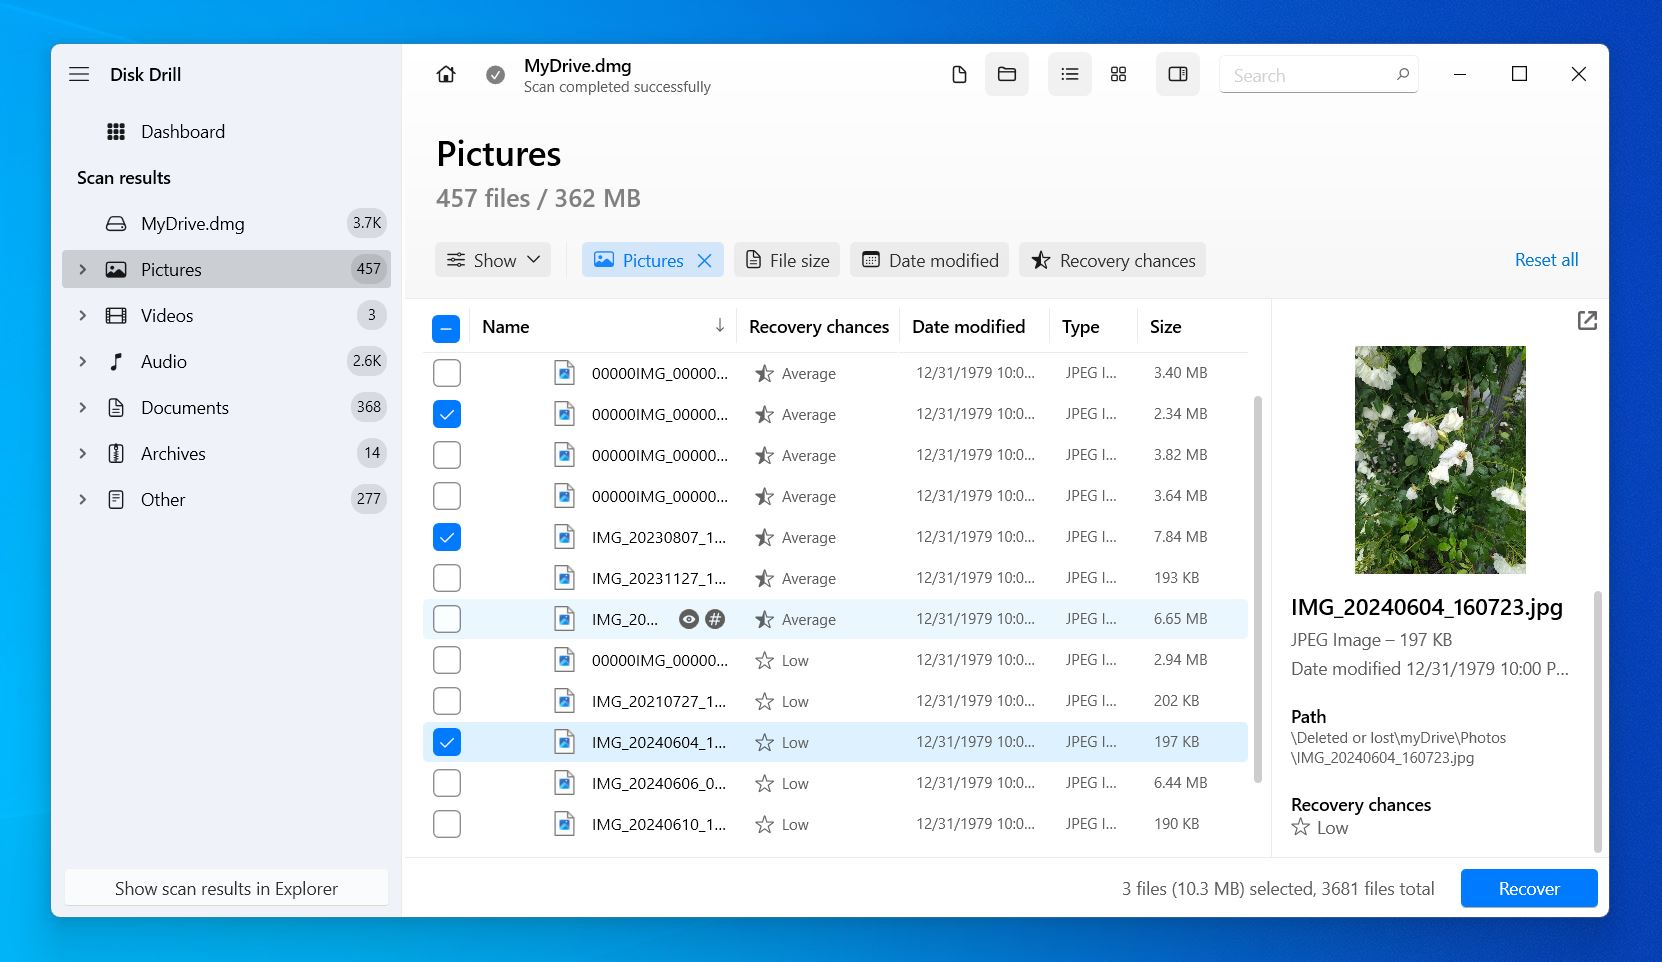
- Pay attention to the Recovery Chances column. It shows how likely it is for each file to be recovered successfully. Files marked with High chances are in the best condition, while files with lower chances may be partially damaged or incomplete.
- You can use filters to narrow down results further by file type, file size, or modification date. Once you’ve identified the files you want, mark them for recovery.
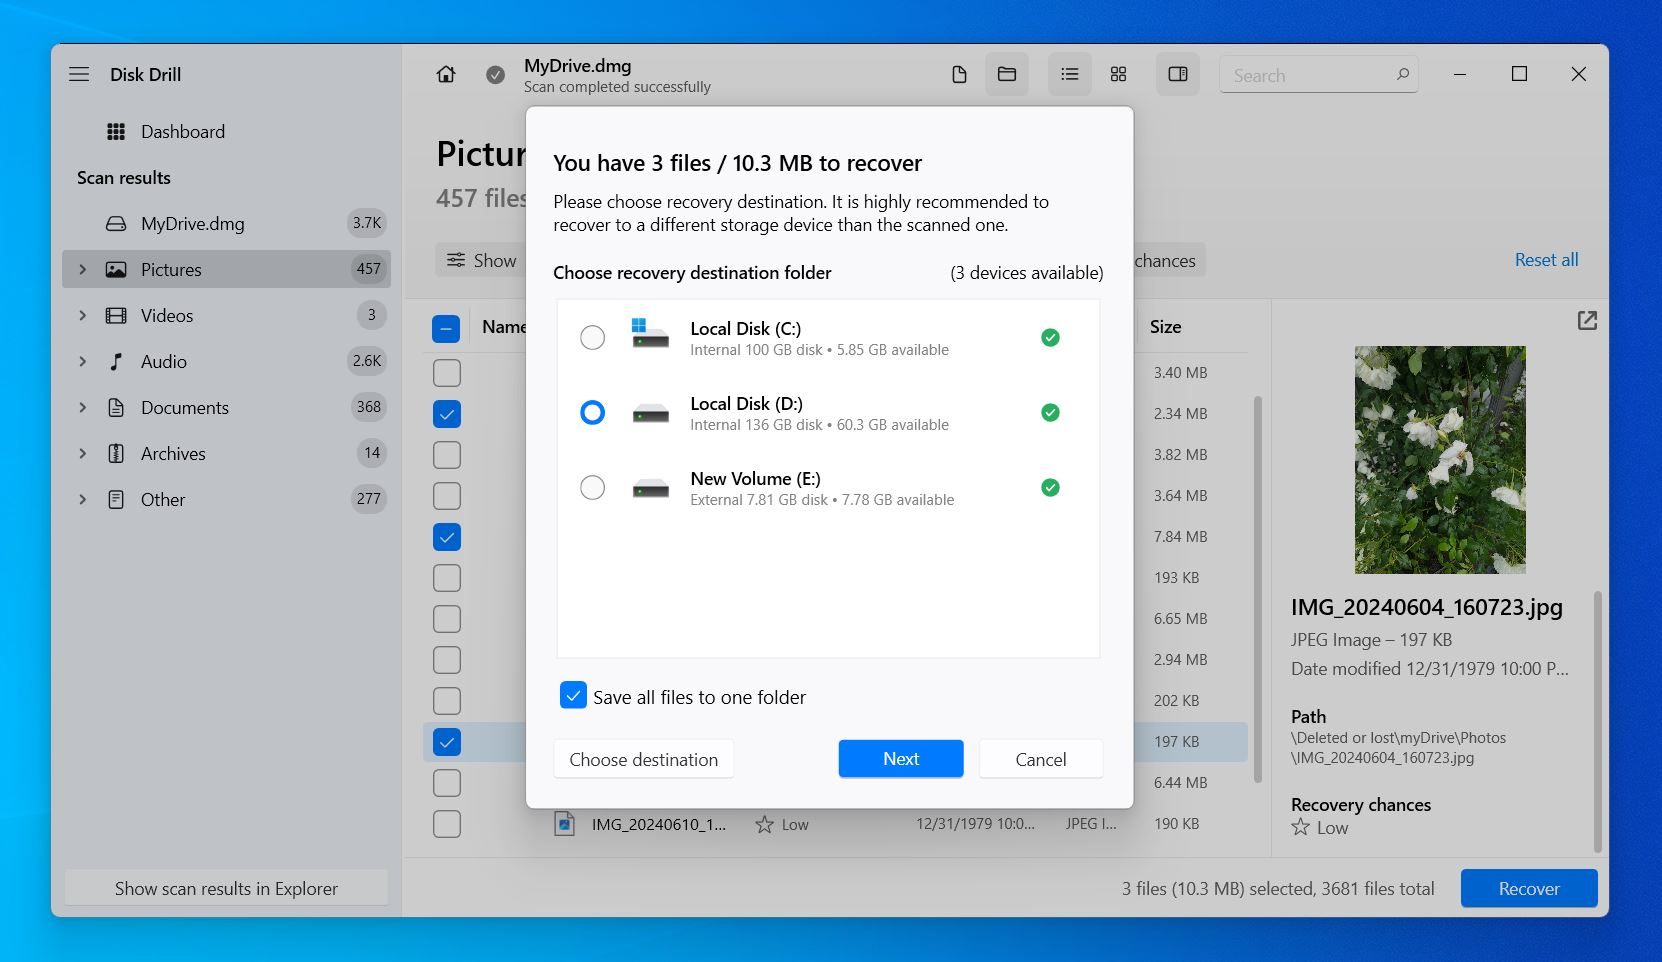
- Click the Recover button and choose a different drive as the recovery destination. Confirm your selection and wait for Disk Drill to complete the recovery process.
Disk Drill is a very reliable tool, but it’s not the only recovery software that can create and scan disk images. If you’d like to explore other options, check out our list of Disk Drill alternatives for additional tools to try.
We’ve mentioned that Disk Drill can monitor your hard drive’s health. While you can check your drive’s health status using built-in Windows tools, such as the wmic diskdrive get status command in Command Prompt, it only provides basic feedback like “OK,” “Bad,” “Unknown,” or “Caution.” This information doesn’t give you a detailed picture of your drive’s condition.
For a more in-depth analysis, you can use Disk Drill’s S.M.A.R.T. Monitoring feature. S.M.A.R.T., or Self-Monitoring, Analysis, and Reporting Technology, is a diagnostic system built into most modern drives. It tracks a range of performance and reliability metrics, such as read/write errors, temperature, and spin-up time, to predict potential failures.
Here’s how to check your drive’s health using Disk Drill’s S.M.A.R.T. Monitoring:
- In Disk Drill’s main menu, navigate to the S.M.A.R.T. Monitoring section.
- Choose the drive you want to monitor and click Turn On to enable real-time monitoring. Disk Drill will begin pulling detailed S.M.A.R.T. metrics.
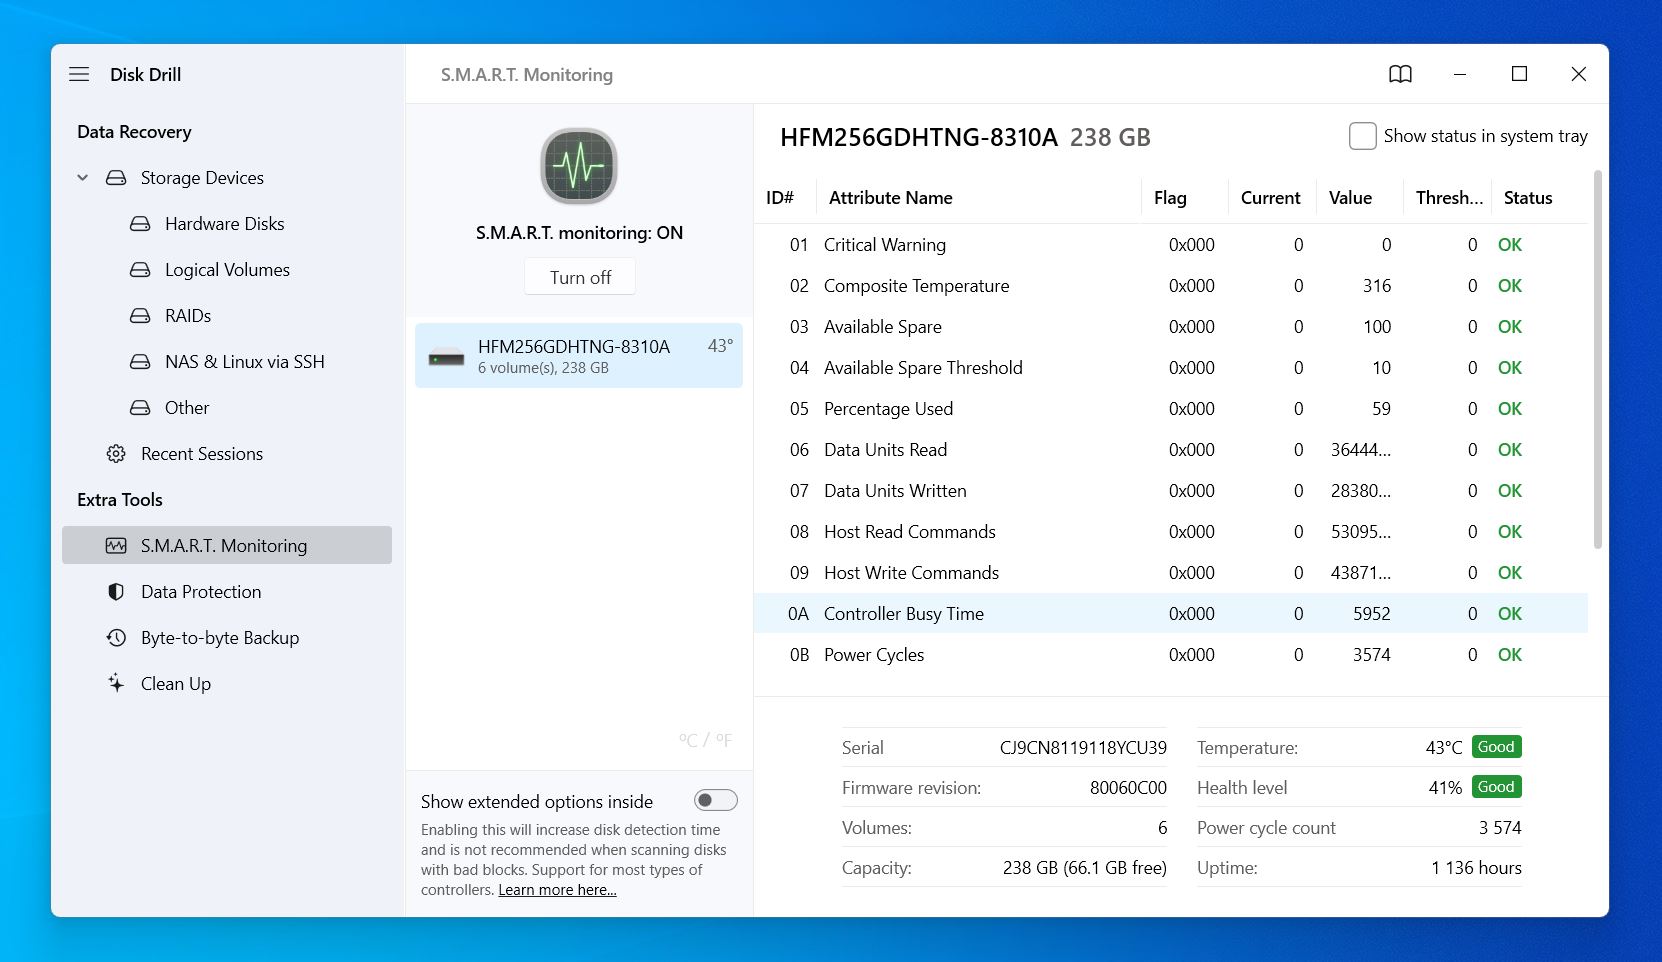
- Disk Drill will interpret these metrics and provide an easy-to-understand health status for the drive, such as “Good,” “Warning,” or “Failing.”
- Disk Drill provides metrics like reallocated sectors, pending sectors, power-on hours, and temperature. As you can see in our snapshot, our drive is in good condition, with all indicators showing normal levels. If you enable this feature, Disk Drill will monitor your drive continuously from now on. It will notify you if it detects any problems, so you can take action before the drive fails completely.
If your drive shows anything other than a “Good” status, we wouldn’t recommend relying on it for important tasks. At the very least, avoid storing anything critical on it. A “Caution” or “Failing” status often means the drive is nearing the end of its usable life, and it’s best to treat it as unreliable moving forward.
How to Fix Corrupted Hard Drive Using Windows Built-in Tools
Now to the fixes. We’ll begin with 6 methods that don’t require any additional apps—everything you need is already included with your Windows OS. These tools are designed to handle common drive issues, from connection problems to file system errors. Let’s go through corrupted disk repair fixes step by step:
Method 1: Check The Connections
This one might seem obvious, but many people overlook it. A corrupted hard drive can often result from something as simple as a loose cable or a faulty port.
Instead of connecting your hard drive using a port on your PC case or USB hub, connect to the USB port that’s on your motherboard. In most PC cases, this is located on the back I/O panel of your computer.
Connecting through the USB port on your motherboard rules out the possibility of ports being broken on your computer’s case or USB hub.
If it’s an internal drive, you’ll need to check the SATA connections:
- Open your computer case and confirm the SATA cable is securely connected to both the drive and the motherboard.
- Look for any signs of damage to the cable, as a worn or faulty cable can cause problems.
- Replace the SATA cable with a new one if you suspect it’s the issue.
- Make sure the power supply cable is properly connected to the drive.
In order to isolate whether the issue sits with your hard drive or the computer, try connecting the hard drive to another computer. If the hard drive works on another computer, then the fault may actually be with your own computer.
Method 2: Scan for Viruses
Corruption can be caused by a virus attack. An easy way to identify if this is the cause of the problem is by running a scan using your antivirus software. This can effectively eliminate the problem and prevent further corruption.
Keep in mind that installing anything to the drive after data loss decreases your chances of recovery as it may be overwritten.
Windows 10 and 11 include a built-in virus scanner called Windows Security (formerly Windows Defender). It’s effective, but you can also use free antivirus tools like Avast or AVG if you prefer.
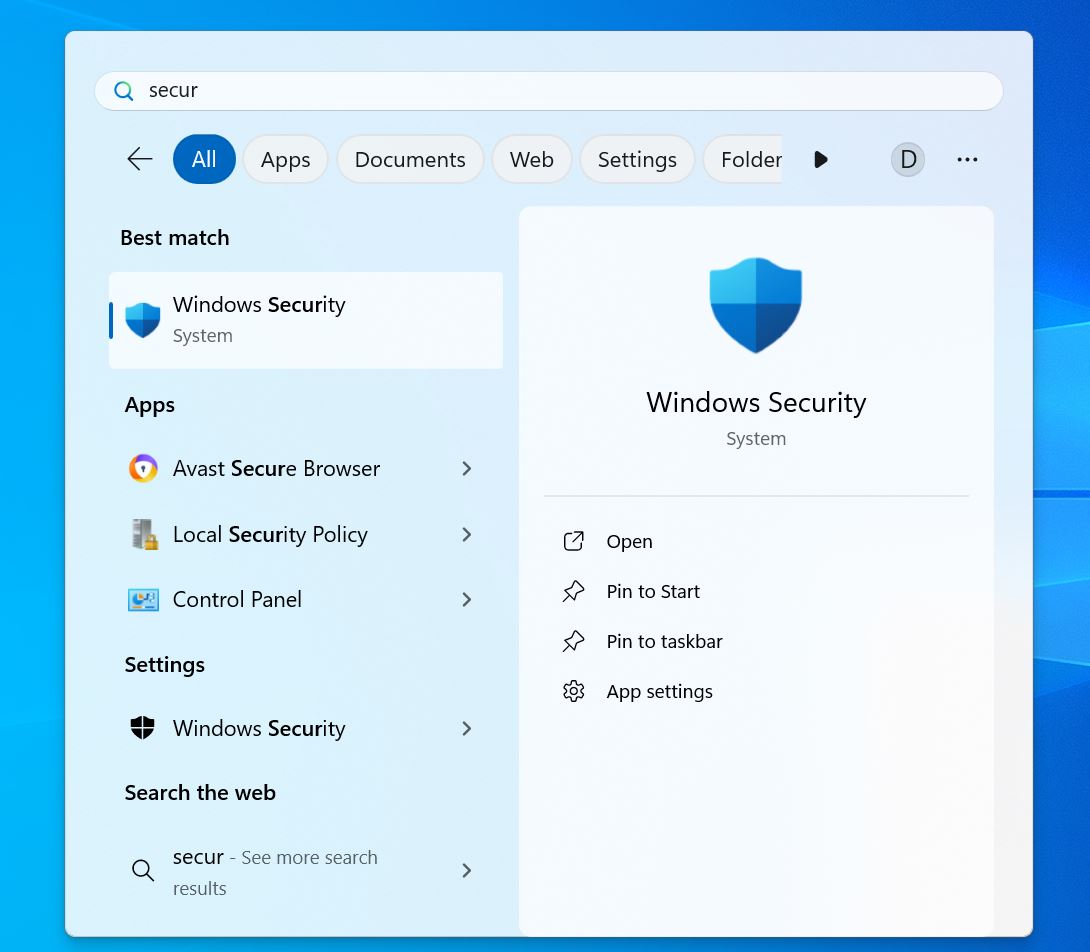
- Press the Win key, type Windows Security, and open it.
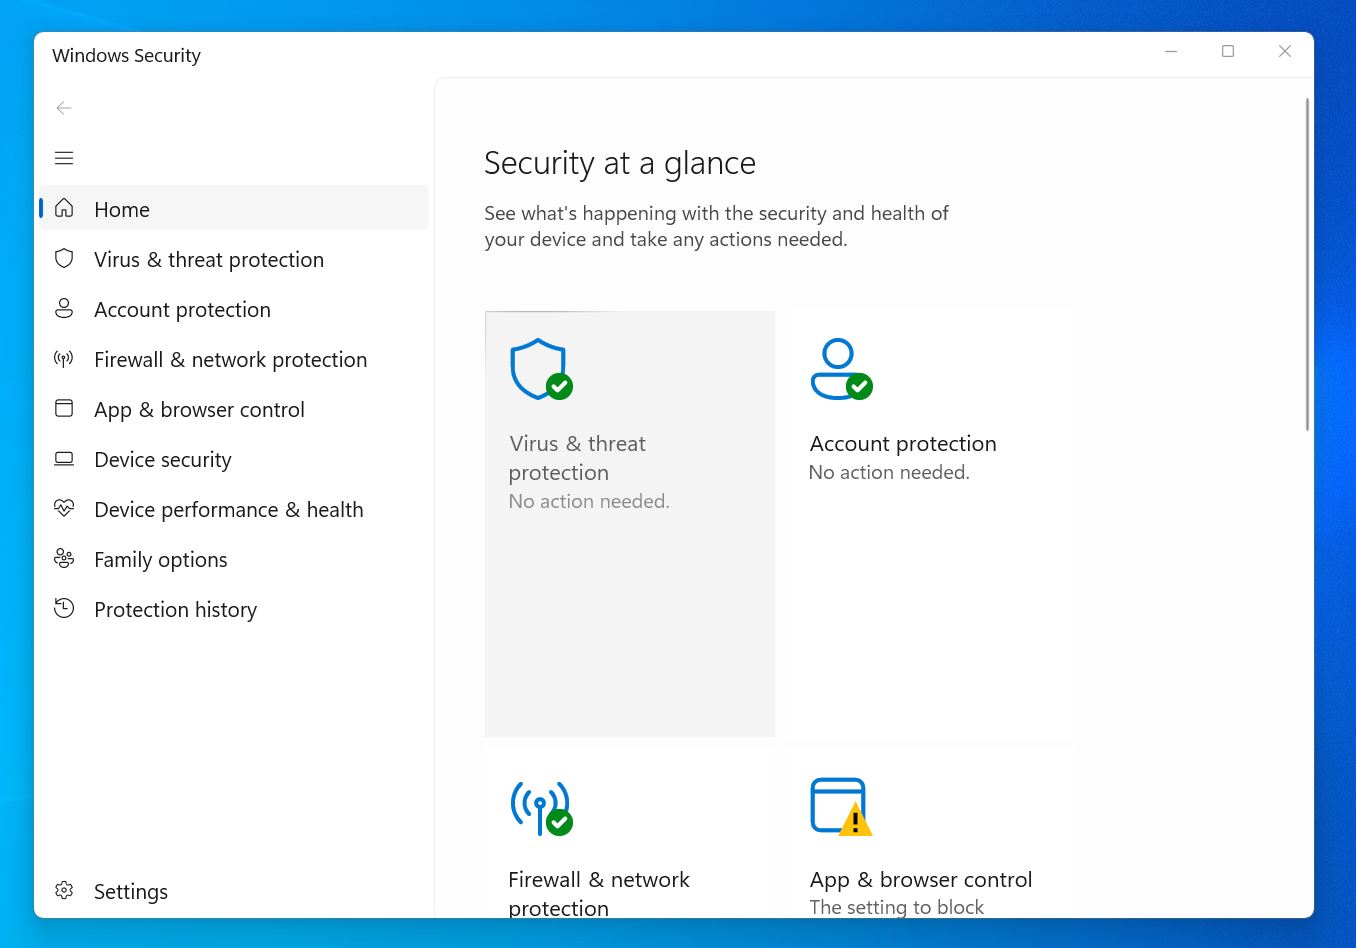
- Go to Virus & Threat Protection and click Quick Scan. For a deeper scan, select Scan Options and choose Full Scan.
Method 3: Assign or Change the Drive Letter
The lack of a drive letter or a conflicting one can cause big problems for a drive’s normal function. However, if that’s the issue, it’s usually quick and easy to fix. Here’s how to assign or change the drive letter:
- Right-click Start and click Disk Management.

- Right-click the corrupted partition and click Change Drive Letter and Paths.

- Click Change. If there is no drive letter, click Add instead.

- Choose a drive letter from the dropdown menu. Click OK.

- Click OK again.
Did you know? Drive letters aren’t required for accessing storage devices. Look at Mac OS X and Linux, for instance. The lack of drive letters seems to work just fine for those operating systems, so why are they still necessary in Windows? Well, the biggest reason would be backwards compatibility. Each change Microsoft makes includes great consideration for what came before.
Method 4: Repair Using CHKDSK
Check Disk (CHKDSK) is a command in Windows that can scan and resolve any problems it discovers on your hard drive. It’s customizable using different parameters, depending on what you want the command to do.
CHKDSK can sometimes delete damaged files during repairs. It’s a good idea to back up your corrupted drive first, as explained in How to Recover Data From a Corrupted Hard Drive. Once your data is safe, you can run CHKDSK without risk.
We’re going to use the /r parameter. This will fix any errors on the disk and search for bad sectors, consequently marking them as unavailable for storage.
- Right-click Start and click Windows PowerShell (Admin). If prompted to allow access by UAC, click Yes.

- Type chkdsk E: /r. Replace E: with the drive letter of your corrupted hard drive. Press Enter.

This command can take some time to complete if your hard drive is large in size.
Method 5: Repair Using SFC & DISM
This method will include the use of two Windows functions: System File Check and DISM. System File Check is used to check for system file corruption and replaces corrupted system files with working versions. DISM also does this and verifies the integrity of the file system to make sure no corruption remains.
If you’ve modified any system files, like DLL files, this method will revert them back to their original state. Always start with SFC. It specifically targets corrupted system files and is faster than DISM. If SFC reports that it couldn’t fix some files, follow up with DISM to repair the system image. After running DISM, rerun SFC to make sure all issues are resolved.
- Right-click Start and select Windows PowerShell (Admin).

- Type sfc /scannow and press Enter.

- Type dism.exe /online /cleanup-image /restorehealth and press Enter.

Method 6: Format the Drive
Formatting is a last-resort solution. Only try it if you’ve exhausted all other options, already retrieved your files from the drive, or don’t care about the data on it.
Formatting your hard drive is a solution used to fix all types of problems, including corruption. It erases your hard drive and puts a new, clean file system in place. It comes in two forms: Quick Format and Full Format.
A Quick Format is faster and works by quickly deleting all of the data on the disk. Although the data is deleted and cannot be accessed by the operating system, it can often be recovered using data recovery tools as the data still remains on the disk until it’s overwritten.
A Full Format takes longer, but it’s more efficient. The data is wiped and is basically unrecoverable. The Full Format also checks your data for bad sectors, which contributes greatly to the time it takes for the format to complete.
Before formatting, it’s important that you backup or recover what data you can. While formatting can repair a damaged hard disk, there’s no guarantee that your data can be recovered after the drive is formatted, and if a Full Format is performed, your data will be gone permanently.
Here’s how to easily format your drive:
- Right-click Start and click Disk Management.

- Right-click the corrupted partition and click Format.

- Check Perform a quick format. Click OK.

If you want to perform a Full Format, uncheck Perform a quick format in the final step. Note, however, that this likely renders your data unrecoverable after completion.
3 Software Options to Repair Corrupted Hard Drive
Here are 3 third-party software solutions that may help you fix a corrupted HDD. Each tool addresses different types of corruption scenarios, which we’ll explain for each option.
Option 1: Use Victoria to Remap Bad Sectors
Use Victoria when your hard drive shows signs of bad sectors, such as slow performance or frequent read/write errors.
Victoria is a powerful diagnostic tool that scans for bad sectors and attempts to remap them. It’s been around since 2006 and has a strong reputation for handling physical drive problems, especially bad sectors.
It scans your drive sector by sector to find slow or damaged areas, then tries to fix bad sectors or marks them as “unusable” so your OS doesn’t touch them. This can improve performance and extend the drive’s usability.
Here’s how to use VictoriaHDD to fix your drive:
- Download the latest version. Extract the program files to a folder. It doesn’t require installation—you run it directly from the executable file.
- Right-click the program file and choose Run as Administrator, so it has full access to the drive.
- From the list of connected drives, choose your hard drive.
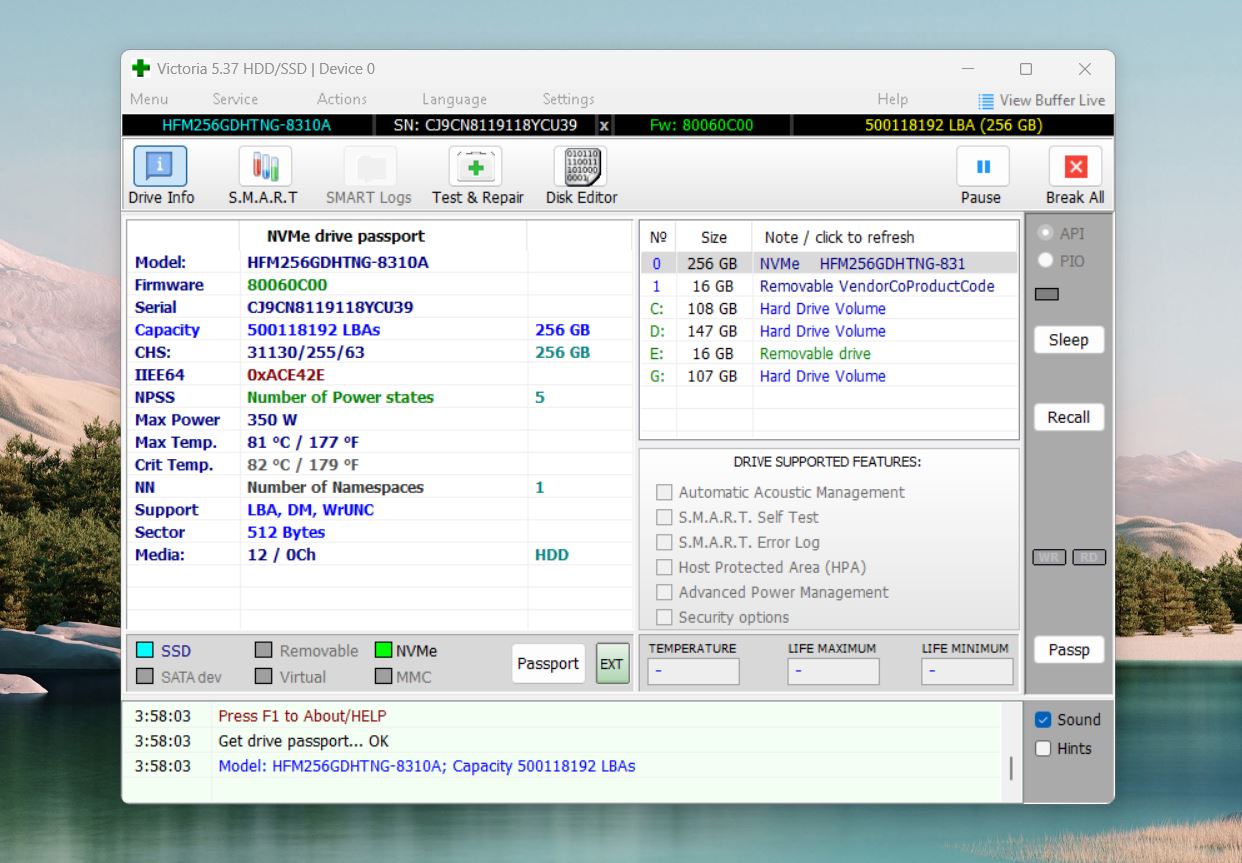
- Open the Tests tab and select Scan to begin analyzing the drive’s sectors. As the scan progresses, Victoria will display a map of your drive’s health, it marks sectors as good, slow, or bad.
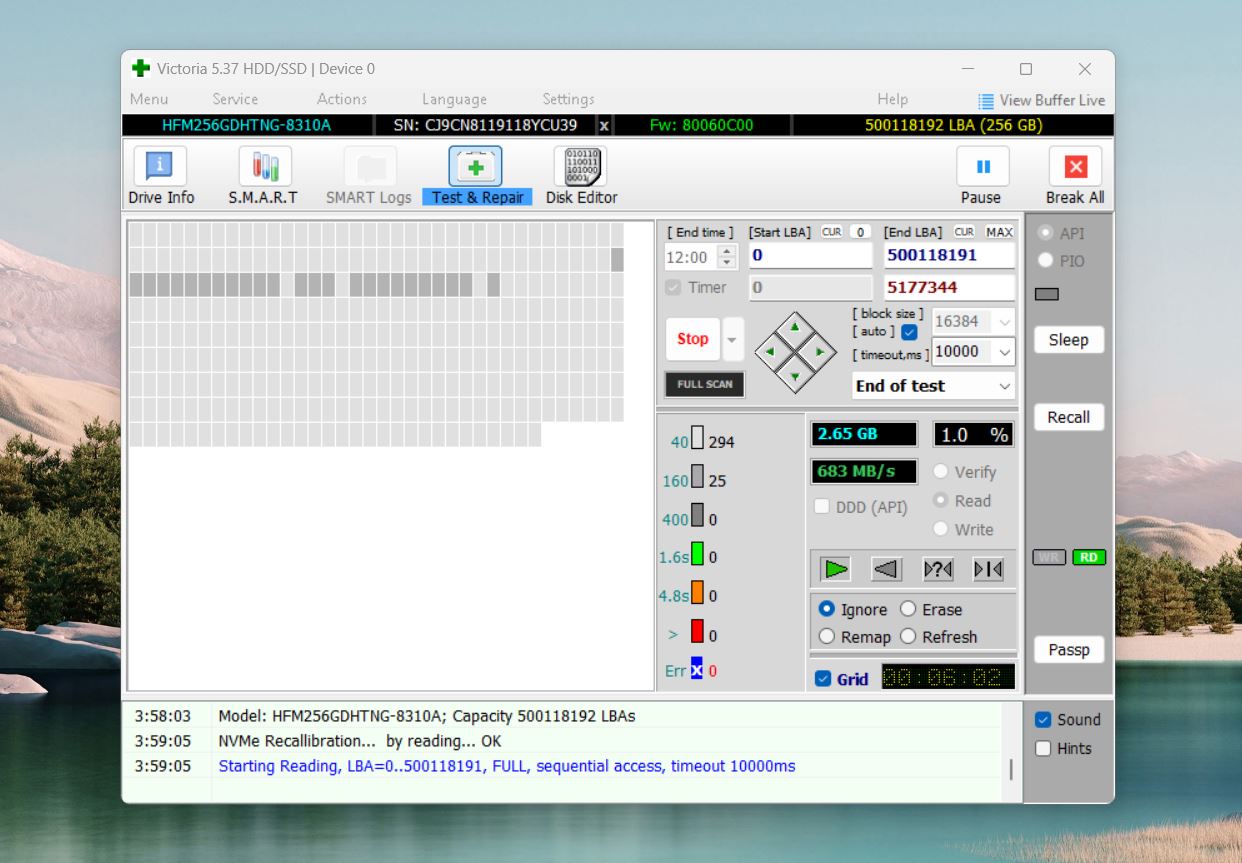
- If bad sectors are found, use the Remap option to reallocate them. This way the system will avoid writing data to these sectors.
Our team has put together a list of the best software to repair a corrupted hard drive. If you’re looking for more tools beyond what’s mentioned here, check out our recommendations.
Option 2: Use TestDisk to Repair Partitions
Use TestDisk if your hard drive has corrupted or missing partitions, or if it shows as RAW or unallocated in Disk Management.
TestDisk is a free, open-source tool designed to fix partition tables, recover deleted partitions, and repair file systems. It’s ideal for logical corruption scenarios where the partition information has been damaged but the drive itself is physically intact.
It’s a tool you’ll often see on “best of” lists, and for good reason—it’s extremely capable at what it’s built to do. However, it works entirely through the command line, which is its biggest downside for most users. Here’s how to use TestDisk to repair hard drive on Windows 10/11:
- Go to the official TestDisk website and download the latest version. TestDisk doesn’t require installation. Simply download the archive from the official website, extract it, and run the TestDisk.exe file inside the extracted folder. The latest version is 7.3, but since it’s currently in beta, we recommend using the stable 7.2 version.
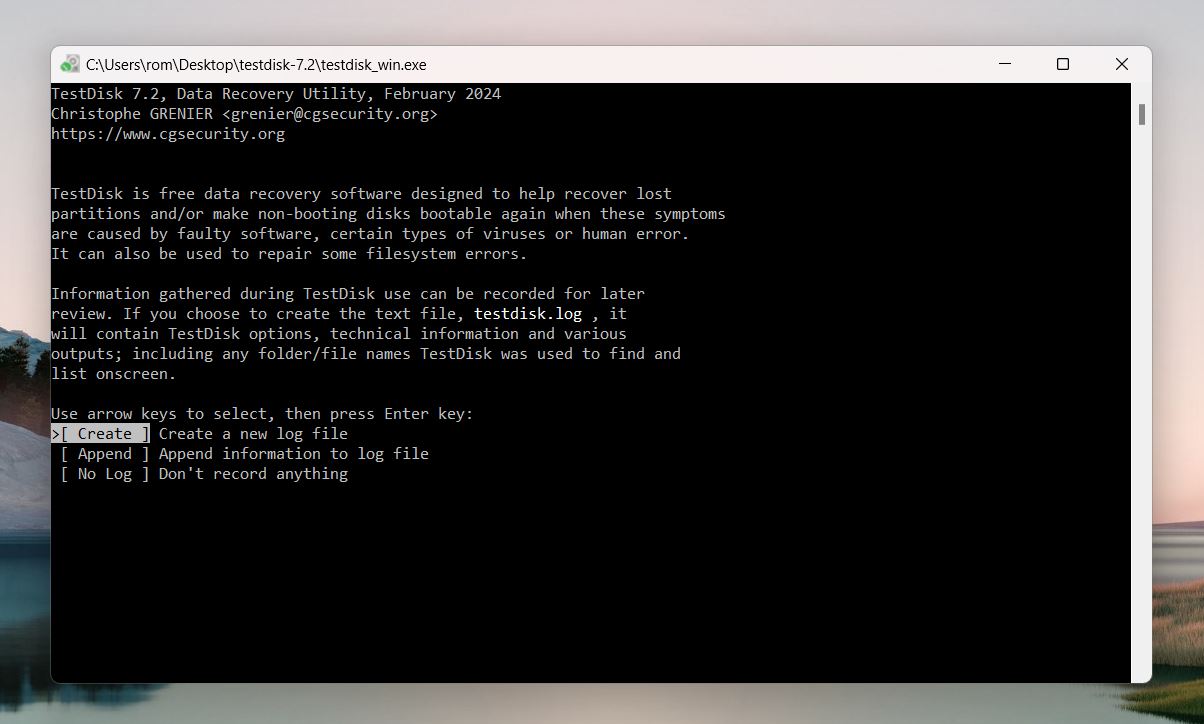
- TestDisk will ask if you want to create a log file. Use the arrow keys to select Create, Append, or No Log, and press Enter to confirm. A log file can be useful for troubleshooting.
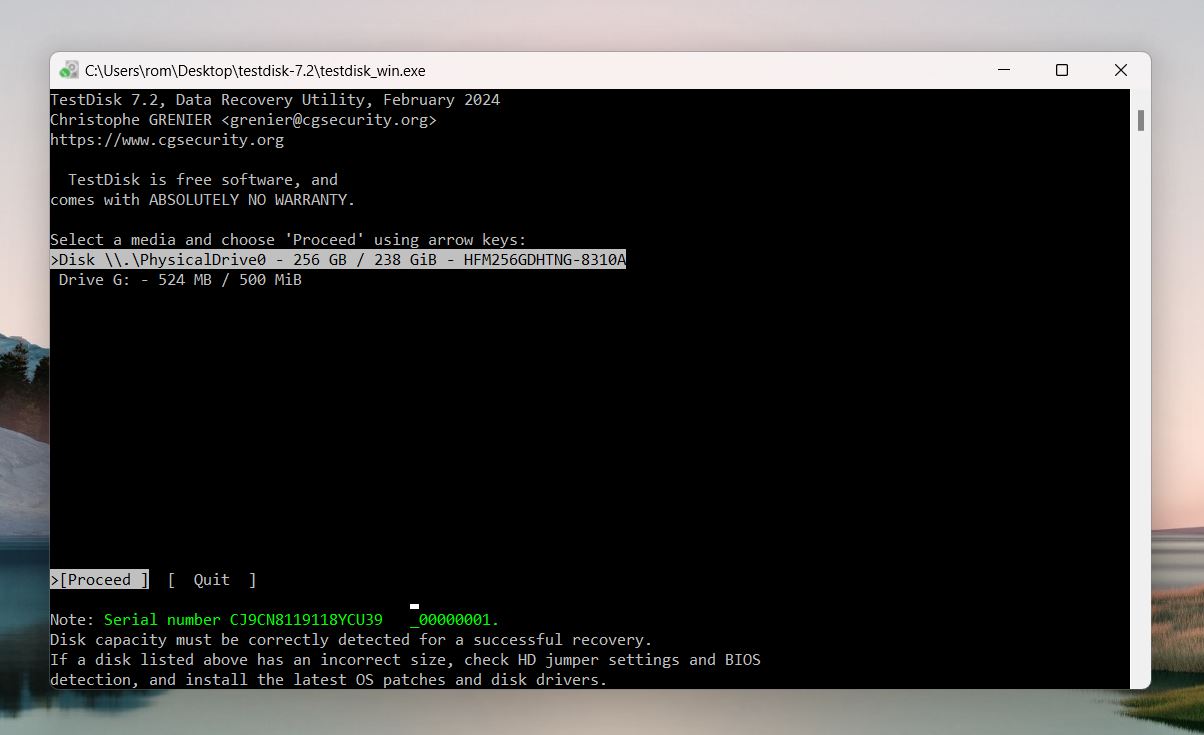
- TestDisk will display a list of connected drives. Use the arrow keys to highlight your hard drive and press Enter.
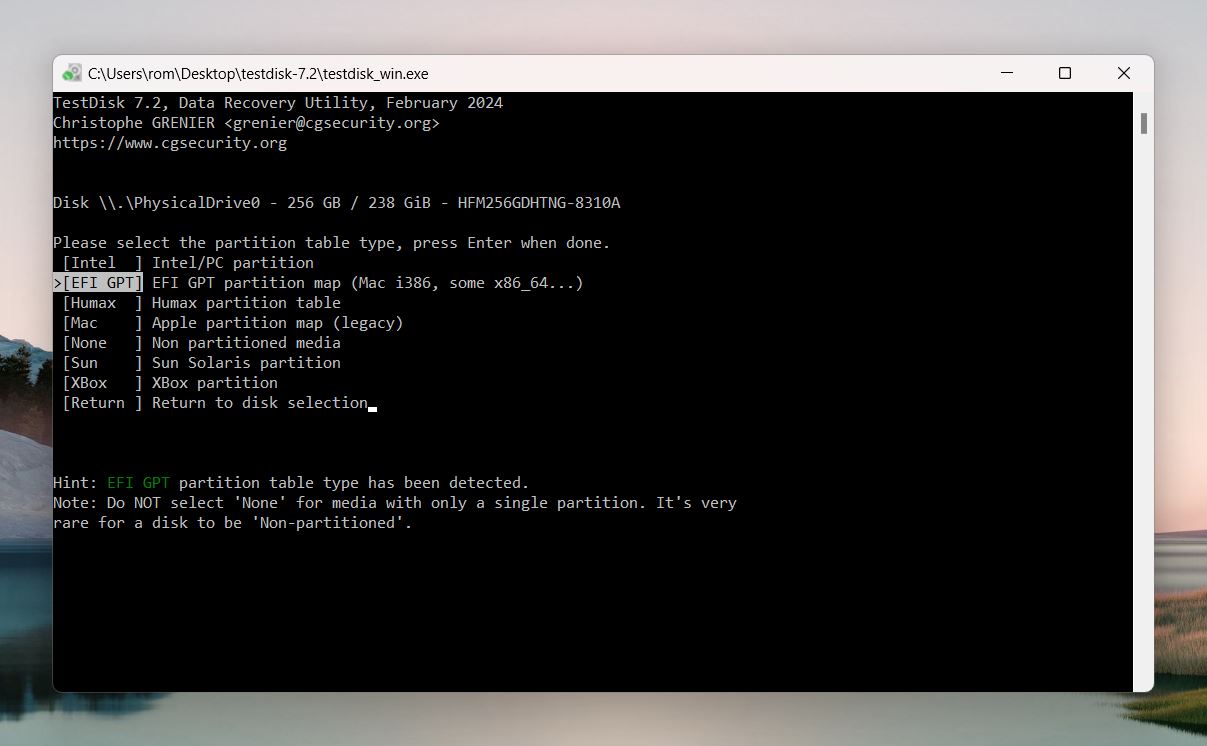
- TestDisk will auto-detect the partition table type. It’s recommended to press Enter to proceed with the default selection unless you know otherwise.
- Highlight the Analyze option in the menu and press Enter. This will initiate a scan to identify issues with the partitions.
- Select Quick Search by highlighting it and pressing Enter. TestDisk will perform a basic scan and list any recoverable partitions it finds.
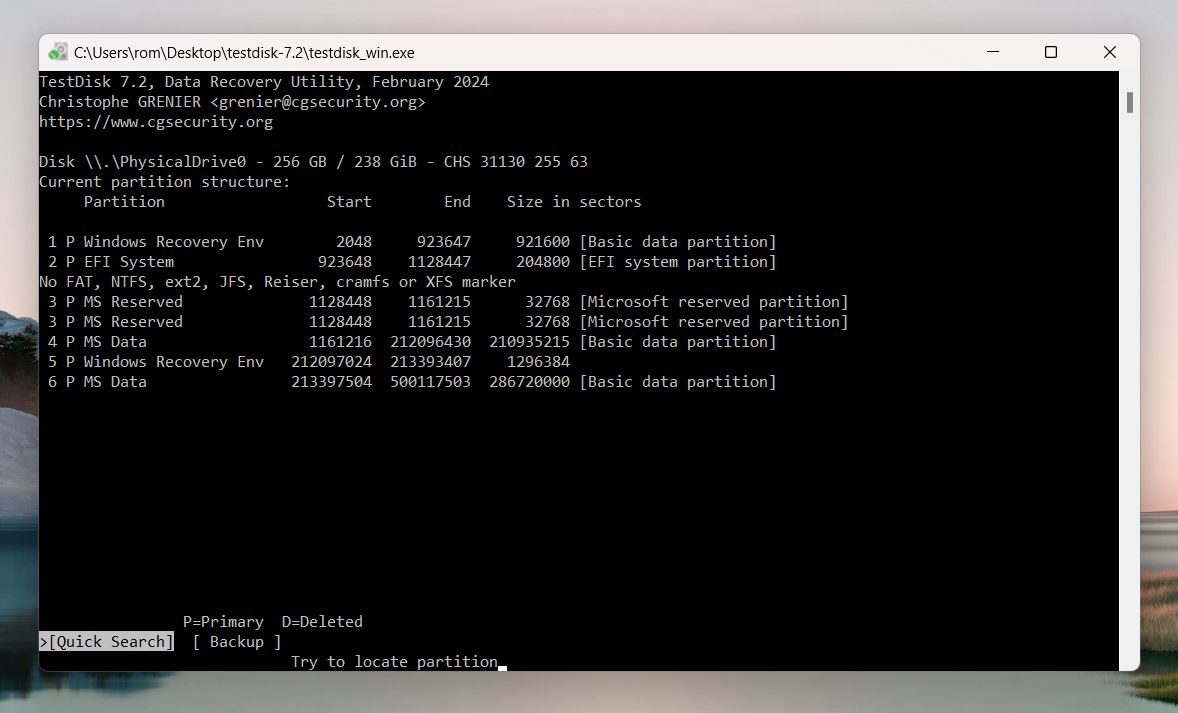
- To view the files in a specific partition, highlight the partition and press P. This allows you to confirm the contents before proceeding. Press Q to return to the partition list.
- If the partition isn’t listed after the Quick Search, highlight Deeper Search and press Enter. This option performs a more thorough scan to locate partitions.
- Each partition will have a prefix such as D (deleted), P (primary), * (bootable), or L (logical). Use the left and right arrow keys to change the prefix of the partition you want to recover to P (primary).
- Highlight the Write option and press Enter to save the changes to the partition table.
- TestDisk will prompt you to confirm your changes. Press Y to proceed with writing the updated partition table to the drive.
- Once the process is complete, reboot your computer.
We also have a list of TestDisk alternatives. While not all of them include the same toolbox as TestDisk, they offer user-friendly interfaces and additional features that may be worth exploring.
Option 3: Use AOMEI Partition Assistant to Fix the MBR
Use AOMEI Partition Assistant when your hard drive’s Master Boot Record (MBR) is corrupted. MBR issues can cause boot failures or make your drive inaccessible.
AOMEI Partition Assistant, developed by AOMEI Technology, is a versatile partition management tool. It includes a Rebuild MBR feature, specifically designed to fix MBR hard drive corruption without erasing your data. It’s user-friendly and easy enough for most people to operate. Here’s how to use it:
- Download the software from the official AOMEI Technology website and install it on a working computer.
- Open the program and locate the corrupted drive in the list of connected drives.
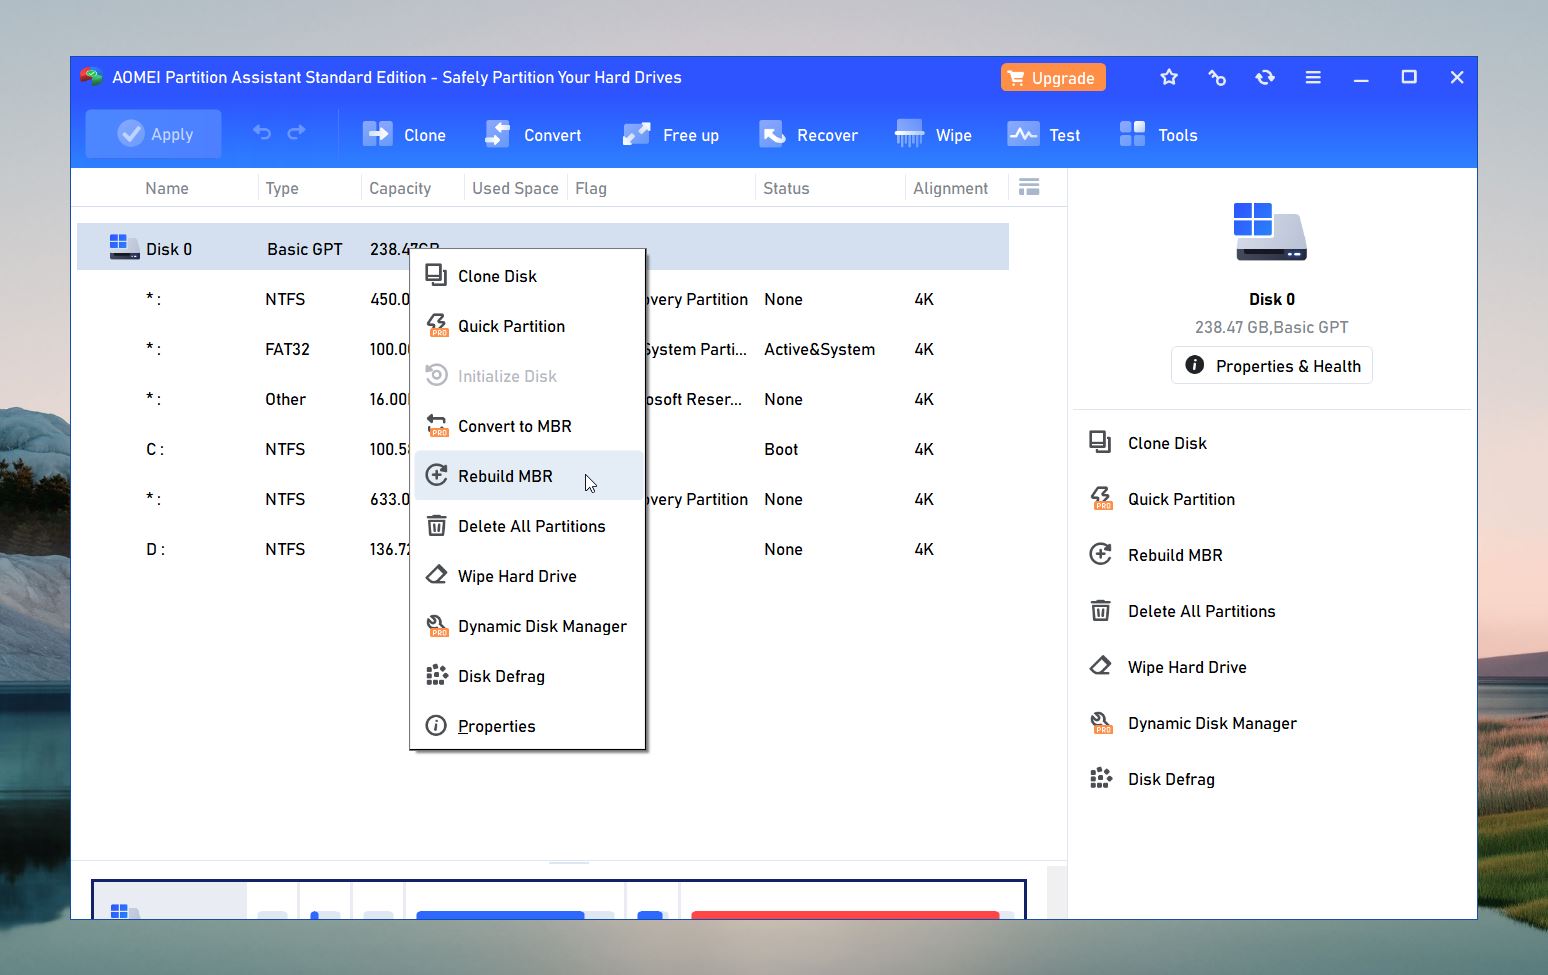
- Right-click on the corrupted drive and select Rebuild MBR.
- Choose the appropriate MBR type based on your operating system.
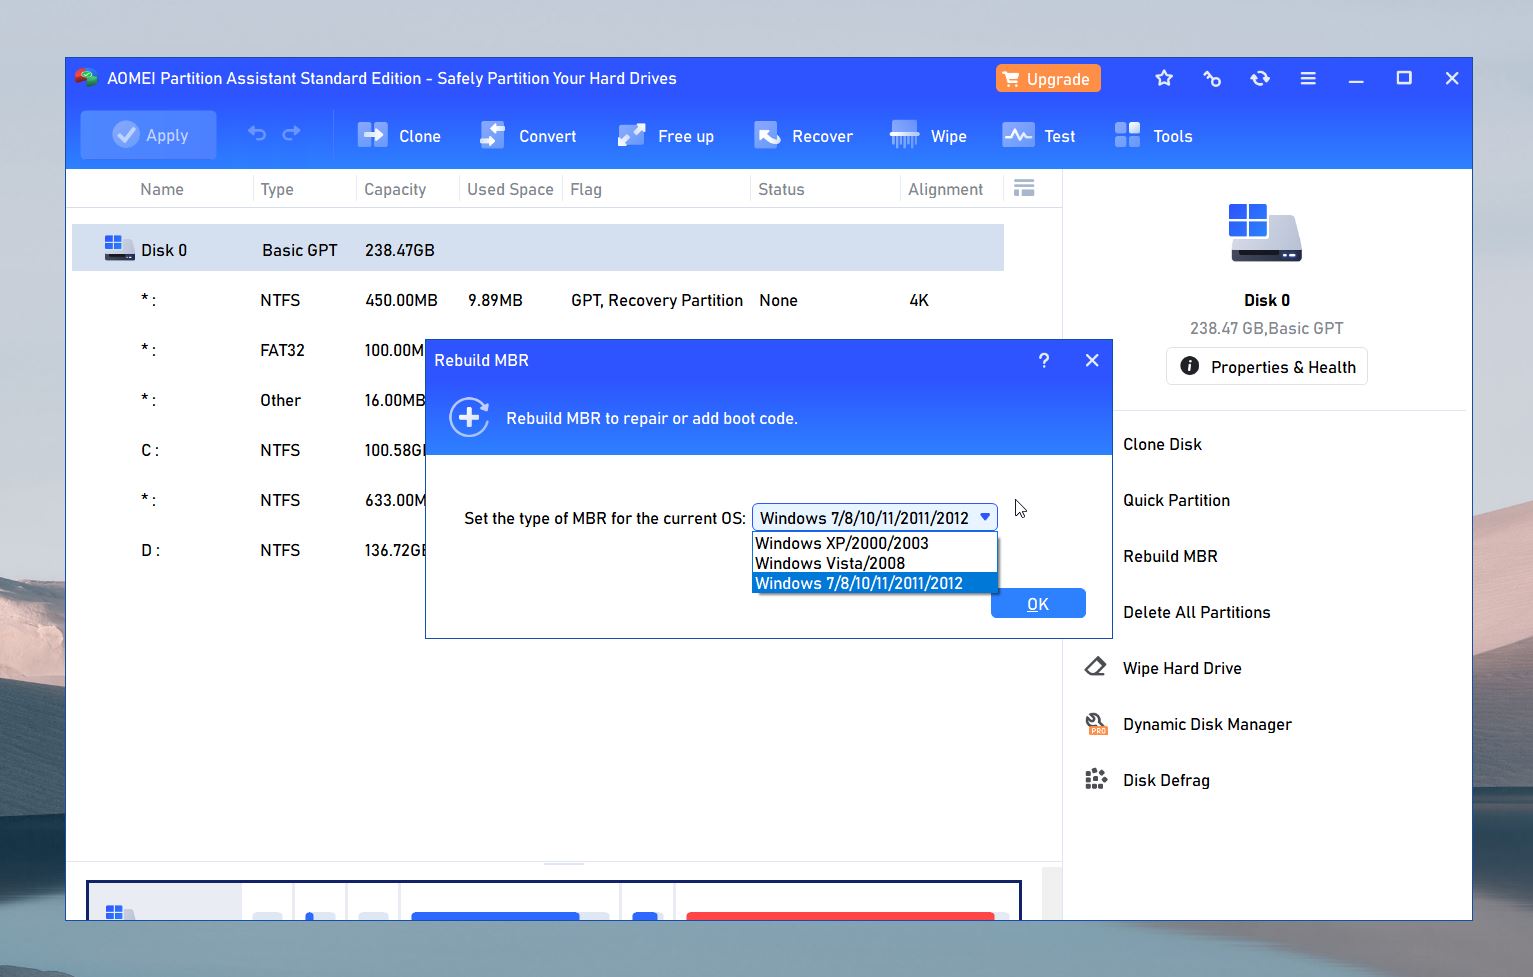
- Click Apply in the top-left corner to confirm and execute the process.
Final Words
We covered many reliable DIY methods you can use at home to fix your corrupted disk on Windows 10/11. However, it’s important to understand that not every case is the same. Some drives may be too damaged for at-home fixes. If your drive’s circuit board is malfunctioning or it has deeper mechanical issues, these problems can’t be repaired without specialized knowledge and equipment.
If your drive holds important data, your only real option in such cases is a professional data recovery service. Keep in mind, though, these services aren’t cheap—they often cost as much as, or more than, a brand-new hard drive. For guidance, check out our list of the best data recovery services, where you’ll find pricing, real customer reviews, and other helpful details.
One of our authors also analyzed several offline data recovery centers to find reliable and affordable options. Here are their findings.
If you find some methods too complex or run into additional obstacles, remember that you can reach out to online communities for help. There are many active forums and groups with people who’ve likely been in your exact situation. For example, you can check Reddit at places like:
You can also ask for help in our own community. When posting a question, be as specific as possible. Provide clear details about your issue, the steps you’ve tried, and even screenshots if possible. The more information you share, the easier it will be for others to guide you.
FAQ
What are the symptoms of hard drive corruption?
Hard drive corruption can show up in several ways. Here are the most common symptoms:
- The drive takes longer than usual to open files or respond to commands.
- You might see error messages like “File system error” or “Drive not accessible.”
- Files may go missing, or folders might become empty without explanation.
- The drive appears as RAW or unallocated in Disk Management.
- File Corruption: Files won’t open or are unusable due to corruption.
- Prompt to Format: The operating system asks you to format the drive before using it.
- System Crashes: The computer freezes or crashes when accessing the drive.
- Drive Not Recognized: The drive doesn’t appear in File Explorer or Disk Management.
If you notice any of these symptoms, it’s important to act quickly. Back up your data if possible, and try the repair methods outlined earlier to restore the drive.
Why is my hard drive unreadable?
There are many reasons why your drive may be unreadable:
- Incompatible file system – If your drive is formatted with an unfamiliar file system, it won’t be readable. Try connecting it to a machine with a compatible operating system.
- Faulty USB port or device – A defective USB won’t read anything connecting to it. Try a different port. If that’s unsuccessful, try connecting it to another device.
- The drive is corrupted – Corruption can result in the hard drive not appearing when connected. Instead of checking Windows File Explorer, try checking Disk Management to see if it appears.
How did my hard drive get corrupted?
Sometimes it’s hard to figure out what caused the corruption. A few common reasons include:
- Premature disconnection – Disconnecting the hard drive without first ejecting it safely can interrupt write processes. This results in incomplete data being saved, which causes corruption.
- Virus attack – Viruses can attack your system and corrupt your drive. Try scanning your system with an antivirus application.
- Old age – Hardware, over time, declines naturally. Especially hard drives. If this is the case, recover what data you can and replace the drive.
Is it possible to repair a corrupted hard disk using CMD?
Yes, you can repair a corrupted hard disk using Command Prompt (CMD) with built-in Windows tools like CHKDSK, SFC, and DISM. Each tool addresses different issues:
- CHKDSK: Scans for and fixes file system errors and bad sectors. Command: chkdsk X: /f /r (Replace X with your drive’s letter).
- SFC (System File Checker): Repairs corrupted system files that may affect the drive. Command: sfc /scannow.
- DISM (Deployment Image Servicing and Management): Fixes system image corruption. Command: DISM /Online /Cleanup-Image /RestoreHealth.
Are third-party hard drive repair tools safe to use?
Yes, third-party hard drive repair tools are generally safe, but their safety depends on the tool and how you use it (if the tool involves direct intervention in the sectors of the disk, there’s always some risk involved). Here’s what to keep in mind:
- Use reliable options like Disk Drill, TestDisk, or AOMEI Partition Assistant. These are widely used and recommended.
- Always get the software directly from the developer’s official site to avoid malware or fake programs.
- Misusing a tool can cause data loss or make the problem worse. Stick to the provided guides or documentation.
- Back up your data or create a disk image before running any repair software, just in case.
Will formatting fix a corrupted hard drive?
There’s no guarantee that formatting a corrupted hard drive will fix it, but formatting does remain one of the most effective solutions to fixing corrupted hard drives. Formatting is effective for software-related issues, such as inaccessible drives, corrupted file systems, or unallocated space. It doesn’t repair physical damage.
Remember, formatting erases all data on the drive. If you need to save files, back up or recover them before formatting.
Is there a difference in repair methods for hard drives on Windows 10 and Windows 11?
No, the repair methods for hard drives on Windows 10 and Windows 11 are virtually the same. Both operating systems include the same built-in tools and commands, and all the third-party tools we covered in this article work great on both Windows 10 and Windows 11.
How can I protect my hard drive against corruption?
The most effective way of fixing a corrupted hard drive is actively avoiding corruption in the first place. Do so by picking up these simple habits.
- 💻 Monitor your S.M.A.R.T. data – Every drive has S.M.A.R.T. data that monitors its health. Disk Drill includes a feature that actively monitors this data and indicates when problems arise so you can stamp them out early on.
- ✅ Remove devices safely – Before removing a hard drive (if it’s externally attached), be sure to safely eject it from the device it’s connected to before removal. This ensures all necessary write processes have been halted.
- 🤖 Use an antivirus – Viruses can corrupt your data. Having an antivirus is an easy way to avoid this. Paid solutions exist, but free solutions, like Malwarebytes, are often more than enough when paired with the built-in Windows Security.
Establishing positive habits when it comes to handling your data and storage devices goes a long way and can often save you hours, potentially days of troubleshooting and recovery.
What are the costs associated with professional corrupted hard drive recovery?
The cost of professional corrupted hard drive recovery varies depending on the type and extent of the damage, as well as the service provider. Here’s a general breakdown:
- For software-related corruption (e.g., file system errors), recovery costs typically range from $100 to $500.
- If the drive has mechanical issues, like a failing read/write head or motor, recovery can cost anywhere from $500 to $2,000 or more.
If it’s a logical issue, it’s definitely worth trying DIY methods first. There’s a great chance you can fix it for free at home with the tools and methods we’ve covered.
This article was written by Jordan Jamieson-Mane, a Staff Writer at Handy Recovery Advisor. It was also verified for technical accuracy by Andrey Vasilyev, our editorial advisor.
Curious about our content creation process? Take a look at our Editor Guidelines.
