Struggling to get a drive properly recognized by Windows? I’m all too familiar with the battle to get a previously functioning drive back to a visible and accessible state. Unfortunately, storage devices of all kinds are prone to issues once in a while – even if you take extra good care of them.
An external hard drive that shows up in Device Manager but not Explorer is fairly straightforward to troubleshoot, and the chances of recovering the data on the drive are very likely in most cases I would say. In this article, I’ll explain why this happens and showcase several tested solutions that have helped solve this issue in the past.
Why This Happens and How to Approach It
According to my research and understanding, this problem can manifest in one of two ways. Either the drive appears in Device Manager but not File Explorer, or the drive appears as normal but Windows says it’s inaccessible. Typically, this issue stems from a logical issue; like a corrupted file system, missing drive letter, or compatibility problem. In some cases, the problem could originate from a physical issue like a damaged hardware component.
Some of the fixes I’ve included will address both types of issues, while others may only target one or the other. Since I’ve covered both, you can use the table below as a way to skip to each applicable solution.
I always recommend creating a backup of the drive where possible. I know that may sound contradictory considering the nature of the article, but there are some tools that can bypass the operating system (OS) and interface with the drive directly, like Clonezilla. As your data may be in a vulnerable state, implementing these fixes may be the tipping point for causing it to become lost or deleted. Furthermore, it gives you the option to scan the backup instead of the drive itself, which could otherwise put additional strain on the device, causing more problems.
The drive appears in Device Manager but not Explorer |
The drive appears in File Explorer but Windows says it’s inaccessible |
How to Fix a Drive That Appears in Device Manager but Not Explorer
A USB or external hard drive that shows in Device Manager but not Explorer is actually being recognized by the computer, but something is getting in the way of it appearing as normal. Work your way through the steps below to diagnose the problem.
Option A: Check the Connection and Inspect the Drive
📌 When to use: The drive either doesn’t appear or intermittently disconnects | ⚙️ Difficulty: Easy | 📈 Risk to data: Low
Before doing more extensive troubleshooting, always do a basic inspection of the storage device and any cables that connect it to your computer. Faulty cables can cause your drive to intermittently disconnect, prompting Windows to display a message like “USB device not recognized”. If you have replacements or spares, I’d recommend switching them out to see if it’s a hardware-related issue.
Option B: Initialize the Disk
📌 When to use: The disk appears in Disk Management as uninitialized | ⚙️ Difficulty: Medium | 📈 Risk to data: Moderate – initializing the disk will not recover data
An uninitialized disk will not appear in File Explorer because it doesn’t contain any partitions. Initializing a disk gives it a partition style. This defines how data will be organized and accessed on the drive. Windows gives you the choice of two partition styles: Master Boot Record (MBR) and GUID Partition Table (GPT). Initializing the disk is necessary to use it, as seen in this thread where a user needed to initialize their new Samsung 500 GB SSD.
Here’s how to initialize a disk using Disk Management:
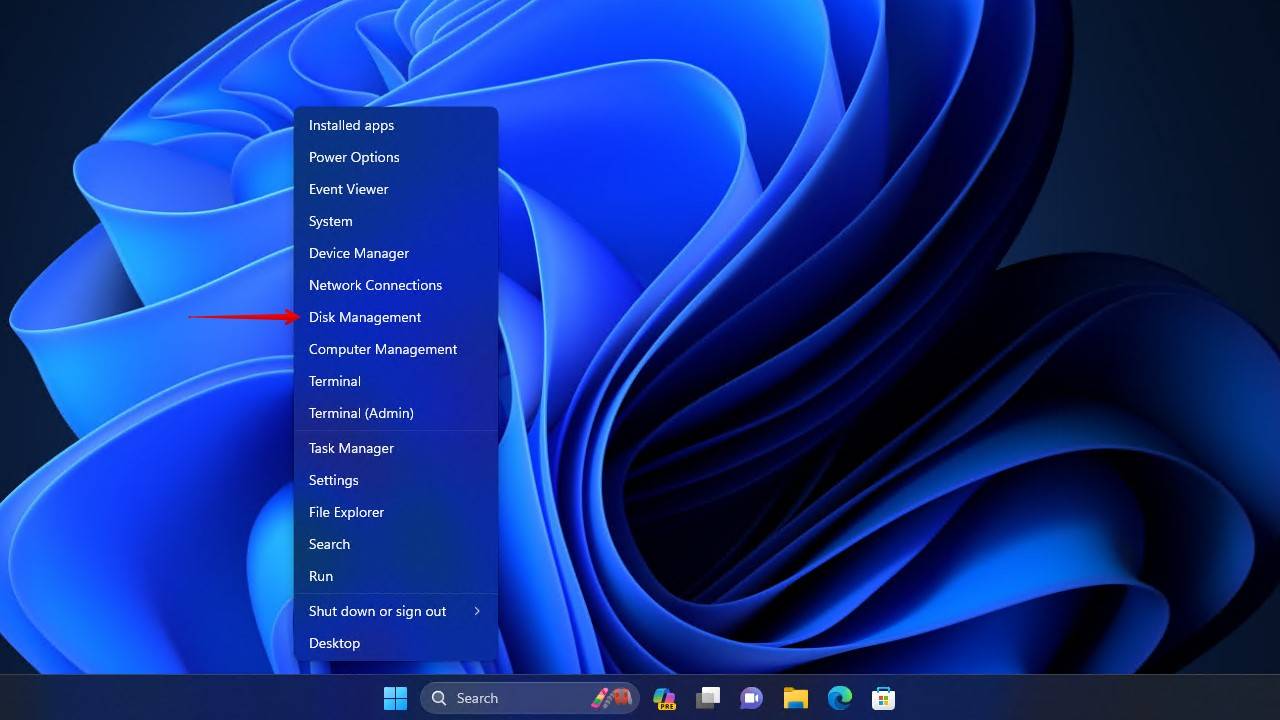
- Right-click Start and click Disk Management.
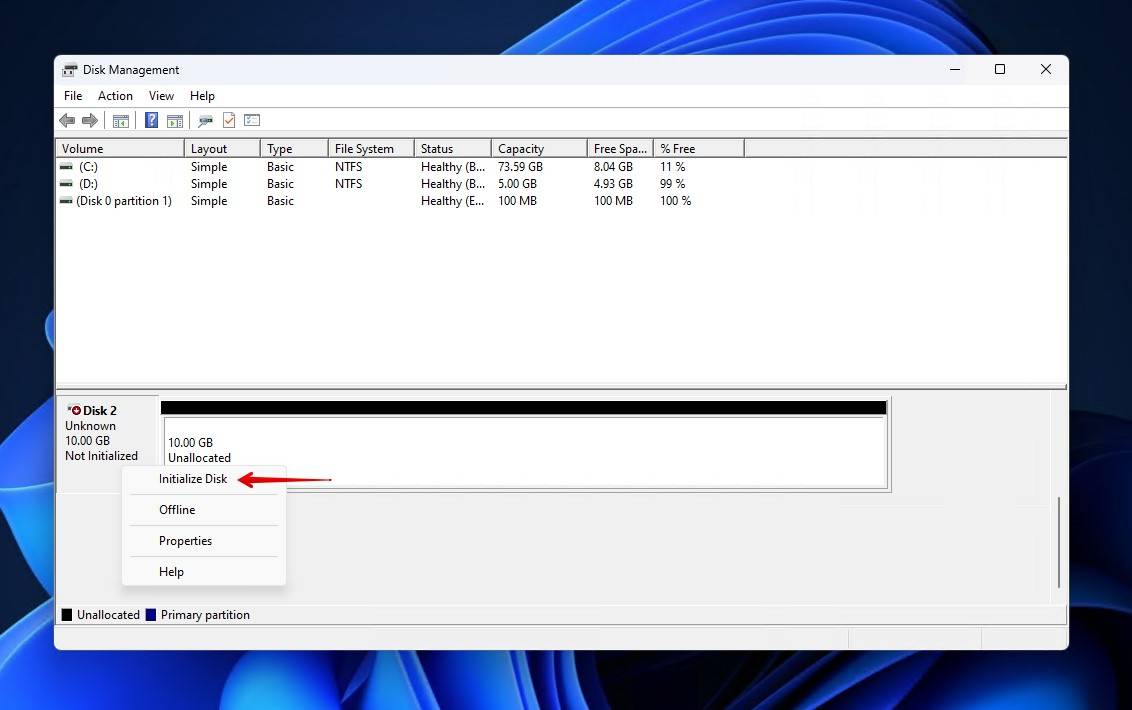
- Right-click the uninitialized disk and click Initialize Disk.
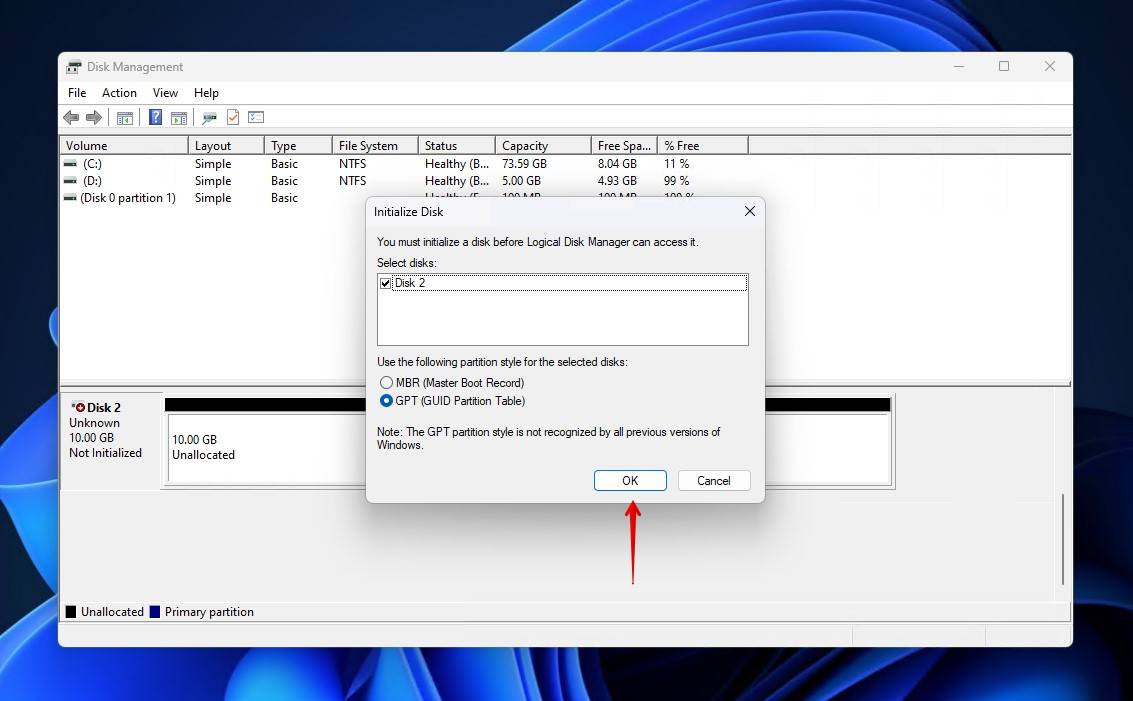
- Select a partition style and click OK.
Option C: Create a Partition Using Unallocated Space
📌 When to use: Unallocated space appears in Disk Management | ⚙️ Difficulty: Medium | 📈 Risk to data: High – existing data will eventually be overwritten
Before data can be written to a drive, the drive needs to be formatted with a file system. Nowadays I’d say it’s pretty common for drives to be preformatted to support plug-and-play for consumers. However, this isn’t always the case, and sometimes a drive will be shipped with unallocated space. Unallocated space refers to space on the drive that isn’t managed by a file system.
Be aware that sometimes storage devices can run into issues that cause partitions to be deleted or lost, making it appear like unallocated space when in reality there is still data on the drive. In this case, you should either recover the lost partition with TestDisk or recover any discoverable data with Disk Drill.
Follow these instructions to create a partition using unallocated space:
- Right-click Start and click Disk Management.
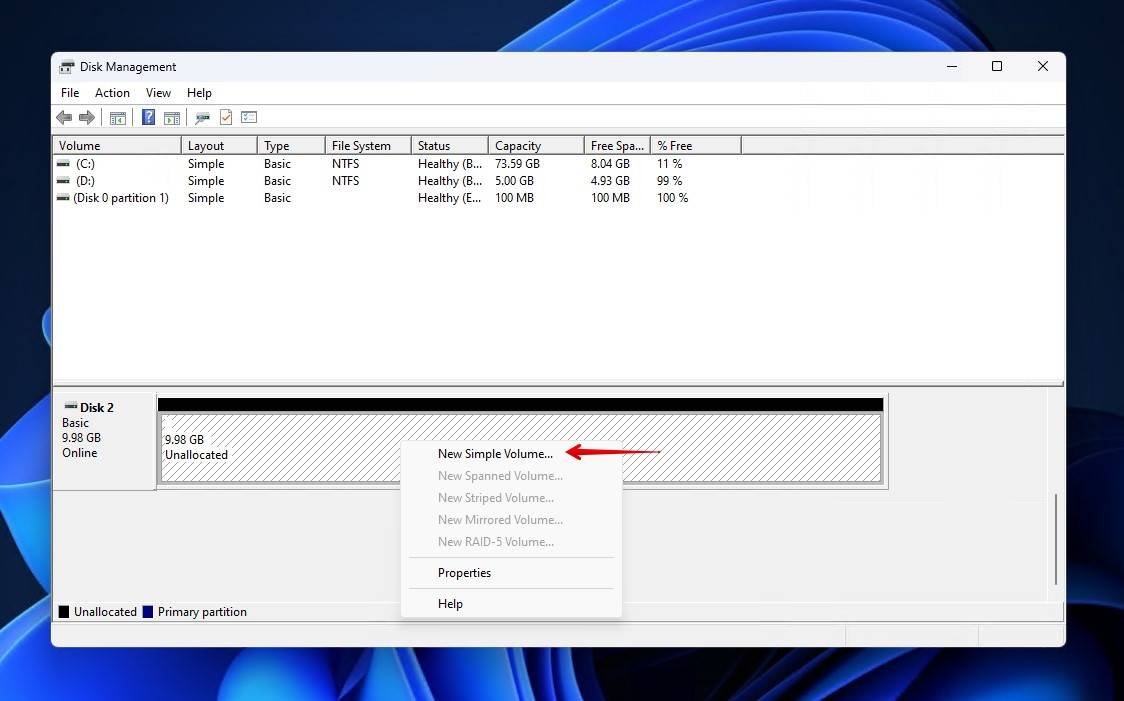
- Right-click the unallocated space and click New Simple Volume.
- Click Next.
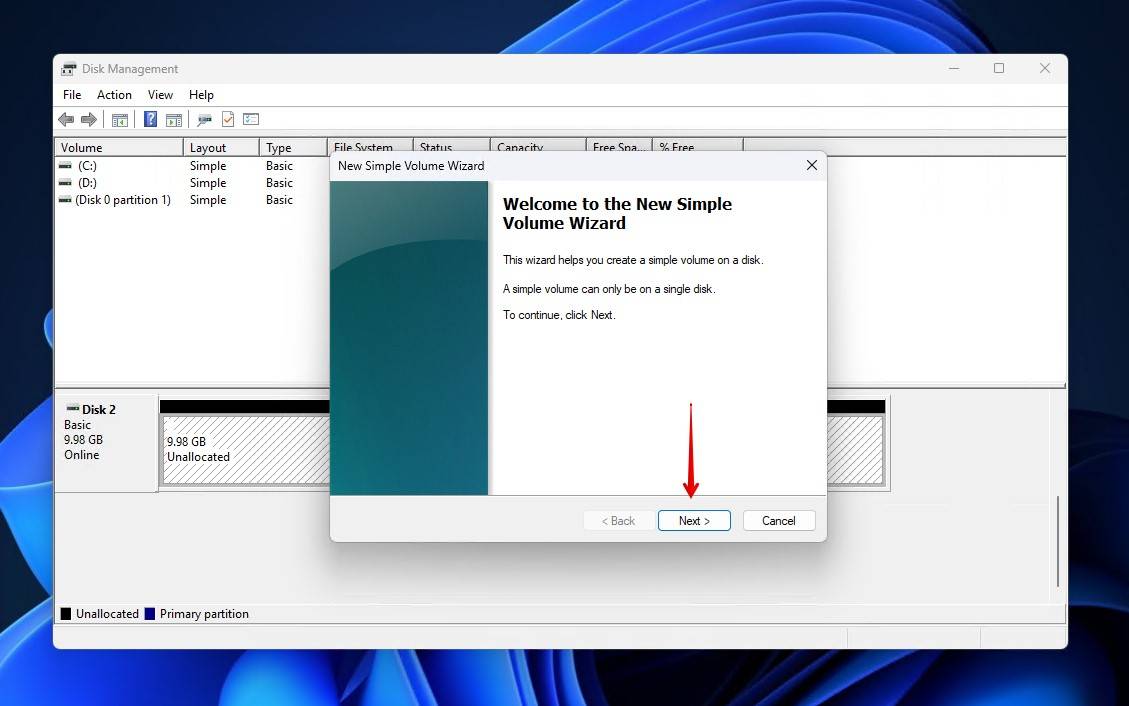
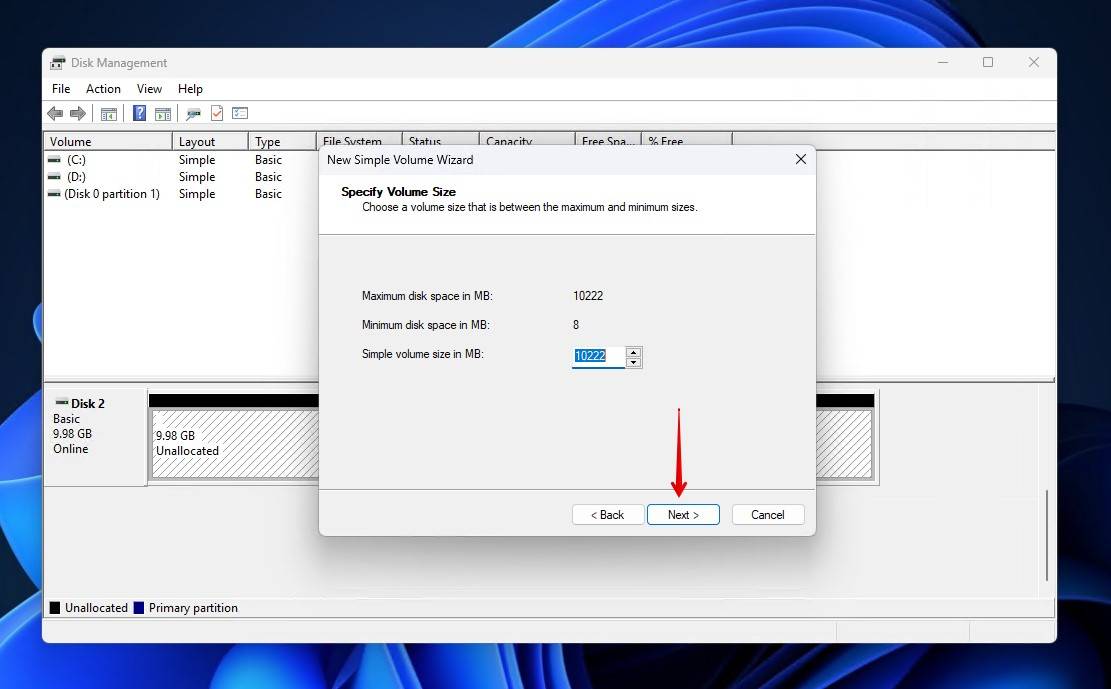
- Specify how large you want the volume to be and click Next.
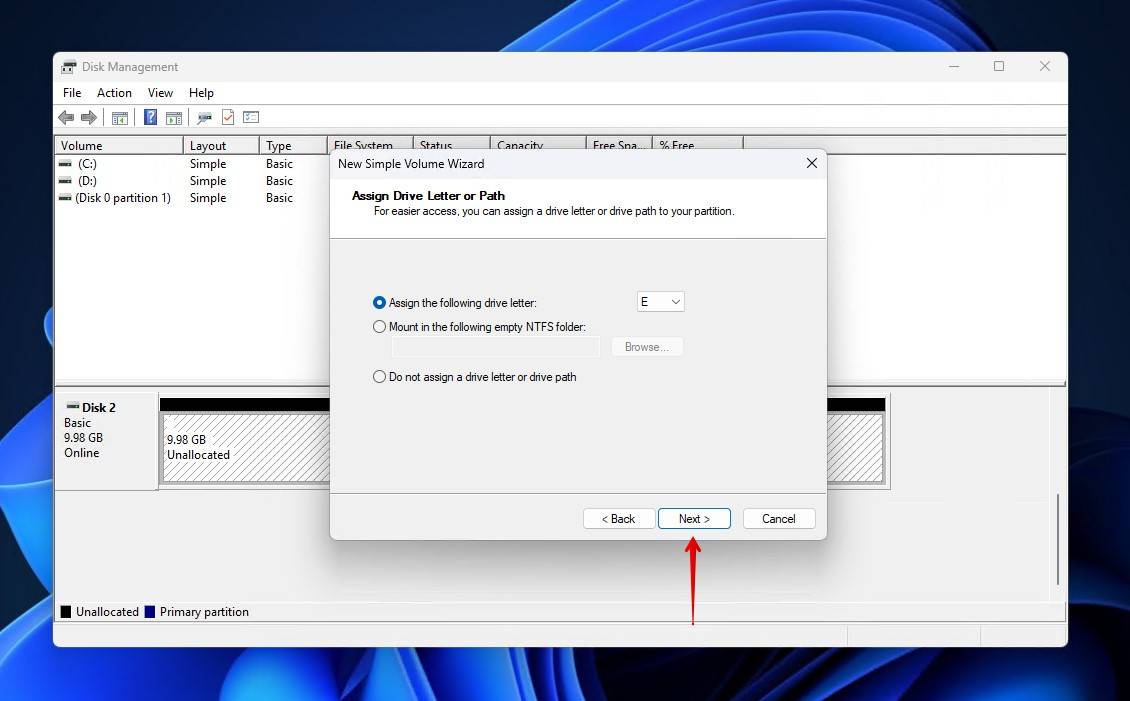
- Select a drive letter and click Next.
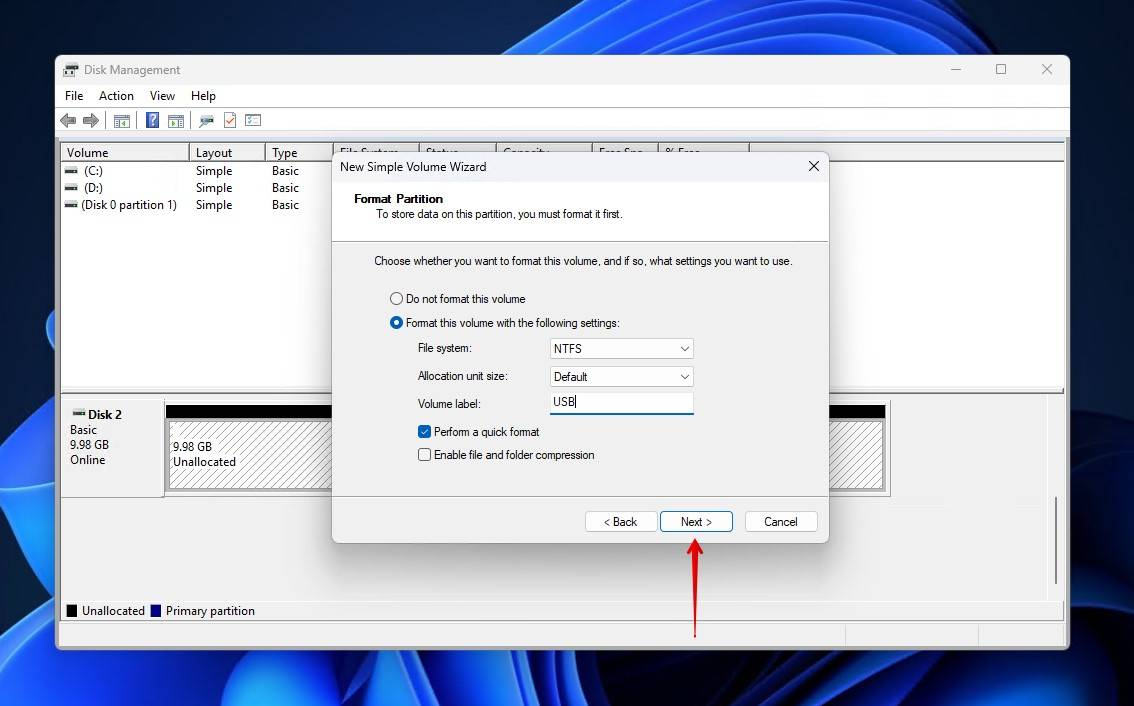
- Choose a file system, specify a volume label, and ensure Perform a quick format is ticked. Click Next.
- Click Finish.
Option D: Assign a Drive Letter
📌 When to use: The drive is in Disk Management but without a drive letter | ⚙️ Difficulty: Easy | 📈 Risk to data: Low
Windows automatically assigns a drive letter to storage devices that are connected to your computer. When a USB drive shows in Disk Management but not Explorer, it could be that a drive letter wasn’t assigned, or the existing one was removed. If so, the drive won’t appear in File Explorer, nor will you be able to access it, as seen in this thread of a Reddit user who’s moving from macOS to Windows.
It is possible for operating systems to mount devices without a drive letter, as seen with macOS. However, Windows continues to use drive letters for backward compatibility and user familiarity.
If your drive is missing a drive letter, the fix is really easy. This is how to assign a drive letter using Disk Management so you can tell File Explorer where to find the USB on Windows:
- Right-click Start and click Disk Management.
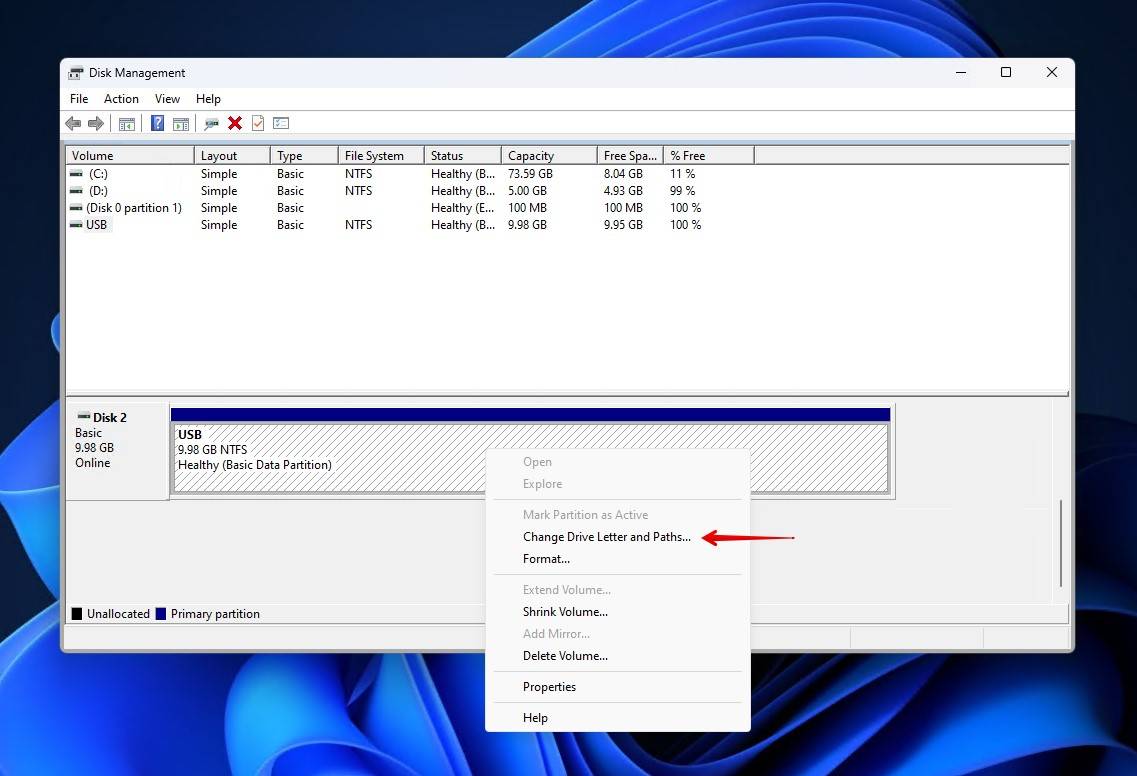
- Right-click the volume without a drive letter and click Change Drive Letter and Paths.
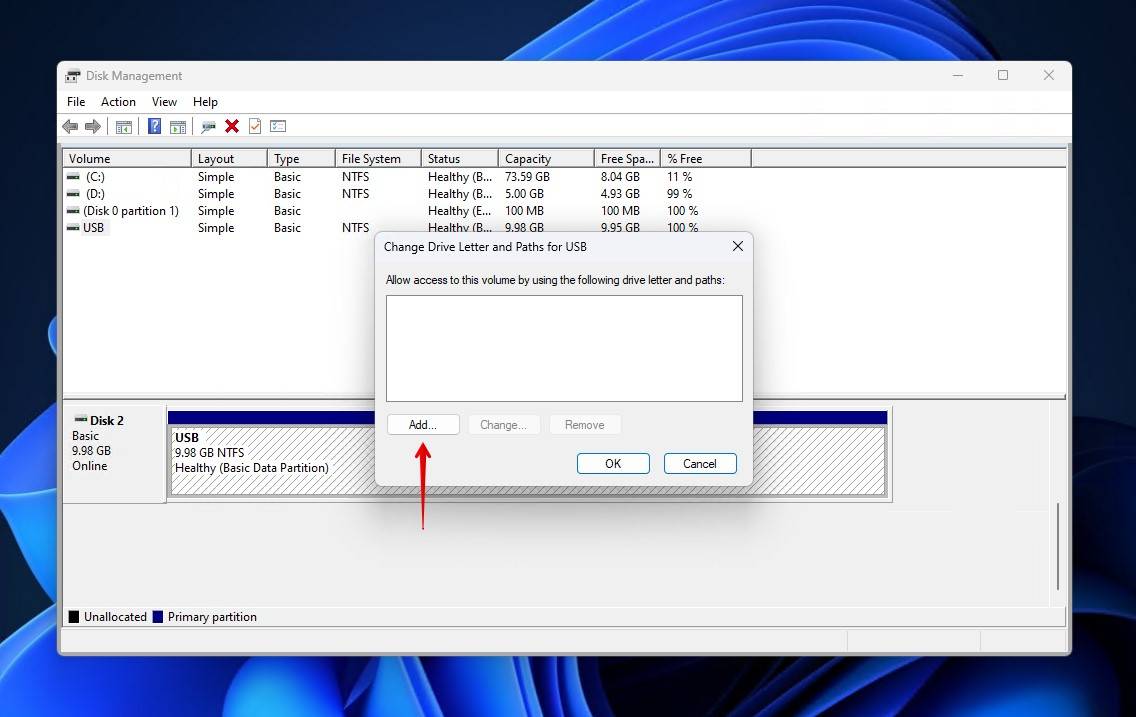
- Click Add.
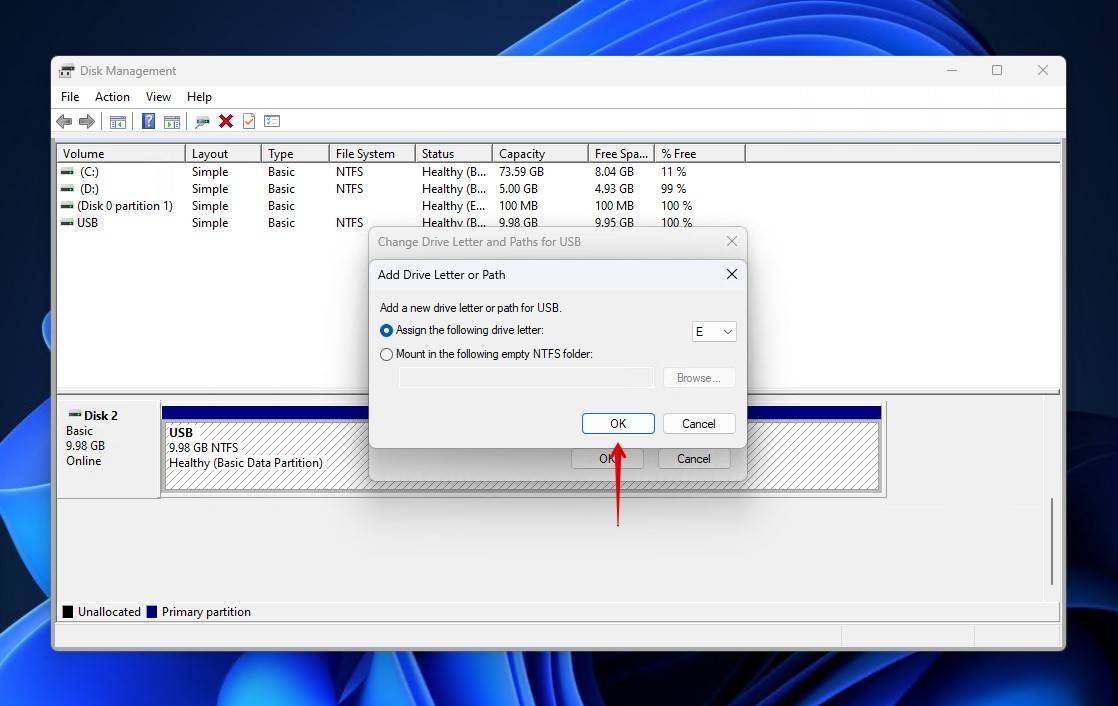
- Choose a drive letter and click OK.
Option E: Use TestDisk to Recover the Lost Partition
📌 When to use: The drive is detected but no partition is appearing | ⚙️ Difficulty: High | 📈 Risk to data: Moderate to high, as this involves writing to the partition table
TestDisk is a free and open-source partition recovery tool that can locate your missing partition and write it back to the partition table. This method is pretty technical and you must be comfortable navigating a command-line interface (CLI), but this program can work wonders if the partition becomes lost due to logical damage like file system corruption.
Follow these guided steps to recover the lost partition with TestDisk:
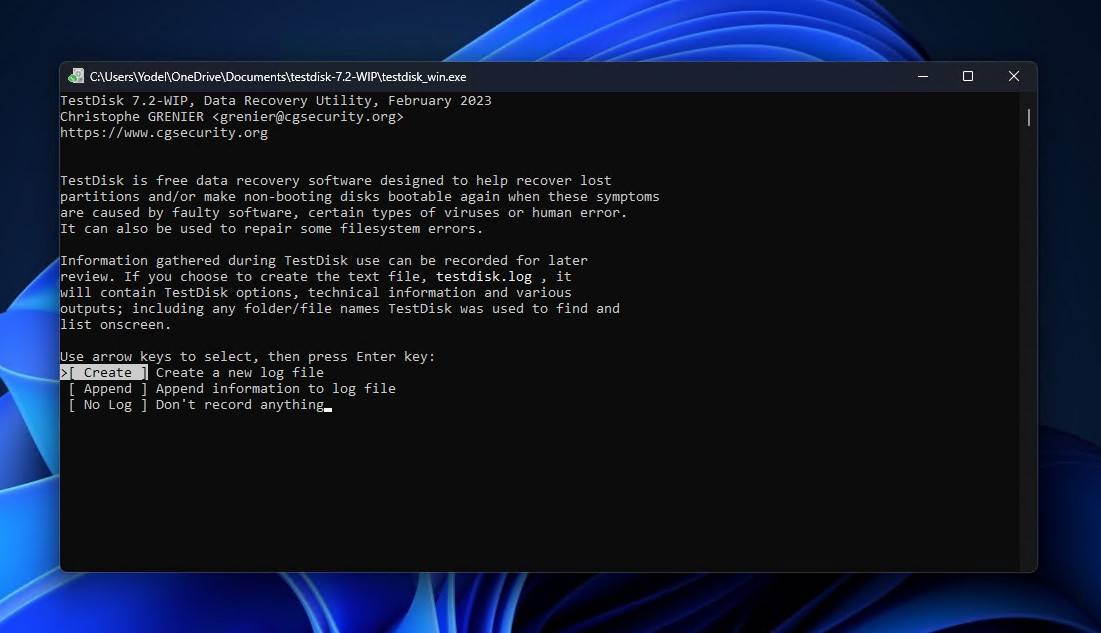
- Download and unpack TestDisk. Open testdisk_win.exe.
- Press Enter to create a log file.
- Select the drive and press Enter.
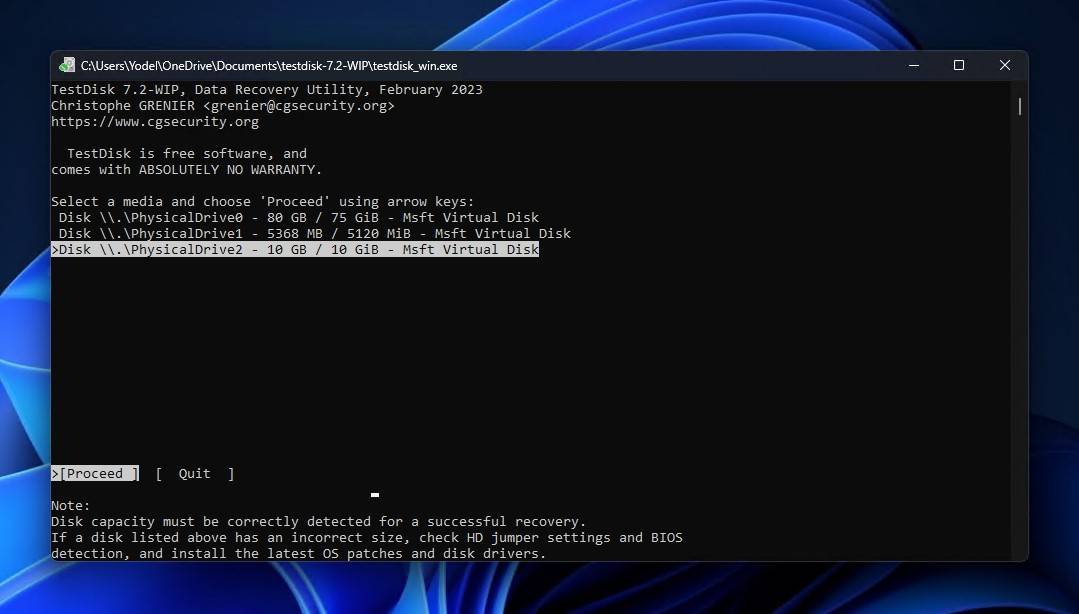
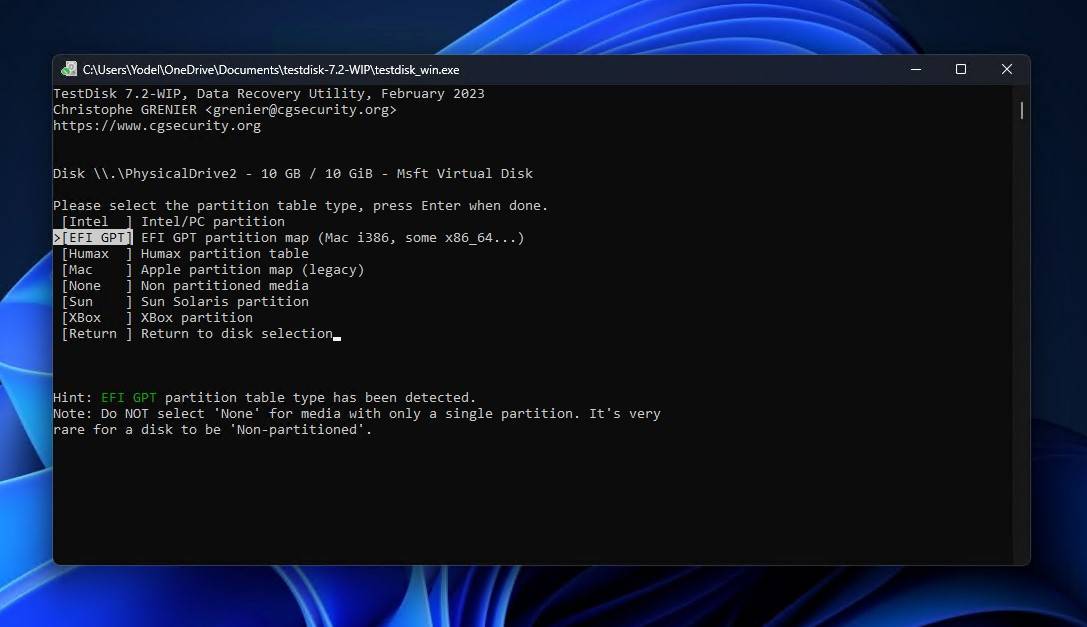
- Select the partition table type and press Enter.
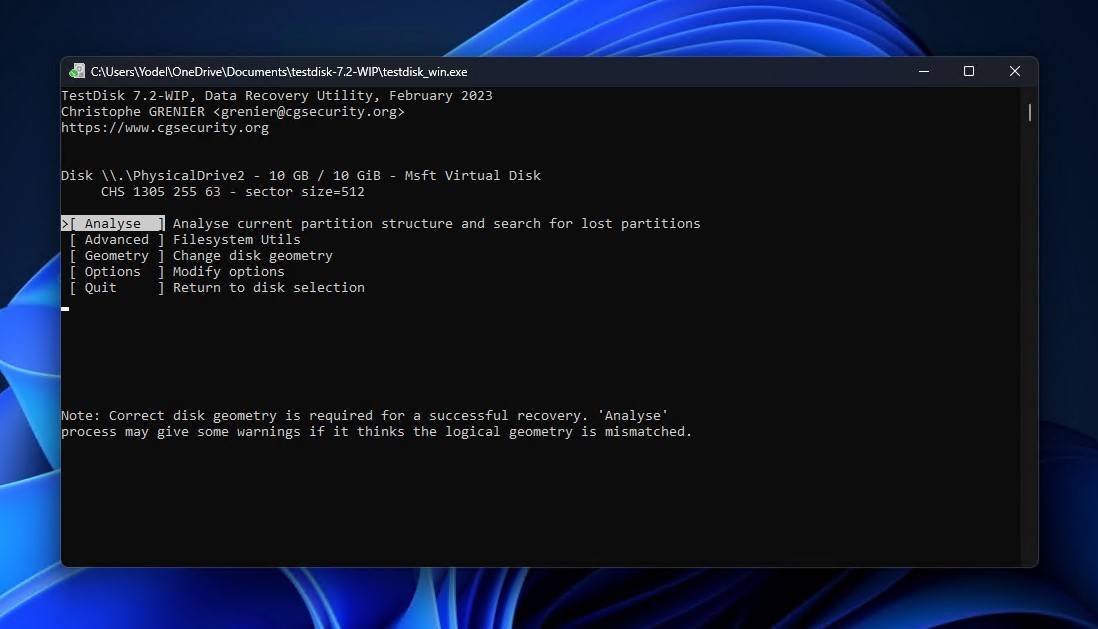
- Press Enter to analyze the current partition structure.
- Press Enter again to begin the Quick Search.
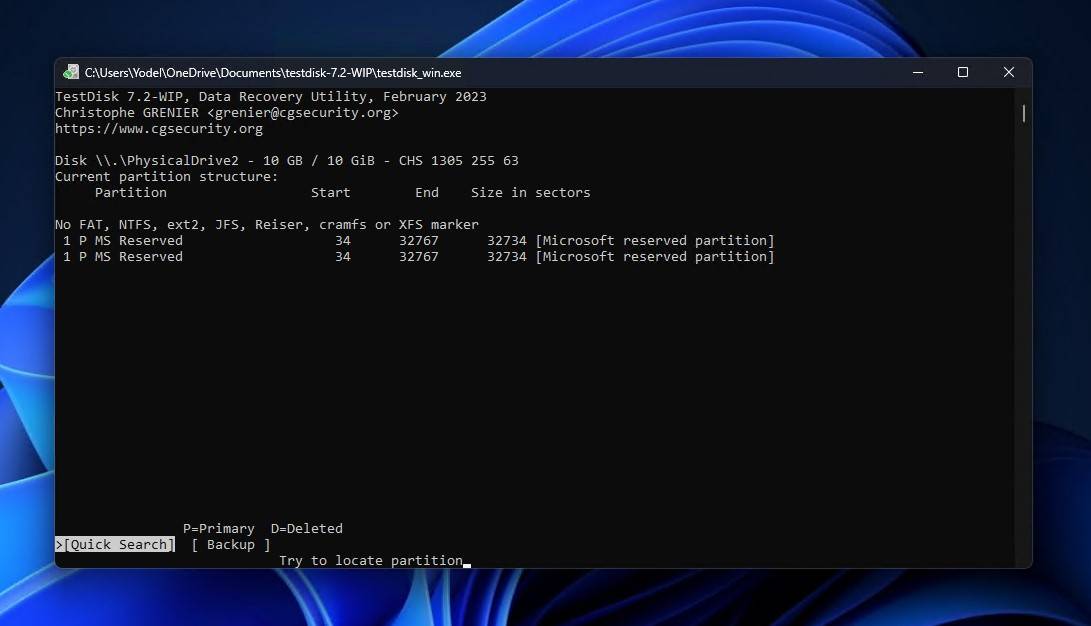
- Select the lost partition and press Enter.
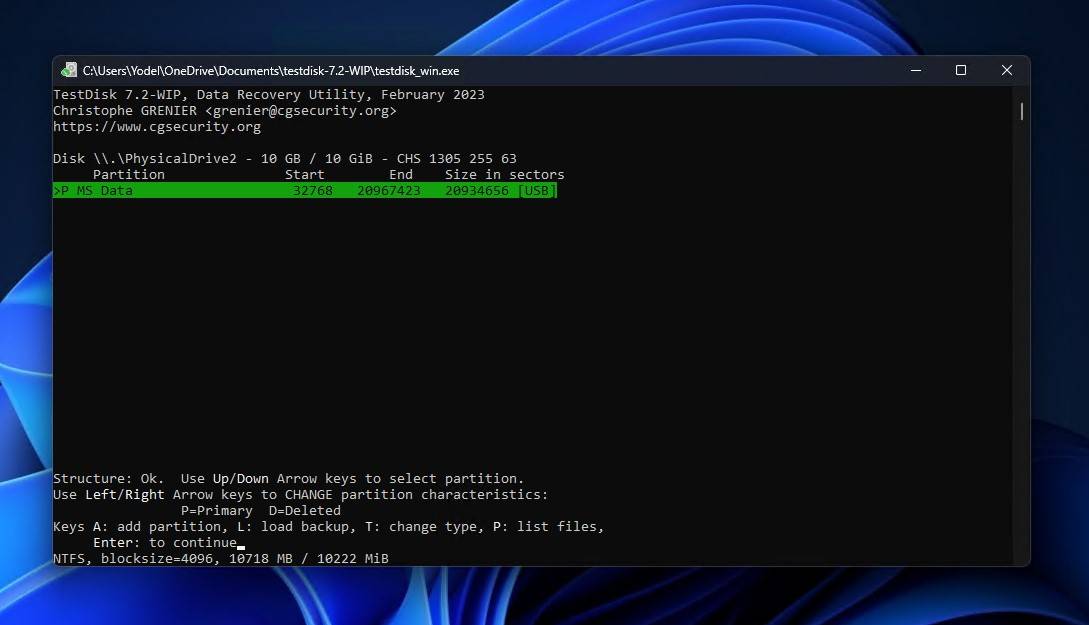
- Choose the Write option and press Enter.
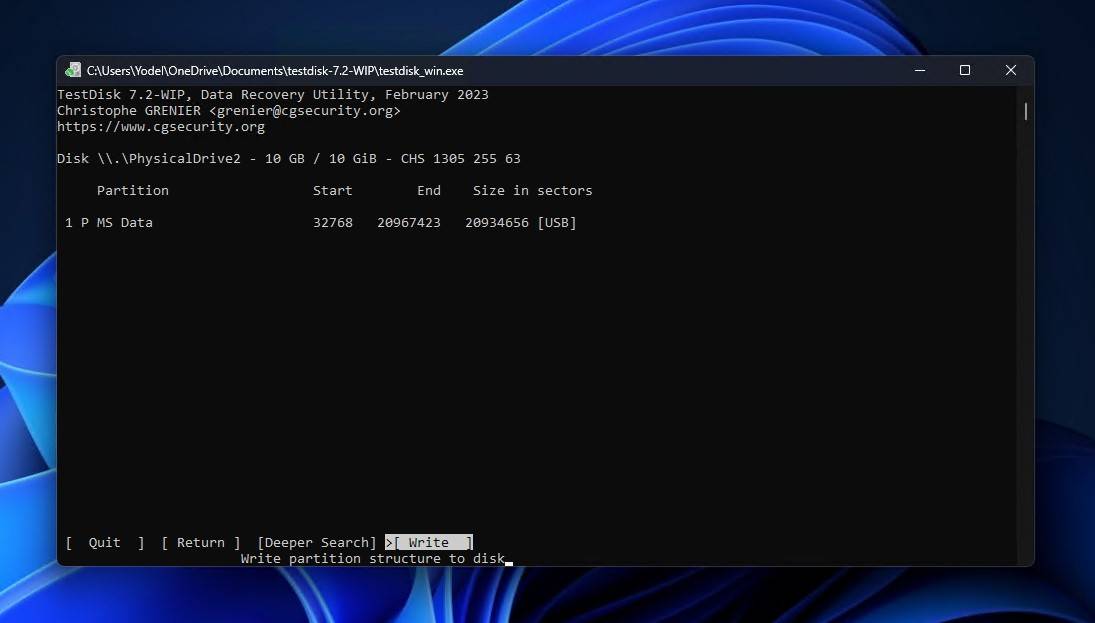
- Press Y to confirm the action.
If you find you need something more in-depth, refer to the official TestDisk documentation. You can learn more about TestDisk as a tool in our TestDisk review, as these condensed steps do little to explain the software as a whole. If you find that it’s not to your liking, we also have a list of TestDisk alternatives you can explore.
Option F: Recover Files Using Disk Drill
📌 When to use: The drive is unhealthy and data recovery is necessary | ⚙️ Difficulty: Easy | 📈 Risk to data: Low, so long as you’re recovering from an image rather than the disk itself
Data recovery software can read a drive that’s otherwise invisible or inaccessible, so long as it shows up in Device Manager and the correct capacity is shown. It can scan the drive for recoverable data (existing or deleted) and restore it to a safe location. This is useful if none of the previous methods have worked and you just want to recover your data and format the drive.
My preferred data recovery tool is Disk Drill because it’s easy to use and useful in a wide range of situations, including this one. If you’ve lost your partition, there’s a chance it will find it in its scan, along with any data that was deleted or lost due to whatever damage affected your drive. We dive deeper into the tool in our Disk Drill review if you want to learn more.
If your external hard drive or USB flash drive is in an unstable state, create a byte-to-byte backup first. Disk Drill includes this function for free. Then, scan the image file instead of the drive itself to minimize stress on the damaged drive.
These steps will explain what it looks like to recover files from a drive that’s showing up in Device Manager but not Explorer with Disk Drill:
- Download, install, and open Disk Drill.
- Select the drive and click Search for lost data to begin the scan.
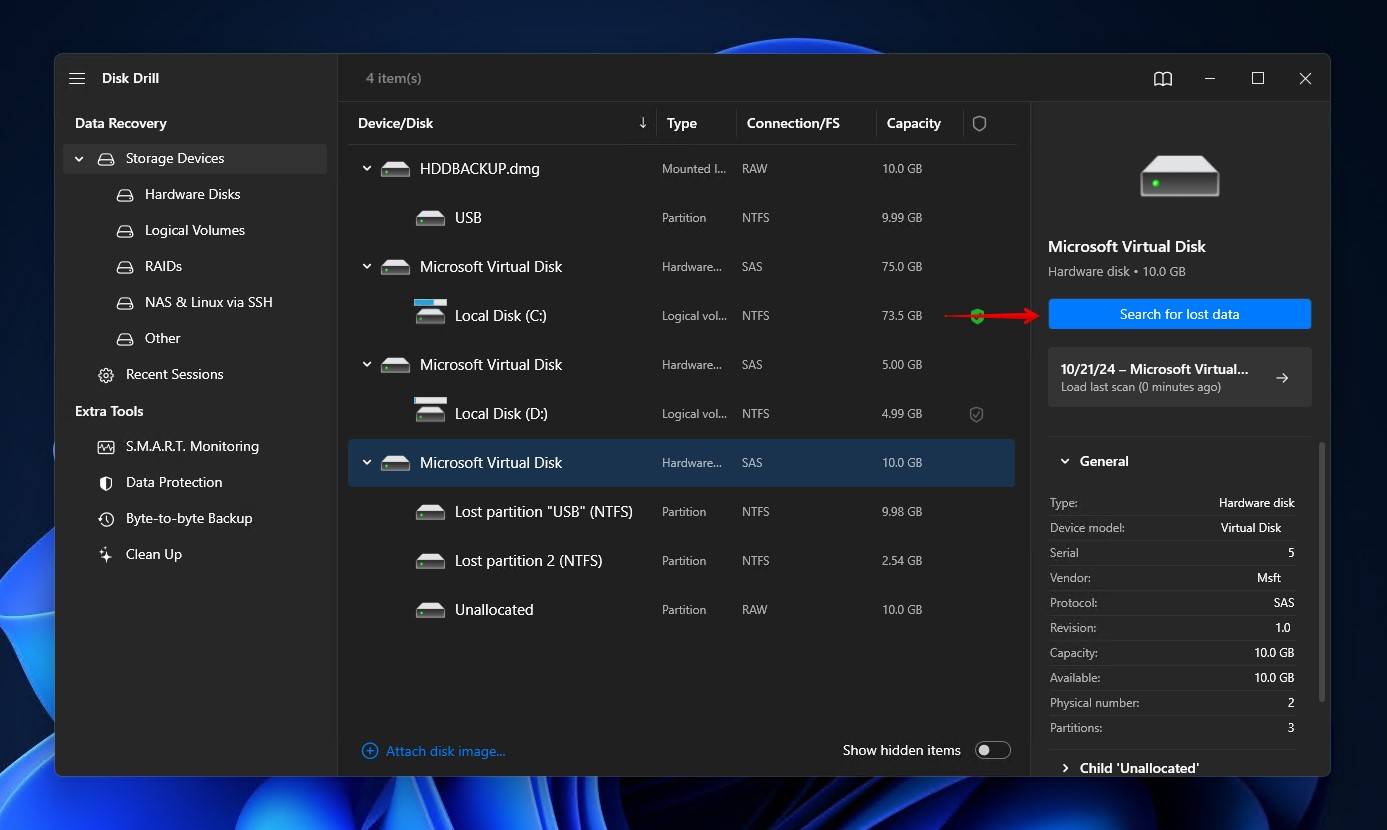
- Click Review found items once the scan is finished. Alternatively, you can click Recover all to recover everything Disk Drill found in one go.
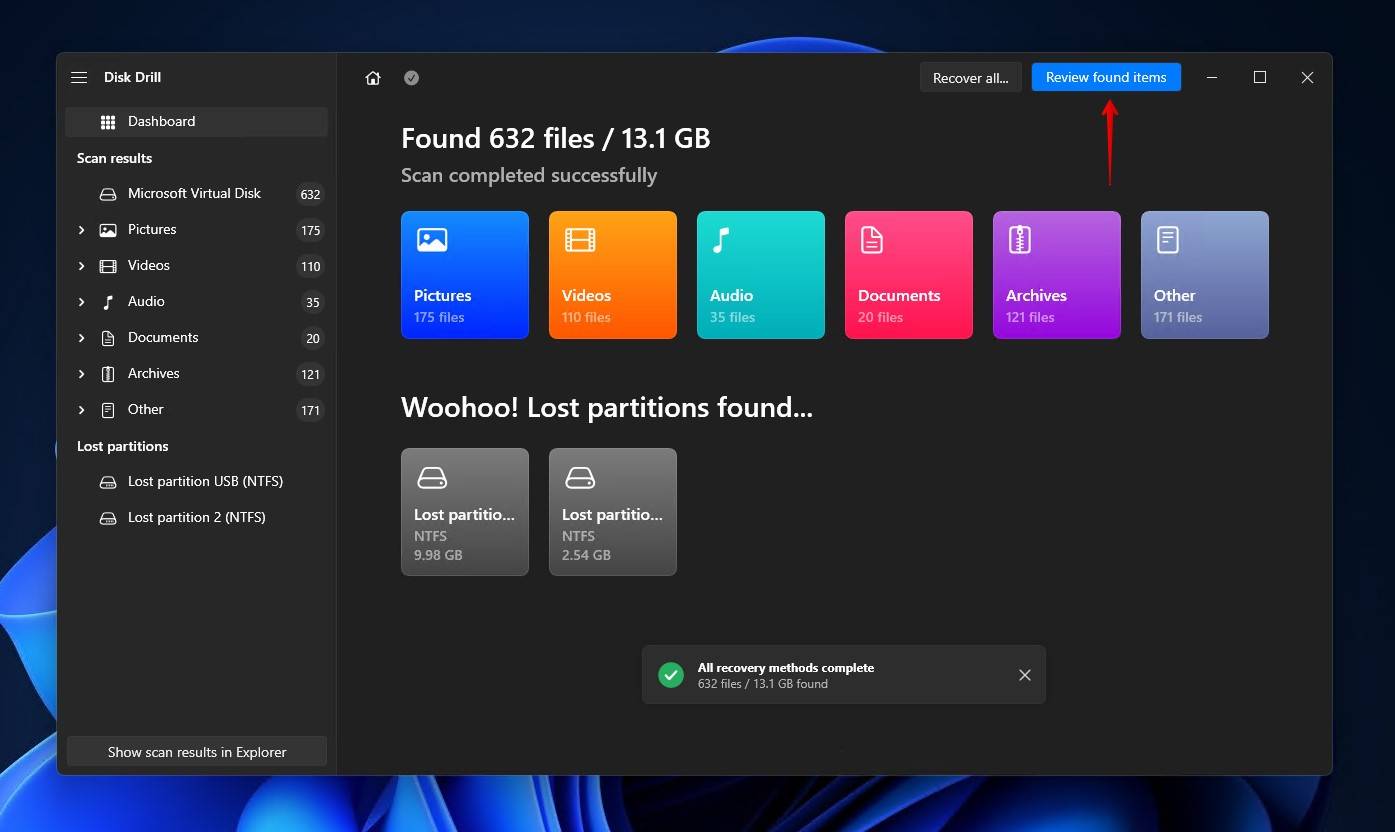
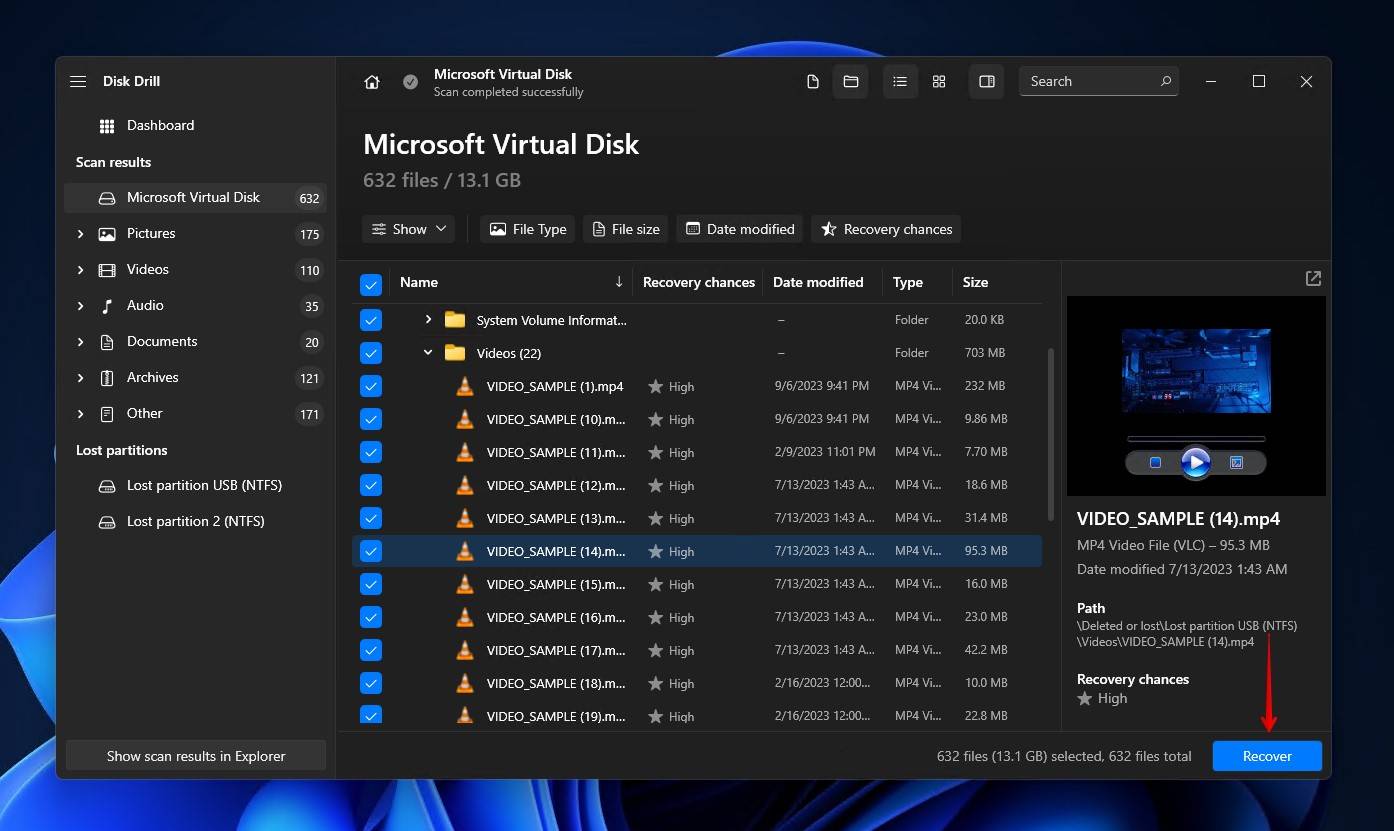
- Select what you want to recover. Existing data is located under the Existing dropdown, while other data can be found under Deleted or lost and Reconstructed respectively. The Recovery chances column gives you an indication of what data has the best chance of successful recovery. Click Recover when you’re ready.
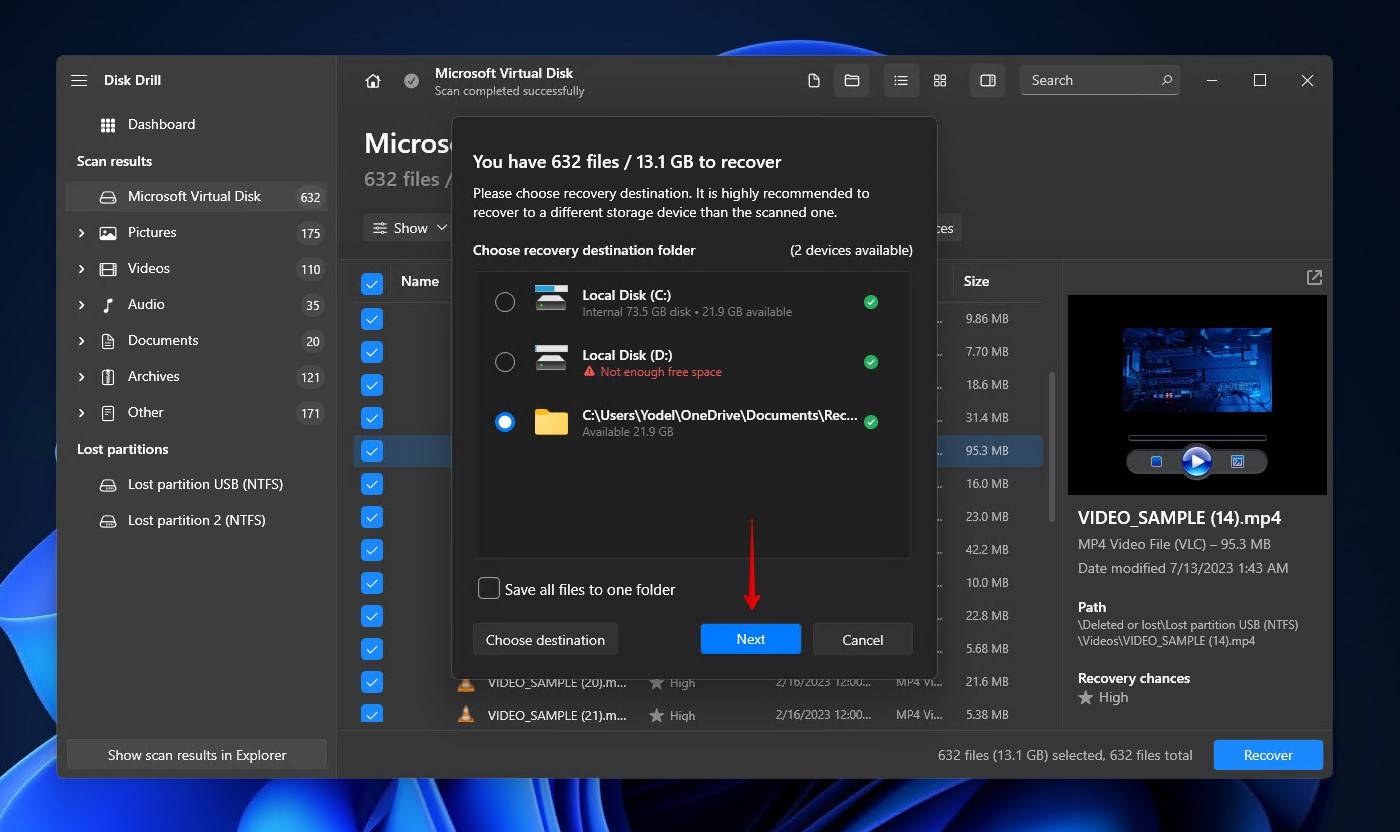
- Choose a recovery location on another drive, then click Next to recover the data.
Option G: Download the Correct Dependencies
📌 When to use: The drive is using an incompatible file system | ⚙️ Difficulty: Easy | 📈 Risk to data: Low
This applies to drives that contain volumes formatted with file systems that are incompatible with the host operating system. For example, if you try to use an APFS-formatted drive in a Windows computer, it won’t be readable unless you use something like APFS for Windows.
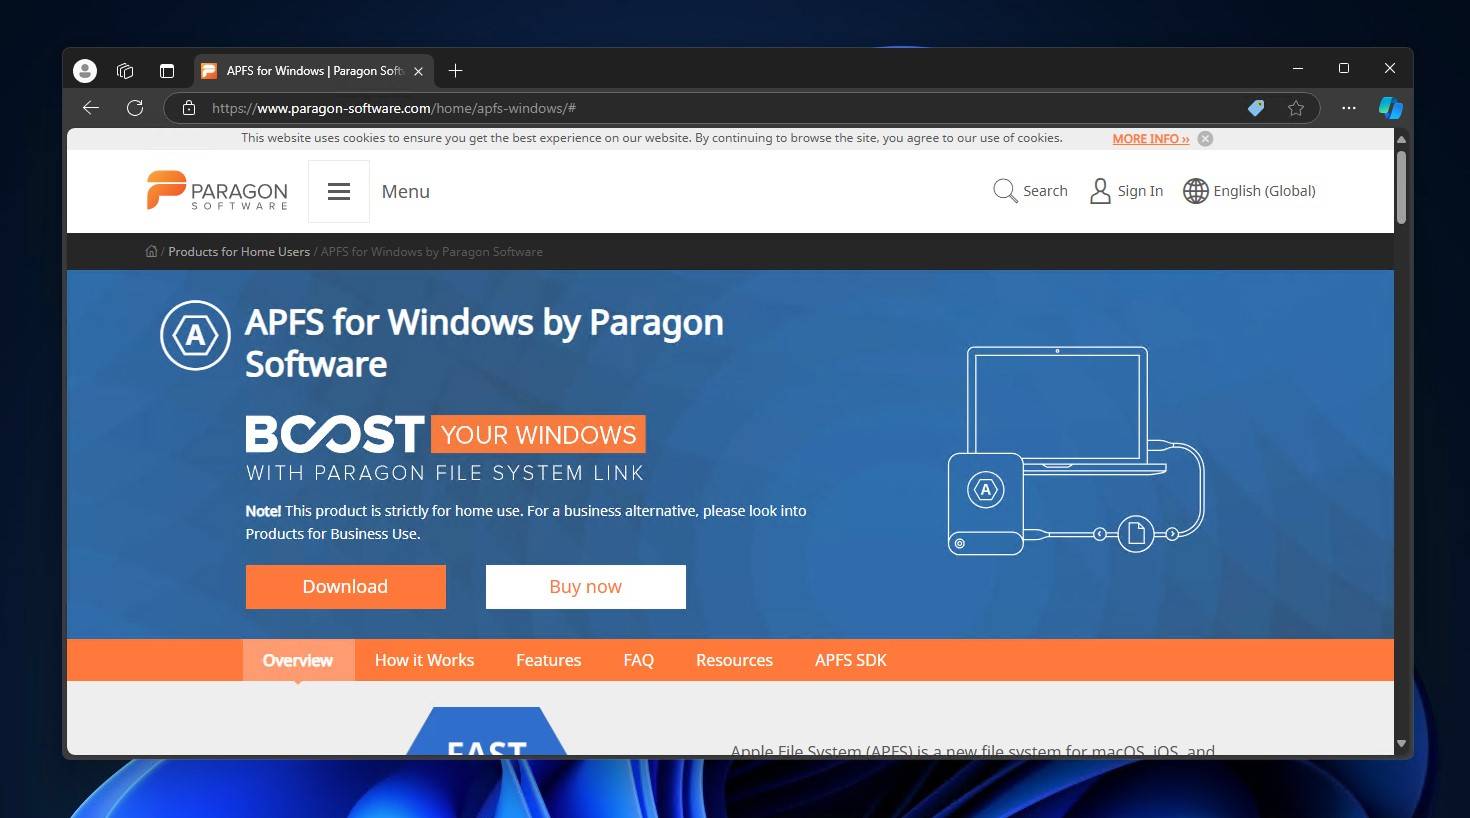
If you don’t have the necessary software installed, Windows will typically ask you to format the drive as it is unable to read its contents and assumes it’s damaged.
Option H: Format the Drive With a Compatible File System
📌 When to use: All other methods have failed | ⚙️ Difficulty: Easy | 📈 Risk to data: Very high. All data will be deleted
Formatting an external or USB drive that’s detected but not accessible addresses any logical issues it has and ensures it’s set up to be used by your Windows computer. Bear in mind, however, that this process will delete all of the data on the drive. While data recovery is possible, it shouldn’t be considered a replacement for backing up data.
This is how to perform a quick format. A full format can be done instead if you wish, but is usually unnecessary and will remove the possibility of data recovery afterward.
Follow these steps to format a drive using Disk Management:
- Right-click Start and click Disk Management.
- Right-click the volume and click Format.
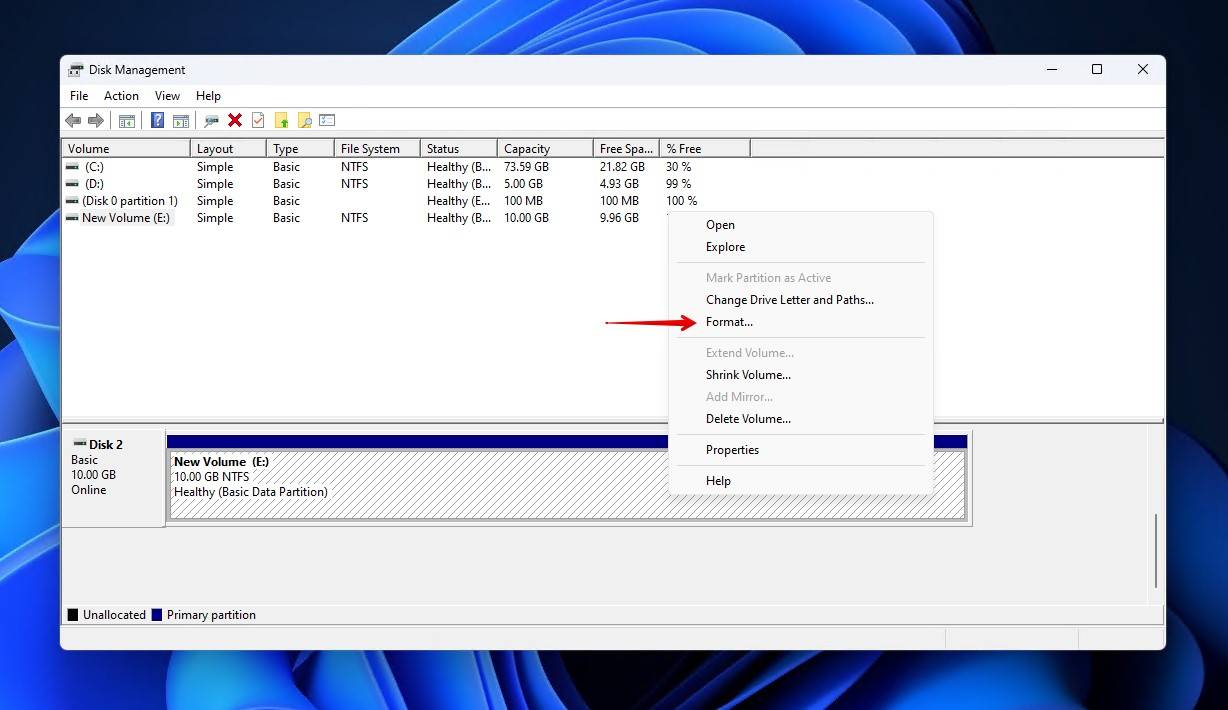
- Specify a volume label, file system, and ensure Perform a quick format is ticked. Click OK.
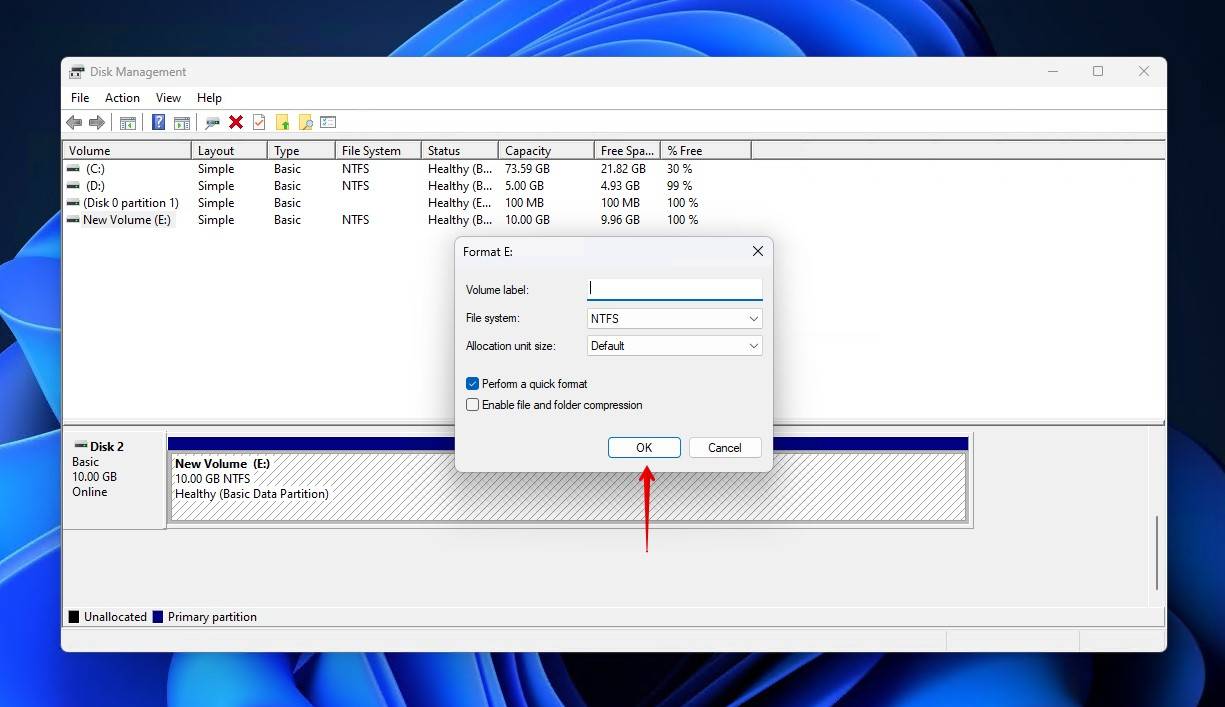
- Click OK to confirm.
Monitoring Your Drive’s Health
Checking your hard drive’s health at least semi-regularly is a really good way of staying ahead of problems. A storage device like a hard drive uses Self-Monitoring, Analysis, and Reporting Technology (S.M.A.R.T. or SMART) to keep tabs on itself. This SMART data can be read by software, allowing you to see the status of your drive.
While you can check the SMART status manually by typing wmic diskdrive, get status into a terminal like Command Prompt, it’s much more convenient to do it with software. I personally use Hard Disk Sentinal, a known community favorite that offers a comprehensive overview of all SMART parameters and active status monitoring. This functionality is available in many tools, including Disk Drill which can alert you to any issues that it detects.
Conclusion
A drive that’s visible in one place but not in others indicates something is wrong with the drive, whether it be logical or physical. Rest assured, the methods I included in this article should be of help in getting your drive back in working order.
FAQ
What causes an external hard drive to not show up in File Explorer?
There are several causes. A missing drive letter, incompatible file system, file system corruption – all of these issues will lead an external hard drive to appear in Device Manager but not File Explorer.
How do I recover data from an external drive that doesn’t appear in Explorer?
Data recovery software can recover data from an external or USB drive that is not accessible through traditional means like File Explorer. I used Disk Drill in this article, but you can explore some Disk Drill alternatives for other options.
Can updating my drivers help fix a half-recognized drive?
Storage devices are designed to operate using the generic drivers that come with your operating system. Therefore, updating or reinstalling your drivers shouldn’t have an effect on the issue.
How can formatting a drive help it appear in File Explorer?
Formatting a USB drive that’s not accessible through File Explorer will make it appear in File Explorer as it will add a working and compatible file system, as well as remove any logical issues.
Why does my USB drive work on other computers but not my own?
If your USB is not accessible on your own computer, it could be due to faulty or disconnected USB ports. When Windows cannot access your disk or USB, try connecting the drive to a port directly on the motherboard as opposed to one on your case.
This article was written by Jordan Jamieson-Mane, a Staff Writer at Handy Recovery Advisor. It was also verified for technical accuracy by Andrey Vasilyev, our editorial advisor.
Curious about our content creation process? Take a look at our Editor Guidelines.
